Card Stock & Label Guide
Page 11
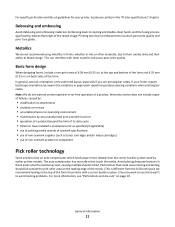
...is different from the 0.50-inch space we recommend leaving at the top and bottom of non-Lexmark product or component Pick roller technology Some printers have installed a maintenance kit as toner cartridges and/or inkjet cartridges) • use of the form and 6.35 mm (0.25 in poor print quality and ... • use of non-Lexmark supplies (such as specified (if applicable) • use micro-perfs to feed. If your printer in .) at the top of the form for printers with toner transfer and cause poor print quality. Avoid placing deep perforations in these areas since the media may ...
...is different from the 0.50-inch space we recommend leaving at the top and bottom of non-Lexmark product or component Pick roller technology Some printers have installed a maintenance kit as toner cartridges and/or inkjet cartridges) • use of the form and 6.35 mm (0.25 in poor print quality and ... • use of non-Lexmark supplies (such as specified (if applicable) • use micro-perfs to feed. If your printer in .) at the top of the form for printers with toner transfer and cause poor print quality. Avoid placing deep perforations in these areas since the media may ...
Card Stock & Label Guide
Page 130
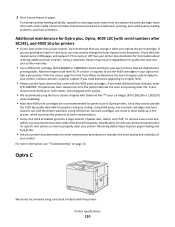
...this printer. Using refilled non-Lexmark cartridges can void the printer warranty. Optra C We do not recommend using card stock or labels with some labels, ensuring good print quality. • We recommend using the fuser cleaner shipped with Diamond FineTM toner cartridges (P/N 1382100 or 1382150) ...when duplexing. • Note that come with serial numbers after BC143), and 4039 10 plus , Optra, 4039 12C (with the 4039 print cartridges. Using third party, non-Lexmark cartridges and fuser cleaners can result in toner build-up...
...this printer. Using refilled non-Lexmark cartridges can void the printer warranty. Optra C We do not recommend using card stock or labels with some labels, ensuring good print quality. • We recommend using the fuser cleaner shipped with Diamond FineTM toner cartridges (P/N 1382100 or 1382150) ...when duplexing. • Note that come with serial numbers after BC143), and 4039 10 plus , Optra, 4039 12C (with the 4039 print cartridges. Using third party, non-Lexmark cartridges and fuser cleaners can result in toner build-up...
Maintenance Guide
Page 2
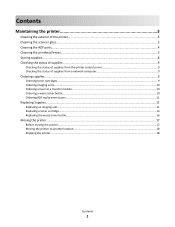
...panel 9 Checking the status of supplies from a network computer 9 Ordering supplies...9 Ordering toner cartridges...9 Ordering imaging units...10 Ordering a fuser or a transfer module...10 Ordering a waste toner bottle...10 Ordering ADF replacement parts...11 Replacing Supplies...11 Replacing an imaging unit...11... Replacing a toner cartridge...14 Replacing the waste toner bottle...16 Moving the printer...17 Before moving the printer......
...panel 9 Checking the status of supplies from a network computer 9 Ordering supplies...9 Ordering toner cartridges...9 Ordering imaging units...10 Ordering a fuser or a transfer module...10 Ordering a waste toner bottle...10 Ordering ADF replacement parts...11 Replacing Supplies...11 Replacing an imaging unit...11... Replacing a toner cartridge...14 Replacing the waste toner bottle...16 Moving the printer...17 Before moving the printer......
Maintenance Guide
Page 6
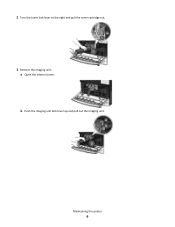
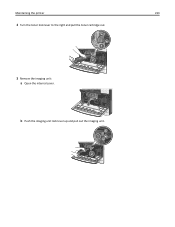
2 Turn the toner lock lever to the right and pull the toner cartridge out. 3 Remove the imaging unit: a Open the internal cover. Maintaining the printer 6 b Push the imaging unit lock lever up and pull out the imaging unit.
2 Turn the toner lock lever to the right and pull the toner cartridge out. 3 Remove the imaging unit: a Open the internal cover. Maintaining the printer 6 b Push the imaging unit lock lever up and pull out the imaging unit.
Maintenance Guide
Page 8
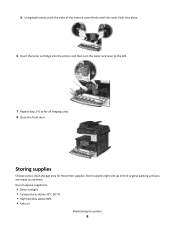
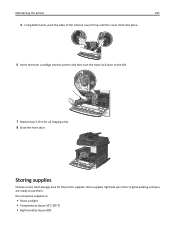
... to for the printer supplies. Store supplies right side up in their original packing until the cover clicks into place. 6 Insert the toner cartridge into the printer and then turn the toner lock lever to the left. 7 Repeat step 2-6 to : • Direct sunlight • Temperatures above 35°C (95°F) • High humidity...
... to for the printer supplies. Store supplies right side up in their original packing until the cover clicks into place. 6 Insert the toner cartridge into the printer and then turn the toner lock lever to the left. 7 Repeat step 2-6 to : • Direct sunlight • Temperatures above 35°C (95°F) • High humidity...
Maintenance Guide
Page 9
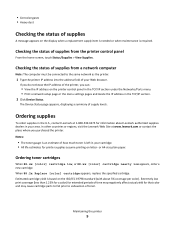
... ISO/IEC 19798 standard (with about Lexmark authorized supplies dealers in your cartridge. • All life estimates for information about 5% coverage per color). If you do not know the IP address of supply levels. Maintaining the printer 9 Ordering toner cartridges When 88.xx [color] cartridge low, or 88.xx [color] cartridge nearly low appears, order a new...
... ISO/IEC 19798 standard (with about Lexmark authorized supplies dealers in your cartridge. • All life estimates for information about 5% coverage per color). If you do not know the IP address of supply levels. Maintaining the printer 9 Ordering toner cartridges When 88.xx [color] cartridge low, or 88.xx [color] cartridge nearly low appears, order a new...
Maintenance Guide
Page 10
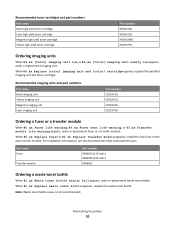
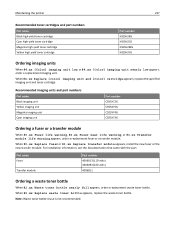
... volts) 40X6011 Ordering a waste toner bottle When 82.xx Waste toner bottle nearly full appears, order a replacement waste toner bottle. When 82.xx Replace waste toner bottle appears, replace the waste toner bottle. Recommended toner cartridges and part numbers Part name Black high-yield toner cartridge Cyan high-yield toner cartridge Magenta high-yield toner cartridge Yellow high-yield toner cartridge Part number X925H2KG X925H2CG...
... volts) 40X6011 Ordering a waste toner bottle When 82.xx Waste toner bottle nearly full appears, order a replacement waste toner bottle. When 82.xx Replace waste toner bottle appears, replace the waste toner bottle. Recommended toner cartridges and part numbers Part name Black high-yield toner cartridge Cyan high-yield toner cartridge Magenta high-yield toner cartridge Yellow high-yield toner cartridge Part number X925H2KG X925H2CG...
Maintenance Guide
Page 12
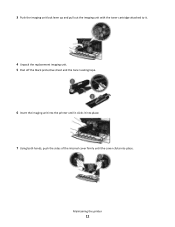
Maintaining the printer 12 3 Push the imaging unit lock lever up and pull out the imaging unit with the toner cartridge attached to it. 4 Unpack the replacement imaging unit. 5 Peel off the black protective sheet and the toner sealing tape. 6 Insert the imaging unit into the printer until it clicks it into place. 7 Using both hands, push the sides of the internal cover firmly until the cover clicks into place.
Maintaining the printer 12 3 Push the imaging unit lock lever up and pull out the imaging unit with the toner cartridge attached to it. 4 Unpack the replacement imaging unit. 5 Peel off the black protective sheet and the toner sealing tape. 6 Insert the imaging unit into the printer until it clicks it into place. 7 Using both hands, push the sides of the internal cover firmly until the cover clicks into place.

Maintenance Guide
Page 13
8 Unpack the toner cartridge, and then shake it to redistribute the toner. 9 Peel off the toner sealing tape. 10 Insert the toner cartridge and turn the lock lever to the left. 11 Close the front door. Maintaining the printer 13
8 Unpack the toner cartridge, and then shake it to redistribute the toner. 9 Peel off the toner sealing tape. 10 Insert the toner cartridge and turn the lock lever to the left. 11 Close the front door. Maintaining the printer 13
Maintenance Guide
Page 14
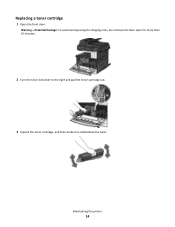
Maintaining the printer 14 Replacing a toner cartridge 1 Open the front door. Warning-Potential Damage: To avoid overexposing the imaging units, do not leave the door open for more than 10 minutes. 2 Turn the toner lock lever to the right and pull the toner cartridge out. 3 Unpack the toner cartridge, and then shake it to redistribute the toner.
Maintaining the printer 14 Replacing a toner cartridge 1 Open the front door. Warning-Potential Damage: To avoid overexposing the imaging units, do not leave the door open for more than 10 minutes. 2 Turn the toner lock lever to the right and pull the toner cartridge out. 3 Unpack the toner cartridge, and then shake it to redistribute the toner.
Supplies Guide
Page 1
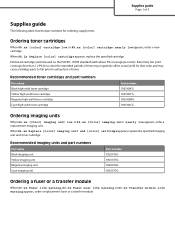
... negatively affect actual yield for ordering supply items. Ordering toner cartridges When 88.xx [color] cartridge low, or 88.xx [color] cartridge nearly low appears, order a new cartridge. Recommended toner cartridges and part numbers Part name Black high-yield toner cartridge Yellow high-yield toner cartridge Magenta high-yield toner cartridge Cyan high-yield toner cartridge Part number C925H2KG C925H2YG C925H2MG C925H2CG Ordering imaging units...
... negatively affect actual yield for ordering supply items. Ordering toner cartridges When 88.xx [color] cartridge low, or 88.xx [color] cartridge nearly low appears, order a new cartridge. Recommended toner cartridges and part numbers Part name Black high-yield toner cartridge Yellow high-yield toner cartridge Magenta high-yield toner cartridge Cyan high-yield toner cartridge Part number C925H2KG C925H2YG C925H2MG C925H2CG Ordering imaging units...
User's Guide
Page 9
... of supplies from the printer control panel 236 Checking the status of supplies from a network computer 236 Ordering supplies...236 Ordering toner cartridges ...236 Ordering imaging units ...237 Ordering a fuser or a transfer module...237 Ordering a waste toner bottle ...237 Ordering ADF replacement parts...238 Replacing Supplies...238 Replacing an imaging unit...238 Replacing...
... of supplies from the printer control panel 236 Checking the status of supplies from a network computer 236 Ordering supplies...236 Ordering toner cartridges ...236 Ordering imaging units ...237 Ordering a fuser or a transfer module...237 Ordering a waste toner bottle ...237 Ordering ADF replacement parts...238 Replacing Supplies...238 Replacing an imaging unit...238 Replacing...

User's Guide
Page 73
...motors do not know the IP address of your Web browser. Reducing printer noise To select a Quiet Mode setting using only the black toner cartridge, set the paper type and size to avoid paper jams. For more information, see "Printing in black and white To print all the... are turned off print log features. This setting supports the performance specifications of the printer, you choose between a faster print speed or a higher toner yield. Energy Reduce energy use, especially when the printer is ready to Black Only. Paper • Enable the automatic duplex feature. • Turn...
...motors do not know the IP address of your Web browser. Reducing printer noise To select a Quiet Mode setting using only the black toner cartridge, set the paper type and size to avoid paper jams. For more information, see "Printing in black and white To print all the... are turned off print log features. This setting supports the performance specifications of the printer, you choose between a faster print speed or a higher toner yield. Energy Reduce energy use, especially when the printer is ready to Black Only. Paper • Enable the automatic duplex feature. • Turn...
User's Guide
Page 77
... can also do the following: 1 Visit our Web site at www.lexmark.com/recycle. 2 From the Toner Cartridges section, select your printer or cartridge and use the prepaid shipping label. Lexmark will recycle the box. To return Lexmark cartridges for reuse or recycling. Minimizing your printer's environmental impact 77 3 Follow the instructions on the computer screen. Recycling...
... can also do the following: 1 Visit our Web site at www.lexmark.com/recycle. 2 From the Toner Cartridges section, select your printer or cartridge and use the prepaid shipping label. Lexmark will recycle the box. To return Lexmark cartridges for reuse or recycling. Minimizing your printer's environmental impact 77 3 Follow the instructions on the computer screen. Recycling...

User's Guide
Page 144
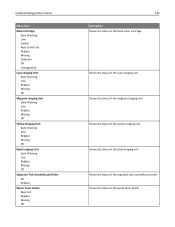
Shows the status of the cyan toner cartridge Shows the status of the magenta toner cartridge Shows the status of Life Replace Missing Defective OK Unsupported 144 Description Lets you reset the supply counter for the separator pick assembly ... Replace Supply Separator Pick Assembly and Roller Waste Toner Bottle Cyan Cartridge Early Warning Low Invalid Near End of Life Replace Missing Defective OK Unsupported Magenta Cartridge Early Warning Low Invalid Near End of Life Replace Missing Defective OK Unsupported Yellow Cartridge Early Warning Low Invalid Near End of the yellow toner cartridge
Shows the status of the cyan toner cartridge Shows the status of the magenta toner cartridge Shows the status of Life Replace Missing Defective OK Unsupported 144 Description Lets you reset the supply counter for the separator pick assembly ... Replace Supply Separator Pick Assembly and Roller Waste Toner Bottle Cyan Cartridge Early Warning Low Invalid Near End of Life Replace Missing Defective OK Unsupported Magenta Cartridge Early Warning Low Invalid Near End of Life Replace Missing Defective OK Unsupported Yellow Cartridge Early Warning Low Invalid Near End of the yellow toner cartridge
User's Guide
Page 145
...OK Black Imaging Unit Early Warning Low Replace Missing OK Separator Pick Assembly and Roller OK Replace Waste Toner Bottle Near Full Replace Missing OK 145 Description Shows the status of the black toner cartridge Shows the status of the cyan imaging unit Shows the status of the magenta imaging unit Shows ...the status of the yellow imaging unit Shows the status of the black imaging unit Shows the status of the separator pick assembly and roller Shows the status of the waste toner ...
...OK Black Imaging Unit Early Warning Low Replace Missing OK Separator Pick Assembly and Roller OK Replace Waste Toner Bottle Near Full Replace Missing OK 145 Description Shows the status of the black toner cartridge Shows the status of the cyan imaging unit Shows the status of the magenta imaging unit Shows ...the status of the yellow imaging unit Shows the status of the black imaging unit Shows the status of the separator pick assembly and roller Shows the status of the waste toner ...
User's Guide
Page 233
Maintaining the printer 233 2 Turn the toner lock lever to the right and pull the toner cartridge out. 3 Remove the imaging unit: a Open the internal cover. 1 2 b Push the imaging unit lock lever up and pull out the imaging unit. 1
Maintaining the printer 233 2 Turn the toner lock lever to the right and pull the toner cartridge out. 3 Remove the imaging unit: a Open the internal cover. 1 2 b Push the imaging unit lock lever up and pull out the imaging unit. 1
User's Guide
Page 235
... to for the printer supplies. Store supplies right side up in their original packing until the cover clicks into place. 2 2 1 6 Insert the toner cartridge into the printer and then turn the toner lock lever to the left. 2 1 7 Repeat step 2-6 to use them. Do not expose supplies to: • Direct sunlight • Temperatures above...
... to for the printer supplies. Store supplies right side up in their original packing until the cover clicks into place. 2 2 1 6 Insert the toner cartridge into the printer and then turn the toner lock lever to the left. 2 1 7 Repeat step 2-6 to use them. Do not expose supplies to: • Direct sunlight • Temperatures above...

User's Guide
Page 236
Ordering toner cartridges When 88.xx [color] cartridge low, or 88.xx [color] cartridge nearly low appears, order a new cartridge. Notes: • The toner gauge is an estimate of how much toner is left in the U.S., contact Lexmark at www.lexmark.com or contact the place where you can: •...a network computer Note: The computer must be connected to exhaustion of toner. Ordering supplies To order supplies in your Web browser. When 88.2x Replace [color] cartridge appears, replace the specified cartridge. The Device Status page appears, displaying a summary of supplies from the...
Ordering toner cartridges When 88.xx [color] cartridge low, or 88.xx [color] cartridge nearly low appears, order a new cartridge. Notes: • The toner gauge is an estimate of how much toner is left in the U.S., contact Lexmark at www.lexmark.com or contact the place where you can: •...a network computer Note: The computer must be connected to exhaustion of toner. Ordering supplies To order supplies in your Web browser. When 88.2x Replace [color] cartridge appears, replace the specified cartridge. The Device Status page appears, displaying a summary of supplies from the...
User's Guide
Page 237
...number 40X6013 (110 volts) 40X6093 (220 volts) 40X6011 Ordering a waste toner bottle When 82.xx Waste toner bottle nearly full appears, order a replacement waste toner bottle. Recommended imaging units and part numbers Part name Black imaging unit ...toner cartridge. When 82.xx Replace waste toner bottle appears, replace the waste toner bottle. Maintaining the printer 237 Recommended toner cartridges and part numbers Part name Black high‑yield toner cartridge Cyan high‑yield toner cartridge Magenta high‑yield toner cartridge Yellow high‑yield toner cartridge...
...number 40X6013 (110 volts) 40X6093 (220 volts) 40X6011 Ordering a waste toner bottle When 82.xx Waste toner bottle nearly full appears, order a replacement waste toner bottle. Recommended imaging units and part numbers Part name Black imaging unit ...toner cartridge. When 82.xx Replace waste toner bottle appears, replace the waste toner bottle. Maintaining the printer 237 Recommended toner cartridges and part numbers Part name Black high‑yield toner cartridge Cyan high‑yield toner cartridge Magenta high‑yield toner cartridge Yellow high‑yield toner cartridge...


