

Card Stock & Label Guide
Page 23
... is aligned on page 23.) Make sure the release strength is adequate so labels stay attached to the paper path guides, drive rollers, charge roller, photoconductor drum, transfer roller, and detack fingers, use zone coating. Water-based topcoats tend to be either water based or solvent based. Check with your application...
... is aligned on page 23.) Make sure the release strength is adequate so labels stay attached to the paper path guides, drive rollers, charge roller, photoconductor drum, transfer roller, and detack fingers, use zone coating. Water-based topcoats tend to be either water based or solvent based. Check with your application...

Print Defects Guide
Page 1
... with this defect. Note: There are four additional color pages and a blank page that shows this Guide. The line that shows this defect. Change the photoconductor unit for Change the toner cartridge for the Change the fuser if one of these pages for assistance in determining which particular part is defective...
... with this defect. Note: There are four additional color pages and a blank page that shows this Guide. The line that shows this defect. Change the photoconductor unit for Change the toner cartridge for the Change the fuser if one of these pages for assistance in determining which particular part is defective...

Quick Reference
Page 19
... printer Jam numbers 200-201 202-203 What to access jam locations. Open the front door, and then remove the jammed paper from under the photoconductor units. Open the duplex cover, and then remove the jammed paper. CAUTION-HOT SURFACE: The inside of injury from the multipurpose feeder, and then remove...
... printer Jam numbers 200-201 202-203 What to access jam locations. Open the front door, and then remove the jammed paper from under the photoconductor units. Open the duplex cover, and then remove the jammed paper. CAUTION-HOT SURFACE: The inside of injury from the multipurpose feeder, and then remove...

Quick Reference
Page 20
... reduce the risk of future print jobs. 2 5 Firmly grasp the jammed paper on a flat surface. Warning-Potential Damage: To avoid overexposing the photoconductor units, do not leave the front door open for more than 10 minutes. 3 Firmly grasp the jammed paper on each side, and then gently ...Make sure all paper fragments are removed. 20 To reduce the risk of the printer might be hot. Warning-Potential Damage: To avoid overexposing the photoconductor units, do not leave the front door open for more than 10 minutes. 3 Determine where the jammed paper is located, and then remove ...
... reduce the risk of future print jobs. 2 5 Firmly grasp the jammed paper on a flat surface. Warning-Potential Damage: To avoid overexposing the photoconductor units, do not leave the front door open for more than 10 minutes. 3 Firmly grasp the jammed paper on each side, and then gently ...Make sure all paper fragments are removed. 20 To reduce the risk of the printer might be hot. Warning-Potential Damage: To avoid overexposing the photoconductor units, do not leave the front door open for more than 10 minutes. 3 Determine where the jammed paper is located, and then remove ...
Quick Reference
Page 22
... in the fuser assembly, then firmly grasp the paper on each side, and then gently pull it out. Warning-Potential Damage: To avoid overexposing the photoconductor units, do not leave the front door open for more than 10 minutes. 3 Determine where the jammed paper is located, and then remove it: a If...
... in the fuser assembly, then firmly grasp the paper on each side, and then gently pull it out. Warning-Potential Damage: To avoid overexposing the photoconductor units, do not leave the front door open for more than 10 minutes. 3 Determine where the jammed paper is located, and then remove it: a If...

Quick Reference
Page 24
..., touch Continue, jam cleared. 2 Firmly grasp the jammed paper on each side, and then gently pull it out. Warning-Potential Damage: To avoid overexposing the photoconductors, do not leave the front door open for more than 10 minutes. Paper jam in Tray 1 1 Open Tray 1. CAUTION-HOT SURFACE: The inside the printer...
..., touch Continue, jam cleared. 2 Firmly grasp the jammed paper on each side, and then gently pull it out. Warning-Potential Damage: To avoid overexposing the photoconductors, do not leave the front door open for more than 10 minutes. Paper jam in Tray 1 1 Open Tray 1. CAUTION-HOT SURFACE: The inside the printer...

Supplies Guide
Page 2
...to feed through the ADF. Recommended part numbers Part name ADF pick assembly Separator pad ADF pick pad Part number 40X5188 40X5187 40X5189 Ordering a photoconductor A message will appear on replacing the ADF parts, see the instruction sheet that came with the supply. Supplies guide Page 2 of 2 ...failing to be replaced at the same time. • Reset the maintenance counter back to zero after installing the four new photoconductors. Recommended part numbers Part name Photoconductor Photoconductor, Multi‑Pack Part number C734X20G C734X24G Notes: • All four...
...to feed through the ADF. Recommended part numbers Part name ADF pick assembly Separator pad ADF pick pad Part number 40X5188 40X5187 40X5189 Ordering a photoconductor A message will appear on replacing the ADF parts, see the instruction sheet that came with the supply. Supplies guide Page 2 of 2 ...failing to be replaced at the same time. • Reset the maintenance counter back to zero after installing the four new photoconductors. Recommended part numbers Part name Photoconductor Photoconductor, Multi‑Pack Part number C734X20G C734X24G Notes: • All four...
User's Guide
Page 133
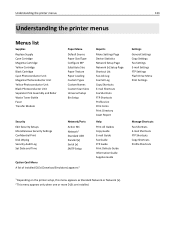
Understanding the printer menus 133 Understanding the printer menus Menus list Supplies Replace Supply Cyan Cartridge Magenta Cartridge Yellow Cartridge Black Cartridge Cyan Photoconductor Unit Magenta Photoconductor Unit Yellow Photoconductor Unit Black Photoconductor Unit Separator Pick Assembly and Roller Waste Toner Bottle Fuser Transfer Module Paper Menu Default Source Paper Size/Type Configure MP Substitute...
Understanding the printer menus 133 Understanding the printer menus Menus list Supplies Replace Supply Cyan Cartridge Magenta Cartridge Yellow Cartridge Black Cartridge Cyan Photoconductor Unit Magenta Photoconductor Unit Yellow Photoconductor Unit Black Photoconductor Unit Separator Pick Assembly and Roller Waste Toner Bottle Fuser Transfer Module Paper Menu Default Source Paper Size/Type Configure MP Substitute...

User's Guide
Page 134
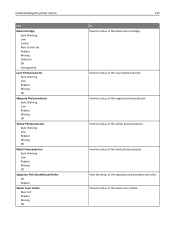
Understanding the printer menus Supplies menu Use Replace Supply All Photoconductors Cyan Photoconductor Magenta Photoconductor Yellow Photoconductor Black Photoconductor Cyan Cartridge Early Warning Low Invalid Near End of Life Replace Missing Defective OK Unsupported Magenta Cartridge Early Warning ...of the cyan toner cartridge. View the status of Life Replace Missing Defective OK Unsupported 134 To Reset the supply counter for the replacement photoconductor or photoconductors. • Select Yes to reset the supply counter. • Select No to exit. View the status of the magenta toner ...
Understanding the printer menus Supplies menu Use Replace Supply All Photoconductors Cyan Photoconductor Magenta Photoconductor Yellow Photoconductor Black Photoconductor Cyan Cartridge Early Warning Low Invalid Near End of Life Replace Missing Defective OK Unsupported Magenta Cartridge Early Warning ...of the cyan toner cartridge. View the status of Life Replace Missing Defective OK Unsupported 134 To Reset the supply counter for the replacement photoconductor or photoconductors. • Select Yes to reset the supply counter. • Select No to exit. View the status of the magenta toner ...
User's Guide
Page 135
... Cartridge Early Warning Low Invalid Near End of Life Replace Missing Defective OK Unsupported Cyan Photoconductor Early Warning Low Replace Missing OK Magenta Photoconductor Early Warning Low Replace Missing OK Yellow Photoconductor Early Warning Low Replace Missing OK Black Photoconductor Early Warning Low Replace Missing OK Separator Pick Assembly and Roller OK Replace Waste...
... Cartridge Early Warning Low Invalid Near End of Life Replace Missing Defective OK Unsupported Cyan Photoconductor Early Warning Low Replace Missing OK Magenta Photoconductor Early Warning Low Replace Missing OK Yellow Photoconductor Early Warning Low Replace Missing OK Black Photoconductor Early Warning Low Replace Missing OK Separator Pick Assembly and Roller OK Replace Waste...

User's Guide
Page 169
Understanding the printer menus Use Displayed Information Left side Right side Custom Text [x] [text entry] [x] Cartridge [x] Photoconductor Fuser Transfer Module 169 To Specify what is the factory default setting for Type of the home screen. For the Left ...: None IP Address Hostname Contact Name Location Date/Time mDNS/DDNS Service Name Zero Configuration Name Cartridge Level Custom Text [x] For [x] Cartridge, [x] Photoconductor, Fuser, and Transfer Module menus, select from the following options: When to display Do not display Display Message to Display Default Alternate Default [text...
Understanding the printer menus Use Displayed Information Left side Right side Custom Text [x] [text entry] [x] Cartridge [x] Photoconductor Fuser Transfer Module 169 To Specify what is the factory default setting for Type of the home screen. For the Left ...: None IP Address Hostname Contact Name Location Date/Time mDNS/DDNS Service Name Zero Configuration Name Cartridge Level Custom Text [x] For [x] Cartridge, [x] Photoconductor, Fuser, and Transfer Module menus, select from the following options: When to display Do not display Display Message to Display Default Alternate Default [text...

User's Guide
Page 228
... to your printer or prevent the printer from the printer. 3 Dampen a clean, lint‑free cloth with water. Warning-Potential Damage: To avoid overexposing the photoconductor unit or imaging unit, do not the leave the door open for more than 10 minutes. Warning-Potential Damage: Failure to replace parts and supplies...
... to your printer or prevent the printer from the printer. 3 Dampen a clean, lint‑free cloth with water. Warning-Potential Damage: To avoid overexposing the photoconductor unit or imaging unit, do not the leave the door open for more than 10 minutes. Warning-Potential Damage: Failure to replace parts and supplies...

User's Guide
Page 233
Doing so may cause damage. 5 Reinstall the toner cartridges. Note: Do not remove the photoconductors for more than 10 minutes. 2 Remove all four toner cartridges. Warning-Potential Damage: Do not touch the printhead lenses. Maintaining the printer 233 Warning-Potential Damage: To avoid overexposing the photoconductors, do not leave the front door open for this procedure. 3 Locate the four printhead lenses. 4 Clean the lenses using compressed air.
Doing so may cause damage. 5 Reinstall the toner cartridges. Note: Do not remove the photoconductors for more than 10 minutes. 2 Remove all four toner cartridges. Warning-Potential Damage: Do not touch the printhead lenses. Maintaining the printer 233 Warning-Potential Damage: To avoid overexposing the photoconductors, do not leave the front door open for this procedure. 3 Locate the four printhead lenses. 4 Clean the lenses using compressed air.

User's Guide
Page 236
... with paper double-feeding or failing to feed through the ADF. Recommended part numbers Part name Photoconductor Photoconductor, Multi‑Pack Notes: • All four photoconductors should be replaced at the same time. Recommended part numbers Part name ADF pick assembly Separator... pad ADF pick pad Part number 40X5188 40X5187 40X5189 Ordering a photoconductor A message will appear on the printer display when a photoconductor needs to be replaced. Maintaining the printer 236 Recommended part numbers Part name Fuser Transfer module Part...
... with paper double-feeding or failing to feed through the ADF. Recommended part numbers Part name Photoconductor Photoconductor, Multi‑Pack Notes: • All four photoconductors should be replaced at the same time. Recommended part numbers Part name ADF pick assembly Separator... pad ADF pick pad Part number 40X5188 40X5187 40X5189 Ordering a photoconductor A message will appear on the printer display when a photoconductor needs to be replaced. Maintaining the printer 236 Recommended part numbers Part name Fuser Transfer module Part...

User's Guide
Page 237
... Replacing a toner cartridge 1 Open the printer top access cover, and then open for superior print quality. Lexmark's warranty does not cover damage caused by non-Lexmark parts and supplies. Warning-Potential Damage: To avoid overexposing the photoconductors, do not leave the front door open the front door. Do not expose supplies to help...
... Replacing a toner cartridge 1 Open the printer top access cover, and then open for superior print quality. Lexmark's warranty does not cover damage caused by non-Lexmark parts and supplies. Warning-Potential Damage: To avoid overexposing the photoconductors, do not leave the front door open the front door. Do not expose supplies to help...

User's Guide
Page 246
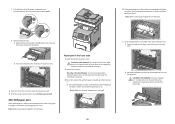
Maintaining the printer 246 6 Place the bag into the shipping box used for the replacement part. 2 1 7 Peel the recycling label off and place it on the shipping box. 1 2 8 Insert the new waste toner bottle into the printer. 1 2 Replacing a photoconductor 1 Open the top access cover, and then open the front door.
Maintaining the printer 246 6 Place the bag into the shipping box used for the replacement part. 2 1 7 Peel the recycling label off and place it on the shipping box. 1 2 8 Insert the new waste toner bottle into the printer. 1 2 Replacing a photoconductor 1 Open the top access cover, and then open the front door.

User's Guide
Page 247
Maintaining the printer 247 Warning-Potential Damage: To avoid overexposing the photoconductors, do not leave the front door open for more than 10 minutes. 2 Pull the specified photoconductor up, and then slide it to the right to remove it from the printer. 2 1 3 Unpack the replacement photoconductor. 1 2 3
Maintaining the printer 247 Warning-Potential Damage: To avoid overexposing the photoconductors, do not leave the front door open for more than 10 minutes. 2 Pull the specified photoconductor up, and then slide it to the right to remove it from the printer. 2 1 3 Unpack the replacement photoconductor. 1 2 3

User's Guide
Page 248
Maintaining the printer 248 4 Align and insert the left end of the photoconductor, and then press the right end into place. 1 2 5 Remove the red packing strip from the top of the photoconductor. 6 Close the front door, and then close the top access cover. 2 1
Maintaining the printer 248 4 Align and insert the left end of the photoconductor, and then press the right end into place. 1 2 5 Remove the red packing strip from the top of the photoconductor. 6 Close the front door, and then close the top access cover. 2 1

User's Guide
Page 249
... set it down. When a "replace" or "low" message appears Follow this procedure when the photoconductors are not under the printer when you replaced. • All • Cyan Photoconductor • Magenta Photoconductor • Yellow Photoconductor • Black Photoconductor 3 When [color] photoconductor replaced appears, touch Yes. 4 Touch to return to : > Supplies Menu > Replace Supply. 2 Touch the buttons that...
... set it down. When a "replace" or "low" message appears Follow this procedure when the photoconductors are not under the printer when you replaced. • All • Cyan Photoconductor • Magenta Photoconductor • Yellow Photoconductor • Black Photoconductor 3 When [color] photoconductor replaced appears, touch Yes. 4 Touch to return to : > Supplies Menu > Replace Supply. 2 Touch the buttons that...

User's Guide
Page 254
... 230 202-203 24x 250 29y.xx What to access jam locations. Open the front door, and then remove the jammed paper from under the photoconductor units. Open the ADF cover, and then remove any paper jam message, you must clear all paper from the paper path. To resolve any jammed...
... 230 202-203 24x 250 29y.xx What to access jam locations. Open the front door, and then remove the jammed paper from under the photoconductor units. Open the ADF cover, and then remove any paper jam message, you must clear all paper from the paper path. To resolve any jammed...


