User's Guide
Page 3
......37 Using the control panel ...37 Saving settings...40 Installing another language control panel...41 Installing the printer software...42 Installing the optional XPS driver (Windows Vista users only 42 Understanding the printer software...43 Turning printing voice notification on or off...46 Security Information...46 General networking 47 Finding your MAC...
......37 Using the control panel ...37 Saving settings...40 Installing another language control panel...41 Installing the printer software...42 Installing the optional XPS driver (Windows Vista users only 42 Understanding the printer software...43 Turning printing voice notification on or off...46 Security Information...46 General networking 47 Finding your MAC...
User's Guide
Page 5
Changing printer settings...65 Saving and deleting print settings ...65 Resetting printer software to factory default settings ...65 Resetting the printer to factory default settings...66 Working with photos 67 Retrieving and managing photos...67 ...Inserting a memory card ...67 Inserting a flash drive ...68 Understanding the Photo Card menu...69 Understanding the PictBridge menu...71 Transferring photos ...72 Changing the Lexmark Productivity Studio preferences 74 Editing photos...75 Cropping a photo ...75 Rotating a photo ...75 Changing the Resolution / Size of a photo...76 Applying One-...
Changing printer settings...65 Saving and deleting print settings ...65 Resetting printer software to factory default settings ...65 Resetting the printer to factory default settings...66 Working with photos 67 Retrieving and managing photos...67 ...Inserting a memory card ...67 Inserting a flash drive ...68 Understanding the Photo Card menu...69 Understanding the PictBridge menu...71 Transferring photos ...72 Changing the Lexmark Productivity Studio preferences 74 Editing photos...75 Cropping a photo ...75 Rotating a photo ...75 Changing the Resolution / Size of a photo...76 Applying One-...
User's Guide
Page 6
... images for e-mailing...100 Changing the Productivity Studio e-mail screen preferences 101 Faxing 102 Sending a fax...103 Entering a fax number ...103 Sending a fax using the software...103 Sending a fax using the control panel ...104 Sending a fax while listening to a call (On Hook Dial)...104 Contents 6
... images for e-mailing...100 Changing the Productivity Studio e-mail screen preferences 101 Faxing 102 Sending a fax...103 Entering a fax number ...103 Sending a fax using the software...103 Sending a fax using the control panel ...104 Sending a fax while listening to a call (On Hook Dial)...104 Contents 6
User's Guide
Page 7
......113 Setting up a fax footer ...114 Blocking junk faxes...115 Blocking unwanted changes to fax settings...115 Using the Fax Solutions Software ...116 Setting up a dialing prefix ...117 Setting the distinctive ring...117 Setting the number of rings before receiving a fax automatically... Replacing print cartridges...120 Installing print cartridges...120 Removing a used print cartridge ...121 Refilling print cartridges...122 Using genuine Lexmark print cartridges...122 Aligning print cartridges...122 Cleaning the print cartridge nozzles...123 Wiping the print cartridge nozzles and contacts 123...
......113 Setting up a fax footer ...114 Blocking junk faxes...115 Blocking unwanted changes to fax settings...115 Using the Fax Solutions Software ...116 Setting up a dialing prefix ...117 Setting the distinctive ring...117 Setting the number of rings before receiving a fax automatically... Replacing print cartridges...120 Installing print cartridges...120 Removing a used print cartridge ...121 Refilling print cartridges...122 Using genuine Lexmark print cartridges...122 Aligning print cartridges...122 Cleaning the print cartridge nozzles...123 Wiping the print cartridge nozzles and contacts 123...
User's Guide
Page 8
... not install...129 Page does not print...130 Solving printer communication problems ...131 Understanding Warning levels ...132 Removing and reinstalling the software ...132 Enabling the USB port...132 Print troubleshooting...133 Improving print quality ...133 Poor text and graphic quality...134 Poor quality at the edges of the page...135 Print ...
... not install...129 Page does not print...130 Solving printer communication problems ...131 Understanding Warning levels ...132 Removing and reinstalling the software ...132 Enabling the USB port...132 Print troubleshooting...133 Improving print quality ...133 Poor text and graphic quality...134 Poor quality at the edges of the page...135 Print ...
User's Guide
Page 9
... not able to communicate with the computer 151 Problems when copying, scanning, or faxing ...151 Wrong printer is attached...151 Updating the printer software ...151 Bidirectional communication is not established...152 Experiencing poor quality or incorrect output ...152 Cannot print from digital camera using PictBridge ...153 Partial ... 153 Jams and misfeeds troubleshooting...154 How to clear and avoid paper jams...154 Paper jam in the Automatic Document Feeder (ADF)...154 Paper jam in the printer...155 Paper jam in the paper support...156 Paper or specialty media misfeeds...156 Printer does...
... not able to communicate with the computer 151 Problems when copying, scanning, or faxing ...151 Wrong printer is attached...151 Updating the printer software ...151 Bidirectional communication is not established...152 Experiencing poor quality or incorrect output ...152 Cannot print from digital camera using PictBridge ...153 Partial ... 153 Jams and misfeeds troubleshooting...154 How to clear and avoid paper jams...154 Paper jam in the Automatic Document Feeder (ADF)...154 Paper jam in the printer...155 Paper jam in the paper support...156 Paper or specialty media misfeeds...156 Printer does...
User's Guide
Page 13
...gives you instructions for setting up hardware and software (on Windows operating systems) and some basic instructions for setting up hardware and software. Where to find You can find this document in the printer box or on the Lexmark Web site at www.lexmark.com. Where to find You can find ...this document in the printer box or on the Lexmark Web site at www.lexmark.com. User's Guide ...
...gives you instructions for setting up hardware and software (on Windows operating systems) and some basic instructions for setting up hardware and software. Where to find You can find this document in the printer box or on the Lexmark Web site at www.lexmark.com. Where to find You can find ...this document in the printer box or on the Lexmark Web site at www.lexmark.com. User's Guide ...
User's Guide
Page 14
.... 4 Click Yes. You can also find The User's Guide: Comprehensive Version gives you When you install the printer software, the User's Guide: instructions for using the printer and other software, if your printer connects to find The Lexmark Solution Center software is included on your desktop, follow • Faxing (if supported by your CD...
.... 4 Click Yes. You can also find The User's Guide: Comprehensive Version gives you When you install the printer software, the User's Guide: instructions for using the printer and other software, if your printer connects to find The Lexmark Solution Center software is included on your desktop, follow • Faxing (if supported by your CD...
User's Guide
Page 16
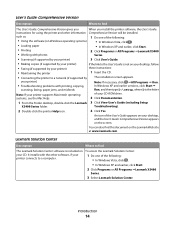
materials and workmanship for a www.lexmark.com. period of Warranty information varies by Lexmark International, Inc. Limited Warranty Description Where to find (US) Where to view the warranty. this limited warranty, see the Mac Help installed with this ... this warranty that we may serve you contact us so that shipped with your product supports Macintosh, see the Statement of Limited Warranty section, click Inkjet & All-In-One Printers. 4 Scroll through the Web page to find (rest of world) Limited Warranty Information To view the limitations and conditions of ...
materials and workmanship for a www.lexmark.com. period of Warranty information varies by Lexmark International, Inc. Limited Warranty Description Where to find (US) Where to view the warranty. this limited warranty, see the Mac Help installed with this ... this warranty that we may serve you contact us so that shipped with your product supports Macintosh, see the Statement of Limited Warranty section, click Inkjet & All-In-One Printers. 4 Scroll through the Web page to find (rest of world) Limited Warranty Information To view the limitations and conditions of ...
User's Guide
Page 18
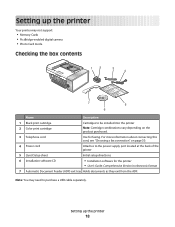
...installed into the printer 2 Color print cartridge Note: Cartridge combinations vary depending on page 30. 4 Power cord Attaches to purchase a USB cable separately. Setting up the printer Your printer may need to the power supply port located at the back of the printer 5 ...Quick Setup sheet Initial setup directions 6 Installation software CD • Installation software for faxing. For more information about connecting this cord, see "Choosing a fax connection" on the product purchased. 3 Telephone cord...
...installed into the printer 2 Color print cartridge Note: Cartridge combinations vary depending on page 30. 4 Power cord Attaches to purchase a USB cable separately. Setting up the printer Your printer may need to the power supply port located at the back of the printer 5 ...Quick Setup sheet Initial setup directions 6 Installation software CD • Installation software for faxing. For more information about connecting this cord, see "Choosing a fax connection" on the product purchased. 3 Telephone cord...

User's Guide
Page 34
... the telephone wall jack. Setting up the printer 34 5 If you have the following: • A telephone • A computer with a modem to send faxes from the software application. Note: Setup steps may vary depending on your country or region.
... the telephone wall jack. Setting up the printer 34 5 If you have the following: • A telephone • A computer with a modem to send faxes from the software application. Note: Setup steps may vary depending on your country or region.
User's Guide
Page 42
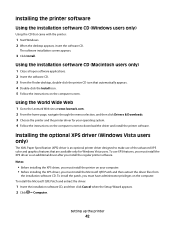
... icon. 5 Follow the instructions on the computer. To install the patch, you must have administrator privileges on the computer screen. The software installation screen appears. 3 Click Install. Installing the optional XPS driver (Windows Vista users only) The XML Paper Specification (XPS) driver is... site at www.lexmark.com. 2 From the home page, navigate through the menu selection, and then click Drivers & Downloads. 3 Choose the printer and the printer driver for Windows Vista users. Installing the printer software Using the installation software CD (Windows users only) Using the...
... icon. 5 Follow the instructions on the computer. To install the patch, you must have administrator privileges on the computer screen. The software installation screen appears. 3 Click Install. Installing the optional XPS driver (Windows Vista users only) The XML Paper Specification (XPS) driver is... site at www.lexmark.com. 2 From the home page, navigate through the menu selection, and then click Drivers & Downloads. 3 Choose the printer and the printer driver for Windows Vista users. Installing the printer software Using the installation software CD (Windows users only) Using the...
User's Guide
Page 43
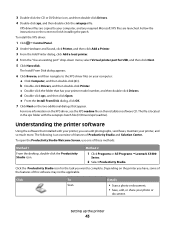
...required Microsoft XPS files are copied to finish installing the patch. Understanding the printer software Using the software that appear. Click To Scan Details • Scan a photo or document. ...the setupxps batch file (D:\Drivers\xps\readme). Method 2 1 Click Programs or All Programs ŒLexmark X5400 Series. 2 Select Productivity Studio. For more . The following is located in the xps folder... computer: a Click Computer, and then double-click (C:). Click the Productivity Studio icon for USB, and then click Next. 5 Click Have disk. The file is an overview of features...
...required Microsoft XPS files are copied to finish installing the patch. Understanding the printer software Using the software that appear. Click To Scan Details • Scan a photo or document. ...the setupxps batch file (D:\Drivers\xps\readme). Method 2 1 Click Programs or All Programs ŒLexmark X5400 Series. 2 Select Productivity Studio. For more . The following is located in the xps folder... computer: a Click Computer, and then double-click (C:). Click the Productivity Studio icon for USB, and then click Next. 5 Click Have disk. The file is an overview of features...
User's Guide
Page 45
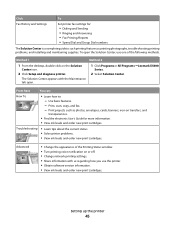
...as photos, envelopes, cards, banners, iron-on the Solution Center icon. 2 Click Setup and diagnose printer. 1 Click Programs or All Programs ŒLexmark X5400 Series. 2 Select Solution Center. Troubleshooting • Learn tips about the current status. • Solve printer problems. • View ink levels...or off. • Change network printing settings. • Share information with us regarding how you use the printer. • Obtain software version information. • View ink levels and order new print cartridges. Print, scan, copy, and fax. - Setting up the printer 45 To ...
...as photos, envelopes, cards, banners, iron-on the Solution Center icon. 2 Click Setup and diagnose printer. 1 Click Programs or All Programs ŒLexmark X5400 Series. 2 Select Solution Center. Troubleshooting • Learn tips about the current status. • Solve printer problems. • View ink levels...or off. • Change network printing settings. • Share information with us regarding how you use the printer. • Obtain software version information. • View ink levels and order new print cartridges. Print, scan, copy, and fax. - Setting up the printer 45 To ...
User's Guide
Page 46
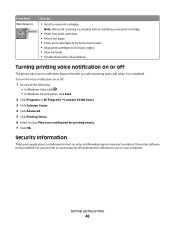
..., and firewall programs may alert you when printing starts and when it is completed. For your printer to work properly, allow the printer software to fix blurry edges. • View ink levels. • Troubleshoot other ink problems. Turning printing voice notification on or off The ... following: • In Windows Vista, click . • In Windows XP and earlier, click Start. 2 Click Programs or All Programs ŒLexmark X5400 Series. 3 Click Solution Center. 4 Click Advanced. 5 Click Printing Status. 6 Select or clear Play voice notification for printing events. 7 Click OK.
..., and firewall programs may alert you when printing starts and when it is completed. For your printer to work properly, allow the printer software to fix blurry edges. • View ink levels. • Troubleshoot other ink problems. Turning printing voice notification on or off The ... following: • In Windows Vista, click . • In Windows XP and earlier, click Start. 2 Click Programs or All Programs ŒLexmark X5400 Series. 3 Click Solution Center. 4 Click Advanced. 5 Click Printing Status. 6 Select or clear Play voice notification for printing events. 7 Click OK.
User's Guide
Page 47
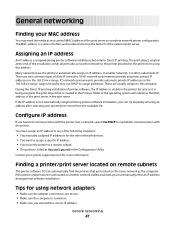
... These are located on the bottom of the print server in the 169.254.x.x range. The MAC address is assigned during printer software installation. The print object that are usually unique to reestablish communication with the printer over a network, select Use DHCP to the company.... You must manually enter an IP address during printer software installation, but only for more information. In smaller networks, it is created in any of Auto-IP networks. There are located ...
... These are located on the bottom of the print server in the 169.254.x.x range. The MAC address is assigned during printer software installation. The print object that are usually unique to reestablish communication with the printer over a network, select Use DHCP to the company.... You must manually enter an IP address during printer software installation, but only for more information. In smaller networks, it is created in any of Auto-IP networks. There are located ...
User's Guide
Page 48
Sharing a printer in a Windows environment 1 Prepare the computers to a USB port. • File is not set to share the printer. b Install the printer software on the Ports tab, and then click Apply. b Right-click the Lexmark X5400 Series icon. c Click Sharing. d Click the Ports tab, and then click Add Port.... h Click Close on page...
Sharing a printer in a Windows environment 1 Prepare the computers to a USB port. • File is not set to share the printer. b Install the printer software on the Ports tab, and then click Apply. b Right-click the Lexmark X5400 Series icon. c Click Sharing. d Click the Ports tab, and then click Add Port.... h Click Close on page...
User's Guide
Page 49
... Œ Settings Œ Printers or Printers and Faxes. 2 Right-click the Lexmark X5400 Series icon. 3 From the sidebar menu, select Properties. 4 Click the Ports tab. 5 Make sure: • The port is set to a USB port. • File is already installed on remote subnets. Add printers Specify remote...a Personal Identification Number (PIN). 1 Select the check box beside I wish to require a PIN to scan to the printer. Note: The software does not automatically configure printers found on your networked printer. Also, your jobs will appear on the keypad of your computer. If you scan an...
... Œ Settings Œ Printers or Printers and Faxes. 2 Right-click the Lexmark X5400 Series icon. 3 From the sidebar menu, select Properties. 4 Click the Ports tab. 5 Make sure: • The port is set to a USB port. • File is already installed on remote subnets. Add printers Specify remote...a Personal Identification Number (PIN). 1 Select the check box beside I wish to require a PIN to scan to the printer. Note: The software does not automatically configure printers found on your networked printer. Also, your jobs will appear on the keypad of your computer. If you scan an...
User's Guide
Page 58
... size in the printer, and the number of photos valid for printing appears next to Photos. 3 If no number appears next to Photos: a From the Lexmark logo drop-down menu, select Options. d Click OK. Printing 58 On the Toolbar, the number of copies you want them . Note: If you print multiple... is the printable side, see the instructions that are finished making changes, click Done. 6 Select the size you do not want to close any printer software dialog boxes that came with the paper.) 2 Open a Web page with Microsoft Internet Explorer 5.5 or later.
... size in the printer, and the number of photos valid for printing appears next to Photos. 3 If no number appears next to Photos: a From the Lexmark logo drop-down menu, select Options. d Click OK. Printing 58 On the Toolbar, the number of copies you want them . Note: If you print multiple... is the printable side, see the instructions that are finished making changes, click Done. 6 Select the size you do not want to close any printer software dialog boxes that came with the paper.) 2 Open a Web page with Microsoft Internet Explorer 5.5 or later.
User's Guide
Page 59
..., to print the even-numbered pages on the back sides of the paper. 4 Make sure Two-Sided is selected. 7 Click OK to close any printer software dialogs that are open , click File Œ Print. 2 Click Properties, Preferences, Options, or Setup. 3 From the "I Want To" menu, click Print on ...paper smaller than A4 or letter size. • To return to close any printer software dialog boxes that are open. 8 Print the document. Printing 59 Reload the document to prevent smudging, remove each copy as a set (collated) or to print...
..., to print the even-numbered pages on the back sides of the paper. 4 Make sure Two-Sided is selected. 7 Click OK to close any printer software dialogs that are open , click File Œ Print. 2 Click Properties, Preferences, Options, or Setup. 3 From the "I Want To" menu, click Print on ...paper smaller than A4 or letter size. • To return to close any printer software dialog boxes that are open. 8 Print the document. Printing 59 Reload the document to prevent smudging, remove each copy as a set (collated) or to print...


