User's Guide
Page 5
... to factory default settings ...65 Resetting the printer to factory default settings...66 Working with photos 67 Retrieving and managing photos...67 Inserting a memory card ...67 Inserting a flash drive ...68 Understanding the Photo Card menu...69 Understanding the PictBridge menu...71 Transferring photos ...72 Changing the Lexmark Productivity Studio preferences 74 Editing...
... to factory default settings ...65 Resetting the printer to factory default settings...66 Working with photos 67 Retrieving and managing photos...67 Inserting a memory card ...67 Inserting a flash drive ...68 Understanding the Photo Card menu...69 Understanding the PictBridge menu...71 Transferring photos ...72 Changing the Lexmark Productivity Studio preferences 74 Editing...
User's Guide
Page 65
...from the Save Settings drop-down menu, select Save your current settings. 6 Click a radio button next to delete, and then click Delete. Resetting printer software to save your settings, then type a name for your settings in the Quality/Speed, Paper Type, and Multiple Copies sections. ...deleted. 7 Click Save. In Windows 2000 and Windows XP, click Start ΠSettings ΠPrinters or Printers and Faxes. 2 Right-click the Lexmark X5400 Series icon. 3 Click Printing Preferences. 4 Click the Save Settings menu. 5 From the Restore section, select Factory Settings (Defaults). Note: The ...
...from the Save Settings drop-down menu, select Save your current settings. 6 Click a radio button next to delete, and then click Delete. Resetting printer software to save your settings, then type a name for your settings in the Quality/Speed, Paper Type, and Multiple Copies sections. ...deleted. 7 Click Save. In Windows 2000 and Windows XP, click Start ΠSettings ΠPrinters or Printers and Faxes. 2 Right-click the Lexmark X5400 Series icon. 3 Click Printing Preferences. 4 Click the Save Settings menu. 5 From the Restore section, select Factory Settings (Defaults). Note: The ...

User's Guide
Page 66
...settings without using the control panel, see "Using the Phone Book" on page 108. Printing 66 Resetting the printer to factory default settings You can reset your printer to print out those numbers before you reset the printer, see "Using the Phone Book" on page 108. 1 Press , , and ... and fax number. Warning-Potential Damage: Do not release the buttons until Language appears on the display, indicating that the printer has been reset. 2 Follow the prompts on the display to factory default settings will delete all printer settings you selected, including Speed Dial and Group Dial numbers...
...settings without using the control panel, see "Using the Phone Book" on page 108. Printing 66 Resetting the printer to factory default settings You can reset your printer to print out those numbers before you reset the printer, see "Using the Phone Book" on page 108. 1 Press , , and ... and fax number. Warning-Potential Damage: Do not release the buttons until Language appears on the display, indicating that the printer has been reset. 2 Follow the prompts on the display to factory default settings will delete all printer settings you selected, including Speed Dial and Group Dial numbers...
User's Guide
Page 70
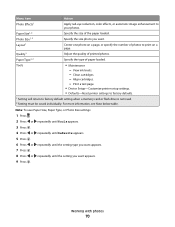
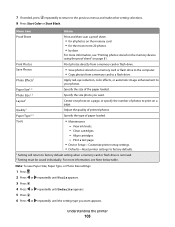
.... 7 Press . 8 Press or repeatedly until the setting you want appears. 9 Press . Clean cartridges. - Print a test page. • Device Setup-Customize printer setup settings. • Defaults-Reset printer settings to factory defaults. 1 Setting will return to your photos. Working with photos 70 Paper Size1, 2 Specify the size of photos to print on...
.... 7 Press . 8 Press or repeatedly until the setting you want appears. 9 Press . Clean cartridges. - Print a test page. • Device Setup-Customize printer setup settings. • Defaults-Reset printer settings to factory defaults. 1 Setting will return to your photos. Working with photos 70 Paper Size1, 2 Specify the size of photos to print on...
User's Guide
Page 128
... on page 66. Try one of the following : CHANGE THE LANGUAGE SELECTION DURING INITIAL SETUP After you cannot understand the language on the display, see "Resetting the printer to factory default settings" on the display These are possible solutions. To change the selection: 1 Press or repeatedly until the language you want...
... on page 66. Try one of the following : CHANGE THE LANGUAGE SELECTION DURING INITIAL SETUP After you cannot understand the language on the display, see "Resetting the printer to factory default settings" on the display These are possible solutions. To change the selection: 1 Press or repeatedly until the language you want...
User's Guide
Page 170
...: • The lower the transmission speed, the longer it will take your fax to send. • This solution will redial: a Press or repeatedly until you reset the transmission speed. 11 Resend the fax. 12 If the problem persists, repeat the previous steps to 8 minutes. Phone Line Busy These are possible causes...
...: • The lower the transmission speed, the longer it will take your fax to send. • This solution will redial: a Press or repeatedly until you reset the transmission speed. 11 Resend the fax. 12 If the problem persists, repeat the previous steps to 8 minutes. Phone Line Busy These are possible causes...
User's Guide
Page 195
... 109 scan 97 custom-size paper, loading 53 custom-size paper, printing 64 D defaults Fax menu 112 Photo Card menu 69 resetting factory defaults 66 resetting printer software to factory defaults 65 Scan menu 97 Index 195 descreening 79 Despeckle change setting 78 digital camera printing photos using the ... attaching to e-mail 100 e-mailing 100 faxing using the control panel 104 faxing using the software 103 loading into the Automatic Document Feeder (ADF) 53 loading on scanner glass 55 printing 57 scanning images for editing 94 scanning text for editing 94 transferring all documents from CD or ...
... 109 scan 97 custom-size paper, loading 53 custom-size paper, printing 64 D defaults Fax menu 112 Photo Card menu 69 resetting factory defaults 66 resetting printer software to factory defaults 65 Scan menu 97 Index 195 descreening 79 Despeckle change setting 78 digital camera printing photos using the ... attaching to e-mail 100 e-mailing 100 faxing using the control panel 104 faxing using the software 103 loading into the Automatic Document Feeder (ADF) 53 loading on scanner glass 55 printing 57 scanning images for editing 94 scanning text for editing 94 transferring all documents from CD or ...
User's Guide
Page 196
... attaching a scanned image 100 attaching files 100 E-mail button 43 e-mail screen preferences changing 101 e-mailing an image 100 F factory default settings resetting printer software 65 factory default settings, resetting to 66 faded colors 139 Fax menu 112 fax activity reports 119 confirmation reports 119 customizing settings 109 forwarding 108 receiving automatically...
... attaching a scanned image 100 attaching files 100 E-mail button 43 e-mail screen preferences changing 101 e-mailing an image 100 F factory default settings resetting printer software 65 factory default settings, resetting to 66 faded colors 139 Fax menu 112 fax activity reports 119 confirmation reports 119 customizing settings 109 forwarding 108 receiving automatically...
User's Guide
Page 200
... Fax Solutions Software 116 Productivity Studio 43 removing and reinstalling 132 Solution Center 45 XPS driver 42 software does not install 129 software settings, printer resetting to factory defaults 65 Solution Center understanding 45 Solution Center buttons Advanced 45 How To 45 Maintenance 45 Troubleshooting 45 understanding 45 Speed Dial setting...
... Fax Solutions Software 116 Productivity Studio 43 removing and reinstalling 132 Solution Center 45 XPS driver 42 software does not install 129 software settings, printer resetting to factory defaults 65 Solution Center understanding 45 Solution Center buttons Advanced 45 How To 45 Maintenance 45 Troubleshooting 45 understanding 45 Speed Dial setting...
User's Guide
Page 4
...122 Print cartridges...122 Cleaning the scanner glass...128 Cleaning the exterior of the printer...128 Refilling a print cartridge...128 Using genuine Lexmark print cartridges...128 Ordering supplies...129 Finding information about the printer...130 Contacting Customer Support...133 Troubleshooting 135 Setup troubleshooting...135 Print ... Memory card reader and PictBridge troubleshooting 169 Error messages on the printer display...170 Settings are not saved...175 Resetting the printer to factory default settings 175 Removing and reinstalling the software...175 Notices 177 Contents 4
...122 Print cartridges...122 Cleaning the scanner glass...128 Cleaning the exterior of the printer...128 Refilling a print cartridge...128 Using genuine Lexmark print cartridges...128 Ordering supplies...129 Finding information about the printer...130 Contacting Customer Support...133 Troubleshooting 135 Setup troubleshooting...135 Print ... Memory card reader and PictBridge troubleshooting 169 Error messages on the printer display...170 Settings are not saved...175 Resetting the printer to factory default settings 175 Removing and reinstalling the software...175 Notices 177 Contents 4

User's Guide
Page 20
...Color or Start Black. Enlarging or reducing an image 1 Load paper. Place these items on page 97 • "Loading original documents into the ADF. Related topics: • "Customizing scan settings from the Scan dialog" on page 44 • "Enhancing photo print quality using the software" on...folder. 2 Double-click the Lexmark X5400 Series Center icon. 3 Click Defaults. Printing 20 Note: Do not load postcards, photos, small items, transparencies, photo paper, or thin media (such as magazine clippings) into the Automatic Document Feeder" on page 92 Resetting All-In-One software settings ...
...Color or Start Black. Enlarging or reducing an image 1 Load paper. Place these items on page 97 • "Loading original documents into the ADF. Related topics: • "Customizing scan settings from the Scan dialog" on page 44 • "Enhancing photo print quality using the software" on...folder. 2 Double-click the Lexmark X5400 Series Center icon. 3 Click Defaults. Printing 20 Note: Do not load postcards, photos, small items, transparencies, photo paper, or thin media (such as magazine clippings) into the Automatic Document Feeder" on page 92 Resetting All-In-One software settings ...

User's Guide
Page 45
...and choose Customize list. See a preview of applications in the Customize list. 1 From the Finder desktop, double-click the Lexmark X5400 Series folder. 2 Double-click the Lexmark X5400 Series Center icon. 3 From the "Send scanned image to" pop-up menu. Adjust the slider to the factory ... you adjust the amount of measurement from the pop-up menu, scroll down to activate or deactivate auto-cropping. Start scanning. Reset the Adjustment controls to adjust cropping sensitivity. Clicking re-scans the original document and shows the recent changes in the Preview area....
...and choose Customize list. See a preview of applications in the Customize list. 1 From the Finder desktop, double-click the Lexmark X5400 Series folder. 2 Double-click the Lexmark X5400 Series Center icon. 3 From the "Send scanned image to" pop-up menu. Adjust the slider to the factory ... you adjust the amount of measurement from the pop-up menu, scroll down to activate or deactivate auto-cropping. Start scanning. Reset the Adjustment controls to adjust cropping sensitivity. Clicking re-scans the original document and shows the recent changes in the Preview area....

User's Guide
Page 47
Related topics: • "Using the All-In-One Center" on page 112 • "Customizing scan settings from the Scan dialog" on page 44 Scanning 47 Resetting All-In-One software settings to defaults 1 From the Finder desktop, double-click the Lexmark X5400 Series folder. 2 Double-click the Lexmark X5400 Series Center icon. 3 Click Defaults.
Related topics: • "Using the All-In-One Center" on page 112 • "Customizing scan settings from the Scan dialog" on page 44 Scanning 47 Resetting All-In-One software settings to defaults 1 From the Finder desktop, double-click the Lexmark X5400 Series folder. 2 Double-click the Lexmark X5400 Series Center icon. 3 Click Defaults.
User's Guide
Page 103
... when a memory card or flash drive is removed. 2 Setting must be saved individually. Print a test page. • Device Setup-Customize printer setup settings. • Defaults-Reset printer settings to factory defaults. 1 Setting will return to your photos. Menu item Action Proof Sheet Print and then scan a proof sheet: • for all...
... when a memory card or flash drive is removed. 2 Setting must be saved individually. Print a test page. • Device Setup-Customize printer setup settings. • Defaults-Reset printer settings to factory defaults. 1 Setting will return to your photos. Menu item Action Proof Sheet Print and then scan a proof sheet: • for all...

User's Guide
Page 135
... not lit These are possible solutions. To change the selection: 1 Press or repeatedly until the language you cannot understand the language on the display, see "Resetting the printer to save . SELECT A DIFFERENT LANGUAGE AFTER INITIAL SETUP 1 From the control panel, press Copy Mode. 2 Press . 3 Press or repeatedly until Tools appears. 4 Press...
... not lit These are possible solutions. To change the selection: 1 Press or repeatedly until the language you cannot understand the language on the display, see "Resetting the printer to save . SELECT A DIFFERENT LANGUAGE AFTER INITIAL SETUP 1 From the control panel, press Copy Mode. 2 Press . 3 Press or repeatedly until Tools appears. 4 Press...

User's Guide
Page 162
...; Legal-size paper-reformat the document on letter-size paper. Fax Mode Unsupported The receiving fax machine does not support the type of fax you reset the transmission speed. 11 Resend the fax. 12 If the problem persists, repeat the previous steps to send the fax at successively lower transmission speeds...
...; Legal-size paper-reformat the document on letter-size paper. Fax Mode Unsupported The receiving fax machine does not support the type of fax you reset the transmission speed. 11 Resend the fax. 12 If the problem persists, repeat the previous steps to send the fax at successively lower transmission speeds...
User's Guide
Page 175
...Group Dial numbers. SAVE SETTINGS If you may need to the selected setting. Resetting the printer to factory default settings will delete all open software applications. 2 From the Finder desktop, double-click the Lexmark X5400 Series folder. 3 Double-click the Uninstaller icon. Related topics: &#...8226; "Using the control panel" on page 67. Note: Resetting to factory default settings You can reset your Speed Dial or Group Dial numbers using the ...
...Group Dial numbers. SAVE SETTINGS If you may need to the selected setting. Resetting the printer to factory default settings will delete all open software applications. 2 From the Finder desktop, double-click the Lexmark X5400 Series folder. 3 Double-click the Uninstaller icon. Related topics: &#...8226; "Using the control panel" on page 67. Note: Resetting to factory default settings You can reset your Speed Dial or Group Dial numbers using the ...
Fax Guide
Page 48
... been a problem with the quality of the following: CHECK PHONE LINE Resend the fax. There may have been a problem with the quality of fax you reset the transmission speed.
... been a problem with the quality of the following: CHECK PHONE LINE Resend the fax. There may have been a problem with the quality of fax you reset the transmission speed.


