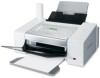

User's Guide
Page 3
... Safety information...2 Finding more information 9 Finding information about the printer 9 Operating system notice...12 Setting up the printer 13 Checking the box contents...13 Understanding the parts of the printer 14 Getting the printer ready to fax...16 Choosing a fax connection ...16 Using an...25 Saving settings ...28 Understanding the Settings menu ...28 Installing another language control panel 30 Installing the printer software...30 Understanding the printer software 31 Turning printing voice notification on or off 33 Security Information...34 Loading paper and original documents...
... Safety information...2 Finding more information 9 Finding information about the printer 9 Operating system notice...12 Setting up the printer 13 Checking the box contents...13 Understanding the parts of the printer 14 Getting the printer ready to fax...16 Choosing a fax connection ...16 Using an...25 Saving settings ...28 Understanding the Settings menu ...28 Installing another language control panel 30 Installing the printer software...30 Understanding the printer software 31 Turning printing voice notification on or off 33 Security Information...34 Loading paper and original documents...
User's Guide
Page 5
... ...69 Printing on custom-size paper ...69 Printing transparencies...70 Printing a banner ...70 Watermark ...70 Changing printer settings...70 Saving and deleting print settings...70 Resetting printer software to factory default settings 71 Resetting the printer to factory default settings 71 Copying...73 Making a copy...73 Adjusting copy quality...73 Making a copy lighter...
... ...69 Printing on custom-size paper ...69 Printing transparencies...70 Printing a banner ...70 Watermark ...70 Changing printer settings...70 Saving and deleting print settings...70 Resetting printer software to factory default settings 71 Resetting the printer to factory default settings 71 Copying...73 Making a copy...73 Adjusting copy quality...73 Making a copy lighter...
User's Guide
Page 7
... server located on remote subnets 96 Direct IP printing...96 Ping the printer...96 Maintaining the printer 98 Removing a used print cartridge...98 Installing print cartridges...99 Refilling print cartridges...101 Using genuine Lexmark print cartridges 101 Aligning print cartridges...101 Cleaning the print cartridge nozzles 101 Wiping the print cartridge nozzles and...
... server located on remote subnets 96 Direct IP printing...96 Ping the printer...96 Maintaining the printer 98 Removing a used print cartridge...98 Installing print cartridges...99 Refilling print cartridges...101 Using genuine Lexmark print cartridges 101 Aligning print cartridges...101 Cleaning the print cartridge nozzles 101 Wiping the print cartridge nozzles and...
User's Guide
Page 9
... icon. 9 User's Guide Description Where to find You can find this document in the printer box or on the hardware and software (on the Lexmark Web site at www.lexmark.com. Finding more information Finding information about the printer Quick Setup sheet Description The Quick Setup sheet gives you instructions for setting up hardware...
... icon. 9 User's Guide Description Where to find You can find this document in the printer box or on the hardware and software (on the Lexmark Web site at www.lexmark.com. Finding more information Finding information about the printer Quick Setup sheet Description The Quick Setup sheet gives you instructions for setting up hardware...

User's Guide
Page 10
...with photos Series. • Scanning (if supported by your printer) 3 Click User's Guide. • Making copies (if supported by your printer) If the link to find The Lexmark Solution Center software is Note: If your printer supports Macintosh operating the letter of the User's Guide appears on... desktop, and the User's Guide: Comprehensive Version appears on your CD. Lexmark Solution Center Description Where to the User's Guide is not on your desktop, • Faxing (if supported by your printer) Note: If necessary, click ŒAll Programs Œ • Troubleshooting...
...with photos Series. • Scanning (if supported by your printer) 3 Click User's Guide. • Making copies (if supported by your printer) If the link to find The Lexmark Solution Center software is Note: If your printer supports Macintosh operating the letter of the User's Guide appears on... desktop, and the User's Guide: Comprehensive Version appears on your CD. Lexmark Solution Center Description Where to the User's Guide is not on your desktop, • Faxing (if supported by your printer) Note: If necessary, click ŒAll Programs Œ • Troubleshooting...
User's Guide
Page 11
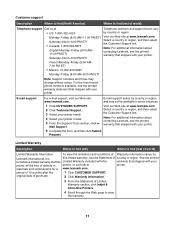
For the most recent phone numbers available, see the printed warranty that shipped with your printer will be available in printer, or set forth at printer. E-mail support varies by country or region. period of Warranty information varies by Lexmark International, Inc. Customer support Description Where to find (North America) Where to find (rest of...
For the most recent phone numbers available, see the printed warranty that shipped with your printer will be available in printer, or set forth at printer. E-mail support varies by country or region. period of Warranty information varies by Lexmark International, Inc. Customer support Description Where to find (North America) Where to find (rest of...
User's Guide
Page 12
Record the following information (located on the store receipt and the back of the printer), and have it ready when you contact us so that we may serve you faster: • Machine Type number • Serial number • Date purchased • Store where purchased Operating system notice All features and functions are operating system-dependent. For complete descriptions: • Windows users-See the User's Guide. • Macintosh users-If your product supports Macintosh, see the Mac Help installed with the printer software. 12
Record the following information (located on the store receipt and the back of the printer), and have it ready when you contact us so that we may serve you faster: • Machine Type number • Serial number • Date purchased • Store where purchased Operating system notice All features and functions are operating system-dependent. For complete descriptions: • Windows users-See the User's Guide. • Macintosh users-If your product supports Macintosh, see the Mac Help installed with the printer software. 12
User's Guide
Page 13
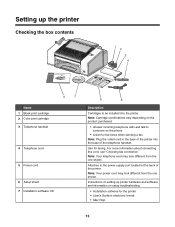
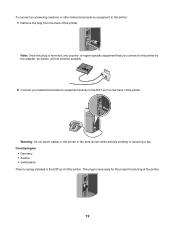
... telephone cord may look different from the one shown. Attaches to be installed into the base of the telephone handset. Instructions on setting up the printer Checking the box contents 1 2 3 4 1 2 3 Name 1 Black print cartridge 2 Color print cartridge 3 Telephone handset 8 7 4 Telephone cord 5 ...Setup sheet 7 Installation software CD 6 5 Description Cartridges to the power supply port located at the back of the printer into the printer. Setting up printer hardware and software, and information on setup troubleshooting. • Installation software for faxing. Use for the...
... telephone cord may look different from the one shown. Attaches to be installed into the base of the telephone handset. Instructions on setting up the printer Checking the box contents 1 2 3 4 1 2 3 Name 1 Black print cartridge 2 Color print cartridge 3 Telephone handset 8 7 4 Telephone cord 5 ...Setup sheet 7 Installation software CD 6 5 Description Cartridges to the power supply port located at the back of the printer into the printer. Setting up printer hardware and software, and information on setup troubleshooting. • Installation software for faxing. Use for the...
User's Guide
Page 14
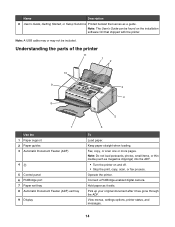
... or fax process. Note: Do not load postcards, photos, small items, or thin media (such as magazine clippings) into the ADF. • Turn the printer on the installation software CD that serves as it has gone through the ADF. Understanding the parts of the... port 7 Paper exit tray 8 Automatic Document Feeder (ADF) exit tray 9 Display 6 To Load paper. Fax, copy, or scan one or more pages. Operate the printer. View menus, settings options, printer status, and messages. 14 Name Description 8 User's Guide, Getting Started, or Setup Solutions Printed booklet that shipped with the...
... or fax process. Note: Do not load postcards, photos, small items, or thin media (such as magazine clippings) into the ADF. • Turn the printer on the installation software CD that serves as it has gone through the ADF. Understanding the parts of the... port 7 Paper exit tray 8 Automatic Document Feeder (ADF) exit tray 9 Display 6 To Load paper. Fax, copy, or scan one or more pages. Operate the printer. View menus, settings options, printer status, and messages. 14 Name Description 8 User's Guide, Getting Started, or Setup Solutions Printed booklet that shipped with the...
User's Guide
Page 15
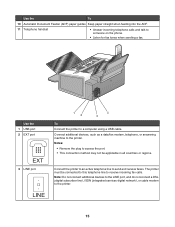
... modem, telephone, or answering machine to send and receive faxes. Use the 1 USB port 2 EXT port EXT 3 LINE port LINE 12 4 3 To Connect the printer to the printer. 15 Notes: • Remove the plug to access the port. • This connection method may not be connected to this telephone line to someone...
... modem, telephone, or answering machine to send and receive faxes. Use the 1 USB port 2 EXT port EXT 3 LINE port LINE 12 4 3 To Connect the printer to the printer. 15 Notes: • Remove the plug to access the port. • This connection method may not be connected to this telephone line to someone...
User's Guide
Page 16
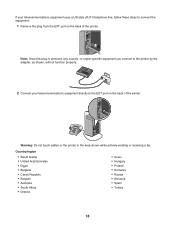
...Power supply with equipment such as a normal For more information, see "Connecting directly to other equipment. Do not set up this section • The printer • A telephone cord • A telephone wall jack • Use the fax line as a telephone, an answering machine, or a computer... modem. telephone wall jack" on page 20. • Send and receive faxes without using a computer. • The printer • An answering machine • Two telephone cords • A telephone wall jack • Use the fax line as the power supply cord...
...Power supply with equipment such as a normal For more information, see "Connecting directly to other equipment. Do not set up this section • The printer • A telephone cord • A telephone wall jack • Use the fax line as a telephone, an answering machine, or a computer... modem. telephone wall jack" on page 20. • Send and receive faxes without using a computer. • The printer • An answering machine • Two telephone cords • A telephone wall jack • Use the fax line as the power supply cord...
User's Guide
Page 17
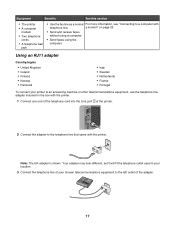
... one end of the telephone cord into the Line port of the adapter. 17 Equipment Benefits See this section • The printer • A computer modem • Two telephone cords • A telephone wall jack • Use the fax line as a normal For more information, see "Connecting ...to the telephone line that came with the printer. Note: The UK adapter is shown. a modem" on page 23. • Send and receive faxes without using a computer. • Send faxes using the ...
... one end of the telephone cord into the Line port of the adapter. 17 Equipment Benefits See this section • The printer • A computer modem • Two telephone cords • A telephone wall jack • Use the fax line as a normal For more information, see "Connecting ...to the telephone line that came with the printer. Note: The UK adapter is shown. a modem" on page 23. • Send and receive faxes without using a computer. • Send faxes using the ...
User's Guide
Page 18
...8226; Slovenia • Spain • Turkey 18 Note: Once this plug is removed, any country- or region-specific equipment you connect to the printer by the adapter, as shown, will not function properly. 2 Connect your telecommunications equipment uses a US-style (RJ11) telephone line, follow these steps ...to the EXT port on the back of the printer. Warning: Do not touch cables or the printer in the area shown while actively sending or receiving a fax. If your telecommunications equipment directly to connect the equipment:...
...8226; Slovenia • Spain • Turkey 18 Note: Once this plug is removed, any country- or region-specific equipment you connect to the printer by the adapter, as shown, will not function properly. 2 Connect your telecommunications equipment uses a US-style (RJ11) telephone line, follow these steps ...to the EXT port on the back of the printer. Warning: Do not touch cables or the printer in the area shown while actively sending or receiving a fax. If your telecommunications equipment directly to connect the equipment:...
User's Guide
Page 19
...other telecommunications equipment to the EXT port on the back of the printer. Note: Once this plug is necessary for the proper functioning of the printer. or region-specific equipment that you connect to the printer by the adapter, as shown, will not function properly. 2 ...Connect your telecommunications equipment directly to the printer: 1 Remove the plug from the back of the printer. Warning: Do not touch cables or the printer in the EXT port of the printer. 19 Country/region • Germany • Austria • Switzerland There is...
...other telecommunications equipment to the EXT port on the back of the printer. Note: Once this plug is necessary for the proper functioning of the printer. or region-specific equipment that you connect to the printer by the adapter, as shown, will not function properly. 2 ...Connect your telecommunications equipment directly to the printer: 1 Remove the plug from the back of the printer. Warning: Do not touch cables or the printer in the EXT port of the printer. 19 Country/region • Germany • Austria • Switzerland There is...
User's Guide
Page 20
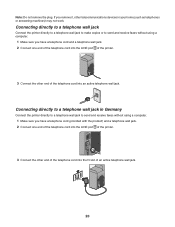
... a telephone cord (provided with the product) and a telephone wall jack. 2 Connect one end of the telephone cord into the LINE port of the printer. 3 Connect the other end of the telephone cord into the N slot of the telephone cord into an active telephone wall jack. Connecting directly to a... telephone wall jack Connect the printer directly to a telephone wall jack to make copies or to send and receive faxes without using a computer. 1 Make sure you remove it, other...
... a telephone cord (provided with the product) and a telephone wall jack. 2 Connect one end of the telephone cord into the LINE port of the printer. 3 Connect the other end of the telephone cord into the N slot of the telephone cord into an active telephone wall jack. Connecting directly to a... telephone wall jack Connect the printer directly to a telephone wall jack to make copies or to send and receive faxes without using a computer. 1 Make sure you remove it, other...
User's Guide
Page 21
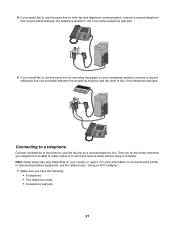
Connecting to a telephone Connect a telephone to the printer to send and receive faxes without using a computer. For more information on connecting the printer to telecommunications equipment, see the related topic, "Using an RJ11 adapter." 1 Make sure you would like to use the same line ...for recording messages on your country or region. Then set up the printer wherever your answering machine, connect a second telephone line (not provided) between the answering machine and the other N slot of an active telephone wall ...
Connecting to a telephone Connect a telephone to the printer to send and receive faxes without using a computer. For more information on connecting the printer to telecommunications equipment, see the related topic, "Using an RJ11 adapter." 1 Make sure you would like to use the same line ...for recording messages on your country or region. Then set up the printer wherever your answering machine, connect a second telephone line (not provided) between the answering machine and the other N slot of an active telephone wall ...
User's Guide
Page 22
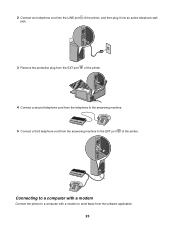
2 Connect one telephone cord to the LINE port of the printer, and then plug it into the EXT port of the printer. Connecting to an answering machine Connect an answering machine to the printer to a telephone, and then plug it into an active telephone wall jack. 3 Remove the protective plug... the other telephone cord to receive both incoming voice messages and faxes. Note: Setup steps may vary depending on connecting the printer to telecommunications equipment, see the related topic, "Using an RJ11 adapter." 1 Make sure you have the following: • A telephone • An answering ...
2 Connect one telephone cord to the LINE port of the printer, and then plug it into the EXT port of the printer. Connecting to an answering machine Connect an answering machine to the printer to a telephone, and then plug it into an active telephone wall jack. 3 Remove the protective plug... the other telephone cord to receive both incoming voice messages and faxes. Note: Setup steps may vary depending on connecting the printer to telecommunications equipment, see the related topic, "Using an RJ11 adapter." 1 Make sure you have the following: • A telephone • An answering ...
User's Guide
Page 23
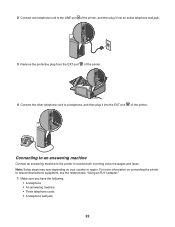
Connecting to a computer with a modem Connect the printer to a computer with a modem to send faxes from the answering machine to the answering machine. 5 Connect a third telephone cord from the software application. 23 2 Connect one telephone cord into the LINE port of the printer, and then plug it into an active telephone wall jack. 3 Remove the protective plug from the EXT port of the printer. 4 Connect a second telephone cord from the telephone to the EXT port of the printer.
Connecting to a computer with a modem Connect the printer to a computer with a modem to send faxes from the answering machine to the answering machine. 5 Connect a third telephone cord from the software application. 23 2 Connect one telephone cord into the LINE port of the printer, and then plug it into an active telephone wall jack. 3 Remove the protective plug from the EXT port of the printer. 4 Connect a second telephone cord from the telephone to the EXT port of the printer.
User's Guide
Page 24
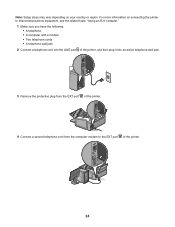
For more information on your country or region. Note: Setup steps may vary depending on connecting the printer to telecommunications equipment, see the related topic, "Using an RJ11 adapter." 1 Make sure you have the following: • A telephone • A computer with a modem • Two ...telephone cords • A telephone wall jack 2 Connect a telephone cord into the LINE port of the printer, and then plug it into an active telephone wall jack. 3 Remove the protective plug from the EXT port of the...
For more information on your country or region. Note: Setup steps may vary depending on connecting the printer to telecommunications equipment, see the related topic, "Using an RJ11 adapter." 1 Make sure you have the following: • A telephone • A computer with a modem • Two ...telephone cords • A telephone wall jack 2 Connect a telephone cord into the LINE port of the printer, and then plug it into an active telephone wall jack. 3 Remove the protective plug from the EXT port of the...

User's Guide
Page 25
... analog telephone port (an R-interface port) on faxing when using an ISDN telephone service, connect the printer to fax while behind a PBX." Understanding the control panel Using the control panel The display shows: • Printer status • Messages • Menus • Setting options 1 3 4 2 5 Press To...phone service The fax modem is selected. 25 For more information on an ISDN terminal adapter. Certain devices can be connected to the printer so that will support analog use. For more information, contact your ISDN provider. • If you are using DSL, connect to...
... analog telephone port (an R-interface port) on faxing when using an ISDN telephone service, connect the printer to fax while behind a PBX." Understanding the control panel Using the control panel The display shows: • Printer status • Messages • Menus • Setting options 1 3 4 2 5 Press To...phone service The fax modem is selected. 25 For more information on an ISDN terminal adapter. Certain devices can be connected to the printer so that will support analog use. For more information, contact your ISDN provider. • If you are using DSL, connect to...


