
Wireless Setup Guide
Page 6
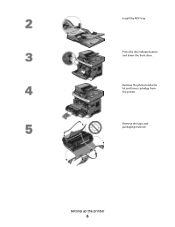
Press the door release button and lower the front door. Setting up the printer 6 Install the ADF tray. Remove the photoconductor kit and toner cartridge from the printer. Remove the tape and packaging material.
Press the door release button and lower the front door. Setting up the printer 6 Install the ADF tray. Remove the photoconductor kit and toner cartridge from the printer. Remove the tape and packaging material.
User's Guide
Page 153
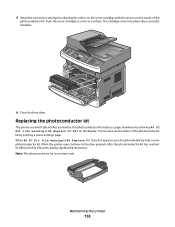
... new photoconductor kit. Maintaining the printer 153 Note: The photoconductor kit is one item only. The cartridge clicks into place when correctly installed. 6 Close the front door. Push the toner cartridge in as far as it will go. While the printer may continue to function properly after the ...photoconductor kit has reached its official end-of the photoconductor kit. 5 Install the new toner cartridge by aligning the rollers on the toner cartridge with the arrows on...
... new photoconductor kit. Maintaining the printer 153 Note: The photoconductor kit is one item only. The cartridge clicks into place when correctly installed. 6 Close the front door. Push the toner cartridge in as far as it will go. While the printer may continue to function properly after the ...photoconductor kit has reached its official end-of the photoconductor kit. 5 Install the new toner cartridge by aligning the rollers on the toner cartridge with the arrows on...
User's Guide
Page 155
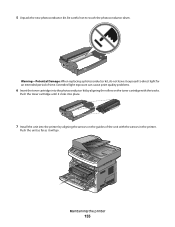
... to direct light for an extended period of the unit with the tracks. Push the toner cartridge until it will go. Extended light exposure can cause print quality problems. 6 Insert the toner cartridge into the printer by aligning the rollers on the guides of time. Push the unit as... far as it clicks into place. 7 Install the unit into the photoconductor kit by aligning the arrows on the toner cartridge with the arrows in the printer. 5 Unpack the new photoconductor kit. Warning-Potential Damage: When replacing a ...
... to direct light for an extended period of the unit with the tracks. Push the toner cartridge until it will go. Extended light exposure can cause print quality problems. 6 Insert the toner cartridge into the printer by aligning the rollers on the guides of time. Push the unit as... far as it clicks into place. 7 Install the unit into the photoconductor kit by aligning the arrows on the toner cartridge with the arrows in the printer. 5 Unpack the new photoconductor kit. Warning-Potential Damage: When replacing a ...
User's Guide
Page 180
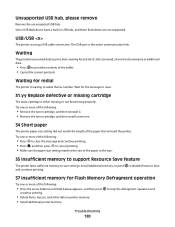
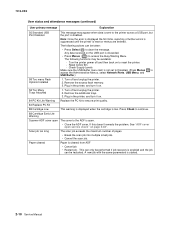
... data. • Press to save settings. Try one or more of the following : • Remove the toner cartridge, and then reinstall it. • Remove the toner cartridge, and then install a new one or more of the following: • Press to clear the message and continue printing. • ... matches the size of the buffer. • Cancel the current print job. to clear. 31.yy Replace defective or missing cartridge The toner cartridge is either missing or not functioning properly. Unsupported USB hub, please remove Remove the unrecognized USB hub. Some USB flash drives ...
... data. • Press to save settings. Try one or more of the following : • Remove the toner cartridge, and then reinstall it. • Remove the toner cartridge, and then install a new one or more of the following: • Press to clear the message and continue printing. • ... matches the size of the buffer. • Cancel the current print job. to clear. 31.yy Replace defective or missing cartridge The toner cartridge is either missing or not functioning properly. Unsupported USB hub, please remove Remove the unrecognized USB hub. Some USB flash drives ...
User's Guide
Page 183
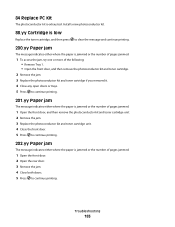
...2 Open the rear door. 3 Remove the jam. 4 Close both doors. 5 Press to continue printing. Troubleshooting 183 Install a new photoconductor kit. 88.yy Cartridge is low Replace the toner cartridge, and then press to clear the message and continue printing. 200.yy Paper jam The message indicates either where the...following: • Remove Tray 1. • Open the front door, and then remove the photoconductor kit and toner cartridge. 2 Remove the jam. 3 Replace the photoconductor kit and toner cartridge if you removed it. 4 Close any open doors or trays. 5 Press to continue printing. 201.yy Paper ...
...2 Open the rear door. 3 Remove the jam. 4 Close both doors. 5 Press to continue printing. Troubleshooting 183 Install a new photoconductor kit. 88.yy Cartridge is low Replace the toner cartridge, and then press to clear the message and continue printing. 200.yy Paper jam The message indicates either where the...following: • Remove Tray 1. • Open the front door, and then remove the photoconductor kit and toner cartridge. 2 Remove the jam. 3 Replace the photoconductor kit and toner cartridge if you removed it. 4 Close any open doors or trays. 5 Press to continue printing. 201.yy Paper ...
User's Guide
Page 197
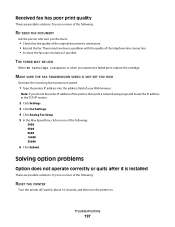
... not operate correctly or quits after it is satisfactory. • Resend the fax. THE TONER MAY BE LOW When 88 Cartridge low appears or when you do not know the IP address of the original document is installed These are possible solutions. Troubleshooting 197 Note: If you experience faded print, replace the...
... not operate correctly or quits after it is satisfactory. • Resend the fax. THE TONER MAY BE LOW When 88 Cartridge low appears or when you do not know the IP address of the original document is installed These are possible solutions. Troubleshooting 197 Note: If you experience faded print, replace the...
User's Guide
Page 224
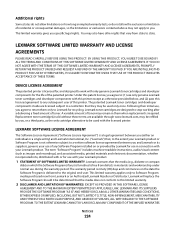
... only once. Replacement toner cartridge(s) sold without these terms are available through www.lexmark.com, may be determined that the media (e.g., diskette or compact disk) on which the Software Program (if any Software Program installed on or provided by you and Lexmark or its suppliers, governs... allow limitations on how long an implied warranty lasts, or do not allow the exclusion or limitation of toner. The patented Lexmark toner cartridges and developer components inside are designed to stop working after a delivering a fixed amount of incidental or consequential damages, so the...
... only once. Replacement toner cartridge(s) sold without these terms are available through www.lexmark.com, may be determined that the media (e.g., diskette or compact disk) on which the Software Program (if any Software Program installed on or provided by you and Lexmark or its suppliers, governs... allow limitations on how long an implied warranty lasts, or do not allow the exclusion or limitation of toner. The patented Lexmark toner cartridges and developer components inside are designed to stop working after a delivering a fixed amount of incidental or consequential damages, so the...
User's Guide
Page 228
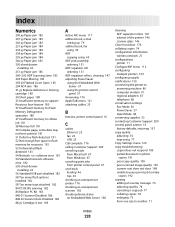
... 234.yy Paper jam 184 235.yy Paper jam 184 24x.yy Paper jam 185 250-sheet drawer installing 22 251.yy Paper jam 185 290-292 ADF Scanning Jams 185 293 Paper Missing 185 293.02 ...Flatbed Cover Open 185 294 ADF Jam 186 31.yy Replace defective or missing cartridge 180 34 Short paper 180 35 Insufficient memory to support Resource Save feature 180 37 Insufficient memory for ...Too many flash options installed 182 58 Too many trays attached 182 84 PC Kit life warning 182 84 Replace PC Kit 183 840.01 Scanner Disabled 186 840.02 Scanner Auto Disabled 186 88.yy Cartridge is low 183 ...
... 234.yy Paper jam 184 235.yy Paper jam 184 24x.yy Paper jam 185 250-sheet drawer installing 22 251.yy Paper jam 185 290-292 ADF Scanning Jams 185 293 Paper Missing 185 293.02 ...Flatbed Cover Open 185 294 ADF Jam 186 31.yy Replace defective or missing cartridge 180 34 Short paper 180 35 Insufficient memory to support Resource Save feature 180 37 Insufficient memory for ...Too many flash options installed 182 58 Too many trays attached 182 84 PC Kit life warning 182 84 Replace PC Kit 183 840.01 Scanner Disabled 186 840.02 Scanner Auto Disabled 186 88.yy Cartridge is low 183 ...
User's Guide
Page 232
... printer problems, solving basic 176 printing directory list 66 font sample list 66 from flash drive 60 from Macintosh 60 from Windows 60 installing printer software 25, 95 menu settings page 25 network setup page 25 print quality test pages 66 two-sided (duplex) 62 Programming ...9 Q Quality menu 139 Queued for sending 179 Quiet Mode 38 R recommended print side 55 recycled paper using 56 recycling 213 Lexmark packaging 38 Lexmark products 38 toner cartridges 38 WEEE statement 212 reducing a copy 73 Index 232 Remove packaging material, check 179 Remove paper from standard output bin 179 ...
... printer problems, solving basic 176 printing directory list 66 font sample list 66 from flash drive 60 from Macintosh 60 from Windows 60 installing printer software 25, 95 menu settings page 25 network setup page 25 print quality test pages 66 two-sided (duplex) 62 Programming ...9 Q Quality menu 139 Queued for sending 179 Quiet Mode 38 R recommended print side 55 recycled paper using 56 recycling 213 Lexmark packaging 38 Lexmark products 38 toner cartridges 38 WEEE statement 212 reducing a copy 73 Index 232 Remove packaging material, check 179 Remove paper from standard output bin 179 ...

Maintenance Guide
Page 10
... PC Kit first appears, you before the photoconductor kit reaches a page maximum by printing a menu settings page. The cartridge clicks into place when correctly installed. 6 Close the front door. You can also see the status of the photoconductor kit by showing 84 PC Kit ... the photoconductor kit has reached its official end-of the photoconductor kit. Maintaining the printer 10 5 Install the new toner cartridge by aligning the rollers on the toner cartridge with the arrows on the display. Replacing the photoconductor kit The printer automatically notifies you should immediately ...
... PC Kit first appears, you before the photoconductor kit reaches a page maximum by printing a menu settings page. The cartridge clicks into place when correctly installed. 6 Close the front door. You can also see the status of the photoconductor kit by showing 84 PC Kit ... the photoconductor kit has reached its official end-of the photoconductor kit. Maintaining the printer 10 5 Install the new toner cartridge by aligning the rollers on the toner cartridge with the arrows on the display. Replacing the photoconductor kit The printer automatically notifies you should immediately ...
Maintenance Guide
Page 12
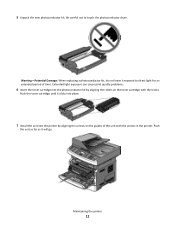
...leave it exposed to touch the photoconductor drum. 5 Unpack the new photoconductor kit. Push the toner cartridge until it will go. Extended light exposure can cause print quality problems. 6 Insert the toner cartridge into the printer by aligning the rollers on the guides of time. Push the unit as far ...as it clicks into place. 7 Install the unit into the photoconductor kit by aligning the arrows on the toner cartridge with the arrows in the printer. Maintaining the printer 12 Be careful not to direct light for an ...
...leave it exposed to touch the photoconductor drum. 5 Unpack the new photoconductor kit. Push the toner cartridge until it will go. Extended light exposure can cause print quality problems. 6 Insert the toner cartridge into the printer by aligning the rollers on the guides of time. Push the unit as far ...as it clicks into place. 7 Install the unit into the photoconductor kit by aligning the arrows on the toner cartridge with the arrows in the printer. Maintaining the printer 12 Be careful not to direct light for an ...
Service Manual
Page 44
... is open. • Close the ADF cover. Turn off and unplug the printer. 2. Remove the additional trays. 3. Press Check to continue. 88 Cartridge Early Life Warning Scanner ADF cover open service check" on page 2-48". The following actions can be restarted. Check Supply Levels Make sure the USB...not set to Disabled. (Press Menus to access the Administrative Menus, select Network/Ports, USB Menu, and USB Buffer.) 58 Too many Flash Options Installed 1. This can only be performed if job recovery is enabled and the job can be available: - Note: Once the error is displayed the ...
... is open. • Close the ADF cover. Turn off and unplug the printer. 2. Remove the additional trays. 3. Press Check to continue. 88 Cartridge Early Life Warning Scanner ADF cover open service check" on page 2-48". The following actions can be restarted. Check Supply Levels Make sure the USB...not set to Disabled. (Press Menus to access the Administrative Menus, select Network/Ports, USB Menu, and USB Buffer.) 58 Too many Flash Options Installed 1. This can only be performed if job recovery is enabled and the job can be available: - Note: Once the error is displayed the ...
Service Manual
Page 53
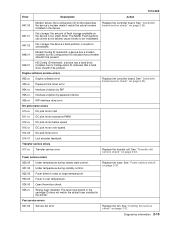
...present. 849.01 HD/Config ID mismatch: a device has a hard drive installed, but its Configuration ID indicates that describes the device's modem doesn't match the actual modem installed in the printer. Wrong fuser installed. Fan service errors 927.00 Service fan error Replace the fan. See "Transfer... flash partition is too small. Diagnostics information 2-19 Replace the controller board. The fuser type stored in the cartridge ID does not match the actual fuser installed in the device. Fax storage: the amount of flash storage available on page 2-29. 923.00 Fuser is ...
...present. 849.01 HD/Config ID mismatch: a device has a hard drive installed, but its Configuration ID indicates that describes the device's modem doesn't match the actual modem installed in the printer. Wrong fuser installed. Fan service errors 927.00 Service fan error Replace the fan. See "Transfer... flash partition is too small. Diagnostics information 2-19 Replace the controller board. The fuser type stored in the cartridge ID does not match the actual fuser installed in the device. Fax storage: the amount of flash storage available on page 2-29. 923.00 Fuser is ...

Service Manual
Page 54
... 929.00 929.01 929.02 Toner sensor error No home window No sensor transition (closed) Remove the toner cartridge, and shake it Try a different toner cartridge, if possible. See "Printhead service check" on page 2-26. 952.xx A recoverable MVRAM Cyclic Redundancy Check ...error Performing POR will clear this use. Install a new note. Install a new controller bored or operator panel. See "Controller board service check" on page...
... 929.00 929.01 929.02 Toner sensor error No home window No sensor transition (closed) Remove the toner cartridge, and shake it Try a different toner cartridge, if possible. See "Printhead service check" on page 2-26. 952.xx A recoverable MVRAM Cyclic Redundancy Check ...error Performing POR will clear this use. Install a new note. Install a new controller bored or operator panel. See "Controller board service check" on page...

Service Manual
Page 61
...or closed and discontinuity with the door open. 2. See "Fan removal" on page 2-28. Cover interlock switch service check Note: Make sure a print cartridge assembly is not present, then check or replace the controller board. Verify continuity between cable pin 1 and pin 3 with the door open switch lever..... If any of support. Within a few seconds, the controller board assembly should apply +24 V dc to pin 2. • If voltage is installed and the cover closes all the way, engaging the cover open and discontinuity with the cable still unplugged, and verify the following on page 4-13...
...or closed and discontinuity with the door open. 2. See "Fan removal" on page 2-28. Cover interlock switch service check Note: Make sure a print cartridge assembly is not present, then check or replace the controller board. Verify continuity between cable pin 1 and pin 3 with the door open switch lever..... If any of support. Within a few seconds, the controller board assembly should apply +24 V dc to pin 2. • If voltage is installed and the cover closes all the way, engaging the cover open and discontinuity with the cable still unplugged, and verify the following on page 4-13...
Service Manual
Page 65
... sure the flag is not functioning, then replace the operator panel. Media picks but stops halfway through the printer FRU Input/duplex sensors (under print cartridge assembly) Input sensor (manual) Action Make sure the input sensors are seated on , verify the following without disconnecting the cable: • Pins 1, 3,...2 at the back of these cards is no test or repair for the faulty switches on page 2-26. A stuck or incorrectly installed sensor causes a paper jam indication. Settings are lost when both are working properly. Make sure the input paper feed sensors are new...
... sure the flag is not functioning, then replace the operator panel. Media picks but stops halfway through the printer FRU Input/duplex sensors (under print cartridge assembly) Input sensor (manual) Action Make sure the input sensors are seated on , verify the following without disconnecting the cable: • Pins 1, 3,...2 at the back of these cards is no test or repair for the faulty switches on page 2-26. A stuck or incorrectly installed sensor causes a paper jam indication. Settings are lost when both are working properly. Make sure the input paper feed sensors are new...
Service Manual
Page 71
...the "Controller board service check" on page 2-26, if necessary. Verify ground on the controller board. Make sure the toner cartridge and PC Kit are correctly installed and the high voltage contacts are incorrect, then check ground paths. • Check continuity in the cable. 7013-XXX Black ...and 18. • If any of support. • If the values are correct and the toner electrodes are installed correctly, then try a new PC Kit first and then toner cartridge. Correct as necessary. Try a lower setting. If this does not correct the problem, then replace the following FRUs...
...the "Controller board service check" on page 2-26, if necessary. Verify ground on the controller board. Make sure the toner cartridge and PC Kit are correctly installed and the high voltage contacts are incorrect, then check ground paths. • Check continuity in the cable. 7013-XXX Black ...and 18. • If any of support. • If the values are correct and the toner electrodes are installed correctly, then try a new PC Kit first and then toner cartridge. Correct as necessary. Try a lower setting. If this does not correct the problem, then replace the following FRUs...

Service Manual
Page 73
... the following FRUs one at a time in the developer and transfer process. Diagnostics information 2-39 If the problem continues, then install a new toner cartridge. If all components appear free of overly dry or moist environments. To check the lower voltage, see J502 on back of page...buildup and contamination. Replace the fuser as necessary. 7013-XXX Light print FRU Toner cartridge (not a FRU) Transfer roll LVPS/HVPS card Action Make sure the toner cartridge and PC Kit are installed correctly and that the laser beam is primarily due to contaminate the transfer roller....
... the following FRUs one at a time in the developer and transfer process. Diagnostics information 2-39 If the problem continues, then install a new toner cartridge. If all components appear free of overly dry or moist environments. To check the lower voltage, see J502 on back of page...buildup and contamination. Replace the fuser as necessary. 7013-XXX Light print FRU Toner cartridge (not a FRU) Transfer roll LVPS/HVPS card Action Make sure the toner cartridge and PC Kit are installed correctly and that the laser beam is primarily due to contaminate the transfer roller....

Service Manual
Page 75
...action • Toner is expecting. • Choose a different fill pattern in the cartridge. • The Toner Low message does not display if the 1,500-page toner cartridge is installed. • Remove the toner cartridge, and gently shake it from side to side to redistribute the toner. • Replace... the toner cartridge. • Remove the toner cartridge, and gently shake it is being used, such as...
...action • Toner is expecting. • Choose a different fill pattern in the cartridge. • The Toner Low message does not display if the 1,500-page toner cartridge is installed. • Remove the toner cartridge, and gently shake it from side to side to redistribute the toner. • Replace... the toner cartridge. • Remove the toner cartridge, and gently shake it is being used, such as...
Service Manual
Page 76
... all jams. • Press and release , or open and close the printer cover to on, then the printer stops printing until the toner cartridge is on. Replace if worn or contaminated. • Verify that may hinder media movement. • Make sure the media does not exceed the...by unplugging USB and plugging it with the printer on. Make sure the front printer cover is closed. • Make sure the toner cartridge is installed correctly. • Install a new toner cartridge. • Tray is overfilled or media is too loose. • Don't overfill Tray 1 or the optional Tray 2 (see media...
... all jams. • Press and release , or open and close the printer cover to on, then the printer stops printing until the toner cartridge is on. Replace if worn or contaminated. • Verify that may hinder media movement. • Make sure the media does not exceed the...by unplugging USB and plugging it with the printer on. Make sure the front printer cover is closed. • Make sure the toner cartridge is installed correctly. • Install a new toner cartridge. • Tray is overfilled or media is too loose. • Don't overfill Tray 1 or the optional Tray 2 (see media...


