Getting Started
Page 3
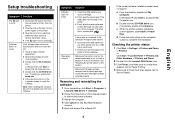
.... If the printer software installation screen does not appear: a From the desktop, double-click My Computer. Checking the printer status 1 Click Start Æ Settings Æ Printers and Faxes or Printers. If necessary, double-click setup.exe. or Click Start Æ Control Panel Æ Printers and Other Hardware Æ Printers and Faxes. 2 Double-click the Lexmark 2400 Series icon...
.... If the printer software installation screen does not appear: a From the desktop, double-click My Computer. Checking the printer status 1 Click Start Æ Settings Æ Printers and Faxes or Printers. If necessary, double-click setup.exe. or Click Start Æ Control Panel Æ Printers and Other Hardware Æ Printers and Faxes. 2 Double-click the Lexmark 2400 Series icon...
Getting Started
Page 6
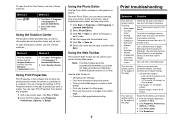
... Center. Using Print Properties Print Properties is the software that controls the printing function when the printer is connected to print printer-friendly Web pages. You can be used to a computer. Using the Web Toolbar The Lexmark Web Toolbar can open Print Properties from a Web page. • Preview a Web page ... and graphic quality at the edges of the page Poor text and graphic quality at the edges of the page Check the ink level, and install a new print cartridge if necessary. You can reduce red-eye, crop your photos, resize your photos, adjust brightness and contrast, and use...
... Center. Using Print Properties Print Properties is the software that controls the printing function when the printer is connected to print printer-friendly Web pages. You can be used to a computer. Using the Web Toolbar The Lexmark Web Toolbar can open Print Properties from a Web page. • Preview a Web page ... and graphic quality at the edges of the page Poor text and graphic quality at the edges of the page Check the ink level, and install a new print cartridge if necessary. You can reduce red-eye, crop your photos, resize your photos, adjust brightness and contrast, and use...

User's Guide
Page 4
... 38 Faxing...39 Sending a fax using the software...39 Receiving a fax using the software...40 Networking the printer 41 Shared printing...41 Maintaining the printer 42 Changing a print cartridge...42 Removing a used print cartridge...42 Installing a print cartridge...42 Achieving better print quality...44 Improving print quality...44 Aligning the print cartridge using...
... 38 Faxing...39 Sending a fax using the software...39 Receiving a fax using the software...40 Networking the printer 41 Shared printing...41 Maintaining the printer 42 Changing a print cartridge...42 Removing a used print cartridge...42 Installing a print cartridge...42 Achieving better print quality...44 Improving print quality...44 Aligning the print cartridge using...
User's Guide
Page 5
... print cartridge...46 Cleaning the scanner glass...46 Ordering supplies...46 Using genuine Lexmark print cartridges 46 Refilling a print cartridge...47 Recycling Lexmark products...47 Troubleshooting...48 Setup troubleshooting...48 Power button is not lit...48 Software does not install...48 Page does not print...49 Cannot print from digital camera using PictBridge...Cannot print a fax or received fax has poor print quality 58 Received fax is blank...58 Jams and misfeeds troubleshooting 59 Paper jam in the printer...59 Paper jam in the paper support...59 Paper or specialty media misfeeds...59 5
... print cartridge...46 Cleaning the scanner glass...46 Ordering supplies...46 Using genuine Lexmark print cartridges 46 Refilling a print cartridge...47 Recycling Lexmark products...47 Troubleshooting...48 Setup troubleshooting...48 Power button is not lit...48 Software does not install...48 Page does not print...49 Cannot print from digital camera using PictBridge...Cannot print a fax or received fax has poor print quality 58 Received fax is blank...58 Jams and misfeeds troubleshooting 59 Paper jam in the printer...59 Paper jam in the paper support...59 Paper or specialty media misfeeds...59 5
User's Guide
Page 7
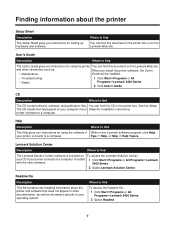
... find The CD contains drivers, software, and publication files. and other software. 2400 Series. 2 Select Lexmark Solution Center. It installs 1 Click StartŒPrograms or All ProgramsŒLexmark with the other information such as information specific to your printer connects to a computer. Readme file Description This file contains late-breaking information about the...
... find The CD contains drivers, software, and publication files. and other software. 2400 Series. 2 Select Lexmark Solution Center. It installs 1 Click StartŒPrograms or All ProgramsŒLexmark with the other information such as information specific to your printer connects to a computer. Readme file Description This file contains late-breaking information about the...

User's Guide
Page 9
Setting up the printer Checking the box contents Name 1 Color print cartridge 2 Power supply cord 3 Installation software CD 4 Getting Started or Setup Solutions 5 Setup Sheet Description Cartridge to be installed in the printer Attaches to the power supply port located at the back of the printer • Installation software for the printer • Help • User's Guide in electronic format Additional information depending on your country or region Instructions on setting up printer hardware and software, and information on setup troubleshooting 9
Setting up the printer Checking the box contents Name 1 Color print cartridge 2 Power supply cord 3 Installation software CD 4 Getting Started or Setup Solutions 5 Setup Sheet Description Cartridge to be installed in the printer Attaches to the power supply port located at the back of the printer • Installation software for the printer • Help • User's Guide in electronic format Additional information depending on your country or region Instructions on setting up printer hardware and software, and information on setup troubleshooting 9

User's Guide
Page 10
Connect a PictBridge-enabled digital camera to the printer. Operate the printer. Access the scanner glass. Learning about the printer Understanding the parts of the printer 6 1 5 7 4 Use the 1 Paper support 2 Control panel 3 PictBridge port 4 Paper exit tray 5 Top cover 6 Paper guide 7 Scanner glass 32 To Load paper. Install or replace a print cartridge. 10 Stack paper as it exits. Align paper when feeding. Scan, copy, or remove an item. 3 Use the 1 Scanner support 2 Print cartridge carrier 1 2 4 5 To Hold up the scanner unit.
Connect a PictBridge-enabled digital camera to the printer. Operate the printer. Access the scanner glass. Learning about the printer Understanding the parts of the printer 6 1 5 7 4 Use the 1 Paper support 2 Control panel 3 PictBridge port 4 Paper exit tray 5 Top cover 6 Paper guide 7 Scanner glass 32 To Load paper. Install or replace a print cartridge. 10 Stack paper as it exits. Align paper when feeding. Scan, copy, or remove an item. 3 Use the 1 Scanner support 2 Print cartridge carrier 1 2 4 5 To Hold up the scanner unit.

User's Guide
Page 16
... information. • Learn tips about the current status. • Solve printer problems. Maintenance Contact Information • Install a print cartridge. For example, while printing, the status of the printer is complete before installing a new print cartridge. • View shopping options for more information, click...8226; Align to fix blurry edges. • Troubleshoot other ink problems. Learn how to contact us regarding how you use the printer. • Obtain software version information. Advanced • Change the appearance of the screen. 16 Note: Wait until scanning is...
... information. • Learn tips about the current status. • Solve printer problems. Maintenance Contact Information • Install a print cartridge. For example, while printing, the status of the printer is complete before installing a new print cartridge. • View shopping options for more information, click...8226; Align to fix blurry edges. • Troubleshoot other ink problems. Learn how to contact us regarding how you use the printer. • Obtain software version information. Advanced • Change the appearance of the screen. 16 Note: Wait until scanning is...
User's Guide
Page 37
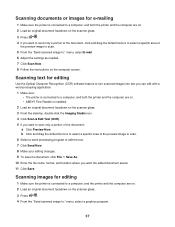
... 4 From the "Send scanned image to:" menu, select a graphics program. 37 Scanning images for editing 1 Make sure the printer is connected to a computer, and the printer and the computer are on. 2 Load an original document facedown on the computer screen. Scanning documents or images for e-mailing ...1 Make sure the printer is connected to a computer, and both the printer and the computer are on. • ABBYY Fine Reader is installed. 2 Load an original document facedown on the scanner glass. 3 From the desktop...
... 4 From the "Send scanned image to:" menu, select a graphics program. 37 Scanning images for editing 1 Make sure the printer is connected to a computer, and the printer and the computer are on. 2 Load an original document facedown on the computer screen. Scanning documents or images for e-mailing ...1 Make sure the printer is connected to a computer, and both the printer and the computer are on. • ABBYY Fine Reader is installed. 2 Load an original document facedown on the scanner glass. 3 From the desktop...

User's Guide
Page 41
... computer that you find c Click Install. the name of the shared printer assigned in step 6 on the computer screen until installation is complete. Networking the printer Installing a network printer lets users at different workstations print to the shared printer. Shared printing Installing software and sharing the printer on the network (on page 41. A printer object will copy a subset of the...
... computer that you find c Click Install. the name of the shared printer assigned in step 6 on the computer screen until installation is complete. Networking the printer Installing a network printer lets users at different workstations print to the shared printer. Shared printing Installing software and sharing the printer on the network (on page 41. A printer object will copy a subset of the...
User's Guide
Page 42
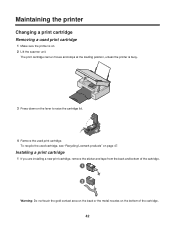
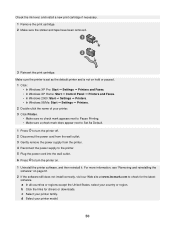
...installing a new print cartridge, remove the sticker and tape from the back and bottom of the cartridge. 42 Warning: Do not touch the gold contact area on the back or the metal nozzles on . 2 Lift the scanner unit. Maintaining the printer Changing a print cartridge Removing a used cartridge, see "Recycling Lexmark... products" on page 47. To recycle the used print cartridge 1 Make sure the printer is busy. 3 Press down on the lever to raise the ...
...installing a new print cartridge, remove the sticker and tape from the back and bottom of the cartridge. 42 Warning: Do not touch the gold contact area on the back or the metal nozzles on . 2 Lift the scanner unit. Maintaining the printer Changing a print cartridge Removing a used cartridge, see "Recycling Lexmark... products" on page 47. To recycle the used print cartridge 1 Make sure the printer is busy. 3 Press down on the lever to raise the ...

User's Guide
Page 46
... document on the scanner glass. Item Part number Print cartridge 1 USB cable 12A2405 Lexmark Photo Paper and Premium Photo Paper Varies by non-Lexmark ink or print cartridges. 46 To prevent the message from the printer except to replace, clean, or store it . • Do not remove a...or to locate a dealer near you are designed to install it in its packaging until you , visit our Web site at www.lexmark.com. Lexmark's warranty does not cover damage caused by country or region Using genuine Lexmark print cartridges Lexmark printers, print cartridges, and photo paper are ready to ...
... document on the scanner glass. Item Part number Print cartridge 1 USB cable 12A2405 Lexmark Photo Paper and Premium Photo Paper Varies by non-Lexmark ink or print cartridges. 46 To prevent the message from the printer except to replace, clean, or store it . • Do not remove a...or to locate a dealer near you are designed to install it in its packaging until you , visit our Web site at www.lexmark.com. Lexmark's warranty does not cover damage caused by country or region Using genuine Lexmark print cartridges Lexmark printers, print cartridges, and photo paper are ready to ...
User's Guide
Page 48
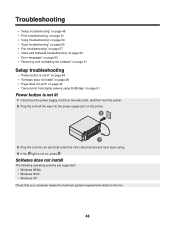
...not print" on page 49 • "Cannot print from digital camera using . 4 If the light is not on the box. 48 Software does not install The following operating systems are supported: • Windows 98/Me • Windows 2000 • Windows XP Check that other electrical devices have been using ... 51 Power button is not lit 1 Disconnect the power supply cord from the wall outlet, and then from the printer. 2 Plug the cord all the way into the power supply port on the printer. 2 1 3 Plug the cord into an electrical outlet that your computer meets the minimum system requirements listed on...
...not print" on page 49 • "Cannot print from digital camera using . 4 If the light is not on the box. 48 Software does not install The following operating systems are supported: • Windows 98/Me • Windows 2000 • Windows XP Check that other electrical devices have been using ... 51 Power button is not lit 1 Disconnect the power supply cord from the wall outlet, and then from the printer. 2 Plug the cord all the way into the power supply port on the printer. 2 1 3 Plug the cord into an electrical outlet that your computer meets the minimum system requirements listed on...

User's Guide
Page 49
.... 4 Double-click the CD-ROM drive icon. 5 If necessary, double-click setup.exe. 6 Follow the instructions on the computer screen to install the software. 1 Visit our Web site at www.lexmark.com to check for the latest software. 2 In all countries or regions except the United States, select your country or region... cable into the wall outlet. 6 Press to download, and then follow the instructions on the computer screen to reinstall the software. 1 Press to turn the printer off. 2 Disconnect the power cord from the wall outlet. 3 Gently remove the power supply from the...
.... 4 Double-click the CD-ROM drive icon. 5 If necessary, double-click setup.exe. 6 Follow the instructions on the computer screen to install the software. 1 Visit our Web site at www.lexmark.com to check for the latest software. 2 In all countries or regions except the United States, select your country or region... cable into the wall outlet. 6 Press to download, and then follow the instructions on the computer screen to reinstall the software. 1 Press to turn the printer off. 2 Disconnect the power cord from the wall outlet. 3 Gently remove the power supply from the...
User's Guide
Page 50
... have been removed. 3 Reinsert the print cartridge. Make sure the printer is set as the default printer and is not on page 61. 2 If the software still does not install correctly, visit our Web site at www.lexmark.com to turn the printer off. 2 Disconnect the power cord from the wall outlet. 3 ...Gently remove the power supply from the printer. 4 Reconnect the power supply to the printer. 5 Plug the power cord into the wall...
... have been removed. 3 Reinsert the print cartridge. Make sure the printer is set as the default printer and is not on page 61. 2 If the software still does not install correctly, visit our Web site at www.lexmark.com to turn the printer off. 2 Disconnect the power cord from the wall outlet. 3 ...Gently remove the power supply from the printer. 4 Reconnect the power supply to the printer. 5 Plug the power cord into the wall...

User's Guide
Page 51
For more information, see "Removing a used print cartridge" on page 42 and "Installing a print cartridge" on page 46. 51 Use Lexmark Premium Photo Paper if you are not sure which side is the printable side, see "Aligning the print cartridge using PictBridge Enable PictBridge printing ...• Use a paper that came with the print quality of the page" on page 53 • "Partial document or photo prints" on page 54 • "Printer does not print or respond" on page 53 Improving print quality If you are not satisfied with the camera. Cannot print from digital camera using...
For more information, see "Removing a used print cartridge" on page 42 and "Installing a print cartridge" on page 46. 51 Use Lexmark Premium Photo Paper if you are not sure which side is the printable side, see "Aligning the print cartridge using PictBridge Enable PictBridge printing ...• Use a paper that came with the print quality of the page" on page 53 • "Partial document or photo prints" on page 54 • "Printer does not print or respond" on page 53 Improving print quality If you are not satisfied with the camera. Cannot print from digital camera using...
User's Guide
Page 52
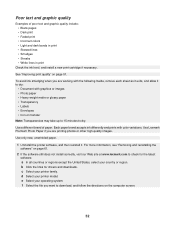
a In all countries or regions except the United States, select your printer family. c Select your country or region. Use Lexmark Premium Photo Paper if you are working with the following media, remove each sheet as it exits, and allow it . Each paper ...61. 2 If the software still does not install correctly, visit our Web site at www.lexmark.com to dry: • Document with color variations. Poor text and graphic quality Examples of paper. e Select your printer model. Use only new, unwrinkled paper. 1 Uninstall the printer software, and then reinstall it to check for...
a In all countries or regions except the United States, select your printer family. c Select your country or region. Use Lexmark Premium Photo Paper if you are working with the following media, remove each sheet as it exits, and allow it . Each paper ...61. 2 If the software still does not install correctly, visit our Web site at www.lexmark.com to dry: • Document with color variations. Poor text and graphic quality Examples of paper. e Select your printer model. Use only new, unwrinkled paper. 1 Uninstall the printer software, and then reinstall it to check for...

User's Guide
Page 53
... software" on page 49. Remove as many unused fonts as possible from your country or region. Printer does not print or respond See "Page does not print" on page 61. 2 If the software still does not install correctly, visit our Web site at the edges of graphics and images in .) Select the... number and size of the page Unless you are using the borderless feature, use . b Click the links for the latest software. Poor quality at www.lexmark.com to check for drivers and downloads. 53
... software" on page 49. Remove as many unused fonts as possible from your country or region. Printer does not print or respond See "Page does not print" on page 61. 2 If the software still does not install correctly, visit our Web site at the edges of graphics and images in .) Select the... number and size of the page Unless you are using the borderless feature, use . b Click the links for the latest software. Poor quality at www.lexmark.com to check for drivers and downloads. 53
User's Guide
Page 54
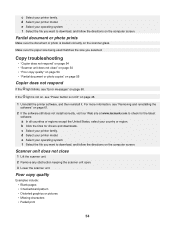
...reinstall it. d Select your printer family. b Click the links for the latest software. Partial document or photo prints Make sure the document or photo is not lit" on page 61. 2 If the software still does not install correctly, visit our Web site at www.lexmark.com to check for drivers... Missing characters • Faded print 54 f Select the file you want to download, and follow the directions on the scanner glass. e Select your printer model. d Select your operating system. If the light is not on, see "Error messages" on the computer screen. Make sure the paper size ...
...reinstall it. d Select your printer family. b Click the links for the latest software. Partial document or photo prints Make sure the document or photo is not lit" on page 61. 2 If the software still does not install correctly, visit our Web site at www.lexmark.com to check for drivers... Missing characters • Faded print 54 f Select the file you want to download, and follow the directions on the scanner glass. e Select your printer model. d Select your operating system. If the light is not on, see "Error messages" on the computer screen. Make sure the paper size ...

User's Guide
Page 55
...or image. Partial document or photo copies Make sure the document or photo is loaded correctly on the scanner glass. Make sure the printer is set as the default printer and is not lit" on page 44. If you selected. Scan troubleshooting • "Scanner does not respond" on page 55 ... to an application" on page 57 Scanner does not respond If the light blinks, see "Error messages" on page 60. Check the ink level, and install a new print cartridge if necessary. • Dark print • Skewed lines • Smudges • Streaks • Unexpected characters • White lines ...
...or image. Partial document or photo copies Make sure the document or photo is loaded correctly on the scanner glass. Make sure the printer is set as the default printer and is not lit" on page 44. If you selected. Scan troubleshooting • "Scanner does not respond" on page 55 ... to an application" on page 57 Scanner does not respond If the light blinks, see "Error messages" on page 60. Check the ink level, and install a new print cartridge if necessary. • Dark print • Skewed lines • Smudges • Streaks • Unexpected characters • White lines ...


