
Setup Sheet
Page 1
... PM EST) Phone number and support times may change without notice. Lift the paper support, and extend the paper exit tray. 1 2 Load paper and adjust the paper guide. Lift the scanner unit. Connect the power supply. Make sure the power light is near the product and easily accessible. • Refer service or repairs, other than those described in the user documentation, to your computer on . Turn your User's Guide. 2 Visit our Web site. Safety information • Use only the power supply provided...
... PM EST) Phone number and support times may change without notice. Lift the paper support, and extend the paper exit tray. 1 2 Load paper and adjust the paper guide. Lift the scanner unit. Connect the power supply. Make sure the power light is near the product and easily accessible. • Refer service or repairs, other than those described in the user documentation, to your computer on . Turn your User's Guide. 2 Visit our Web site. Safety information • Use only the power supply provided...

User's Guide
Page 2
... infringe any time. You can purchase additional copies of Lexmark International, Inc., registered in the user documentation, to a professional service person. CAUTION: Do not use or distribute any of their respective owners. © 2003 Lexmark International, Inc. References in this publication to products, programs, or services do not allow disclaimer of purchase. Do not set up this product or make these changes will be...
... infringe any time. You can purchase additional copies of Lexmark International, Inc., registered in the user documentation, to a professional service person. CAUTION: Do not use or distribute any of their respective owners. © 2003 Lexmark International, Inc. References in this publication to products, programs, or services do not allow disclaimer of purchase. Do not set up this product or make these changes will be...
User's Guide
Page 3
Contents Learning about the All-In-One 1 Setting up the All-In-One 1 Understanding the parts of the All-In-One 1 Using the control panel 2 Understanding the software 3 Using the Lexmark All-In-One Center 3 Using Print Properties 6 Using the Lexmark Solution Center 8 Using the Lexmark Photo Editor 9 Using the All-In-One 10 Printing 10 Scanning 13 Copying 14 Faxing 16 Maintenance 17 Replacing the print cartridges 17 Troubleshooting 19 Troubleshooting checklist 19 Setup troubleshooting 20 Printing troubleshooting 22 Scanning, copying, and faxing troubleshooting 24 iii
Contents Learning about the All-In-One 1 Setting up the All-In-One 1 Understanding the parts of the All-In-One 1 Using the control panel 2 Understanding the software 3 Using the Lexmark All-In-One Center 3 Using Print Properties 6 Using the Lexmark Solution Center 8 Using the Lexmark Photo Editor 9 Using the All-In-One 10 Printing 10 Scanning 13 Copying 14 Faxing 16 Maintenance 17 Replacing the print cartridges 17 Troubleshooting 19 Troubleshooting checklist 19 Setup troubleshooting 20 Printing troubleshooting 22 Scanning, copying, and faxing troubleshooting 24 iii

User's Guide
Page 4
The Lexmark™ X1100 Series All-In-One combines the functionality of an inkjet printer, a scanner, a copier, and a fax machine all into a single, multifunction device, making it one of the most exciting products on your purchase. Also included are sections describing the All-In-One software and troubleshooting information. iv Removing and reinstalling the software 26 Other help sources 26 Thank you how to perform printing, copying, scanning, and faxing tasks. Congratulations on the market today. This guide tells you for purchasing a Lexmark X1100 Series All-In-One!
The Lexmark™ X1100 Series All-In-One combines the functionality of an inkjet printer, a scanner, a copier, and a fax machine all into a single, multifunction device, making it one of the most exciting products on your purchase. Also included are sections describing the All-In-One software and troubleshooting information. iv Removing and reinstalling the software 26 Other help sources 26 Thank you how to perform printing, copying, scanning, and faxing tasks. Congratulations on the market today. This guide tells you for purchasing a Lexmark X1100 Series All-In-One!
User's Guide
Page 5
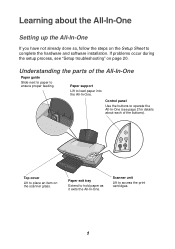
Paper support Lift to complete the hardware and software installation. Learning about each of the All-In-One Paper guide Slide next to paper to access the print cartridges. 1 Understanding the parts of the buttons). Paper exit tray Extend to place an item on page 20. Control panel Use the buttons to operate the All-In-One (see "Setup troubleshooting" on the scanner glass. Top cover Lift to hold paper as it exits the All-In-One. Scanner unit Lift to...
Paper support Lift to complete the hardware and software installation. Learning about each of the All-In-One Paper guide Slide next to paper to access the print cartridges. 1 Understanding the parts of the buttons). Paper exit tray Extend to place an item on page 20. Control panel Use the buttons to operate the All-In-One (see "Setup troubleshooting" on the scanner glass. Top cover Lift to hold paper as it exits the All-In-One. Scanner unit Lift to...
User's Guide
Page 6
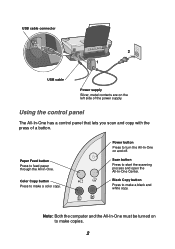
...-In-One must be turned on and off. Using the control panel The All-In-One has a control panel that lets you scan and copy with the press of the power supply. Color Copy button Press to make a color copy. Scan button Press to feed paper through the All-In-One. Paper Feed button Press to start the scanning process and open the All-In-One Center. USB cable connector 2 1 USB cable Power supply Silver, metal contacts are on the left side of a button. Black Copy button Press to make a black and white copy.
...-In-One must be turned on and off. Using the control panel The All-In-One has a control panel that lets you scan and copy with the press of the power supply. Color Copy button Press to make a color copy. Scan button Press to feed paper through the All-In-One. Paper Feed button Press to start the scanning process and open the All-In-One Center. USB cable connector 2 1 USB cable Power supply Silver, metal contacts are on the left side of a button. Black Copy button Press to make a black and white copy.
User's Guide
Page 7
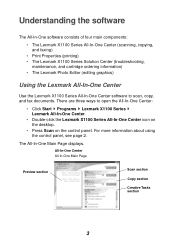
...-One Center (scanning, copying, and faxing) • Print Properties (printing) • The Lexmark X1100 Series Solution Center (troubleshooting, maintenance, and cartridge ordering information) • The Lexmark Photo Editor (editing graphics) Using the Lexmark All-In-One Center Use the Lexmark X1100 Series All-In-One Center software to open the All-In-One Center: • Click Start Programs Lexmark X1100 Series Lexmark All-In-One Center. • Double-click the Lexmark X1100 Series All-In-One Center icon on the desktop. • Press Scan on the control panel. The All-In-One Main Page...
...-One Center (scanning, copying, and faxing) • Print Properties (printing) • The Lexmark X1100 Series Solution Center (troubleshooting, maintenance, and cartridge ordering information) • The Lexmark Photo Editor (editing graphics) Using the Lexmark All-In-One Center Use the Lexmark X1100 Series All-In-One Center software to open the All-In-One Center: • Click Start Programs Lexmark X1100 Series Lexmark All-In-One Center. • Double-click the Lexmark X1100 Series All-In-One Center icon on the desktop. • Press Scan on the control panel. The All-In-One Main Page...
User's Guide
Page 8
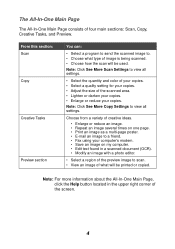
Note: For more information about the All-In-One Main Page, click the Help button located in a scanned document (OCR). • Modify an image with a photo editor. • Select a region of the preview image to a friend. • Fax using your copies. Choose from a variety of creative ideas. • Enlarge or reduce an image. • Repeat an image several times on my computer. • Edit text found in the...
Note: For more information about the All-In-One Main Page, click the Help button located in a scanned document (OCR). • Modify an image with a photo editor. • Select a region of the preview image to a friend. • Fax using your copies. Choose from a variety of creative ideas. • Enlarge or reduce an image. • Repeat an image several times on my computer. • Edit text found in the...

User's Guide
Page 9
... to the Lexmark Solution Center. Note: Click See More Copy Settings to . • Choose the quantity and color of creative ideas. Note: For more information about this page, click the Help button located in the upper right corner of three sections. Select from these topics: • Maintain or fix quality problems • Troubleshoot All-In-One problems • Device status and ink levels • More printing ideas and...
... to the Lexmark Solution Center. Note: Click See More Copy Settings to . • Choose the quantity and color of creative ideas. Note: For more information about this page, click the Help button located in the upper right corner of three sections. Select from these topics: • Maintain or fix quality problems • Troubleshoot All-In-One problems • Device status and ink levels • More printing ideas and...
User's Guide
Page 10
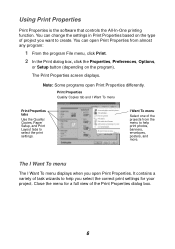
... help print photos, banners, envelopes, posters, and more. You can change the settings in Print Properties based on the type of the projects from almost any program: 1 From the program File menu, click Print. 2 In the Print dialog box, click the Properties, Preferences, Options, or Setup button (depending on the program). Print Properties Quality Copies tab and I Want To menu Select one of project you open Print Properties differently. Note: Some programs open Print Properties. I Want To menu Print...
... help print photos, banners, envelopes, posters, and more. You can change the settings in Print Properties based on the type of the projects from almost any program: 1 From the program File menu, click Print. 2 In the Print dialog box, click the Properties, Preferences, Options, or Setup button (depending on the program). Print Properties Quality Copies tab and I Want To menu Select one of project you open Print Properties differently. Note: Some programs open Print Properties. I Want To menu Print...
User's Guide
Page 11
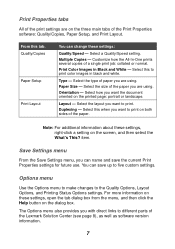
... size of a single print job: collated or normal. Duplexing - Save Settings menu From the Save Settings menu, you want to print on both sides of the paper. From this when you can name and save up to print color images in Black and White - Orientation - For more information on these settings, open the tab dialog box from the menu, and then click the Help button on the printed page: portrait or landscape. Select a Quality/Speed setting. Select the type...
... size of a single print job: collated or normal. Duplexing - Save Settings menu From the Save Settings menu, you want to print on both sides of the paper. From this when you can name and save up to print color images in Black and White - Orientation - For more information on these settings, open the tab dialog box from the menu, and then click the Help button on the printed page: portrait or landscape. Select a Quality/Speed setting. Select the type...
User's Guide
Page 12
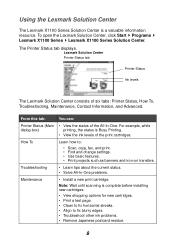
...To open the Lexmark Solution Center, click Start Programs Lexmark X1100 Series Lexmark X1100 Series Solution Center. Troubleshooting • Learn tips about the current status. • Solve All-In-One problems. Maintenance • Install a new print cartridge. Using the Lexmark Solution Center The Lexmark X1100 Series Solution Center is complete before installing new cartridges. • View shopping options for new cartridges. • Print a test page. • Clean to fix horizontal streaks. • Align to : • Scan, copy, fax, and print. • Find and change settings...
...To open the Lexmark Solution Center, click Start Programs Lexmark X1100 Series Lexmark X1100 Series Solution Center. Troubleshooting • Learn tips about the current status. • Solve All-In-One problems. Maintenance • Install a new print cartridge. Using the Lexmark Solution Center The Lexmark X1100 Series Solution Center is complete before installing new cartridges. • View shopping options for new cartridges. • Print a test page. • Clean to fix horizontal streaks. • Align to : • Scan, copy, fax, and print. • Find and change settings...
User's Guide
Page 15
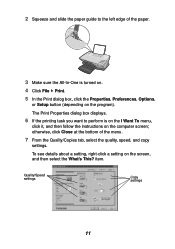
2 Squeeze and slide the paper guide to perform is turned on. 4 Click File Print. 5 In the Print dialog box, click the Properties, Preferences, Options, or Setup button (depending on the program). item. Quality/Speed settings Copy settings 11 To see details about a setting, right-click a setting on the computer screen; The Print Properties dialog box displays. 6 If the printing task you want to the left edge of the menu. 7 From the Quality...
2 Squeeze and slide the paper guide to perform is turned on. 4 Click File Print. 5 In the Print dialog box, click the Properties, Preferences, Options, or Setup button (depending on the program). item. Quality/Speed settings Copy settings 11 To see details about a setting, right-click a setting on the computer screen; The Print Properties dialog box displays. 6 If the printing task you want to the left edge of the menu. 7 From the Quality...
User's Guide
Page 21
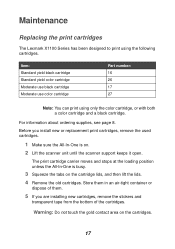
... and stops at the loading position unless the All-In-One is on. 2 Lift the scanner unit until the scanner support keeps it open. Store them in an air-tight container or dispose of them. 5 If you install new or replacement print cartridges, remove the used cartridges. 1 Make sure the All-In-One is busy. 3 Squeeze the tabs on the cartridges. 17 Item: Standard yield black cartridge Standard yield color cartridge Moderate use black cartridge Moderate use color cartridge Part number...
... and stops at the loading position unless the All-In-One is on. 2 Lift the scanner unit until the scanner support keeps it open. Store them in an air-tight container or dispose of them. 5 If you install new or replacement print cartridges, remove the used cartridges. 1 Make sure the All-In-One is busy. 3 Squeeze the tabs on the cartridges. 17 Item: Standard yield black cartridge Standard yield color cartridge Moderate use black cartridge Moderate use color cartridge Part number...
User's Guide
Page 23
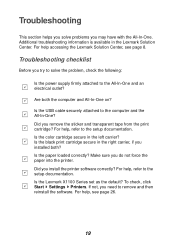
... the computer and the All-In-One? Is the black print cartridge secure in the right carrier, if you try to solve the problem, check the following: Is the power supply firmly attached to the setup documentation. Is the Lexmark X1100 Series set as the default? Additional troubleshooting information is available in the left carrier? For help , see page 8. Troubleshooting This section helps you solve problems you install the printer software correctly?
... the computer and the All-In-One? Is the black print cartridge secure in the right carrier, if you try to solve the problem, check the following: Is the power supply firmly attached to the setup documentation. Is the Lexmark X1100 Series set as the default? Additional troubleshooting information is available in the left carrier? For help , see page 8. Troubleshooting This section helps you solve problems you install the printer software correctly?
User's Guide
Page 25
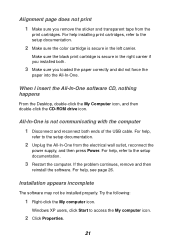
... be installed properly. For help , see page 26. Alignment page does not print 1 Make sure you loaded the paper correctly and did not force the paper into the All-In-One. For help , refer to the setup documentation. 2 Unplug the All-In-One from the print cartridges. For help , refer to the setup documentation. 3 Restart the computer. If the problem continues, remove and then reinstall the software. Windows XP users, click Start to the setup documentation. 2 Make sure the color cartridge...
... be installed properly. For help , see page 26. Alignment page does not print 1 Make sure you loaded the paper correctly and did not force the paper into the All-In-One. For help , refer to the setup documentation. 2 Unplug the All-In-One from the print cartridges. For help , refer to the setup documentation. 3 Restart the computer. If the problem continues, remove and then reinstall the software. Windows XP users, click Start to the setup documentation. 2 Make sure the color cartridge...
User's Guide
Page 26
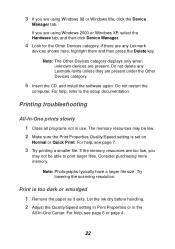
... install the software again. Note: Photographs typically have a larger file size. Let the ink dry before handling. 2 Adjust the Quality/Speed setting in Print Properties or in use. Do not delete any Lexmark devices shown here, highlight them and then press the Delete key. Printing troubleshooting All-In-One prints slowly 1 Close all programs not in the All-In-One Center. Print is set on Normal or Quick Print. If the memory resources are using Windows 98 or Windows Me...
... install the software again. Note: Photographs typically have a larger file size. Let the ink dry before handling. 2 Adjust the Quality/Speed setting in Print Properties or in use. Do not delete any Lexmark devices shown here, highlight them and then press the Delete key. Printing troubleshooting All-In-One prints slowly 1 Close all programs not in the All-In-One Center. Print is set on Normal or Quick Print. If the memory resources are using Windows 98 or Windows Me...
User's Guide
Page 27
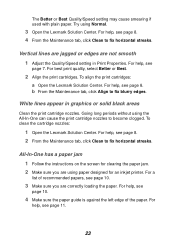
.... 2 Align the print cartridges. White lines appear in Print Properties. For help , see page 8. 2 From the Maintenance tab, click Clean to fix horizontal streaks. Vertical lines are jagged or edges are correctly loading the paper. Try using the All-In-One can cause the print cartridge nozzles to fix blurry edges. For help , see page 11. 23 Going long periods without using Normal. 3 Open the Lexmark Solution Center. For help , see page 10. 3 Make sure you are using paper designed...
.... 2 Align the print cartridges. White lines appear in Print Properties. For help , see page 8. 2 From the Maintenance tab, click Clean to fix horizontal streaks. Vertical lines are jagged or edges are correctly loading the paper. Try using the All-In-One can cause the print cartridge nozzles to fix blurry edges. For help , see page 11. 23 Going long periods without using Normal. 3 Open the Lexmark Solution Center. For help , see page 10. 3 Make sure you are using paper designed...
User's Guide
Page 33
... Main Page Copy section 4 Creative Tasks section 4 Preview section 4 Scan section 4 All-In-One status 8 B banner printing 6 banner paper 10 banners printing 6 black and white, printing in 7 Black Copy button 2 both sides, printing on, see duplexing C card stock 10 cartridges viewing ink levels of 8 Color Copy button 2 Contact Information tab 9 control panel 2 copies 7 copy settings 4 copying 14 copyright advisory ii D duplexing 7 E edition information ii electrical emission statement 27 emission statement 27 envelopes printing 6 F faxing 16 FCC statement 27 G glossy paper 10 H hardware setup...
... Main Page Copy section 4 Creative Tasks section 4 Preview section 4 Scan section 4 All-In-One status 8 B banner printing 6 banner paper 10 banners printing 6 black and white, printing in 7 Black Copy button 2 both sides, printing on, see duplexing C card stock 10 cartridges viewing ink levels of 8 Color Copy button 2 Contact Information tab 9 control panel 2 copies 7 copy settings 4 copying 14 copyright advisory ii D duplexing 7 E edition information ii electrical emission statement 27 emission statement 27 envelopes printing 6 F faxing 16 FCC statement 27 G glossy paper 10 H hardware setup...
User's Guide
Page 34
... paper exit tray 1 Paper Feed button 2 paper guide adjusting 11 Paper Setup tab 7 parts of your All-In-One 1 photo paper 10 photos printing 6 scanning 13 poor quality printing 22 posters printing 6 Power button 2 Preview Now button 13 Preview section Preview Now button 13 Print/Copy preview 4 Scan preview 4 print cartridges viewing ink levels of 8 Print Layout tab 7 Print Properties 6 I Want To menu 6 opening 6 Options menu 7 Paper Setup tab 7 Print Layout tab 7 Quality/Copies tab 7 Save Settings menu 7 tabs 7 printing 10 banners 6 envelopes 6 photos 6 posters 6 Printing Status window changing...
... paper exit tray 1 Paper Feed button 2 paper guide adjusting 11 Paper Setup tab 7 parts of your All-In-One 1 photo paper 10 photos printing 6 scanning 13 poor quality printing 22 posters printing 6 Power button 2 Preview Now button 13 Preview section Preview Now button 13 Print/Copy preview 4 Scan preview 4 print cartridges viewing ink levels of 8 Print Layout tab 7 Print Properties 6 I Want To menu 6 opening 6 Options menu 7 Paper Setup tab 7 Print Layout tab 7 Quality/Copies tab 7 Save Settings menu 7 tabs 7 printing 10 banners 6 envelopes 6 photos 6 posters 6 Printing Status window changing...


