
User's Guide
Page 9
... that are saved on the computer. Select from these topics: • Maintain or fix quality problems • Troubleshoot All-In-One problems • Device status and ink levels • More printing ideas and how to's • Contact information • Advanced (skin, voice, and communication options)...Lexmark Solution Center, see page 4. Note: For more information about this page, click the Help button located in the upper right corner of creative ideas. The View Saved Images page consists of the screen. Note: Click See More Copy Settings to . • Choose the quantity and color...
... that are saved on the computer. Select from these topics: • Maintain or fix quality problems • Troubleshoot All-In-One problems • Device status and ink levels • More printing ideas and how to's • Contact information • Advanced (skin, voice, and communication options)...Lexmark Solution Center, see page 4. Note: For more information about this page, click the Help button located in the upper right corner of creative ideas. The View Saved Images page consists of the screen. Note: Click See More Copy Settings to . • Choose the quantity and color...
User's Guide
Page 12
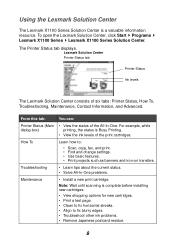
.... Maintenance • Install a new print cartridge. Using the Lexmark Solution Center The Lexmark X1100 Series Solution Center is Busy Printing. • View the ink levels of the print cartridges. Lexmark Solution Center Printer Status tab Printer Status Ink levels The Lexmark Solution Center consists of the All-In-One. Note: Wait until scanning is complete before installing new cartridges...
.... Maintenance • Install a new print cartridge. Using the Lexmark Solution Center The Lexmark X1100 Series Solution Center is Busy Printing. • View the ink levels of the print cartridges. Lexmark Solution Center Printer Status tab Printer Status Ink levels The Lexmark Solution Center consists of the All-In-One. Note: Wait until scanning is complete before installing new cartridges...
User's Guide
Page 14
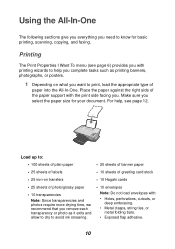
Using the All-In-One The following sections give you everything you need to avoid ink smearing. • 10 envelopes Note: Do not load envelopes with the print side facing you. Load up to: • 100 sheets of plain paper • ...: Since transparencies and photos require more drying time, we recommend that you want to print, load the appropriate type of paper into the All-In-One. For help, see page 6) provides you with printing wizards to help you select the paper size for basic printing, scanning, copying, and faxing. Make sure...
Using the All-In-One The following sections give you everything you need to avoid ink smearing. • 10 envelopes Note: Do not load envelopes with the print side facing you. Load up to: • 100 sheets of plain paper • ...: Since transparencies and photos require more drying time, we recommend that you want to print, load the appropriate type of paper into the All-In-One. For help, see page 6) provides you with printing wizards to help you select the paper size for basic printing, scanning, copying, and faxing. Make sure...
User's Guide
Page 26
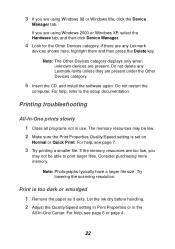
... slowly 1 Close all programs not in the All-In-One Center. The memory resources may not be low. 2 Make sure the Print Properties Quality/Speed setting is too dark or smudged 1 Remove the paper as ... press the Delete key. If there are any Lexmark items unless they are present under the Other Devices category. 5 Insert the CD, and install the software again. For help , refer to print larger files. Print is set on Normal or Quick Print. Let the ink dry before handling. 2 Adjust the Quality/Speed...
... slowly 1 Close all programs not in the All-In-One Center. The memory resources may not be low. 2 Make sure the Print Properties Quality/Speed setting is too dark or smudged 1 Remove the paper as ... press the Delete key. If there are any Lexmark items unless they are present under the Other Devices category. 5 Insert the CD, and install the software again. For help , refer to print larger files. Print is set on Normal or Quick Print. Let the ink dry before handling. 2 Adjust the Quality/Speed...
User's Guide
Page 33
... paper 6 see more printing ideas 6 I Want To menu 6 ink cartridges viewing ink levels of 8 ink levels viewing 8 inkjet paper 10 iron-on transfers 10 printing 6 L labels 10 Lexmark All-In-One Center 3 opening 3 using 3 Lexmark Solution Center 8 Advanced tab 9 Contact Information tab 9 How To tab 8 Maintenance tab 8 opening 8 Printer Status tab 8 Troubleshooting tab 8 loading paper 10 M Maintain...
... paper 6 see more printing ideas 6 I Want To menu 6 ink cartridges viewing ink levels of 8 ink levels viewing 8 inkjet paper 10 iron-on transfers 10 printing 6 L labels 10 Lexmark All-In-One Center 3 opening 3 using 3 Lexmark Solution Center 8 Advanced tab 9 Contact Information tab 9 How To tab 8 Maintenance tab 8 opening 8 Printer Status tab 8 Troubleshooting tab 8 loading paper 10 M Maintain...
User's Guide
Page 34
...types of 10 loading 10 paper exit tray 1 Paper Feed button 2 paper guide adjusting 11 Paper Setup tab 7 parts of your All-In-One 1 photo paper 10 photos printing 6 scanning 13 poor quality printing 22 posters printing 6 Power button 2 Preview Now button 13 Preview section ...Preview Now button 13 Print/Copy preview 4 Scan preview 4 print cartridges viewing ink levels of 8 Print Layout tab 7 Print Properties 6 I Want To menu 6 opening 6 Options menu 7 Paper Setup tab 7 Print Layout tab 7 Quality/Copies ...
...types of 10 loading 10 paper exit tray 1 Paper Feed button 2 paper guide adjusting 11 Paper Setup tab 7 parts of your All-In-One 1 photo paper 10 photos printing 6 scanning 13 poor quality printing 22 posters printing 6 Power button 2 Preview Now button 13 Preview section ...Preview Now button 13 Print/Copy preview 4 Scan preview 4 print cartridges viewing ink levels of 8 Print Layout tab 7 Print Properties 6 I Want To menu 6 opening 6 Options menu 7 Paper Setup tab 7 Print Layout tab 7 Quality/Copies ...


