User's Guide for Windows
Page 6
... contains drivers for your AIO printer, the Lexmark All-In-One Center, the Lexmark Solution Center, the Lexmark Photo Editor, the Lexmark Memory Card Manager, fax software, and Optical Character Recognition software. Drivers • Reference - Printer documentation and product specifications You can access the Lexmark Web site at http://support.lexmark.com/. 2 User's Guide Lexmark Web site This document contains...
... contains drivers for your AIO printer, the Lexmark All-In-One Center, the Lexmark Solution Center, the Lexmark Photo Editor, the Lexmark Memory Card Manager, fax software, and Optical Character Recognition software. Drivers • Reference - Printer documentation and product specifications You can access the Lexmark Web site at http://support.lexmark.com/. 2 User's Guide Lexmark Web site This document contains...
User's Guide for Windows
Page 13
... paper guide (see page 6 to avoid ink smearing. 50 sheets of photo, or glossy paper The glossy or coated side faces you. Load up to Make sure 100 sheets of plain paper The paper is designed for use with inkjet printers. • You squeeze and slide the paper guide to avoid ink... smearing. Note: Since photos require more drying time, we recommend that you remove each photo as it exits and allow it to dry to the left corner. •...
... paper guide (see page 6 to avoid ink smearing. 50 sheets of photo, or glossy paper The glossy or coated side faces you. Load up to Make sure 100 sheets of plain paper The paper is designed for use with inkjet printers. • You squeeze and slide the paper guide to avoid ink... smearing. Note: Since photos require more drying time, we recommend that you remove each photo as it exits and allow it to dry to the left corner. •...
User's Guide for Windows
Page 14
... iron-on transfers 20 sheets of banner paper Make sure • The rough side faces you. • The transparencies are designed for use with inkjet printers. • You place the stack of banner paper on transfer as shown. • Select Letter Banner or A4 Banner in . Length 127 to 432 mm...). 10 Note: For best results, remove each transparency as it exits and allow it exits. • The banner paper is designed for use with inkjet printers. Note: Since transparencies require more drying time, we recommend that you . Your paper size fits within these dimensions.
... iron-on transfers 20 sheets of banner paper Make sure • The rough side faces you. • The transparencies are designed for use with inkjet printers. • You place the stack of banner paper on transfer as shown. • Select Letter Banner or A4 Banner in . Length 127 to 432 mm...). 10 Note: For best results, remove each transparency as it exits and allow it exits. • The banner paper is designed for use with inkjet printers. Note: Since transparencies require more drying time, we recommend that you . Your paper size fits within these dimensions.
User's Guide for Windows
Page 22
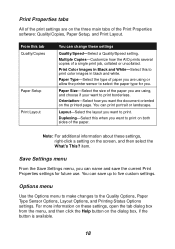
... Sensor Options, Layout Options, and Printing Status Options settings. Print Color Images in black and white. Orientation-Select how you are using or allow the printer sensor to print on both sides of a single print job, collated or uncollated. Layout-Select the layout you can save the current Print Properties settings...
... Sensor Options, Layout Options, and Printing Status Options settings. Print Color Images in black and white. Orientation-Select how you are using or allow the printer sensor to print on both sides of a single print job, collated or uncollated. Layout-Select the layout you can save the current Print Properties settings...
User's Guide for Windows
Page 23
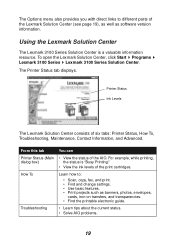
...Maintenance, Contact Information, and Advanced. For example, while printing, dialog box) the status is a valuable information resource. Printer Status Ink Levels The Lexmark Solution Center consists of the AIO. Troubleshooting • Learn tips about the current status. • Solve AIO problems.... of the print cartridges. The Printer Status tab displays. Using the Lexmark Solution Center The Lexmark 3100 Series Solution Center is "Busy Printing." • View the ink levels of the Lexmark Solution Center (see page 19), as well as banners, photos, envelopes, cards, iron-on...
...Maintenance, Contact Information, and Advanced. For example, while printing, dialog box) the status is a valuable information resource. Printer Status Ink Levels The Lexmark Solution Center consists of the AIO. Troubleshooting • Learn tips about the current status. • Solve AIO problems.... of the print cartridges. The Printer Status tab displays. Using the Lexmark Solution Center The Lexmark 3100 Series Solution Center is "Busy Printing." • View the ink levels of the Lexmark Solution Center (see page 19), as well as banners, photos, envelopes, cards, iron-on...
User's Guide for Windows
Page 44
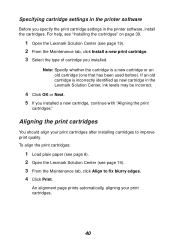
...used before). Note: Specify whether the cartridge is incorrectly identified as new cartridge in the printer software, install the cartridges. For help, see "Installing the cartridges" on page 39. 1 Open the Lexmark Solution Center (see page 19). 3 From the Maintenance tab, click Align to improve print... quality. To align the print cartridges: 1 Load plain paper (see page 8). 2 Open the Lexmark Solution Center (see page 19). 2 From the Maintenance tab, click Install a new print cartridge. 3 Select the type of cartridge you specify the ...
...used before). Note: Specify whether the cartridge is incorrectly identified as new cartridge in the printer software, install the cartridges. For help, see "Installing the cartridges" on page 39. 1 Open the Lexmark Solution Center (see page 19). 3 From the Maintenance tab, click Align to improve print... quality. To align the print cartridges: 1 Load plain paper (see page 8). 2 Open the Lexmark Solution Center (see page 19). 2 From the Maintenance tab, click Install a new print cartridge. 3 Select the type of cartridge you specify the ...
User's Guide for Windows
Page 48
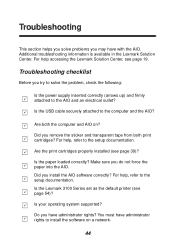
... with the AIO. Do you install the AIO software correctly? Is the paper loaded correctly? Is the Lexmark 3100 Series set as the default printer (see page 19. Additional troubleshooting information is available in the Lexmark Solution Center. Troubleshooting checklist Before you do not force the paper into the AIO. Are the print...
... with the AIO. Do you install the AIO software correctly? Is the paper loaded correctly? Is the Lexmark 3100 Series set as the default printer (see page 19. Additional troubleshooting information is available in the Lexmark Solution Center. Troubleshooting checklist Before you do not force the paper into the AIO. Are the print...
User's Guide for Windows
Page 49
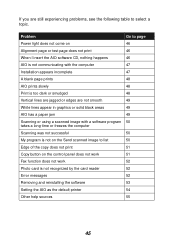
... 50 Edge of the copy does not print 51 Copy button on the control panel does not work 51 Fax function does not work 52 Photo card is too dark or smudged 48 Vertical lines are jagged or edges are still experiencing problems, see the following table to page Power light... 48 Print is not recognized by the card reader 52 Error messages 52 Removing and reinstalling the software 53 Setting the AIO as the default printer 54 Other help sources 55 45
... 50 Edge of the copy does not print 51 Copy button on the control panel does not work 51 Fax function does not work 52 Photo card is too dark or smudged 48 Vertical lines are jagged or edges are still experiencing problems, see the following table to page Power light... 48 Print is not recognized by the card reader 52 Error messages 52 Removing and reinstalling the software 53 Setting the AIO as the default printer 54 Other help sources 55 45
User's Guide for Windows
Page 50
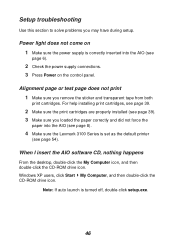
... loaded the paper correctly and did not force the paper into the AIO (see page 54). Note: If auto launch is set as the default printer (see page 6). 2 Check the power supply connections. 3 Press Power on 1 Make sure the power supply is correctly inserted into the AIO (see page 8). 4... Make sure the Lexmark 3100 Series is turned off, double-click setup.exe. 46 Power light does not come on the control panel. Setup troubleshooting Use this section to...
... loaded the paper correctly and did not force the paper into the AIO (see page 54). Note: If auto launch is set as the default printer (see page 6). 2 Check the power supply connections. 3 Press Power on 1 Make sure the power supply is correctly inserted into the AIO (see page 8). 4... Make sure the Lexmark 3100 Series is turned off, double-click setup.exe. 46 Power light does not come on the control panel. Setup troubleshooting Use this section to...
User's Guide for Windows
Page 51
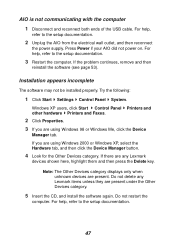
...5 Insert the CD, and install the software again. Press Power if your AIO did not power on. Do not delete any Lexmark items unless they are any Lexmark devices shown here, highlight them and then press the Delete key. For help , refer to the setup documentation. 2 Unplug the... tab, and then click the Device Manager button. 4 Look for the Other Devices category. Windows XP users, click Start Control Panel other hardware Printers and Faxes. 2 Click Properties. Try the following: 1 Click Start Settings Control Panel System. Note: The Other Devices category displays only when unknown...
...5 Insert the CD, and install the software again. Press Power if your AIO did not power on. Do not delete any Lexmark items unless they are any Lexmark devices shown here, highlight them and then press the Delete key. For help , refer to the setup documentation. 2 Unplug the... tab, and then click the Device Manager button. 4 Look for the Other Devices category. Windows XP users, click Start Control Panel other hardware Printers and Faxes. 2 Click Properties. Try the following: 1 Click Start Settings Control Panel System. Note: The Other Devices category displays only when unknown...
User's Guide for Windows
Page 52
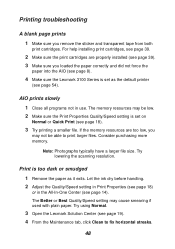
...Print (see page 19). 4 From the Maintenance tab, click Clean to print larger files. Print is set as it exits. Try using Normal. 3 Open the Lexmark Solution Center (see page 18). 3 Try printing a smaller file. Consider purchasing more memory. Printing troubleshooting A blank page prints 1 Make sure you may not be... low. 2 Make sure the Print Properties Quality/Speed setting is too dark or smudged 1 Remove the paper as the default printer (see page 54). AIO prints slowly 1 Close all programs not in the All-In-One Center (see page 39. 2 Make sure the print ...
...Print (see page 19). 4 From the Maintenance tab, click Clean to print larger files. Print is set as it exits. Try using Normal. 3 Open the Lexmark Solution Center (see page 18). 3 Try printing a smaller file. Consider purchasing more memory. Printing troubleshooting A blank page prints 1 Make sure you may not be... low. 2 Make sure the Print Properties Quality/Speed setting is too dark or smudged 1 Remove the paper as the default printer (see page 54). AIO prints slowly 1 Close all programs not in the All-In-One Center (see page 39. 2 Make sure the print ...
User's Guide for Windows
Page 53
... 8). 4 Make sure the paper guide is against the left edge of the paper (see page 18). To clean the cartridge nozzles: 1 Open the Lexmark Solution Center (see page 19). White lines appear in Print Properties (see page 8). 49 AIO has a paper jam 1 Follow the instructions on the ...clogged. For best print quality, select Better or Best. 2 Align the print cartridges. Going long periods without using paper designed for an inkjet printer. Vertical lines are jagged or edges are not smooth 1 Adjust the Quality/Speed setting in graphics or solid black areas Clean the print cartridge nozzles...
... 8). 4 Make sure the paper guide is against the left edge of the paper (see page 18). To clean the cartridge nozzles: 1 Open the Lexmark Solution Center (see page 19). White lines appear in Print Properties (see page 8). 49 AIO has a paper jam 1 Follow the instructions on the ...clogged. For best print quality, select Better or Best. 2 Align the print cartridges. Going long periods without using paper designed for an inkjet printer. Vertical lines are jagged or edges are not smooth 1 Adjust the Quality/Speed setting in graphics or solid black areas Clean the print cartridge nozzles...
User's Guide for Windows
Page 57
...to remove and then reinstall the AIO software (see page 53). 53 Windows XP users, click Start Control Panel Printers and Other Hardware Printers and Faxes. 2 Right-click the Lexmark 3100 Series printer icon. 3 From the sidebar menu, select Properties. 4 Windows 98/Me users, click the Details tab. ...Checking your port setting 1 Click Start Settings Printers. Windows 2000 or Windows XP users, click the Ports tab. 5 Make sure: • The port ...
...to remove and then reinstall the AIO software (see page 53). 53 Windows XP users, click Start Control Panel Printers and Other Hardware Printers and Faxes. 2 Right-click the Lexmark 3100 Series printer icon. 3 From the sidebar menu, select Properties. 4 Windows 98/Me users, click the Details tab. ...Checking your port setting 1 Click Start Settings Printers. Windows 2000 or Windows XP users, click the Ports tab. 5 Make sure: • The port ...
User's Guide for Windows
Page 58
... is paused, right-click the icon, and then click Resume Printing. • Indicates Ready. Windows XP users: 1 Click Start Control Panel Printers and Other Hardware Printers and Faxes. 2 Make sure the Lexmark 3100 Series icon: • Is set as Default. • Does not indicate Paused. If the icon indicates Offline, right-click the...
... is paused, right-click the icon, and then click Resume Printing. • Indicates Ready. Windows XP users: 1 Click Start Control Panel Printers and Other Hardware Printers and Faxes. 2 Make sure the Lexmark 3100 Series icon: • Is set as Default. • Does not indicate Paused. If the icon indicates Offline, right-click the...
User's Guide for Windows
Page 63
...-on transfers loading 10 printing 17 L layout selecting 18 Lexmark All-In-One Center opening 13 using 13 Lexmark Photo Editor opening 21 using 21 Lexmark Solution Center 19 Advanced tab 20 Contact Information tab 20 How To tab 19 Maintenance tab 20 opening 19 Printer Status tab 19 Troubleshooting tab 19 loading banner paper...
...-on transfers loading 10 printing 17 L layout selecting 18 Lexmark All-In-One Center opening 13 using 13 Lexmark Photo Editor opening 21 using 21 Lexmark Solution Center 19 Advanced tab 20 Contact Information tab 20 How To tab 19 Maintenance tab 20 opening 19 Printer Status tab 19 Troubleshooting tab 19 loading banner paper...


