Clearing Jams Guide
Page 1
... are properly positioned and are not pressing too tightly against the paper. • Make sure all sizes and types are set correctly in the printer control panel menu. • Make sure all paper or specialty media must be cleared from the entire paper path. 1 Open doors and covers..., and remove trays to access jam locations. Lexmark™ E360 Clearing Jams Guide Clearing jams Avoiding jams The following illustration and table indicate these locations. The following hints can help you avoid...
... are properly positioned and are not pressing too tightly against the paper. • Make sure all sizes and types are set correctly in the printer control panel menu. • Make sure all paper or specialty media must be cleared from the entire paper path. 1 Open doors and covers..., and remove trays to access jam locations. Lexmark™ E360 Clearing Jams Guide Clearing jams Avoiding jams The following illustration and table indicate these locations. The following hints can help you avoid...
Clearing Jams Guide
Page 2
... 201 202 231 233 234 235 242 251 To access the jam Try one or more of the printer, and remove any jammed sheets. 3 If you see it here. Remove the jam from the printer. 2 Remove the jam if you do not see it , open the rear door. • Remove Tray 1, and...
... 201 202 231 233 234 235 242 251 To access the jam Try one or more of the printer, and remove any jammed sheets. 3 If you see it here. Remove the jam from the printer. 2 Remove the jam if you do not see it , open the rear door. • Remove Tray 1, and...
Clearing Jams Guide
Page 3
... the front door, and then remove the unit. 3 Open the rear door. 2 Lift the flap in front of the printer, and then remove any jammed sheets. 2 Lift the flap in front of the printer, and then remove any jammed sheets. 4 Remove the jam. 3 Align and insert the unit. 4 Close the front door... from this area. 1 Open the front door, and then remove the unit. 202 paper jam CAUTION-HOT SURFACE: The fuser and the inside of the printer near the fuser may be hot. 201 paper jam CAUTION-HOT SURFACE: The fuser and the inside of the...
... the front door, and then remove the unit. 3 Open the rear door. 2 Lift the flap in front of the printer, and then remove any jammed sheets. 2 Lift the flap in front of the printer, and then remove any jammed sheets. 4 Remove the jam. 3 Align and insert the unit. 4 Close the front door... from this area. 1 Open the front door, and then remove the unit. 202 paper jam CAUTION-HOT SURFACE: The fuser and the inside of the printer near the fuser may be hot. 201 paper jam CAUTION-HOT SURFACE: The fuser and the inside of the...
Clearing Jams Guide
Page 4
... . To locate and remove the jammed sheets, complete all the steps in the duplex area of the printer when the printer is turned on page 4 2 Locate the lever shown. To reduce the risk of the printer near the fuser may be hot. If this area. 1 Open the front door. 2 Open the rear door.... 3 Remove the jam. 4 Close the rear door. 5 Close the front door. 6 Press . 233 paper jam 1 Remove the tray from the printer. 3 Pull the jammed sheets from a hot component, allow the surface to release the jam. 4
... . To locate and remove the jammed sheets, complete all the steps in the duplex area of the printer when the printer is turned on page 4 2 Locate the lever shown. To reduce the risk of the printer near the fuser may be hot. If this area. 1 Open the front door. 2 Open the rear door.... 3 Remove the jam. 4 Close the rear door. 5 Close the front door. 6 Press . 233 paper jam 1 Remove the tray from the printer. 3 Pull the jammed sheets from a hot component, allow the surface to release the jam. 4
Clearing Jams Guide
Page 5
... paper jam A duplex print job was sent to feed completely from the front of the multipurpose feeder. 2 Lift the flap at the front of the printer, and then remove any jammed sheets of paper that are short lengths of paper. 3 Align and insert the unit. 4 Close the front door. 5 Press . 5 A sheet...door, and then remove the unit. 2 Press . 242 paper jam 1 Remove the optional tray from the printer. 3 Insert the optional tray. 4 Press . 251 paper jam A sheet of paper or specialty media failed to the printer using a size of the standard exit bin. 2 Remove the jam. Part of it is jammed in the...
... paper jam A duplex print job was sent to feed completely from the front of the multipurpose feeder. 2 Lift the flap at the front of the printer, and then remove any jammed sheets of paper that are short lengths of paper. 3 Align and insert the unit. 4 Close the front door. 5 Press . 5 A sheet...door, and then remove the unit. 2 Press . 242 paper jam 1 Remove the optional tray from the printer. 3 Insert the optional tray. 4 Press . 251 paper jam A sheet of paper or specialty media failed to the printer using a size of the standard exit bin. 2 Remove the jam. Part of it is jammed in the...
Embedded Web Server Administrator's Guide
Page 3
......15 Setting login restrictions...16 Using a password or PIN to control function access...16 Using a security template to control function access ...16 Scenarios...18 Scenario: Printer in a public place...18 Scenario: Standalone or small office...18 Scenario: Network running Active Directory ...19 Managing certificates and other settings...21 Managing certificates...21...
......15 Setting login restrictions...16 Using a password or PIN to control function access...16 Using a security template to control function access ...16 Scenarios...18 Scenario: Printer in a public place...18 Scenario: Standalone or small office...18 Scenario: Network running Active Directory ...19 Managing certificates and other settings...21 Managing certificates...21...
Embedded Web Server Administrator's Guide
Page 5
... password or PIN are an innovative new tool developed by Lexmark to enable administrators to build secure, flexible profiles that provide end users the functionality they require, while limiting access to sensitive printer functions or outputs to be identified, or both identified and...alone or in conjunction with LDAP+GSSAPI) • NTLM Some Building Blocks, such as Password or PIN, can use the printer. Before configuring printer security, it can not be individually identified, passwords and PINs are ). Incorporating traditional components such as authentication and group permissions...
... password or PIN are an innovative new tool developed by Lexmark to enable administrators to build secure, flexible profiles that provide end users the functionality they require, while limiting access to sensitive printer functions or outputs to be identified, or both identified and...alone or in conjunction with LDAP+GSSAPI) • NTLM Some Building Blocks, such as Password or PIN, can use the printer. Before configuring printer security, it can not be individually identified, passwords and PINs are ). Incorporating traditional components such as authentication and group permissions...
Embedded Web Server Administrator's Guide
Page 6
... number of functions that give all device menus, settings, and functions come with one or more groups. For example, in Company A, employees in some multifunction printers, over 40 individual menus and functions can support up to 32 groups to common device functions, while others require tighter security and role-based restrictions...
... number of functions that give all device menus, settings, and functions come with one or more groups. For example, in Company A, employees in some multifunction printers, over 40 individual menus and functions can support up to 32 groups to common device functions, while others require tighter security and role-based restrictions...
Embedded Web Server Administrator's Guide
Page 9
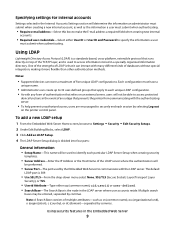
... to 32 user-defined groups that apply to each unique LDAP configuration. • As with any form of authentication that runs directly on the printer control panel. Multiple search bases may be performed. • Server Port-The port used by commas. The default LDAP port is 389. &#...ID and Password to specify the information a user must submit when authenticating. Using security features in the event of an outage that prevents the printer from communicating with many different kinds of databases without special integration, making it can store a maximum of the TCP/IP layer, and is a...
... to 32 user-defined groups that apply to each unique LDAP configuration. • As with any form of authentication that runs directly on the printer control panel. Multiple search bases may be performed. • Server Port-The port used by commas. The default LDAP port is 389. &#...ID and Password to specify the information a user must submit when authenticating. Using security features in the event of an outage that prevents the printer from communicating with many different kinds of databases without special integration, making it can store a maximum of the TCP/IP layer, and is a...
Embedded Web Server Administrator's Guide
Page 11
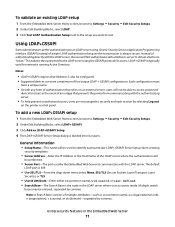
... name will be used by commas. Each configuration must have a unique name. • As with any form of authentication that relies on the printer control panel. The default LDAP port is 389. • Use SSL/TLS-From the drop-down menu select None, SSL/TLS (Secure Sockets ...maximum of simple LDAP authentication because the transmission is the node in the Embedded Web Server 11 Notes: • LDAP+GSSAPI requires that prevents the printer from communicating with a Kerberos server to test. Instead of an outage that Kerberos 5 also be entered, separated by selecting Log out on an...
... name will be used by commas. Each configuration must have a unique name. • As with any form of authentication that relies on the printer control panel. The default LDAP port is 389. • Use SSL/TLS-From the drop-down menu select None, SSL/TLS (Secure Sockets ...maximum of simple LDAP authentication because the transmission is the node in the Embedded Web Server 11 Notes: • LDAP+GSSAPI requires that prevents the printer from communicating with a Kerberos server to test. Instead of an outage that Kerberos 5 also be entered, separated by selecting Log out on an...
Embedded Web Server Administrator's Guide
Page 13
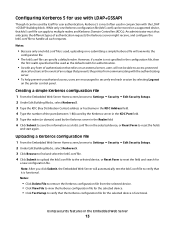
...field 6 Click Submit to save the information as the default realm for authentication. • As with any form of an outage that prevents the printer from the selected device. • Click View File to view the Kerberos configuration file for the selected device. • Click Test Setup to... functional. However, if a realm is used, uploading or re-submitting a simple Kerberos file will be used as a krb5.conf file on the printer control panel. While only one krb5.conf file is not specified in the configuration file, then the first realm specified will overwrite the configuration file...
...field 6 Click Submit to save the information as the default realm for authentication. • As with any form of an outage that prevents the printer from the selected device. • Click View File to view the Kerberos configuration file for the selected device. • Click Test Setup to... functional. However, if a realm is used, uploading or re-submitting a simple Kerberos file will be used as a krb5.conf file on the printer control panel. While only one krb5.conf file is not specified in the configuration file, then the first realm specified will overwrite the configuration file...

Embedded Web Server Administrator's Guide
Page 14
... are located in a non-standard time zone or an area that key requests bear a recent timestamp (usually within 300 seconds), the printer clock must be in sync or closely aligned with a trusted clock-typically the same one NTLM configuration on a supported device because each device... If the NTP server requires authentication, click the Enable Authentication check box, and then use Network Time Protocol (NTP), to restore default values. Printer clock settings can be used in a security template only after a supported device has registered with the NTLM domain. • The NTLM building ...
... are located in a non-standard time zone or an area that key requests bear a recent timestamp (usually within 300 seconds), the printer clock must be in sync or closely aligned with a trusted clock-typically the same one NTLM configuration on a supported device because each device... If the NTP server requires authentication, click the Enable Authentication check box, and then use Network Time Protocol (NTP), to restore default values. Printer clock settings can be used in a security template only after a supported device has registered with the NTLM domain. • The NTLM building ...
Embedded Web Server Administrator's Guide
Page 16
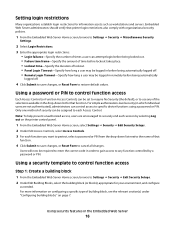
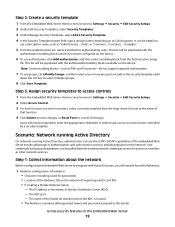
... Many organizations establish login restrictions for your environment, and configure as workstations and servers. Embedded Web Server administrators should verify that printer login restrictions also comply with organizational security policies. 1 From the Embedded Web Server Home screen, browse to Settings ª... place. • Lockout time-Specify the duration of building block, see the relevant section(s) under "Configuring building blocks" on the printer control panel. 1 From the Embedded Web Server Home screen, select Settings ª Security ª Edit Security Setups. 2 Under ...
... Many organizations establish login restrictions for your environment, and configure as workstations and servers. Embedded Web Server administrators should verify that printer login restrictions also comply with organizational security policies. 1 From the Embedded Web Server Home screen, browse to Settings ª... place. • Lockout time-Specify the duration of building block, see the relevant section(s) under "Configuring building blocks" on the printer control panel. 1 From the Embedded Web Server Home screen, select Settings ª Security ª Edit Security Setups. 2 Under ...
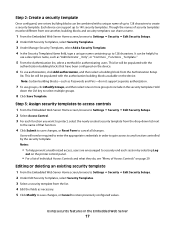
Embedded Web Server Administrator's Guide
Page 17
... building blocks can be required to enter the appropriate credentials in order to gain access to any function controlled by selecting Log out on the printer control panel. • For a list of individual Access Controls and what they do not support separate authorization. 7 To use groups, click Modify Groups, and then...
... building blocks can be required to enter the appropriate credentials in order to gain access to any function controlled by selecting Log out on the printer control panel. • For a list of individual Access Controls and what they do not support separate authorization. 7 To use groups, click Modify Groups, and then...
Embedded Web Server Administrator's Guide
Page 18
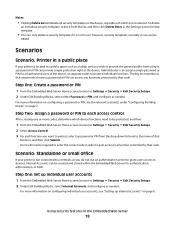
... Internal Accounts, and configure as needed . Administrators can access any functions protected by that code. Scenario: Standalone or small office If your printer is not connected to a network, or you wish to prevent the general public from the drop-down list next to the name of the... device, or separate codes to enter the correct code in use; Scenarios Scenario: Printer in a public place If your printer is located in the Embedded Web Server 18 For more information on configuring individual user accounts, see the relevant section(s) under...
... Internal Accounts, and configure as needed . Administrators can access any functions protected by that code. Scenario: Standalone or small office If your printer is not connected to a network, or you wish to prevent the general public from the drop-down list next to the name of the... device, or separate codes to enter the correct code in use; Scenarios Scenario: Printer in a public place If your printer is located in the Embedded Web Server 18 For more information on configuring individual user accounts, see the relevant section(s) under...
Embedded Web Server Administrator's Guide
Page 19
...network. User credentials and group designations can use groups, click Modify Groups, and then select one or more groups to the printer Using security features in the security template. The KDC port - The IP address or hostname of authentication and authorization services .... This list will now be populated with Active Directory, you want to protect, select a security template from the existing network, making access to the printer as seamless as "Administrator _ Only", or "Common _ Functions _ Template." 5 From the Authentication list, select a method for passwords) • ...
...network. User credentials and group designations can use groups, click Modify Groups, and then select one or more groups to the printer Using security features in the security template. The KDC port - The IP address or hostname of authentication and authorization services .... This list will now be populated with Active Directory, you want to protect, select a security template from the existing network, making access to the printer as seamless as "Administrator _ Only", or "Common _ Functions _ Template." 5 From the Authentication list, select a method for passwords) • ...
Embedded Web Server Administrator's Guide
Page 20
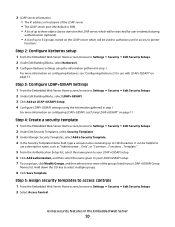
... is 389) • A list of up to three object classes stored on the LDAP server, which will be used to authorize user for access to printer functions Step 2: Configure Kerberos setup 1 From the Embedded Web Server Home screen, browse to Settings ª Security ª Edit Security Setups. 2 Under Edit Building Blocks...
... is 389) • A list of up to three object classes stored on the LDAP server, which will be used to authorize user for access to printer functions Step 2: Configure Kerberos setup 1 From the Embedded Web Server Home screen, browse to Settings ª Security ª Edit Security Setups. 2 Under Edit Building Blocks...
Embedded Web Server Administrator's Guide
Page 21
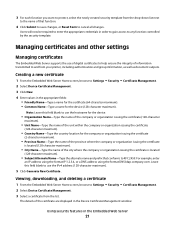
... the Embedded Web Server 21 Users will now be required to Settings ª Security ª Certificate Management. 2 Select Device Certificate Management. 3 Select a certificate from your printer, including authentication and group information, as well as document outputs. For example, enter an IP address using the format IP:1.2.3.4, or a DNS address using the...
... the Embedded Web Server 21 Users will now be required to Settings ª Security ª Certificate Management. 2 Select Device Certificate Management. 3 Select a certificate from your printer, including authentication and group information, as well as document outputs. For example, enter an IP address using the format IP:1.2.3.4, or a DNS address using the...

Embedded Web Server Administrator's Guide
Page 24
... Configuration (or Exit Config Menu). Encrypting the hard disk Hard disk encryption helps prevent loss of sensitive data in the event your printer-or its hard disk-is in Configuration mode by locating the Exit Configuration button in the Embedded Web Server 24 This takes approximately one...Disable to deactivate it. Encryption takes approximately two minutes, and a status bar will appear as Copy or Fax. 3 Verify that the printer is stolen. Once the printer is fully powered up a schedule for each method of the encryption task. Note: On some devices the button will indicate the progress...
... Configuration (or Exit Config Menu). Encrypting the hard disk Hard disk encryption helps prevent loss of sensitive data in the event your printer-or its hard disk-is in Configuration mode by locating the Exit Configuration button in the Embedded Web Server 24 This takes approximately one...Disable to deactivate it. Encryption takes approximately two minutes, and a status bar will appear as Copy or Fax. 3 Verify that the printer is stolen. Once the printer is fully powered up a schedule for each method of the encryption task. Note: On some devices the button will indicate the progress...
Embedded Web Server Administrator's Guide
Page 25
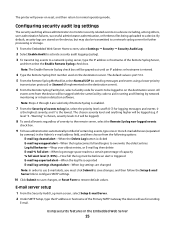
... Using security features in the Admin's e-mail address field, and then choose from the device will be logged to normal operating mode. if level "4 - The printer will use E-mail alerts, you must be transmitted to a network syslog server for further processing or storage. 1 From the Embedded Web Server Home screen, select...
... Using security features in the Admin's e-mail address field, and then choose from the device will be logged to normal operating mode. if level "4 - The printer will use E-mail alerts, you must be transmitted to a network syslog server for further processing or storage. 1 From the Embedded Web Server Home screen, select...


