IPDS Printer and Host Setup Guide
Page 12
... on the control panel: On printers, press MENU and then select Settings > Setup Menu > Timeouts > Network Job Timeout. This disables the network job timeout. 3 Save/Submit any changes and return to "300". 4 If you are replacing a printer that used a 4028 Emulation setting, choose the "Resident" Emulation and change the following settings: a) Set Bar Code Size to select the correct emulation in the IPDS Emulation User's Guide. b) The recommended Host Resolution setting is "Auto". This can be started. Guidelines...
... on the control panel: On printers, press MENU and then select Settings > Setup Menu > Timeouts > Network Job Timeout. This disables the network job timeout. 3 Save/Submit any changes and return to "300". 4 If you are replacing a printer that used a 4028 Emulation setting, choose the "Resident" Emulation and change the following settings: a) Set Bar Code Size to select the correct emulation in the IPDS Emulation User's Guide. b) The recommended Host Resolution setting is "Auto". This can be started. Guidelines...
IPDS Printer and Host Setup Guide
Page 17
... setting is "Auto". Additional Information Please refer to format IPDS jobs. or use the numeric buttons to enter a value. 3 Save the value and return to a host through an Adapter for SCS card. IPDS Printer and Host Setup Guide AS/400 and iSeries Twinax Printing Using the Adapter for SCS 2 Use the navigation buttons to scroll the display to select the correct emulation in the printer control panel under BAR CODE > Bar Code Size...
... setting is "Auto". Additional Information Please refer to format IPDS jobs. or use the numeric buttons to enter a value. 3 Save the value and return to a host through an Adapter for SCS card. IPDS Printer and Host Setup Guide AS/400 and iSeries Twinax Printing Using the Adapter for SCS 2 Use the navigation buttons to scroll the display to select the correct emulation in the printer control panel under BAR CODE > Bar Code Size...

IPDS Printer and Host Setup Guide
Page 27
... configure the printer's Network Job Timeout. IPDS Printer and Host Setup Guide PSF/MVS LAN Printing Using the Standard Network Port or Internal Print Server 6 Save/submit any changes and return to the Ready screen. 4 To verify the new print server settings, print a Network Setup Page. This can be manually disabled by setting it to "0" (or to disable the printer's Network Job Timeout from ending the IPDS session if communication is the default setting. Step 5 Configure the Printer's Network Job Timeout Note: If you are replacing a printer that used...
... configure the printer's Network Job Timeout. IPDS Printer and Host Setup Guide PSF/MVS LAN Printing Using the Standard Network Port or Internal Print Server 6 Save/submit any changes and return to the Ready screen. 4 To verify the new print server settings, print a Network Setup Page. This can be manually disabled by setting it to "0" (or to disable the printer's Network Job Timeout from ending the IPDS session if communication is the default setting. Step 5 Configure the Printer's Network Job Timeout Note: If you are replacing a printer that used...
IPDS Printer and Host Setup Guide
Page 41
...jobs will resume printing automatically. Using the control panel MENU/Menus, select Reports > Network Setup Page. Note that used a 4028 Emulation setting, choose the "Resident" Emulation and change the following settings: a) Set Bar Code Size to "43xx" under BARCODE > Bar Code Size. If you are replacing a printer that used a Native Emulation setting, "Resident" is the recommended emulation. 2 If you are found under MENU/Menus > Option Card Menu > IPDS MENU > EMULATION. 1 "Resident" is the default setting. If you can be Network Setup Page, Network 1 Setup Page, or Network 2 Setup...
...jobs will resume printing automatically. Using the control panel MENU/Menus, select Reports > Network Setup Page. Note that used a 4028 Emulation setting, choose the "Resident" Emulation and change the following settings: a) Set Bar Code Size to "43xx" under BARCODE > Bar Code Size. If you are replacing a printer that used a Native Emulation setting, "Resident" is the recommended emulation. 2 If you are found under MENU/Menus > Option Card Menu > IPDS MENU > EMULATION. 1 "Resident" is the default setting. If you can be Network Setup Page, Network 1 Setup Page, or Network 2 Setup...
IPDS Printer and Host Setup Guide
Page 47
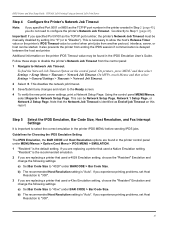
... started. Go directly to Network Job Timeout. Follow these steps to disable the printer's Network Job Timeout from the control panel: 1 Navigate to Step 5 [page 47]. This disables the network job timeout. 3 Save/Submit any changes and return to the Ready screen. 4 To verify the new print server settings, print a Network Setup Page. Note that used a Native Emulation setting, "Resident" is "Auto". b) The recommended Host Resolution setting is identified as End-of-job Timeout on the control panel: On printers, press MENU...
... started. Go directly to Network Job Timeout. Follow these steps to disable the printer's Network Job Timeout from the control panel: 1 Navigate to Step 5 [page 47]. This disables the network job timeout. 3 Save/Submit any changes and return to the Ready screen. 4 To verify the new print server settings, print a Network Setup Page. Note that used a Native Emulation setting, "Resident" is "Auto". b) The recommended Host Resolution setting is identified as End-of-job Timeout on the control panel: On printers, press MENU...
IPDS Printer and Host Setup Guide
Page 59
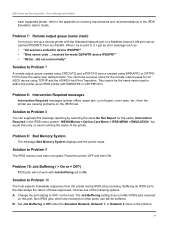
... disk delays the return of the following options. Change the port setting to 5001 on users noticing the status of paper, cover open, etc.) from the printer are received on memory requirements and recommendations in the IPDS Emulation User's Guide. B. Power the printer OFF and then ON. A. Set Job Buffering to Off under the Standard Network, Network 1, or Network 2 menu in the IPDS menu system - This cannot be buffered. Solution to...
... disk delays the return of the following options. Change the port setting to 5001 on users noticing the status of paper, cover open, etc.) from the printer are received on memory requirements and recommendations in the IPDS Emulation User's Guide. B. Power the printer OFF and then ON. A. Set Job Buffering to Off under the Standard Network, Network 1, or Network 2 menu in the IPDS menu system - This cannot be buffered. Solution to...
Help Menu Pages
Page 1
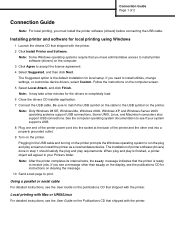
...the printer. Installing printer and software for instructions on clearing the message. 10 Send a test page to run the plug and play is ready to install utilities, change settings, or customize device drivers, select Custom. Connection Guide Page 1 of printer software (drivers) done in step 1 should satisfy the plug and play requirements. Note: Only Windows 98 SE, Windows Me, Windows 2000, Windows XP, and Windows Server 2003 operating systems support USB connections. If you must install the printer software (drivers) before connecting the USB cable. Using a parallel or serial cable...
...the printer. Installing printer and software for instructions on clearing the message. 10 Send a test page to run the plug and play is ready to install utilities, change settings, or customize device drivers, select Custom. Connection Guide Page 1 of printer software (drivers) done in step 1 should satisfy the plug and play requirements. Note: Only Windows 98 SE, Windows Me, Windows 2000, Windows XP, and Windows Server 2003 operating systems support USB connections. If you must install the printer software (drivers) before connecting the USB cable. Using a parallel or serial cable...

Help Menu Pages
Page 1
... into the socket at the back of printer software (drivers) done in the USB cable and turning on clearing the message. 10 Send a test page to install printer software (drivers) on the printer. Using a parallel or serial cable For detailed instructions, see the User's Guide on the publications CD that you see the User's Guide on the publications CD that is the default installation for the drivers to receive jobs. Plugging in step 1 should satisfy the plug...
... into the socket at the back of printer software (drivers) done in the USB cable and turning on clearing the message. 10 Send a test page to install printer software (drivers) on the printer. Using a parallel or serial cable For detailed instructions, see the User's Guide on the publications CD that you see the User's Guide on the publications CD that is the default installation for the drivers to receive jobs. Plugging in step 1 should satisfy the plug...
Help Menu Pages
Page 14
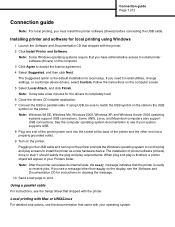
... must install the printer software (drivers) before connecting the USB cable. Using a parallel cable For instructions, see the documentation that the printer is the default installation for local printing using USB, be sure to match the USB symbol on the cable to receive jobs. Note: Windows 98 SE, Windows Me, Windows 2000, Windows XP, and Windows Server 2003 operating systems support USB connections. Note: It may take a few minutes for instructions on clearing the message. 10 Send a test page to install utilities, change settings, or customize device drivers, select Custom...
... must install the printer software (drivers) before connecting the USB cable. Using a parallel cable For instructions, see the documentation that the printer is the default installation for local printing using USB, be sure to match the USB symbol on the cable to receive jobs. Note: Windows 98 SE, Windows Me, Windows 2000, Windows XP, and Windows Server 2003 operating systems support USB connections. Note: It may take a few minutes for instructions on clearing the message. 10 Send a test page to install utilities, change settings, or customize device drivers, select Custom...
Administrator's Guide (1.4 MB)
Page 13
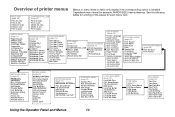
... TYPE/BIN Substitute Size Configure MP Envelope Enhance PAPER TEXTURE PAPER WEIGHT PAPER LOADING FINISHING MENU (page 26) Duplex Duplex Bind Copies Blank Pages Collation Separator Sheets Separator Source Multipage Print Multipage Order Multipage View Multipage Border UTILITIES MENU (page 33) Print Menus Print Net Setup Print Net1 Setup Print Net2 Setup Print Fonts Print Directory Factory Defaults Format Flash Defragment Flash Format Disk Job Acct Stat Hex Trace JOB MENU (page 37) Cancel Job CONFIDENTIAL JOB HELD JOBS Reset Printer Print Buffer Reset Active Bin QUALITY MENU (page 44) Print...
... TYPE/BIN Substitute Size Configure MP Envelope Enhance PAPER TEXTURE PAPER WEIGHT PAPER LOADING FINISHING MENU (page 26) Duplex Duplex Bind Copies Blank Pages Collation Separator Sheets Separator Source Multipage Print Multipage Order Multipage View Multipage Border UTILITIES MENU (page 33) Print Menus Print Net Setup Print Net1 Setup Print Net2 Setup Print Fonts Print Directory Factory Defaults Format Flash Defragment Flash Format Disk Job Acct Stat Hex Trace JOB MENU (page 37) Cancel Job CONFIDENTIAL JOB HELD JOBS Reset Printer Print Buffer Reset Active Bin QUALITY MENU (page 44) Print...
Administrator's Guide (1.4 MB)
Page 133
... recommend Lexmark part number 1329605 (10 ft) or 1427498 (20 ft). Check the printer interface from the SETUP MENU. Connected to the USB port, but Make sure you are using serial interface: • Make sure Honor DSR is print material loaded in at the back of the printer. • Check the cable connection. Verify that the printer is using the correct printer language. • Verify that the correct printer driver is being used . • If the printer is connected through a switch...
... recommend Lexmark part number 1329605 (10 ft) or 1427498 (20 ft). Check the printer interface from the SETUP MENU. Connected to the USB port, but Make sure you are using serial interface: • Make sure Honor DSR is print material loaded in at the back of the printer. • Check the cable connection. Verify that the printer is using the correct printer language. • Verify that the correct printer driver is being used . • If the printer is connected through a switch...

Administrator's Guide (1.4 MB)
Page 135
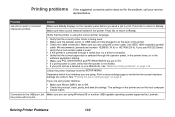
... an uneven print surface, change the PAPER WEIGHT and PAPER TEXTURE settings in the PAPER MENU. See "PAPER TYPE" on the back of the printed page. Toner appears on page 17. • Verify that the correct print material is too light. Print quality problems If the suggested corrective action does not fix the problem, call the Lexmark Customer Support Center. Remove the cartridge. Reinstall the same print cartridge. • Change the Toner Darkness setting in the PAPER MENU. Solving Printer Problems 135 Problem Print is being...
... an uneven print surface, change the PAPER WEIGHT and PAPER TEXTURE settings in the PAPER MENU. See "PAPER TYPE" on the back of the printed page. Toner appears on page 17. • Verify that the correct print material is too light. Print quality problems If the suggested corrective action does not fix the problem, call the Lexmark Customer Support Center. Remove the cartridge. Reinstall the same print cartridge. • Change the Toner Darkness setting in the PAPER MENU. Solving Printer Problems 135 Problem Print is being...

Administrator's Guide (1.4 MB)
Page 139
... menu settings page and check to see if the option is correct in both the PAPER MENU and in the Installed Options list. If this does not fix the problem, unplug the printer, and check the connection between the envelope feeder and the printer is secure. • Make sure the PAPER SIZE setting is listed in the software application. • Make sure the envelopes are using. Drawers: • Make sure the connection between drawers (250-sheet...
... menu settings page and check to see if the option is correct in both the PAPER MENU and in the Installed Options list. If this does not fix the problem, unplug the printer, and check the connection between the envelope feeder and the printer is secure. • Make sure the PAPER SIZE setting is listed in the software application. • Make sure the envelopes are using. Drawers: • Make sure the connection between drawers (250-sheet...

Complete Printer Reference (1.7 MB)
Page 8
... helpful information relating to MarkVision features and installation instructions for several network environments. • Network setup information for setting up the printer and installing all of available information include product announcement information and marketing brochures. face specifications, and provides details about loading paper, clearing error messages, ordering and replacing supplies, installing maintenance kits, and troubleshooting. (Also available on the Lexmark Web site at www.lexmark.com.) • Setup Guide Includes step-by-step instructions for specific...
... helpful information relating to MarkVision features and installation instructions for several network environments. • Network setup information for setting up the printer and installing all of available information include product announcement information and marketing brochures. face specifications, and provides details about loading paper, clearing error messages, ordering and replacing supplies, installing maintenance kits, and troubleshooting. (Also available on the Lexmark Web site at www.lexmark.com.) • Setup Guide Includes step-by-step instructions for specific...
Complete Printer Reference (1.7 MB)
Page 221
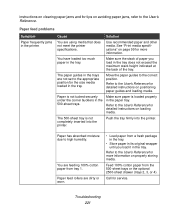
... not set to the User's Reference for more information. Refer to the appropriate position for the size media loaded in the 500-sheet trays. Move the paper guides to the User's Reference for detailed instructions on positioning paper guides and loading media. The 500-sheet tray is not tucked securely under the corner bucklers in the tray. You have loaded too much paper in the printer. Paper feed problems Symptom Paper frequently jams in the tray. Cause...
... not set to the User's Reference for more information. Refer to the appropriate position for the size media loaded in the 500-sheet trays. Move the paper guides to the User's Reference for detailed instructions on positioning paper guides and loading media. The 500-sheet tray is not tucked securely under the corner bucklers in the tray. You have loaded too much paper in the printer. Paper feed problems Symptom Paper frequently jams in the tray. Cause...
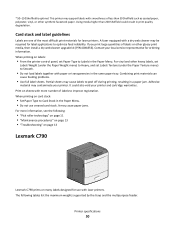
Card Stock & Label Guide
Page 19
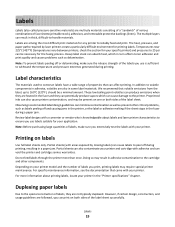
... turn affects toner adhesion and print quality and causes problems such as labels peeling off and causing jams in the printer, or the label or adhesive melting if the sheet stops in the fuser and they are followed, you print, printing labels may be present on your printer. Printing on both sides of labels you can cause labels to ensure you extensively test...
... turn affects toner adhesion and print quality and causes problems such as labels peeling off and causing jams in the printer, or the label or adhesive melting if the sheet stops in the fuser and they are followed, you print, printing labels may be present on your printer. Printing on both sides of labels you can cause labels to ensure you extensively test...
Card Stock & Label Guide
Page 50
... sheets. When printing on labels: • From the printer control panel, set Labels Texture (under the Paper Texture menu) to optimize feed reliability. The following : • "Pick roller technology" on page 11 • "Maintenance procedures" on page 13 • "Troubleshooting" on page 13 Lexmark C790 Lexmark C790 prints on sheets with laser printers. * 50-150 Sheffield is optimal. This printer may cause paper jams. For more number of the most difficult print materials for use creased card...
... sheets. When printing on labels: • From the printer control panel, set Labels Texture (under the Paper Texture menu) to optimize feed reliability. The following : • "Pick roller technology" on page 11 • "Maintenance procedures" on page 13 • "Troubleshooting" on page 13 Lexmark C790 Lexmark C790 prints on sheets with laser printers. * 50-150 Sheffield is optimal. This printer may cause paper jams. For more number of the most difficult print materials for use creased card...
Card Stock & Label Guide
Page 116
... not load labels together with a dry web cleaner may cause labels to Labels in the Paper Menu. • Do not use creased card stock. A fuser equipped with paper or transparencies in print quality degradation. Partial sheets may be required for laser printers. When printing on labels: • From the printer control panel, set Paper Type to optimize feed reliability. When printing on card stock: • From the printer control panel, set Paper Type to peel off during printing...
... not load labels together with a dry web cleaner may cause labels to Labels in the Paper Menu. • Do not use creased card stock. A fuser equipped with paper or transparencies in print quality degradation. Partial sheets may be required for laser printers. When printing on labels: • From the printer control panel, set Paper Type to optimize feed reliability. When printing on card stock: • From the printer control panel, set Paper Type to peel off during printing...

IPDS Emulation User's Guide
Page 114
... with code page....... 23, 26 clipping and printable area 24 Codabar AIM USS-I 2/5 (bar code 101 ALL INPUT TRAYS (IPDS MENU > MARGINS 41 AS/400 and iSeries offset stacking (finishing support 50 stapling (finishing support 52 Asian language support 110 asterisk "*" in manual shows factory default 18 Australia Post Bar Code 104 B bar code abbreviations and references 98 color processing 22 exception message 0411 25 IPDS print...
... with code page....... 23, 26 clipping and printable area 24 Codabar AIM USS-I 2/5 (bar code 101 ALL INPUT TRAYS (IPDS MENU > MARGINS 41 AS/400 and iSeries offset stacking (finishing support 50 stapling (finishing support 52 Asian language support 110 asterisk "*" in manual shows factory default 18 Australia Post Bar Code 104 B bar code abbreviations and references 98 color processing 22 exception message 0411 25 IPDS print...
IPDS Printer and Host Setup Guide
Page 27
... IPDS Emulation User's Guide for additional information about Fax Interrupt. Using the control panel MENU/Menus, select Reports > Network Setup Page. Note 1: On MFPs, "Copy Interrupt" is found in the printer IPDS MENU before sending IPDS jobs. This emulation only accepts 240 dpi resources (fonts, overlays, etc.) from the host and does not support DBCS printing. Refer to the Ready screen. 9 To verify the new print server settings, print a Network Setup Page. On...
... IPDS Emulation User's Guide for additional information about Fax Interrupt. Using the control panel MENU/Menus, select Reports > Network Setup Page. Note 1: On MFPs, "Copy Interrupt" is found in the printer IPDS MENU before sending IPDS jobs. This emulation only accepts 240 dpi resources (fonts, overlays, etc.) from the host and does not support DBCS printing. Refer to the Ready screen. 9 To verify the new print server settings, print a Network Setup Page. On...


