Supplies Guide
Page 1
Ordering toner cartridges Notes: • Estimated cartridge yield is based on countries located in MS811n, MS811dn, MS812dn, and MS812ne printer models. For more information on the ISO/IEC 19752 standard. • Extremely low print coverage for extended periods of time may negatively...Cartridge 525 High Yield Toner Cartridge 525H Extra High Yield Toner Cartridge 525X* * This toner cartridge is supported only in each region, visit www.lexmark.com/regions. Supplies Guide Page 1 of 3 Supplies Guide When Cartridge low appears, you may be able to print a limited number of pages...
Ordering toner cartridges Notes: • Estimated cartridge yield is based on countries located in MS811n, MS811dn, MS812dn, and MS812ne printer models. For more information on the ISO/IEC 19752 standard. • Extremely low print coverage for extended periods of time may negatively...Cartridge 525 High Yield Toner Cartridge 525H Extra High Yield Toner Cartridge 525X* * This toner cartridge is supported only in each region, visit www.lexmark.com/regions. Supplies Guide Page 1 of 3 Supplies Guide When Cartridge low appears, you may be able to print a limited number of pages...

Supplies Guide
Page 2
...To identify the supported fuser type, view the label on the rear of the fuser. Lexmark Return Program fuser maintenance kits and part numbers for more than 10 minutes. For more information... The separator roller, fuser, pick rollers, and transfer roller are all included in MS811n, MS811dn, MS812dn, and MS812ne printer models. Warning-Potential Damage: Do not expose the imaging unit to exhaustion of the following: ... may cause imaging unit parts to fail prior to direct light for MS810, MS811, and MS812 Fuser maintenance kit type Part number Type 00 40X8420 Type 01 40X8421 Type ...
...To identify the supported fuser type, view the label on the rear of the fuser. Lexmark Return Program fuser maintenance kits and part numbers for more than 10 minutes. For more information... The separator roller, fuser, pick rollers, and transfer roller are all included in MS811n, MS811dn, MS812dn, and MS812ne printer models. Warning-Potential Damage: Do not expose the imaging unit to exhaustion of the following: ... may cause imaging unit parts to fail prior to direct light for MS810, MS811, and MS812 Fuser maintenance kit type Part number Type 00 40X8420 Type 01 40X8421 Type ...
User's Guide
Page 2
...Installing a memory card ...17 Installing an Internal Solutions Port...18 Installing an optional card ...23 Installing a printer hard disk ...24 Removing a printer hard disk...29 Installing hardware options...31 Order of installation...31 Installing optional trays ...31 Attaching cables...33 Setting... network Internal Solutions Port 41 Setting up serial printing...42 Verifying printer setup...43 Using MS810n, MS810dn, MS811n, MS811dn, MS812dn 45 Learning about the printer...45 Printer configurations ...45 Using the printer control panel...47 Understanding the colors of the indicator and Sleep ...
...Installing a memory card ...17 Installing an Internal Solutions Port...18 Installing an optional card ...23 Installing a printer hard disk ...24 Removing a printer hard disk...29 Installing hardware options...31 Order of installation...31 Installing optional trays ...31 Attaching cables...33 Setting... network Internal Solutions Port 41 Setting up serial printing...42 Verifying printer setup...43 Using MS810n, MS810dn, MS811n, MS811dn, MS812dn 45 Learning about the printer...45 Printer configurations ...45 Using the printer control panel...47 Understanding the colors of the indicator and Sleep ...
User's Guide
Page 45
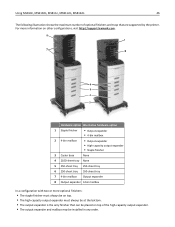
...-capacity input tray or more information, see www.lexmark.com/multifunctionprinters. You must use either a printer stand or printer base if you may need additional furniture. Using MS810n, MS810dn, MS811n, MS811dn, MS812dn 45 Using MS810n, MS810dn, MS811n, MS811dn, MS812dn Learning about the printer Printer configurations Basic model 1 2 4 3 1 Standard bin 2 Printer control panel 3 Multipurpose feeder 4 Standard 550‑sheet...
...-capacity input tray or more information, see www.lexmark.com/multifunctionprinters. You must use either a printer stand or printer base if you may need additional furniture. Using MS810n, MS810dn, MS811n, MS811dn, MS812dn 45 Using MS810n, MS810dn, MS811n, MS811dn, MS812dn Learning about the printer Printer configurations Basic model 1 2 4 3 1 Standard bin 2 Printer control panel 3 Multipurpose feeder 4 Standard 550‑sheet...
User's Guide
Page 46
For more information on other configurations, visit http://support.lexmark.com. 8 1 7 2 6 5 4 3 Hardware option Alternative hardware option 1 Staple finisher • Output expander • 4‑bin mailbox 2 4‑bin mailbox • Output expander • High&#... The output expander is the only finisher that can be placed on top of optional finishers and trays that are supported by the printer. Using MS810n, MS810dn, MS811n, MS811dn, MS812dn 46 The following illustration shows the maximum number of the high‑capacity output expander. • The output expander and ...
For more information on other configurations, visit http://support.lexmark.com. 8 1 7 2 6 5 4 3 Hardware option Alternative hardware option 1 Staple finisher • Output expander • 4‑bin mailbox 2 4‑bin mailbox • Output expander • High&#... The output expander is the only finisher that can be placed on top of optional finishers and trays that are supported by the printer. Using MS810n, MS810dn, MS811n, MS811dn, MS812dn 46 The following illustration shows the maximum number of the high‑capacity output expander. • The output expander and ...
User's Guide
Page 47
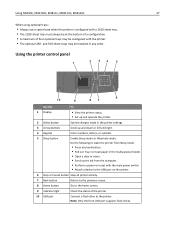
...Display • View the printer status. • Set up and down or left and right. 4 Keypad Enter numbers, letters, or symbols. 5 Sleep button Enable Sleep mode or Hibernate mode. Note: Only the front USB port supports flash drives. Using MS810n, MS810dn, MS811n, MS811dn, MS812dn 47 When using ...optional trays: • Always use a caster base when the printer is configured with a 2100‑sheet tray. • The 2100‑sheet tray must always be...
...Display • View the printer status. • Set up and down or left and right. 4 Keypad Enter numbers, letters, or symbols. 5 Sleep button Enable Sleep mode or Hibernate mode. Note: Only the front USB port supports flash drives. Using MS810n, MS810dn, MS811n, MS811dn, MS812dn 47 When using ...optional trays: • Always use a caster base when the printer is configured with a 2100‑sheet tray. • The 2100‑sheet tray must always be...

User's Guide
Page 48
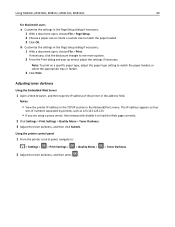
... off or in Hibernate mode. Configuring Universal paper settings The Universal paper size is on page 183. Setting the paper size and type 1 From the printer control panel, navigate to: > Settings > > Paper Menu > > Paper Size/Type > 2 Press the up or down arrow button to select the ...then press to select the paper size, and then press . 4 Press the up , processing data, or printing. Using MS810n, MS810dn, MS811n, MS811dn, MS812dn 48 Understanding the colors of the indicator and Sleep button lights The colors of paper and specialty media can affect how reliably documents print.
... off or in Hibernate mode. Configuring Universal paper settings The Universal paper size is on page 183. Setting the paper size and type 1 From the printer control panel, navigate to: > Settings > > Paper Menu > > Paper Size/Type > 2 Press the up or down arrow button to select the ...then press to select the paper size, and then press . 4 Press the up , processing data, or printing. Using MS810n, MS810dn, MS811n, MS811dn, MS812dn 48 Understanding the colors of the indicator and Sleep button lights The colors of paper and specialty media can affect how reliably documents print.
User's Guide
Page 49
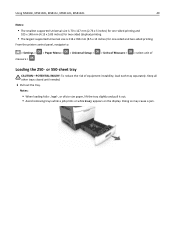
Using MS810n, MS810dn, MS811n, MS811dn, MS812dn 49 Notes: • The smallest supported Universal size is 70 x 127 mm (2.76 x 5 inches) for one‑sided printing and 105 x 148 mm (4.13 x 5.... paper, lift the tray slightly and pull it out. • Avoid removing trays while a job prints or while Busy appears on the display. From the printer control panel, navigate to: > Settings > measure > > Paper Menu > > Universal Setup > > Units of Measure > > select unit of Loading the 250‑ or 550‑sheet tray...
Using MS810n, MS810dn, MS811n, MS811dn, MS812dn 49 Notes: • The smallest supported Universal size is 70 x 127 mm (2.76 x 5 inches) for one‑sided printing and 105 x 148 mm (4.13 x 5.... paper, lift the tray slightly and pull it out. • Avoid removing trays while a job prints or while Busy appears on the display. From the printer control panel, navigate to: > Settings > measure > > Paper Menu > > Universal Setup > > Units of Measure > > select unit of Loading the 250‑ or 550‑sheet tray...
User's Guide
Page 54
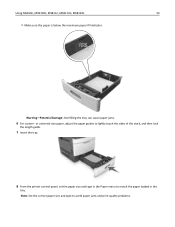
Note: Set the correct paper size and type to match the paper loaded in the Paper menu to avoid paper jams and print quality problems. Using MS810n, MS810dn, MS811n, MS811dn, MS812dn 54 • Make sure the paper is below the maximum paper fill indicator. Warning-Potential Damage: Overfilling the tray can cause paper jams. 6 For custom‑ or universal‑size paper, adjust the paper guides to lightly touch the sides of the stack, and then lock the length guide. 7 Insert the tray. 8 From the printer control panel, set the paper size and type in the tray.
Note: Set the correct paper size and type to match the paper loaded in the Paper menu to avoid paper jams and print quality problems. Using MS810n, MS810dn, MS811n, MS811dn, MS812dn 54 • Make sure the paper is below the maximum paper fill indicator. Warning-Potential Damage: Overfilling the tray can cause paper jams. 6 For custom‑ or universal‑size paper, adjust the paper guides to lightly touch the sides of the stack, and then lock the length guide. 7 Insert the tray. 8 From the printer control panel, set the paper size and type in the tray.
User's Guide
Page 62
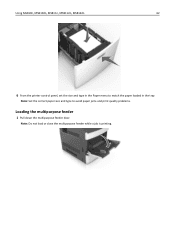
EXECB5 A4 A5 LTR Note: Do not load or close the multipurpose feeder while a job is printing. Note: Set the correct paper size and type to match the paper loaded in the Paper menu to avoid paper jams and print quality problems. Loading the multipurpose feeder 1 Pull down the multipurpose feeder door. Using MS810n, MS810dn, MS811n, MS811dn, MS812dn 62 6 From the printer control panel, set the size and type in the tray.
EXECB5 A4 A5 LTR Note: Do not load or close the multipurpose feeder while a job is printing. Note: Set the correct paper size and type to match the paper loaded in the Paper menu to avoid paper jams and print quality problems. Loading the multipurpose feeder 1 Pull down the multipurpose feeder door. Using MS810n, MS810dn, MS811n, MS811dn, MS812dn 62 6 From the printer control panel, set the size and type in the tray.
User's Guide
Page 66
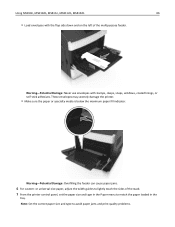
...R 5 A A 4 C E X E B 5 Warning-Potential Damage: Never use envelopes with the flap side down and on the left of the stack. 7 From the printer control panel, set the paper size and type in the tray. Note: Set the correct paper size and type to match the paper loaded in... paper jams and print quality problems. Warning-Potential Damage: Overfilling the feeder can cause paper jams. 6 For custom- Using MS810n, MS810dn, MS811n, MS811dn, MS812dn 66 • Load envelopes with stamps, clasps, snaps, windows, coated linings, or self‑stick adhesives. or universal-size paper, adjust...
...R 5 A A 4 C E X E B 5 Warning-Potential Damage: Never use envelopes with the flap side down and on the left of the stack. 7 From the printer control panel, set the paper size and type in the tray. Note: Set the correct paper size and type to match the paper loaded in... paper jams and print quality problems. Warning-Potential Damage: Overfilling the feeder can cause paper jams. 6 For custom- Using MS810n, MS810dn, MS811n, MS811dn, MS812dn 66 • Load envelopes with stamps, clasps, snaps, windows, coated linings, or self‑stick adhesives. or universal-size paper, adjust...
User's Guide
Page 67
... type name has replaced the custom name. Notes: • View the printer IP address on page 48. Notes: • View the printer IP address in the TCP/IP section in the address field. Using MS810n, MS810dn, MS811n, MS811dn, MS812dn 67 Linking and unlinking trays Linking and unlinking trays 1 Open a... Web browser, and then type the printer IP address in the Network/Ports menu. Creating a custom name for the tray does not...
... type name has replaced the custom name. Notes: • View the printer IP address on page 48. Notes: • View the printer IP address in the TCP/IP section in the address field. Using MS810n, MS810dn, MS811n, MS811dn, MS812dn 67 Linking and unlinking trays Linking and unlinking trays 1 Open a... Web browser, and then type the printer IP address in the Network/Ports menu. Creating a custom name for the tray does not...
User's Guide
Page 68
...8209;defined custom names. 4 Click Submit. c Adjust the settings, if necessary. Printing Printing a document Printing a document 1 From the Paper menu on the printer control panel, set the paper type and size to load the Web page correctly. 2 Click Settings > Paper Menu > Custom Types. 3 Select a custom paper...match the paper loaded. 2 Send the print job: For Windows users a With a document open, click File > Print. Using MS810n, MS810dn, MS811n, MS811dn, MS812dn 68 3 Press . 4 Press Custom Types, and then verify if the new custom paper type name has replaced the custom name. Note: Paper ...
...8209;defined custom names. 4 Click Submit. c Adjust the settings, if necessary. Printing Printing a document Printing a document 1 From the Paper menu on the printer control panel, set the paper type and size to load the Web page correctly. 2 Click Settings > Paper Menu > Custom Types. 3 Select a custom paper...match the paper loaded. 2 Send the print job: For Windows users a With a document open, click File > Print. Using MS810n, MS810dn, MS811n, MS811dn, MS812dn 68 3 Press . 4 Press Custom Types, and then verify if the new custom paper type name has replaced the custom name. Note: Paper ...
User's Guide
Page 69
...Click Settings > Print Settings > Quality Menu > Toner Darkness. 3 Adjust the toner darkness, and then click Submit. Using MS810n, MS810dn, MS811n, MS811dn, MS812dn 69 For Macintosh users a Customize the settings in the Page Setup dialog if necessary: 1 With a document open , choose File > ...Page Setup. 2 Choose a paper size or create a custom size to match the paper loaded. 3 Click OK. Using the printer control panel 1 From the printer control panel, navigate to: > Settings > > Print Settings > > Quality Menu > > Toner Darkness 2 Adjust the toner darkness, and then press...
...Click Settings > Print Settings > Quality Menu > Toner Darkness. 3 Adjust the toner darkness, and then click Submit. Using MS810n, MS810dn, MS811n, MS811dn, MS812dn 69 For Macintosh users a Customize the settings in the Page Setup dialog if necessary: 1 With a document open , choose File > ...Page Setup. 2 Choose a paper size or create a custom size to match the paper loaded. 3 Click OK. Using the printer control panel 1 From the printer control panel, navigate to: > Settings > > Print Settings > > Quality Menu > > Toner Darkness 2 Adjust the toner darkness, and then press...
User's Guide
Page 70
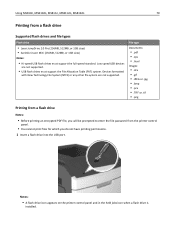
... encrypted PDF file, you do not have printing permissions. 1 Insert a flash drive into the USB port. Using MS810n, MS810dn, MS811n, MS811dn, MS812dn 70 Printing from the printer control panel. • You cannot print files for which you will be prompted to enter the file password from a flash drive Supported flash...: • Hi‑speed USB flash drives must support the File Allocation Table (FAT) system. Notes: • A flash drive icon appears on the printer control panel and in the held jobs icon when a flash drive is installed. Low-speed USB devices are not supported.
... encrypted PDF file, you do not have printing permissions. 1 Insert a flash drive into the USB port. Using MS810n, MS810dn, MS811n, MS811dn, MS812dn 70 Printing from the printer control panel. • You cannot print files for which you will be prompted to enter the file password from a flash drive Supported flash...: • Hi‑speed USB flash drives must support the File Allocation Table (FAT) system. Notes: • A flash drive icon appears on the printer control panel and in the held jobs icon when a flash drive is installed. Low-speed USB devices are not supported.
User's Guide
Page 71
...-Potential Damage: Do not touch the printer or the flash drive in the printer after leaving the initial USB menu screen, then access held jobs from the printer control panel to print files from the flash drive. Using MS810n, MS810dn, MS811n, MS811dn, MS812dn 71 • If you insert... the flash drive when the printer requires attention, such as when a jam has occurred, then the printer ignores the flash drive. • If you insert the flash drive while the printer is processing other held jobs Storing...
...-Potential Damage: Do not touch the printer or the flash drive in the printer after leaving the initial USB menu screen, then access held jobs from the printer control panel to print files from the flash drive. Using MS810n, MS810dn, MS811n, MS811dn, MS812dn 71 • If you insert... the flash drive when the printer requires attention, such as when a jam has occurred, then the printer ignores the flash drive. • If you insert the flash drive while the printer is processing other held jobs Storing...
User's Guide
Page 72
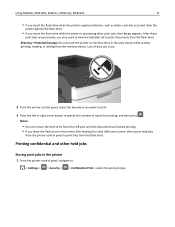
...: When the limit is satisfactory. For a confidential print job, also enter a four‑digit PIN. 5 Click OK or Print. 6 From the printer control panel, release the print job. • For confidential print jobs, navigate to delete them. Reserve Job Expiration Lets you choose to : Held jobs...of copies > Print • For other held in the printer memory until you start the print job from the printer control panel. • All print jobs that user name and PIN are deleted. Using MS810n, MS810dn, MS811n, MS811dn, MS812dn 72 Print job type Description Max Invalid PIN Limits ...
...: When the limit is satisfactory. For a confidential print job, also enter a four‑digit PIN. 5 Click OK or Print. 6 From the printer control panel, release the print job. • For confidential print jobs, navigate to delete them. Reserve Job Expiration Lets you choose to : Held jobs...of copies > Print • For other held in the printer memory until you start the print job from the printer control panel. • All print jobs that user name and PIN are deleted. Using MS810n, MS810dn, MS811n, MS811dn, MS812dn 72 Print job type Description Max Invalid PIN Limits ...
User's Guide
Page 73
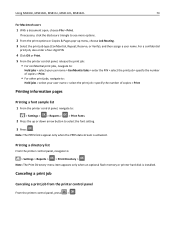
...select your user name > select the print job > specify the number of copies > Print Printing information pages Printing a font sample list 1 From the printer control panel, navigate to: > Settings > > Reports > > Print Fonts 2 Press the up or down arrow button to see more options. 2 From...a print job from the printer control panel From the printer control panel, press > . Note: The PPDS fonts appear only when the PPDS data stream is installed. If necessary, click the disclosure triangle to select the font setting. 3 Press . Using MS810n, MS810dn, MS811n, MS811dn, MS812dn 73 For Macintosh ...
...select your user name > select the print job > specify the number of copies > Print Printing information pages Printing a font sample list 1 From the printer control panel, navigate to: > Settings > > Reports > > Print Fonts 2 Press the up or down arrow button to see more options. 2 From...a print job from the printer control panel From the printer control panel, press > . Note: The PPDS fonts appear only when the PPDS data stream is installed. If necessary, click the disclosure triangle to select the font setting. 3 Press . Using MS810n, MS810dn, MS811n, MS811dn, MS812dn 73 For Macintosh ...
User's Guide
Page 74
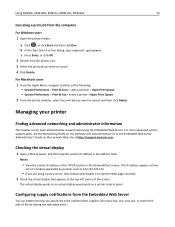
... display would like to load the Web page correctly. 2 Check the virtual display that appears at http://support.lexmark.com. Managing your printer Finding advanced networking and administrator information This chapter covers basic administrative support tasks using a proxy server, then temporarily ... MS810n, MS810dn, MS811n, MS811dn, MS812dn 74 Canceling a print job from the Embedded Web Server You can determine how you would work on the Lexmark Web site at the top left corner of the following: • System Preferences > Print & Scan > select a printer > Open Print Queue &#...
... display would like to load the Web page correctly. 2 Check the virtual display that appears at http://support.lexmark.com. Managing your printer Finding advanced networking and administrator information This chapter covers basic administrative support tasks using a proxy server, then temporarily ... MS810n, MS810dn, MS811n, MS811dn, MS812dn 74 Canceling a print job from the Embedded Web Server You can determine how you would work on the Lexmark Web site at the top left corner of the following: • System Preferences > Print & Scan > select a printer > Open Print Queue &#...
User's Guide
Page 75
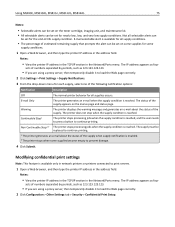
... conditions. The supply must be set for all supplies occurs. Notes: • View the printer IP address in the TCP/IP section in the Network/Ports menu. Using MS810n, MS810dn, MS811n, MS811dn, MS812dn 75 Notes: • Selectable alerts can be set on the toner cartridge, imaging ...Setup. Not all selectable alerts can be set for the end‑of the following notification options: Notification Description Off The normal printer behavior for all supply conditions. • The percentage of estimated remaining supply that prompts the alert can be replaced to continue printing. 1...
... conditions. The supply must be set for all supplies occurs. Notes: • View the printer IP address in the TCP/IP section in the Network/Ports menu. Using MS810n, MS810dn, MS811n, MS811dn, MS812dn 75 Notes: • Selectable alerts can be set on the toner cartridge, imaging ...Setup. Not all selectable alerts can be set for the end‑of the following notification options: Notification Description Off The normal printer behavior for all supply conditions. • The percentage of estimated remaining supply that prompts the alert can be replaced to continue printing. 1...


