Get support for Lexmark E250D - E B/W Laser Printer

Lexmark E250D Support Question

Lexmark E250D Support Question

Find answers below for this question about Lexmark E250D - E B/W Laser Printer.
Need a Lexmark E250D manual? We have 4 online manuals for this item!
Question posted by joycessmitherman on October 20th, 2011

If This Printer Will Not Power Up At All - Is There A Reset Button Somewhere On?

this printer has been powered off approx 1 month - now will not power back up. Is there a reset button on this printer and if so where is it? thx

Current Answers

Answer #1: Posted by LexmarkListens on October 20th, 2011 11:27 AM
This answer was accepted by the poster of the original question.
LexmarkListens

Member since:
July 1st, 2011

Points: 1,410,540
1,110
points
This issue may be due to one of the following:

  • An incorrectly set power switch.
  • An improperly functioning power outlet, surge protector, or power supply backup.
  • A poorly connected power or data cable.
  • A defect with a third-party (i.e. non-Lexmark) option such as a memory card.
  • An incorrectly connected or malfunctioning optional paper tray.
  • A malfunctioning printer component.


Please try the following steps:

If your printer's power cord is plugged into a surge protector or uninterruptible power supply (UPS), unplug it and connect it directly to a grounded wall outlet. Some of these devices can interfere with consistent electrical flow and cause the printer to fail to power up properly. 

Disconnect the power cord from the back of the machine and then reconnect it. Make sure the power cord is plugged in all the way.

Disconnect any data cables (parallel, USB, Ethernet) from the rear of the printer.  Any defect in a data cable may cause an electrical short circuit that could cause a loss of power to the printer.

Turn the printer on, this time with only the power cord connected and plugged directly into a grounded wall outlet. 

If the printer still fails to power up, power off the printer once more. Verify that the outlet is working properly by connecting another device to it to see if it receives power. You can also try plugging the printer into a different grounded outlet.

If possible, try another printer power cord.

Remove any third-party (i.e. non-Lexmark) options, such as memory cards, as they may interfere with proper printer functioning.  Also remove any paper-handling options such as an optional second paper tray.

Attempt to power on the printer once more with all options removed, having verified that other devices work from that power outlet.

If there is still no power, the printer may require service to fix the issue.Please contact us by sending an email on the address below or you may contact Lexmark Technical Support or a local service provider


Lexmark Listens
Phone:
USA: 1-800-539-6275
Canada: (877) 856-5540
UK: 0800 121 4726
South Africa: 0800 981 435

Related Lexmark E250D Manual Pages

Quick Reference - Page 1

Quick Reference Printer Overview 7 6 5 4 1 1 150-sheet output bin 2 250-sheet tray 3 550-sheet drawer (optional) 4 Manual feeder 5 Front door 6 Control panel 7 Paper support 2 3 1 2 3 4 5 6 7 1 Rear exit 2 Power button 3 Power cord connect 4 Dust cover (not available for some models) 5 USB connect 6 Parallel connect 7 Ethernet connect Quick Reference 1
Quick Reference - Page 2

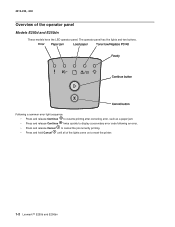
... 3 4 5 7 6 1 Error 5 Ready 2 Paper Jam 6 Cancel button 3 Load Paper 7 Continue button 4 Toner Low / Replace PC Kit Following a common error light sequence: • Press and release Continue to resume printing. • Press and release Continue twice quickly to display a secondary error code. • Press and release Cancel to reset the printer. Overview of the lights come...
Quick Reference - Page 6

... the Continue button. 9 Turn the printer off the printer. 2 Open the front door. 3 Press Continue as you loaded. Verify the amount of paper you turn off the printer, unplug the power cord from your computer 1 Click Start Æ Settings Æ Printers. 2 Select your printer. 3 Click File Æ Properties. 4 Click Print Test Page. Factory defaults have been reset. Printing...
User's Guide - Page 6

Printer overview 1 Rear exit 5 USB connect 2 Power button 6 Parallel connect 3 Power connect 7 Ethernet connect 4 Dust cover (not available for some models) 6
User's Guide - Page 7

... Continue button also functions as a light. 1 Error 2 Paper Jam 3 Load Paper 4 Toner Low / Replace PC Kit 5 Ready 6 Cancel button 7 Continue button Following a common error light sequence: • Press and release Continue to resume printing. • Press and release Continue twice quickly to display a secondary error code. • Press and release Cancel to reset the printer. 7
User's Guide - Page 11

... pages, or Print Quality Test Pages: - Press and hold Cancel to reset the printer. • Receiving/processing data from a host interface: - Understanding the control panel lights Primary codes Ready / Power Saver Light sequence: • Ready-On What this light sequence means: • The printer is busy receiving and processing data or printing. • The...
User's Guide - Page 15

...; Toner Low/Replace PC Kit-On • Load Paper-On • Paper Jam-On • Error-On What this light sequence means: The printer is resetting to reset the printer. 15 A user default setting remains in effect until you change it or until you can do : Wait for the message to clear. What you...
User's Guide - Page 43

... for the printer: • Paper • Transparencies • Envelopes • Labels • Card stock Paper To ensure the best print quality and feed reliability, use may also provide acceptable print quality. Note: Certain paper types will not print at maximum speed. Selecting print media 1 Rear exit 5 USB connect 2 Power button 6 Parallel connect 3 Power cord...
User's Guide - Page 74

... the menu settings page and network setup page, press the Continue button from the computer 1 Click Start à Settings à Printers. 2 Select your printer. 3 Click File à Properties. 4 Click Print Test Page.... 74 If an option is correctly listed under Installed Features, turn off the printer, unplug the power cord from the wall outlet, and reinstall the option. - Verify the amount ...
User's Guide - Page 85

... formatting problems. To reset the factory defaults: 1 Turn off and back on , but I still print with the rear exit door open the rear exit door for laser printers. • If possible... Toner Low / Replace PC Kit, Ready and Continue lights appear. 8 Release the Continue button. 9 Turn the printer off the printer. 2 Open the front door. 3 Press Continue as a xerographic paper for a straight-...
User's Guide - Page 94

... may not cover damages caused by the Director of Manufacturing and Technic al Support, Lexmark International, S.A., Boigny, France. Hot surface notice Power regulation notice Warning: Electrical surges can be very destructive to equipment connected to the printer power supply. Notices A declaration of conformity with the requirements of the directives has been signed by...
User's Guide - Page 99

...menus Parallel MAC Binary PS 39 Mode 2 39 NPA Mode 39 Protocol 39 printing the Printer Settings Configuration sheet 37 Setup Auto CR after LF 39 Auto LF after CR 39 USB...Offline 13 Photoconductor kit near full 17 Printer error 20 Programming engine code 18 Programming system code 18 Ready/Power Saver 11 Replace photoconductor kit 18 Resetting printer 15 Restoring factory defaults 15 secondary error...
Service Manual - Page 16

4512-220, -230 Overview of the lights come on to reset the printer. 1-2 Lexmark™ E250d and E250dn Following a common error light sequence: • Press and release Continue to resume printing after ... currently printing. • Press and hold Cancel until all of the operator panel Models E250d and E250dn These models have the LED operator panel. The operator panel has five lights and two...
Service Manual - Page 23

...Memory External Network Adapter Field Replaceable Unit Host Based Printing High Voltage Power Supply Liquid Crystal Diode Light Emitting Diode Laser Scanning Unit Low Voltage Power Supply Nonvolatile Random Access Memory Photoconductor Printer Control Language Power-On Reset Power-On Self Test Personal Printer Data Stream People's Republic of China Participating Standards Organization Raster Image...
Service Manual - Page 25

... codes and diagnostic tools to repair a printer, look for a malfunctioning printer. Models E250d and E250dn have an operator panel containing lights and buttons. To determine the corrective action to aid... power from the operator panel of the printer. - Always check for personal safety and to prevent damage to the printer. Warning: Paper clips are commonly used near printers and...
Service Manual - Page 27

... blinking slowly Common light sequences 4512-220, -230 Printer Condition Page Ready / Power Saver 4 Busy 4 Hex Trace Ready 4 Waiting 5 Flushing / Resolution reduced 5 ✷ Not ready 5 (printer is offline) Close door 6 z Insufficient collation area/ 6 Insufficient memory Cancel job/ Reset printer 6 Load print media Tray 1 7 Load manual feeder 7 z z z z z Toner...
Service Manual - Page 28

... print job. • Press and hold Cancel to reset the printer. The Ready light is displayed as the pages print. Hex Trace Ready x Meaning The printer is in Power Saver mode. Busy ✷ Meaning • The printer is busy receiving and processing data or printing. • The printer is active. Printing a directory, a font list, menu settings...
Service Manual - Page 30

... Cancel to cancel the print job. • Press Cancel to the user default settings. Cancel job/Reset printer z z z z z z Meaning • The current print job is canceled. • The printer is too full to clear. 2-6 Lexmark™ E250d and E250dn Action Wait for the message to collate the print job. Insufficient collation area/Insufficient memory...
Service Manual - Page 49

...beginning, or use caution if the product must receive power in the area of the transfer roll. For the other errors, which allows the printer to temporarily recover from the error. Service tertiary error ...order to the right side of the product that is a danger from the cable connection on reset) is the primary indication or code. 4512-220, -230 Service tertiary error codes Service tertiary ...
Service Manual - Page 142

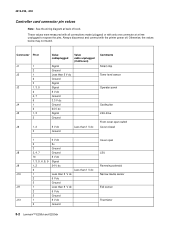
These values were measured with all connections made (plugged) or with the printer power off. Otherwise, the values below may not match. 4512-220, -230 Controller...5 V dc 3 Ground J11 1 Less than 5 V dc Exit sensor 2 5 V dc 3 Ground J13 1 5 V dc Thermistor 2 Ground 5-2 Lexmark™ E250d and E250dn Always disconnect and connect with only one connector at back of book.

Similar Questions

Cannot Find Printer
Lexmark printer E250d cannot find in the computer with linux operatong systen although the drivers a...
(Posted by luxsura 11 years ago)
Lexmark 250dn Printer Not Printing
New printer photo kit installed, service light still on pronter not printing and no error message sh...
(Posted by wkc 12 years ago)
Blinking Lights
all the lights are blinking on the panel...I have already, changed the photodonductor, toner cartrid...
(Posted by scozio 12 years ago)
Ask a New Question
Use the box below to post a new question about this Lexmark product .
Points & Prizes
  • You can earn points for nearly everything you do on HelpOwl.com
  • You can trade in those points for gift cards at leading retailers such as Amazon.com and Walmart
  • It's that simple!
See How it Works
Create a Free Account

Lexmark Manuals

Find free Lexmark E250D - E B/W Laser Printer manuals and user guides available at ManualOwl.com. Try out our unique manual viewer allowing you to interact with manuals from directly within your browser!

Lexmark Reviews

View thousands of Lexmark user reviews and customer ratings available at ReviewOwl.com.

Contact Information

Complete Lexmark customer service contact information including steps to reach representatives, hours of operation, customer support links and more from ContactHelp.com.

Scoreboard Ratings

See detailed Lexmark customer service rankings, employee comments and much more from our sister site.

Lexmark Recalls

Find comprehensive Lexmark recall information updated hourly on RecallOwl.com.