User's Guide
Page 2
...Installing a printer hard disk ...24 Removing a printer hard disk...29 Installing hardware options...31 Order of installation...31 Installing optional trays ...31 Attaching cables...33 Setting up the printer software...35 Installing the printer software ...35 Updating available options in the printer ...installing a new network Internal Solutions Port 41 Setting up serial printing...42 Verifying printer setup...43 Using MS810n, MS810dn, MS811n, MS811dn, MS812dn 45 Learning about the printer...45 Printer configurations ...45 Using the printer control panel...47 Understanding the colors of the ...
...Installing a printer hard disk ...24 Removing a printer hard disk...29 Installing hardware options...31 Order of installation...31 Installing optional trays ...31 Attaching cables...33 Setting up the printer software...35 Installing the printer software ...35 Updating available options in the printer ...installing a new network Internal Solutions Port 41 Setting up serial printing...42 Verifying printer setup...43 Using MS810n, MS810dn, MS811n, MS811dn, MS812dn 45 Learning about the printer...45 Printer configurations ...45 Using the printer control panel...47 Understanding the colors of the ...
User's Guide
Page 45
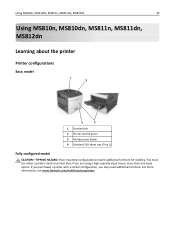
Using MS810n, MS810dn, MS811n, MS811dn, MS812dn 45 Using MS810n, MS810dn, MS811n, MS811dn, MS812dn Learning about the printer Printer configurations Basic model 1 2 4 3 1 Standard bin 2 Printer control panel 3 Multipurpose feeder 4 Standard 550‑sheet tray (Tray 1) Fully configured model CAUTION-TIPPING HAZARD: Floor...stability. If you purchased a printer with a similar configuration, you are using a high-capacity input tray or more information, see www.lexmark.com/multifunctionprinters. You must use either a printer stand or printer base if you may need additional furniture...
Using MS810n, MS810dn, MS811n, MS811dn, MS812dn 45 Using MS810n, MS810dn, MS811n, MS811dn, MS812dn Learning about the printer Printer configurations Basic model 1 2 4 3 1 Standard bin 2 Printer control panel 3 Multipurpose feeder 4 Standard 550‑sheet tray (Tray 1) Fully configured model CAUTION-TIPPING HAZARD: Floor...stability. If you purchased a printer with a similar configuration, you are using a high-capacity input tray or more information, see www.lexmark.com/multifunctionprinters. You must use either a printer stand or printer base if you may need additional furniture...
User's Guide
Page 46
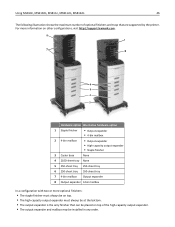
...MS811dn, MS812dn 46 The following illustration shows the maximum number of the high‑capacity output expander. • The output expander and mailbox may be placed on top. • The high‑capacity output expander must always be on top of optional finishers and trays... that are supported by the printer. For more information on other configurations, visit http://support.lexmark.com. 8 1 7 2 6 5 4 3 Hardware option Alternative hardware option 1 Staple finisher &#...
...MS811dn, MS812dn 46 The following illustration shows the maximum number of the high‑capacity output expander. • The output expander and mailbox may be placed on top. • The high‑capacity output expander must always be on top of optional finishers and trays... that are supported by the printer. For more information on other configurations, visit http://support.lexmark.com. 8 1 7 2 6 5 4 3 Hardware option Alternative hardware option 1 Staple finisher &#...
User's Guide
Page 47
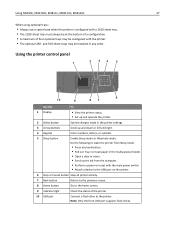
...8226; Perform a power‑on reset with the printer. • The optional 250‑ and 550‑sheet trays may be installed in any hard button. • Pull out Tray 1 or load paper in the printer settings. 3 Arrow buttons Scroll up and down or left and right. 4... button Enable Sleep mode or Hibernate mode. Using MS810n, MS810dn, MS811n, MS811dn, MS812dn 47 When using optional trays: • Always use a caster base when the printer is configured with a 2100‑sheet tray. • The 2100‑sheet tray must always be at the bottom of a configuration. • A maximum...
...8226; Perform a power‑on reset with the printer. • The optional 250‑ and 550‑sheet trays may be installed in any hard button. • Pull out Tray 1 or load paper in the printer settings. 3 Arrow buttons Scroll up and down or left and right. 4... button Enable Sleep mode or Hibernate mode. Using MS810n, MS810dn, MS811n, MS811dn, MS812dn 47 When using optional trays: • Always use a caster base when the printer is configured with a 2100‑sheet tray. • The 2100‑sheet tray must always be at the bottom of a configuration. • A maximum...

User's Guide
Page 48
... is idle or in the printer menus. The printer is in Hibernate mode. The printer is in Hibernate mode. Using MS810n, MS810dn, MS811n, MS811dn, MS812dn 48 Understanding the colors of the indicator and Sleep button lights The colors of paper and specialty media can affect how reliably documents print...1 From the printer control panel, navigate to: > Settings > > Paper Menu > > Paper Size/Type > 2 Press the up or down arrow button to select the tray or feeder, and then press . 3 Press the up or down arrow button to select the paper size, and then press . 4 Press the up , processing data...
... is idle or in the printer menus. The printer is in Hibernate mode. The printer is in Hibernate mode. Using MS810n, MS810dn, MS811n, MS811dn, MS812dn 48 Understanding the colors of the indicator and Sleep button lights The colors of paper and specialty media can affect how reliably documents print...1 From the printer control panel, navigate to: > Settings > > Paper Menu > > Paper Size/Type > 2 Press the up or down arrow button to select the tray or feeder, and then press . 3 Press the up or down arrow button to select the paper size, and then press . 4 Press the up , processing data...
User's Guide
Page 49
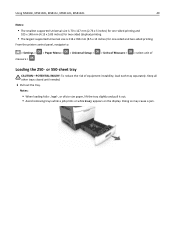
... loading folio‑, legal‑, or oficio‑size paper, lift the tray slightly and pull it out. • Avoid removing trays while a job prints or while Busy appears on the display. Using MS810n, MS810dn, MS811n, MS811dn, MS812dn 49 Notes: • The smallest supported Universal size is 70 x... x 356 mm (8.5 x 14 inches) for one‑sided and two‑sided printing. Doing so may cause a jam. Keep all other trays closed until needed. 1 Pull out the tray. From the printer control panel, navigate to: > Settings > measure > > Paper Menu > > Universal Setup > > Units of Measure >...
... loading folio‑, legal‑, or oficio‑size paper, lift the tray slightly and pull it out. • Avoid removing trays while a job prints or while Busy appears on the display. Using MS810n, MS810dn, MS811n, MS811dn, MS812dn 49 Notes: • The smallest supported Universal size is 70 x... x 356 mm (8.5 x 14 inches) for one‑sided and two‑sided printing. Doing so may cause a jam. Keep all other trays closed until needed. 1 Pull out the tray. From the printer control panel, navigate to: > Settings > measure > > Paper Menu > > Universal Setup > > Units of Measure >...
User's Guide
Page 50
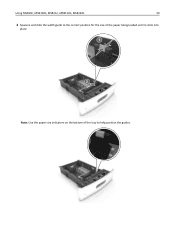
Using MS810n, MS810dn, MS811n, MS811dn, MS812dn 50 2 Squeeze and slide the width guide to the correct position for the size of the paper being loaded until it clicks into place. 1 2 Note: Use the paper size indicators on the bottom of the tray to help position the guides.
Using MS810n, MS810dn, MS811n, MS811dn, MS812dn 50 2 Squeeze and slide the width guide to the correct position for the size of the paper being loaded until it clicks into place. 1 2 Note: Use the paper size indicators on the bottom of the tray to help position the guides.
User's Guide
Page 51
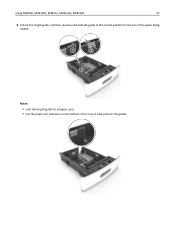
Using MS810n, MS810dn, MS811n, MS811dn, MS812dn 51 3 Unlock the length guide, and then squeeze and slide the guide to the correct position for the size of the paper being loaded. 1 2 3 Notes: • Lock the length guide for all paper sizes. • Use the paper size indicators on the bottom of the tray to help position the guides.
Using MS810n, MS810dn, MS811n, MS811dn, MS812dn 51 3 Unlock the length guide, and then squeeze and slide the guide to the correct position for the size of the paper being loaded. 1 2 3 Notes: • Lock the length guide for all paper sizes. • Use the paper size indicators on the bottom of the tray to help position the guides.
User's Guide
Page 53
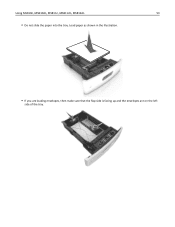
Using MS810n, MS810dn, MS811n, MS811dn, MS812dn 53 • Do not slide the paper into the tray. Load paper as shown in the illustration. • If you are loading envelopes, then make sure that the flap side is facing up and the envelopes are on the left side of the tray.
Using MS810n, MS810dn, MS811n, MS811dn, MS812dn 53 • Do not slide the paper into the tray. Load paper as shown in the illustration. • If you are loading envelopes, then make sure that the flap side is facing up and the envelopes are on the left side of the tray.
User's Guide
Page 54
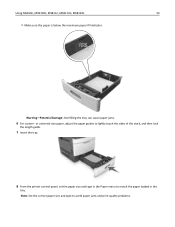
Warning-Potential Damage: Overfilling the tray can cause paper jams. 6 For custom‑ or universal‑size paper, adjust the paper guides to lightly touch the sides of the stack, and then lock the length guide. 7 Insert the tray. 8 From the printer control panel, set the paper size and type in the tray. Note: Set the correct paper size and type to match the paper loaded in the Paper menu to avoid paper jams and print quality problems. Using MS810n, MS810dn, MS811n, MS811dn, MS812dn 54 • Make sure the paper is below the maximum paper fill indicator.
Warning-Potential Damage: Overfilling the tray can cause paper jams. 6 For custom‑ or universal‑size paper, adjust the paper guides to lightly touch the sides of the stack, and then lock the length guide. 7 Insert the tray. 8 From the printer control panel, set the paper size and type in the tray. Note: Set the correct paper size and type to match the paper loaded in the Paper menu to avoid paper jams and print quality problems. Using MS810n, MS810dn, MS811n, MS811dn, MS812dn 54 • Make sure the paper is below the maximum paper fill indicator.
User's Guide
Page 55
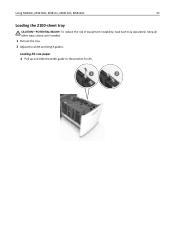
Loading A5‑size paper a Pull up and slide the width guide to the position for A5. 1 LGLOFCFOLLITOR A4 A5 2 LGLOFCFOLLITOR A4 A5 LGLOFCFOLILOTR A4 A5 Keep all other trays closed until needed. 1 Pull out the tray. 2 Adjust the width and length guides. Using MS810n, MS810dn, MS811n, MS811dn, MS812dn 55 Loading the 2100‑sheet tray CAUTION-POTENTIAL INJURY: To reduce the risk of equipment instability, load each tray separately.
Loading A5‑size paper a Pull up and slide the width guide to the position for A5. 1 LGLOFCFOLLITOR A4 A5 2 LGLOFCFOLLITOR A4 A5 LGLOFCFOLILOTR A4 A5 Keep all other trays closed until needed. 1 Pull out the tray. 2 Adjust the width and length guides. Using MS810n, MS810dn, MS811n, MS811dn, MS812dn 55 Loading the 2100‑sheet tray CAUTION-POTENTIAL INJURY: To reduce the risk of equipment instability, load each tray separately.
User's Guide
Page 61
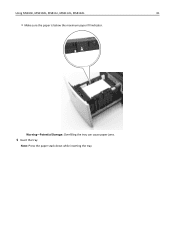
Note: Press the paper stack down while inserting the tray. Using MS810n, MS810dn, MS811n, MS811dn, MS812dn 61 • Make sure the paper is below the maximum paper fill indicator. Warning-Potential Damage: Overfilling the tray can cause paper jams. 5 Insert the tray.
Note: Press the paper stack down while inserting the tray. Using MS810n, MS810dn, MS811n, MS811dn, MS812dn 61 • Make sure the paper is below the maximum paper fill indicator. Warning-Potential Damage: Overfilling the tray can cause paper jams. 5 Insert the tray.
User's Guide
Page 62
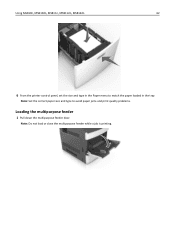
Using MS810n, MS810dn, MS811n, MS811dn, MS812dn 62 6 From the printer control panel, set the size and type in the tray. EXECB5 A4 A5 LTR Note: Do not load or close the multipurpose feeder while a job is printing. Note: Set the correct paper size and type to match the paper loaded in the Paper menu to avoid paper jams and print quality problems. Loading the multipurpose feeder 1 Pull down the multipurpose feeder door.
Using MS810n, MS810dn, MS811n, MS811dn, MS812dn 62 6 From the printer control panel, set the size and type in the tray. EXECB5 A4 A5 LTR Note: Do not load or close the multipurpose feeder while a job is printing. Note: Set the correct paper size and type to match the paper loaded in the Paper menu to avoid paper jams and print quality problems. Loading the multipurpose feeder 1 Pull down the multipurpose feeder door.
User's Guide
Page 63
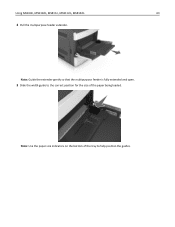
Note: Guide the extender gently so that the multipurpose feeder is fully extended and open. 3 Slide the width guide to the correct position for the size of the tray to help position the guides. Note: Use the paper size indicators on the bottom of the paper being loaded. EXECB5 A4 A5 LTR EXECB5 A4 A5 LTR Using MS810n, MS810dn, MS811n, MS811dn, MS812dn 63 2 Pull the multipurpose feeder extender.
Note: Guide the extender gently so that the multipurpose feeder is fully extended and open. 3 Slide the width guide to the correct position for the size of the tray to help position the guides. Note: Use the paper size indicators on the bottom of the paper being loaded. EXECB5 A4 A5 LTR EXECB5 A4 A5 LTR Using MS810n, MS810dn, MS811n, MS811dn, MS812dn 63 2 Pull the multipurpose feeder extender.
User's Guide
Page 66
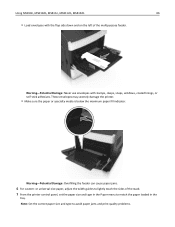
Using MS810n, MS810dn, MS811n, MS811dn, MS812dn 66 • Load envelopes with stamps, clasps, snaps, windows, coated linings, or self‑stick adhesives. Warning-Potential Damage: Overfilling the feeder can cause ... Paper menu to avoid paper jams and print quality problems. Note: Set the correct paper size and type to match the paper loaded in the tray.
Using MS810n, MS810dn, MS811n, MS811dn, MS812dn 66 • Load envelopes with stamps, clasps, snaps, windows, coated linings, or self‑stick adhesives. Warning-Potential Damage: Overfilling the feeder can cause ... Paper menu to avoid paper jams and print quality problems. Note: Set the correct paper size and type to match the paper loaded in the tray.
User's Guide
Page 67
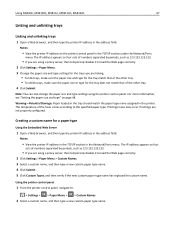
...it to load the Web page correctly. 2 Click Settings > Paper Menu. 3 Change the paper size and type settings for the tray does not match that of the other tray. 4 Click Submit. Notes: • View the printer IP address in the TCP/IP section in the TCP/IP section under ...name has replaced the custom name. Notes: • View the printer IP address on page 48. Using MS810n, MS810dn, MS811n, MS811dn, MS812dn 67 Linking and unlinking trays Linking and unlinking trays 1 Open a Web browser, and then type the printer IP address in the address field. Using the printer control panel 1 ...
...it to load the Web page correctly. 2 Click Settings > Paper Menu. 3 Change the paper size and type settings for the tray does not match that of the other tray. 4 Click Submit. Notes: • View the printer IP address in the TCP/IP section in the TCP/IP section under ...name has replaced the custom name. Notes: • View the printer IP address on page 48. Using MS810n, MS810dn, MS811n, MS811dn, MS812dn 67 Linking and unlinking trays Linking and unlinking trays 1 Open a Web browser, and then type the printer IP address in the address field. Using the printer control panel 1 ...
User's Guide
Page 69
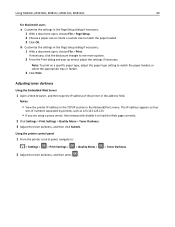
...123.123.123.123. • If you are using a proxy server, then temporarily disable it to match the paper loaded, or select the appropriate tray or feeder. 3 Click Print. Notes: • View the printer IP address in the TCP/IP section in the address field. Using MS810n, MS810dn, ...MS811n, MS811dn, MS812dn 69 For Macintosh users a Customize the settings in the Page Setup dialog if necessary: 1 With a document open , choose File > Print. b Customize the settings...
...123.123.123.123. • If you are using a proxy server, then temporarily disable it to match the paper loaded, or select the appropriate tray or feeder. 3 Click Print. Notes: • View the printer IP address in the TCP/IP section in the address field. Using MS810n, MS810dn, ...MS811n, MS811dn, MS812dn 69 For Macintosh users a Customize the settings in the Page Setup dialog if necessary: 1 With a document open , choose File > Print. b Customize the settings...

