
IPDS Emulation User’s Guide
Page 8
...printer becomes an IBM host workstation printer capable of the following: • Standard Network (Ethernet connection integrated into printer system board on selected printer models) 8 Refer to install the Card. If you need basic information about your printer. If you ...using the front panel to the following printers: • Lexmark C770, C772 (IPDS color and monochrome printing, SCS monochrome printing only) • Lexmark C780, C782 (IPDS color and monochrome printing, SCS monochrome printing only) • Lexmark C920 (IPDS color and monochrome printing, SCS monochrome printing ...
...printer becomes an IBM host workstation printer capable of the following: • Standard Network (Ethernet connection integrated into printer system board on selected printer models) 8 Refer to install the Card. If you need basic information about your printer. If you ...using the front panel to the following printers: • Lexmark C770, C772 (IPDS color and monochrome printing, SCS monochrome printing only) • Lexmark C780, C782 (IPDS color and monochrome printing, SCS monochrome printing only) • Lexmark C920 (IPDS color and monochrome printing, SCS monochrome printing ...
IPDS Printer and Host Setup Guide
Page 4
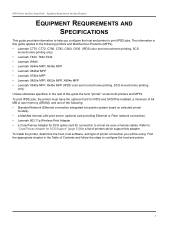
...; Standard Network (Ethernet connection integrated into printer system board on selected printer models). • a MarkNet internal LAN print server (optional card providing Ethernet or Fiber network connection). • Lexmark 802.11g Wireless Print Adapter • a Coax/Twinax...Lexmark C770, C772, C780, C782, C920, C935 (IPDS color and monochrome printing, SCS monochrome printing only) • Lexmark T640, T642,T644 • Lexmark W840 • Lexmark X644e MFP, X646e MFP • Lexmark X646ef MFP • Lexmark X782e MFP • Lexmark X850e MFP, X852e MFP, X854e MFP • Lexmark...
...; Standard Network (Ethernet connection integrated into printer system board on selected printer models). • a MarkNet internal LAN print server (optional card providing Ethernet or Fiber network connection). • Lexmark 802.11g Wireless Print Adapter • a Coax/Twinax...Lexmark C770, C772, C780, C782, C920, C935 (IPDS color and monochrome printing, SCS monochrome printing only) • Lexmark T640, T642,T644 • Lexmark W840 • Lexmark X644e MFP, X646e MFP • Lexmark X646ef MFP • Lexmark X782e MFP • Lexmark X850e MFP, X852e MFP, X854e MFP • Lexmark...
Troubleshooting Guide
Page 3
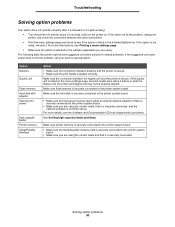
... See Solving high capacity feeder capacity problems. feeder Printer Make sure printer memory is securely memory connected to the printer interface system board. • Make sure you are positioned correctly for related problems. If the suggested corrective actions for the paper size selected. .... Option Action Drawers • Make sure the connection between the duplex unit and the printer is securely connected to the printer system board. Option Action Serial/ • Make sure the Serial/parallel interface Parallel card is secure. More than one sheet of the high ...
... See Solving high capacity feeder capacity problems. feeder Printer Make sure printer memory is securely memory connected to the printer interface system board. • Make sure you are positioned correctly for related problems. If the suggested corrective actions for the paper size selected. .... Option Action Drawers • Make sure the connection between the duplex unit and the printer is securely connected to the printer system board. Option Action Serial/ • Make sure the Serial/parallel interface Parallel card is secure. More than one sheet of the high ...

User's Guide
Page 5
... INAs) Note: Some options may not be available on some models. 1 Installing and removing options You can also use these instructions to remove the system board access cover. • Other internal options - Installing and removing options 5 Printer hard disk - Install the printer and any options you have purchased in this section...
... INAs) Note: Some options may not be available on some models. 1 Installing and removing options You can also use these instructions to remove the system board access cover. • Other internal options - Installing and removing options 5 Printer hard disk - Install the printer and any options you have purchased in this section...

User's Guide
Page 15
... the finisher for the card you want to the printer. Installing and removing options Installing a StapleSmart finisher Your printer supports a StapleSmart finisher. Removing the system board access cover 1 Locate the access cover on the back of the printer. 2 Remove the four access cover screws (two at top, two at bottom). 3 Remove...
... the finisher for the card you want to the printer. Installing and removing options Installing a StapleSmart finisher Your printer supports a StapleSmart finisher. Removing the system board access cover 1 Locate the access cover on the back of the printer. 2 Remove the four access cover screws (two at top, two at bottom). 3 Remove...
User's Guide
Page 16
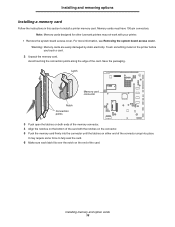
... open the latches on both ends of the memory connector. 4 Align the notches on the bottom of the card with your printer. 1 Remove the system board access cover. Installing and removing options Installing a memory card Follow the instructions in this section to fully seat the card. 6 Make sure each latch fits... the printer before you touch a card. 2 Unpack the memory card. Touch something metal on either end of the card. Note: Memory cards designed for other Lexmark printers may require some force to install a printer memory card. For more information, see Removing the system...
... open the latches on both ends of the memory connector. 4 Align the notches on the bottom of the card with your printer. 1 Remove the system board access cover. Installing and removing options Installing a memory card Follow the instructions in this section to fully seat the card. 6 Make sure each latch fits... the printer before you touch a card. 2 Unpack the memory card. Touch something metal on either end of the card. Note: Memory cards designed for other Lexmark printers may require some force to install a printer memory card. For more information, see Removing the system...
User's Guide
Page 17
... memory cards are easily damaged by its sides, align the pins on the card with your printer. For more information, see Removing the system board access cover. 2 Unpack the card. Save the packaging. 3 Holding the card by static electricity. Be careful not to install an optional "option... flash memory card. Note: "Option-added" firmware and flash memory cards offered for other Lexmark printers cannot be used with the holes on the printer before you touch a card. 1 Remove the system board access cover. Pins Installing memory and option cards 17 "Option-added" fiOnly one of each...
... memory cards are easily damaged by its sides, align the pins on the card with your printer. For more information, see Removing the system board access cover. 2 Unpack the card. Save the packaging. 3 Holding the card by static electricity. Be careful not to install an optional "option... flash memory card. Note: "Option-added" firmware and flash memory cards offered for other Lexmark printers cannot be used with the holes on the printer before you touch a card. 1 Remove the system board access cover. Pins Installing memory and option cards 17 "Option-added" fiOnly one of each...
User's Guide
Page 18
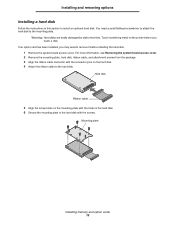
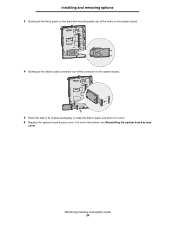
If an option card has been installed, you touch a disk. For more information, see Removing the system board access cover. 2 Remove the mounting plate, hard disk, ribbon cable, and attachment screws from the package. 3 Align the ribbon cable connector with the connector pins... to the mounting plate. Mounting plate Installing memory and option cards 18 You need to remove it before installing the hard disk. 1 Remove the system board access cover. Installing and removing options Installing a hard disk Follow the instructions in the hard disk. 6 Secure the mounting plate to the hard disk ...
If an option card has been installed, you touch a disk. For more information, see Removing the system board access cover. 2 Remove the mounting plate, hard disk, ribbon cable, and attachment screws from the package. 3 Align the ribbon cable connector with the connector pins... to the mounting plate. Mounting plate Installing memory and option cards 18 You need to remove it before installing the hard disk. 1 Remove the system board access cover. Installing and removing options Installing a hard disk Follow the instructions in the hard disk. 6 Secure the mounting plate to the hard disk ...

User's Guide
Page 19
Installing memory and option cards 19 Installing and removing options 7 Press the ribbon cable connector into the connector on the system board. 8 Flip the hard disk over, and then press the three posts on the system board. The hard disk snaps into the holes on the mounting plate into place.
Installing memory and option cards 19 Installing and removing options 7 Press the ribbon cable connector into the connector on the system board. 8 Flip the hard disk over, and then press the three posts on the system board. The hard disk snaps into the holes on the mounting plate into place.

User's Guide
Page 20
...option card connector. Touch something metal on the printer before you can connect your printer to install these options. 1 Remove the system board access cover. Save the packing materials. 4 Align the connector on the option card with an integrated Ethernet print server already installed. ...The following table describes their function. The cable connectors on the system board. Installing and removing options Installing an option card Your printer has one expansion card slot that covers the connector slot, and ...
...option card connector. Touch something metal on the printer before you can connect your printer to install these options. 1 Remove the system board access cover. Save the packing materials. 4 Align the connector on the option card with an integrated Ethernet print server already installed. ...The following table describes their function. The cable connectors on the system board. Installing and removing options Installing an option card Your printer has one expansion card slot that covers the connector slot, and ...
User's Guide
Page 21
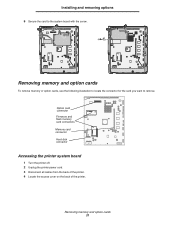
Removing memory and option cards To remove memory or option cards, use the following illustration to locate the connector for the card you want to the system board with the screw. Option card connector Firmware and flash memory card connectors Memory card connector Hard disk connector Accessing the printer system board 1 Turn the printer off. 2 Unplug the printer power cord. 3 Disconnect all cables from the back of the printer. 4 Locate the access cover on the back of the printer. Installing and removing options 6 Secure the card to remove. Removing memory and option cards 21
Removing memory and option cards To remove memory or option cards, use the following illustration to locate the connector for the card you want to the system board with the screw. Option card connector Firmware and flash memory card connectors Memory card connector Hard disk connector Accessing the printer system board 1 Turn the printer off. 2 Unplug the printer power cord. 3 Disconnect all cables from the back of the printer. 4 Locate the access cover on the back of the printer. Installing and removing options 6 Secure the card to remove. Removing memory and option cards 21
User's Guide
Page 22
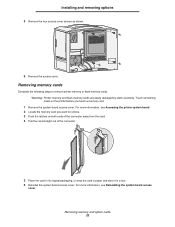
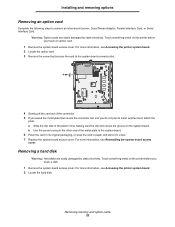
... 5 Place the card in its original packaging, or wrap the card in paper and store it in a box. 6 Reinstall the system board access cover. Warning: Printer memory and flash memory cards are easily damaged by static electricity. Removing memory and option cards 22 For more information,... see Reinstalling the system board access cover. Removing memory cards Complete the following steps to remove. 3 Push the latches on the printer before you touch a memory card....
... 5 Place the card in its original packaging, or wrap the card in paper and store it in a box. 6 Reinstall the system board access cover. Warning: Printer memory and flash memory cards are easily damaged by static electricity. Removing memory and option cards 22 For more information,... see Reinstalling the system board access cover. Removing memory cards Complete the following steps to remove. 3 Push the latches on the printer before you touch a memory card....
User's Guide
Page 23
... static electricity. Removing memory and option cards 23 For more information, see Accessing the printer system board. 2 Locate the hard disk. Touch something metal on the system board. Warning: Option cards are easily damaged by static electricity. b Use the screw to secure the... metal on the printer before you touch a disk. 1 Remove the system board access cover. For more information, see Reinstalling the system board access cover. For more information, see Accessing the printer system board. 2 Locate the option card. 3 Remove the screw that covers the connector...
... static electricity. Removing memory and option cards 23 For more information, see Accessing the printer system board. 2 Locate the hard disk. Touch something metal on the system board. Warning: Option cards are easily damaged by static electricity. b Use the screw to secure the... metal on the printer before you touch a disk. 1 Remove the system board access cover. For more information, see Reinstalling the system board access cover. For more information, see Accessing the printer system board. 2 Locate the option card. 3 Remove the screw that covers the connector...
User's Guide
Page 24
Installing and removing options 3 Gently pull the three posts on the hard disk mounting plate out of the holes on the system board. 4 Gently pull the ribbon cable connector out of the connector on the system board. 5 Place the disk in its original packaging, or wrap the disk in paper and store it in a box. 6 Replace the system board access cover. For more information, see Reinstalling the system board access cover. Removing memory and option cards 24
Installing and removing options 3 Gently pull the three posts on the hard disk mounting plate out of the holes on the system board. 4 Gently pull the ribbon cable connector out of the connector on the system board. 5 Place the disk in its original packaging, or wrap the disk in paper and store it in a box. 6 Replace the system board access cover. For more information, see Reinstalling the system board access cover. Removing memory and option cards 24
User's Guide
Page 25
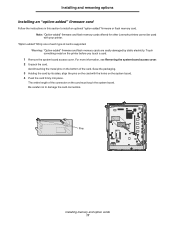
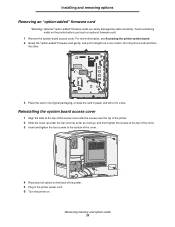
... card in its original packaging, or wrap the card in paper and store it in one motion. For more information, see Accessing the printer system board. 2 Grasp the "option-added" firmware card gently, and pull it will go, and then tighten the screws at the top of the cover. 3... and removing options Removing an "option-added" firmware card Warning: Optional "option-added" firmware cards are easily damaged by static electricity. Reinstalling the system board access cover 1 Align the slots at the top of the access cover with the screws near the top of the printer. 5 Plug in the printer...
... card in its original packaging, or wrap the card in paper and store it in one motion. For more information, see Accessing the printer system board. 2 Grasp the "option-added" firmware card gently, and pull it will go, and then tighten the screws at the top of the cover. 3... and removing options Removing an "option-added" firmware card Warning: Optional "option-added" firmware cards are easily damaged by static electricity. Reinstalling the system board access cover 1 Align the slots at the top of the access cover with the screws near the top of the printer. 5 Plug in the printer...
User's Guide
Page 90
... corrective action does not fix the problem, call your printer. Make sure the hard disk is securely connected to the printer system board. • Make sure the internal print server (also called an internal network adapter or INA) is securely connected to the printer system... menu settings page and check to see Printing a menu settings page. • Make sure the option is securely connected to the printer system board. • Make sure you are using the correct cable, that shipped with adapter Internal print server High capacity feeder Printer memory Serial/Parallel interface...
... corrective action does not fix the problem, call your printer. Make sure the hard disk is securely connected to the printer system board. • Make sure the internal print server (also called an internal network adapter or INA) is securely connected to the printer system... menu settings page and check to see Printing a menu settings page. • Make sure the option is securely connected to the printer system board. • Make sure you are using the correct cable, that shipped with adapter Internal print server High capacity feeder Printer memory Serial/Parallel interface...
User's Guide
Page 107
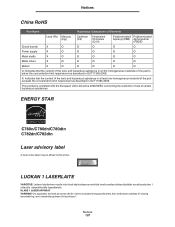
.... Notices China RoHS Part Name Hazardous Substances or Elements Lead (Pb) Mercury (Hg) Cadmium (Cd) Hexavalent Chromium (CrVI) Polybrominated Polybrominated biphenyl (PBB) diphenylether (PBDE) Circuit boards X O O O O O Power supply X O O O O O Metal shafts X O O O O O Metal rollers X O O O O O Motors X O O O O O O: Indicates that the content of the toxic and hazardous substance in at least one homogeneous material of certain...
.... Notices China RoHS Part Name Hazardous Substances or Elements Lead (Pb) Mercury (Hg) Cadmium (Cd) Hexavalent Chromium (CrVI) Polybrominated Polybrominated biphenyl (PBB) diphenylether (PBDE) Circuit boards X O O O O O Power supply X O O O O O Metal shafts X O O O O O Metal rollers X O O O O O Motors X O O O O O O: Indicates that the content of the toxic and hazardous substance in at least one homogeneous material of certain...
User's Guide
Page 111
L labels guidelines 52 laser notice 107 letterhead 50 guidelines 50 page orientation 51 printing 51 Lexmark Authorized Supplies Dealers 60 linking 40 bins 41 trays 40 loading 2000-sheet tray 35 500-sheet trays 33 multipurpose feeder 37 lock feature, security ... Power Saver, adjusting 80 preprinted forms 50 Print and Hold function see held jobs 41 print server installing printer memory option, removing 22 printer system board 21 accessing 21 closing 25 problems incorrect characters print 89 job didn't print 88 job prints 89 from wrong tray 89 on wrong paper or...
L labels guidelines 52 laser notice 107 letterhead 50 guidelines 50 page orientation 51 printing 51 Lexmark Authorized Supplies Dealers 60 linking 40 bins 41 trays 40 loading 2000-sheet tray 35 500-sheet trays 33 multipurpose feeder 37 lock feature, security ... Power Saver, adjusting 80 preprinted forms 50 Print and Hold function see held jobs 41 print server installing printer memory option, removing 22 printer system board 21 accessing 21 closing 25 problems incorrect characters print 89 job didn't print 88 job prints 89 from wrong tray 89 on wrong paper or...
User's Guide
Page 112
..., maximum multipurpose feeder 38 trays 1, 2, 3 34, 36 Stop button 27 storing 46 media 53 paper 46 supplies 46 supplies print cartridge 61 storing 46 system board accessing 15 T transfer roller ordering 63 tray linking 40 U unpacking memory cards 16 option cards 20 USB Direct interface 29 USB flash memory device 29...
..., maximum multipurpose feeder 38 trays 1, 2, 3 34, 36 Stop button 27 storing 46 media 53 paper 46 supplies 46 supplies print cartridge 61 storing 46 system board accessing 15 T transfer roller ordering 63 tray linking 40 U unpacking memory cards 16 option cards 20 USB Direct interface 29 USB flash memory device 29...
Service Manual
Page 7
5061 Auto Color Adjust 3-34 Paper Prompts 3-34 Env Prompts 3-34 Font Sharpening 3-34 Jobs On Disk 3-35 Disk Encryption 3-35 Exit Config Menu 3-35 Paper jams 3-36 Identifying jams 3-36 Access doors and trays 3-36 Understanding jam messages 3-37 Paper jam messages 3-37 Clearing the entire paper path 3-38 Area A 3-38 Area B 3-39 Area C 3-39 Area D 3-40 Area T1 3-40 Area E 3-41 Area T
5061 Auto Color Adjust 3-34 Paper Prompts 3-34 Env Prompts 3-34 Font Sharpening 3-34 Jobs On Disk 3-35 Disk Encryption 3-35 Exit Config Menu 3-35 Paper jams 3-36 Identifying jams 3-36 Access doors and trays 3-36 Understanding jam messages 3-37 Paper jam messages 3-37 Clearing the entire paper path 3-38 Area A 3-38 Area B 3-39 Area C 3-39 Area D 3-40 Area T1 3-40 Area E 3-41 Area T

