
IPDS Emulation User’s Guide
Page 26
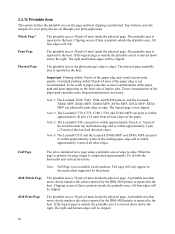
.... The physical page printable area is formatted for your print jobs are set through your print application. Print Page The printable area is printed outside the printable area. All four edges will be clipped. Note 2: The Lexmark C770, C772, C780, C782, and X782e MFP can make more closely matches the ... four edges of the paper edge is not clipped. Note: Full Page is printed outside the printable area. Top, bottom, and side margins for a page using a printable area of the paper path can print to the host. Toner contamination of edge to the host. Full Page The ...
.... The physical page printable area is formatted for your print jobs are set through your print application. Print Page The printable area is printed outside the printable area. All four edges will be clipped. Note 2: The Lexmark C770, C772, C780, C782, and X782e MFP can make more closely matches the ... four edges of the paper edge is not clipped. Note: Full Page is printed outside the printable area. Top, bottom, and side margins for a page using a printable area of the paper path can print to the host. Toner contamination of edge to the host. Full Page The ...
IPDS Emulation User’s Guide
Page 33
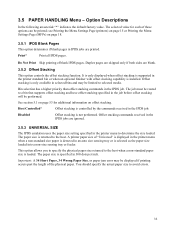
... pages. Duplex pages are skipped only if both sides are printed. Offset stacking commands received in the IPDS jobs are ignored. ...bin that supports offset stacking and have offset stacking specified in selected bins and may be displayed if printing occurs past the length of these options can be limited to the host when a non-standard paper ...the default factory value. Bin selection has a higher priority than offset stacking commands in the IPDS job. Do Not Print Skip printing of "Universal" is displayed in the printer menu when a non-standard size paper is not performed. A printer...
... pages. Duplex pages are skipped only if both sides are printed. Offset stacking commands received in the IPDS jobs are ignored. ...bin that supports offset stacking and have offset stacking specified in selected bins and may be displayed if printing occurs past the length of these options can be limited to the host when a non-standard paper ...the default factory value. Bin selection has a higher priority than offset stacking commands in the IPDS job. Do Not Print Skip printing of "Universal" is displayed in the printer menu when a non-standard size paper is not performed. A printer...

IPDS Emulation User’s Guide
Page 44
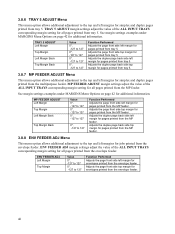
...each of the ALL INPUT TRAYS corresponding margin setting for simplex and duplex pages to 127 Function Performed Adjusts the page front side left margin for pages printed from all input trays and feeders. TRAY 1 ADJUST margin settings adjust the value of the margin menu options. 3.8.1 ...TRAYS Menu This menu option allows the top and left margin for pages printed from all pages printed from tray 1. Adjusts the page front side top margin for pages printed from tray 1. Adjusts the duplex page back side left margins for all input trays and feeders. Margin menu option ALL ...
...each of the ALL INPUT TRAYS corresponding margin setting for simplex and duplex pages to 127 Function Performed Adjusts the page front side left margin for pages printed from all input trays and feeders. TRAY 1 ADJUST margin settings adjust the value of the margin menu options. 3.8.1 ...TRAYS Menu This menu option allows the top and left margin for pages printed from all pages printed from tray 1. Adjusts the page front side top margin for pages printed from tray 1. Adjusts the duplex page back side left margins for all input trays and feeders. Margin menu option ALL ...

IPDS Emulation User’s Guide
Page 45
...-127 to 127 0*, -127 to 127 0*, -127 to 127 0*, -127 to 127 Function Performed Adjusts the page front side left margin for pages printed from tray 4. See margin settings examples under MARGINS Menu Options on page 42 for additional information. TRAY 4 ADJUST margin settings adjust... 4 ADJUST Menu This menu option allows additional adjustment to the top and left margins for simplex and duplex pages printed from tray 4. Adjusts the page front side top margin for additional information. See margin settings examples under MARGINS Menu Options on page 42 for additional information....
...-127 to 127 0*, -127 to 127 0*, -127 to 127 0*, -127 to 127 Function Performed Adjusts the page front side left margin for pages printed from tray 4. See margin settings examples under MARGINS Menu Options on page 42 for additional information. TRAY 4 ADJUST margin settings adjust... 4 ADJUST Menu This menu option allows additional adjustment to the top and left margins for simplex and duplex pages printed from tray 4. Adjusts the page front side top margin for additional information. See margin settings examples under MARGINS Menu Options on page 42 for additional information....
IPDS Emulation User’s Guide
Page 46
... additional information. See margin settings examples under MARGINS Menu Options on page 42 for all pages printed from the envelope feeder. Adjusts the duplex page back side left margin for envelopes printed from the envelope feeder. ENV FEEDER ADJ Left Margin Top Margin Value 0*, -127 to 127...-127 to 127 0*, -127 to 127 0*, -127 to 127 0*, -127 to 127 Function Performed Adjusts the page front side left margin for all pages printed from tray 5. ENV FEEDER ADJ margin settings adjust the value of the ALL INPUT TRAYS corresponding margin setting for additional information. ...
... additional information. See margin settings examples under MARGINS Menu Options on page 42 for all pages printed from the envelope feeder. Adjusts the duplex page back side left margin for envelopes printed from the envelope feeder. ENV FEEDER ADJ Left Margin Top Margin Value 0*, -127 to 127...-127 to 127 0*, -127 to 127 0*, -127 to 127 0*, -127 to 127 Function Performed Adjusts the page front side left margin for all pages printed from tray 5. ENV FEEDER ADJ margin settings adjust the value of the ALL INPUT TRAYS corresponding margin setting for additional information. ...
IPDS Emulation User’s Guide
Page 62
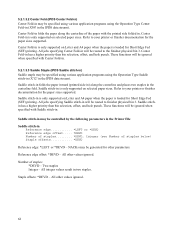
... staple may be specified using various application programs using the Operation Type Center Fold-in (X'08' in will be ignored when specified with the printed side folded in is only supported on selected paper sizes. Saddle stitch-in may be controlled by the following parameters in the Printer File Saddle stitch... functions will be routed to finisher physical bin 3. Two staples Integer - Saddle stitch-in folds the paper inward (printed side in) along the centerline of staples: *DEVD - Saddle stitch-in . Center Fold-in folds the paper along the centerline and places two staples in...
... staple may be specified using various application programs using the Operation Type Center Fold-in (X'08' in will be ignored when specified with the printed side folded in is only supported on selected paper sizes. Saddle stitch-in may be controlled by the following parameters in the Printer File Saddle stitch... functions will be routed to finisher physical bin 3. Two staples Integer - Saddle stitch-in folds the paper inward (printed side in) along the centerline of staples: *DEVD - Saddle stitch-in . Center Fold-in folds the paper along the centerline and places two staples in...
IPDS Emulation User’s Guide
Page 65
... paper sizes. Refer to your printer or finisher documentation to determine the finishing support and staple location for Short Edge Fed (SEF) printing. Saddle stitch-in will be routed to specify the Printer File parameters for Saddle staple is loaded for various paper sizes How to ...Saddle stitch-in . Saddle stitch-in folds the paper inward (printed side in) along the centerline and places two staples in is only supported on the host with IPDS code 3.01-01257 (or greater). Refer to all paper sizes. 5.2.2.3 Lexmark C935, X940e MFP, X945e MFP, X850e MFP, X852e MFP...
... paper sizes. Refer to your printer or finisher documentation to determine the finishing support and staple location for Short Edge Fed (SEF) printing. Saddle stitch-in will be routed to specify the Printer File parameters for Saddle staple is loaded for various paper sizes How to ...Saddle stitch-in . Saddle stitch-in folds the paper inward (printed side in) along the centerline and places two staples in is only supported on the host with IPDS code 3.01-01257 (or greater). Refer to all paper sizes. 5.2.2.3 Lexmark C935, X940e MFP, X945e MFP, X850e MFP, X852e MFP...
User's Guide
Page 34
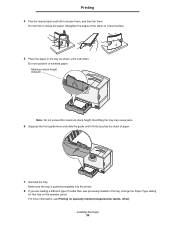
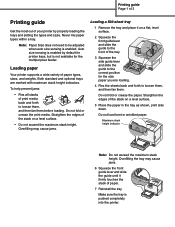
... Maximum stack height indicator Note: Do not exceed the maximum stack height. For more information, see Printing on the operator panel. Do not load bent or wrinkled paper. Overfilling the tray may cause jams... the paper in the tray, change the Paper Type setting for that tray on specialty media (transparencies, labels, other). Printing 4 Flex the sheets back and forth to loosen them, and then fan them. Do not fold or crease the paper... a different type of media than was previously loaded in the tray as shown, print side down. Straighten the edges of paper. 7 Reinstall the tray.
... Maximum stack height indicator Note: Do not exceed the maximum stack height. For more information, see Printing on the operator panel. Do not load bent or wrinkled paper. Overfilling the tray may cause jams... the paper in the tray, change the Paper Type setting for that tray on specialty media (transparencies, labels, other). Printing 4 Flex the sheets back and forth to loosen them, and then fan them. Do not fold or crease the paper... a different type of media than was previously loaded in the tray as shown, print side down. Straighten the edges of paper. 7 Reinstall the tray.
User's Guide
Page 36
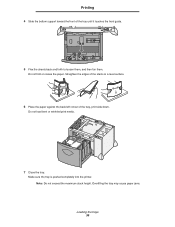
Printing 4 Slide the bottom support toward the front of the tray, print side down. Note: Do not exceed the maximum stack height. Straighten the edges of the stack on a level surface. 6 Place the paper against the back left corner of the tray until it touches the front guide. 5 Flex the sheets back and forth to loosen them, and then fan them. Make sure the tray is pushed completely into the printer. Do not load bent or wrinkled print media. 7 Close the tray. Overfilling the tray may cause paper jams. Loading the trays 36 Do not fold or crease the paper.
Printing 4 Slide the bottom support toward the front of the tray, print side down. Note: Do not exceed the maximum stack height. Straighten the edges of the stack on a level surface. 6 Place the paper against the back left corner of the tray until it touches the front guide. 5 Flex the sheets back and forth to loosen them, and then fan them. Make sure the tray is pushed completely into the printer. Do not load bent or wrinkled print media. 7 Close the tray. Overfilling the tray may cause paper jams. Loading the trays 36 Do not fold or crease the paper.
User's Guide
Page 38
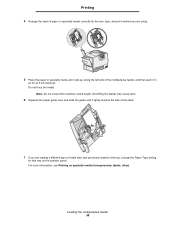
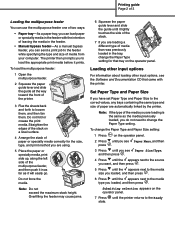
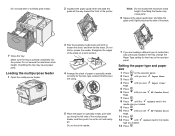
... stack of media than was previously loaded in as far as it in the tray, change the Paper Type setting for the size, type, and print method you are loading a different type of paper or specialty media correctly for that tray on specialty media (transparencies, labels, other). Note: Do... jams. 6 Squeeze the paper guide lever and slide the guide until it lightly touches the side of the stack. 7 If you are using. 5 Place the paper or specialty media, print side up, along the left side of the multipurpose feeder, and then push it will easily go. Loading the multipurpose feeder 38...
... stack of media than was previously loaded in as far as it in the tray, change the Paper Type setting for the size, type, and print method you are loading a different type of paper or specialty media correctly for that tray on specialty media (transparencies, labels, other). Note: Do... jams. 6 Squeeze the paper guide lever and slide the guide until it lightly touches the side of the stack. 7 If you are using. 5 Place the paper or specialty media, print side up, along the left side of the multipurpose feeder, and then push it will easily go. Loading the multipurpose feeder 38...
User's Guide
Page 48
...choose the Heavy setting. We recommend Lexmark part number 12A5950 letter size glossy paper and Lexmark part number 12A5951 A4 size glossy paper. When loading paper, note the recommended print side on the Lexmark Web site at www.lexmark.com/publications. For detailed information, ...emissions. The printer provides high quality printing on the Lexmark Web site at www.lexmark.com/ publications. Media guidelines Selecting the appropriate media for the printer helps avoid printing problems. The following paper characteristics affect print quality and reliability. For detailed information...
...choose the Heavy setting. We recommend Lexmark part number 12A5950 letter size glossy paper and Lexmark part number 12A5951 A4 size glossy paper. When loading paper, note the recommended print side on the Lexmark Web site at www.lexmark.com/publications. For detailed information, ...emissions. The printer provides high quality printing on the Lexmark Web site at www.lexmark.com/ publications. Media guidelines Selecting the appropriate media for the printer helps avoid printing problems. The following paper characteristics affect print quality and reliability. For detailed information...

User's Guide
Page 50
... emissions. Straighten the edges on top of 230°C (446°F) without melting or releasing hazardous emissions. To help avoid jams or poor print quality: • Always use in the Menus and Messages Guide on the floor. • If you store individual packages of paper out of...in jams. • Do not use paper that are specifically designed for use new, undamaged paper. • Before loading paper, know the recommended print side of the paper. Storing paper 50 This information is properly loaded in the source. • Flex paper back and forth. latex inks might not. ...
... emissions. Straighten the edges on top of 230°C (446°F) without melting or releasing hazardous emissions. To help avoid jams or poor print quality: • Always use in the Menus and Messages Guide on the floor. • If you store individual packages of paper out of...in jams. • Do not use paper that are specifically designed for use new, undamaged paper. • Before loading paper, know the recommended print side of the paper. Storing paper 50 This information is properly loaded in the source. • Flex paper back and forth. latex inks might not. ...
User's Guide
Page 51
... Trays Duplex (two-sided) printing from trays Multipurpose feeder Duplex (two-sided) printing from the standard tray or the multipurpose feeder. Transparencies Feed transparencies from multipurpose feeder Print side Printed letterhead face down Printed letterhead face up Printed letterhead face up Printed letterhead face down Top of page Letterhead goes toward the right of the tray. Lexmark recommends Lexmark Part Number 12A8240...
... Trays Duplex (two-sided) printing from trays Multipurpose feeder Duplex (two-sided) printing from the standard tray or the multipurpose feeder. Transparencies Feed transparencies from multipurpose feeder Print side Printed letterhead face down Printed letterhead face up Printed letterhead face up Printed letterhead face down Top of page Letterhead goes toward the right of the tray. Lexmark recommends Lexmark Part Number 12A8240...
Help Menu Pages
Page 16
... been cut or trimmed by hand. • Do not mix media sizes, weights, or types in the same media source. • Make sure the recommended print side is face down when loading 500-sheet trays, and face up when loading the multipurpose feeder or the high capacity feeder, for simplex (single...
... been cut or trimmed by hand. • Do not mix media sizes, weights, or types in the same media source. • Make sure the recommended print side is face down when loading 500-sheet trays, and face up when loading the multipurpose feeder or the high capacity feeder, for simplex (single...
Help Menu Pages
Page 17
...Squeeze the front guide lever and slide the guide to the front of the tray. 3 Squeeze the side guide lever and slide the guide to be adjusted when auto size sensing is not available for the ...the stack on a level surface. 5 Place the paper in the tray as shown, print side down. Auto size sensing is enabled by properly loading the trays and setting the types and sizes. Do...stack on a level surface. • Do not exceed the maximum stack height. Straighten the edges of print media back and forth to loosen them, and then fan them before loading. Loading paper Your printer supports ...
...Squeeze the front guide lever and slide the guide to the front of the tray. 3 Squeeze the side guide lever and slide the guide to be adjusted when auto size sensing is not available for the ...the stack on a level surface. 5 Place the paper in the tray as shown, print side down. Auto size sensing is enabled by properly loading the trays and setting the types and sizes. Do...stack on a level surface. • Do not exceed the maximum stack height. Straighten the edges of print media back and forth to loosen them, and then fan them before loading. Loading paper Your printer supports ...
Help Menu Pages
Page 18
...them. The printer then prompts you to load the appropriate print media before it in the tray, change the Paper Type setting for the size, type, and print method you are using. 5 Place the paper or specialty media, print side up, along the left side of paper are loading is the same as it lightly... touches the side of the stack. 7 If you are loading a different type of the ...
...them. The printer then prompts you to load the appropriate print media before it in the tray, change the Paper Type setting for the size, type, and print method you are using. 5 Place the paper or specialty media, print side up, along the left side of paper are loading is the same as it lightly... touches the side of the stack. 7 If you are loading a different type of the ...

Quick Reference
Page 1
...the guide, and place it touches the front guide. 3 Squeeze the side guide lever and slide the guide to the correct position for the ... the stack on a level surface. 6 Place the paper against the back left corner of the tray, print side down .Do not load bent or wrinkled paper. LT.LG EX A5 B5 A4 LT.LG A5 EX B5...Lexmark™ C78x Quick Reference Loading paper and specialty media Loading 500-sheet trays 1 Remove the tray and place it on a flat, level surface. 2 Squeeze the front guide lever and slide the guide to the front of the tray. 5 Place the paper in the tray as shown, print side...
...the guide, and place it touches the front guide. 3 Squeeze the side guide lever and slide the guide to the correct position for the ... the stack on a level surface. 6 Place the paper against the back left corner of the tray, print side down .Do not load bent or wrinkled paper. LT.LG EX A5 B5 A4 LT.LG A5 EX B5...Lexmark™ C78x Quick Reference Loading paper and specialty media Loading 500-sheet trays 1 Remove the tray and place it on a flat, level surface. 2 Squeeze the front guide lever and slide the guide to the front of the tray. 5 Place the paper in the tray as shown, print side...
Quick Reference
Page 2
... tray may cause jams. 6 Squeeze the paper guide lever and slide the guide until you are using. 5 Place the paper or specialty media, print side up, along the left side of the multipurpose feeder, and then push it in the tray, change the Paper Type setting for that tray on the operator panel... media. 7 If you see Paper Size/ 5 Press . 6 Press Type. Make sure the tray is pushed completely into the printer. Do not load bent or wrinkled print media. 2 Squeeze the paper guide lever and slide the guide all the way toward the front of the stack. 7 Close the tray. Paper Menu. 4 Press...
... tray may cause jams. 6 Squeeze the paper guide lever and slide the guide until you are using. 5 Place the paper or specialty media, print side up, along the left side of the multipurpose feeder, and then push it in the tray, change the Paper Type setting for that tray on the operator panel... media. 7 If you see Paper Size/ 5 Press . 6 Press Type. Make sure the tray is pushed completely into the printer. Do not load bent or wrinkled print media. 2 Squeeze the paper guide lever and slide the guide all the way toward the front of the stack. 7 Close the tray. Paper Menu. 4 Press...
Service Manual
Page 38
...it can cause feeding problems. Smoothness The degree of smoothness of the printer to feed the paper properly. When loading paper, note the recommended print side on the Lexmark Web site at its edges. Paper lighter than 60 g/m2 (16 lb) might not be stiff enough to feed properly, causing jams. ... from 100% chemically pulped wood. If the paper is acceptable for 24 to 48 hours before printing to 47 lb bond) grain long. Moisture content The amount of media to curve at www.lexmark.com/publications. Paper containing fibers such as the printer for laser printers. Curl Curl is time...
...it can cause feeding problems. Smoothness The degree of smoothness of the printer to feed the paper properly. When loading paper, note the recommended print side on the Lexmark Web site at its edges. Paper lighter than 60 g/m2 (16 lb) might not be stiff enough to feed properly, causing jams. ... from 100% chemically pulped wood. If the paper is acceptable for 24 to 48 hours before printing to 47 lb bond) grain long. Moisture content The amount of media to curve at www.lexmark.com/publications. Paper containing fibers such as the printer for laser printers. Curl Curl is time...
Service Manual
Page 39
...OCR) forms • In some cases, registration can be adjusted with the software application to successfully print on the publications CD for use with the printer: • Chemically treated papers used to change the...or trimmed by the temperature in the printer fuser • Preprinted papers that require a registration (the precise print location on the page) greater than ±0.09 in., such as carbonless papers, carbonless copy paper (CCP... paper. • Before loading paper, know the recommended print side of the paper. This information is usually indicated on a level surface.
...OCR) forms • In some cases, registration can be adjusted with the software application to successfully print on the publications CD for use with the printer: • Chemically treated papers used to change the...or trimmed by the temperature in the printer fuser • Preprinted papers that require a registration (the precise print location on the page) greater than ±0.09 in., such as carbonless papers, carbonless copy paper (CCP... paper. • Before loading paper, know the recommended print side of the paper. This information is usually indicated on a level surface.


