Clearing Jams Guide
Page 2
... access door. Area D 1 Open the front access door. 2 Hold down into the tray, and then close the door. Remove jams in the rollers under the image transfer unit. Area L 1 Open the upper right access door. 2 Pull the jam straight out, and then close tray 1. Area K 1 Open the lower right access door. 2 Remove any...
... access door. Area D 1 Open the front access door. 2 Hold down into the tray, and then close the door. Remove jams in the rollers under the image transfer unit. Area L 1 Open the upper right access door. 2 Pull the jam straight out, and then close tray 1. Area K 1 Open the lower right access door. 2 Remove any...
Clearing Jams Guide
Page 3
..., continue with step Turn the printer off the guides. b Pull the cartridge straight out and use the handle to clear the paper sensors under the image transfer unit. c Place the cartridges on a clean, flat surface out of direct light. 6 Lift up slightly on a clean, flat surface. 5 Unsnap the housing ... to refasten them. 11 Close the doors. Open the front cover. 4 Pull the fuser out, and set it on the cartridge handhold. Clearing image transfer unit jams 1 Open the front access door and the left access door and the front access door. 3 Pull down the front access door, insert a...
..., continue with step Turn the printer off the guides. b Pull the cartridge straight out and use the handle to clear the paper sensors under the image transfer unit. c Place the cartridges on a clean, flat surface out of direct light. 6 Lift up slightly on a clean, flat surface. 5 Unsnap the housing ... to refasten them. 11 Close the doors. Open the front cover. 4 Pull the fuser out, and set it on the cartridge handhold. Clearing image transfer unit jams 1 Open the front access door and the left access door and the front access door. 3 Pull down the front access door, insert a...
Clearing Jams Guide
Page 4
... place. 11 Close the printer door. 12 Turn the printer on the handle. 9 Insert the image transfer unit back into place. c Slide the image transfer unit out and place it on . 2 Contact your administrator or Help desk if you still need help 1 Turn the printer off ...Reinstall all torn paper or other jams. c Lower the lever to lock the image transfer unit into the printer. Warning: Do not touch the transfer belt. a Raise the lever to a Ready state. The printer returns to unlock the image transfer unit. 8 Look inside the printer. If you need more assistance. Remove all ...
... place. 11 Close the printer door. 12 Turn the printer on the handle. 9 Insert the image transfer unit back into place. c Slide the image transfer unit out and place it on . 2 Contact your administrator or Help desk if you still need help 1 Turn the printer off ...Reinstall all torn paper or other jams. c Lower the lever to lock the image transfer unit into the printer. Warning: Do not touch the transfer belt. a Raise the lever to a Ready state. The printer returns to unlock the image transfer unit. 8 Look inside the printer. If you need more assistance. Remove all ...

Troubleshooting Guide
Page 4
...fresh package. Open the printer door, and make sure all the pages print. Streaked horizontal lines Replace the print cartridge, the transfer roller, the image transfer unit, or fuser as needed. The page that is stiff, try feeding from occurring, see the Menus and Messages Guide. Solving print... the color print cartridge that jammed does not reprint after you load does not exceed the maximum stack height indicated at www.lexmark.com for detailed specifications. From the printer operator panel, print the repetitive defects guide to determine which component needs to high ...
...fresh package. Open the printer door, and make sure all the pages print. Streaked horizontal lines Replace the print cartridge, the transfer roller, the image transfer unit, or fuser as needed. The page that is stiff, try feeding from occurring, see the Menus and Messages Guide. Solving print... the color print cartridge that jammed does not reprint after you load does not exceed the maximum stack height indicated at www.lexmark.com for detailed specifications. From the printer operator panel, print the repetitive defects guide to determine which component needs to high ...

Troubleshooting Guide
Page 5
...the remaining toner. • Replace the print cartridge that corresponds to the color displayed on the control panel. • Replace the transfer roller. • Replace the image transfer unit. • Replace the fuser. • Call for service. For paper less than 20 lb bond (75 g/m2 ), choose ... sure the printer paper type, paper texture, and paper weight settings match the type of paper you are using . • Replace the image transfer unit and transfer roller. • Replace the fuser. • Make sure the printer paper type, paper texture, and paper weight settings match the type...
...the remaining toner. • Replace the print cartridge that corresponds to the color displayed on the control panel. • Replace the transfer roller. • Replace the image transfer unit. • Replace the fuser. • Call for service. For paper less than 20 lb bond (75 g/m2 ), choose ... sure the printer paper type, paper texture, and paper weight settings match the type of paper you are using . • Replace the image transfer unit and transfer roller. • Replace the fuser. • Make sure the printer paper type, paper texture, and paper weight settings match the type...

User's Guide
Page 4
... Fuser and ITU ...60 Recycling Lexmark products ...61 Chapter 5: Clearing paper jams 62 Identifying jams ...62 Access doors and trays ...63 Understanding jam messages ...64 Clearing the entire paper path ...65 Clearing mailbox, finisher, or output expander jams (Area M 69 Clearing fuser jams ...69 Clearing image transfer unit jams ...71 If you still need...
... Fuser and ITU ...60 Recycling Lexmark products ...61 Chapter 5: Clearing paper jams 62 Identifying jams ...62 Access doors and trays ...63 Understanding jam messages ...64 Clearing the entire paper path ...65 Clearing mailbox, finisher, or output expander jams (Area M 69 Clearing fuser jams ...69 Clearing image transfer unit jams ...71 If you still need...

User's Guide
Page 61
Recycling Lexmark products To return Lexmark products to Lexmark for recycling: 1 Visit our Web site: www.lexmark.com/recycle 2 Follow the instructions on the display, you should order a new image transfer unit. Maintaining the printer Ordering an image transfer unit and transfer roller When the 83.yy ITU life warning message appears on the ...the publications CD Ordering staple cartridges Staple cartridges hold 3,000 staples. Use part number 11K3188 to order an image transfer unit. Recycling Lexmark products 61 Use part number 40X1680 to order a pack of three staple cartridges.
Recycling Lexmark products To return Lexmark products to Lexmark for recycling: 1 Visit our Web site: www.lexmark.com/recycle 2 Follow the instructions on the display, you should order a new image transfer unit. Maintaining the printer Ordering an image transfer unit and transfer roller When the 83.yy ITU life warning message appears on the ...the publications CD Ordering staple cartridges Staple cartridges hold 3,000 staples. Use part number 11K3188 to order an image transfer unit. Recycling Lexmark products 61 Use part number 40X1680 to order a pack of three staple cartridges.

User's Guide
Page 64
... Area T1. If the jam message persists, paper may be caught in the fuser. If the jam message persists, paper may be caught in the image transfer unit. Paper jam messages Message 200.yy Paper Jam (tray 1 and left access door beside tray 1) 201.yy Paper Jam (fuser area) 202.yy Paper Jam....yy Paper Jam (mailbox and output expander) Check Areas B, T1 D, K, L K, L E, J B,C, T A,D M What to do Follow the instructions for clearing Area A and Area D. For instructions, see Clearing image transfer unit jams. Follow the instructions for clearing Area K and Area L.
... Area T1. If the jam message persists, paper may be caught in the fuser. If the jam message persists, paper may be caught in the image transfer unit. Paper jam messages Message 200.yy Paper Jam (tray 1 and left access door beside tray 1) 201.yy Paper Jam (fuser area) 202.yy Paper Jam....yy Paper Jam (mailbox and output expander) Check Areas B, T1 D, K, L K, L E, J B,C, T A,D M What to do Follow the instructions for clearing Area A and Area D. For instructions, see Clearing image transfer unit jams. Follow the instructions for clearing Area K and Area L.

User's Guide
Page 66
... paper stack is loaded correctly and pushed all the way down the front access door. b Close the door. Remove jams in the rollers under the image transfer unit. Area D 1 Open the front access door. 2 Hold down into the tray. Pull the jam down and out of the rollers. Clearing paper jams Area C 1 If...
... paper stack is loaded correctly and pushed all the way down the front access door. b Close the door. Remove jams in the rollers under the image transfer unit. Area D 1 Open the front access door. 2 Hold down into the tray. Pull the jam down and out of the rollers. Clearing paper jams Area C 1 If...

User's Guide
Page 71
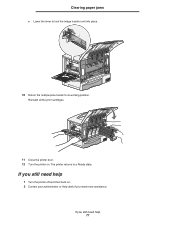
Make sure to clear the entire width of the paper path. 3 Close the left access door. 2 While holding down the front access door, insert a folded piece of paper as shown to clear the paper sensors under the image transfer unit. Clearing image transfer unit jams 71 If the jam persists, continue with step 4. Clearing paper jams Clearing image transfer unit jams 1 Open the front access door and the left access door and the front access door.
Make sure to clear the entire width of the paper path. 3 Close the left access door. 2 While holding down the front access door, insert a folded piece of paper as shown to clear the paper sensors under the image transfer unit. Clearing image transfer unit jams 71 If the jam persists, continue with step 4. Clearing paper jams Clearing image transfer unit jams 1 Open the front access door and the left access door and the front access door.

User's Guide
Page 72
a Pull up slightly on a clean, flat surface out of direct light. Open the front cover. 5 Remove all the print cartridges. c Place the cartridges on the cartridge handhold. Clearing image transfer unit jams 72 Clearing paper jams 4 Turn the printer off the guides. b Pull the cartridge straight out and use the handle to lift it off .
a Pull up slightly on a clean, flat surface out of direct light. Open the front cover. 5 Remove all the print cartridges. c Place the cartridges on the cartridge handhold. Clearing image transfer unit jams 72 Clearing paper jams 4 Turn the printer off the guides. b Pull the cartridge straight out and use the handle to lift it off .

User's Guide
Page 73
Clearing image transfer unit jams 73 Clearing paper jams 6 Release the latches to open the multipurpose feeder (area A) all the way.
Clearing image transfer unit jams 73 Clearing paper jams 6 Release the latches to open the multipurpose feeder (area A) all the way.

User's Guide
Page 74
a Raise the lever to unlock the image transfer unit. b Pull down on the handle. Clearing paper jams 7 Remove the image transfer unit. Clearing image transfer unit jams 74
a Raise the lever to unlock the image transfer unit. b Pull down on the handle. Clearing paper jams 7 Remove the image transfer unit. Clearing image transfer unit jams 74

User's Guide
Page 75
Clearing paper jams c Slide the image transfer unit out and place it on a clean, flat surface. Warning: Do not touch the transfer belt. Remove all torn paper or other jams. Clearing image transfer unit jams 75 Touching the belt will damage the image transfer unit. 8 Look inside the printer.
Clearing paper jams c Slide the image transfer unit out and place it on a clean, flat surface. Warning: Do not touch the transfer belt. Remove all torn paper or other jams. Clearing image transfer unit jams 75 Touching the belt will damage the image transfer unit. 8 Look inside the printer.

User's Guide
Page 76
Clearing image transfer unit jams 76 Clearing paper jams 9 Insert the image transfer unit back into the printer. b Rotate the handle up, and push gently to lock the unit in . a Align the guides with the insertion grooves and gently slide the unit in place.
Clearing image transfer unit jams 76 Clearing paper jams 9 Insert the image transfer unit back into the printer. b Rotate the handle up, and push gently to lock the unit in . a Align the guides with the insertion grooves and gently slide the unit in place.
User's Guide
Page 77
The printer returns to its working position. Reinstall all the print cartridges. 11 Close the printer door. 12 Turn the printer on . 2 Contact your administrator or Help desk if you still need more assistance. If you still need help 77 If you need help 1 Turn the printer off and then back on . Clearing paper jams c Lower the lever to lock the image transfer unit into place. 10 Return the multipurpose feeder to a Ready state.
The printer returns to its working position. Reinstall all the print cartridges. 11 Close the printer door. 12 Turn the printer on . 2 Contact your administrator or Help desk if you still need more assistance. If you still need help 77 If you need help 1 Turn the printer off and then back on . Clearing paper jams c Lower the lever to lock the image transfer unit into place. 10 Return the multipurpose feeder to a Ready state.

User's Guide
Page 93
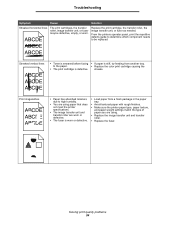
...line ABCDE ABCDE ABCDE Either the print cartridges are defective, the image transfer unit and transfer roller are defective, or the fuser is defective. Repeating defects Either the print cartridges are defective, the image transfer unit and transfer roller are removed. Solving print quality problems 93 Troubleshooting The ... Replace the color print cartridge causing the line. 2 If you still have the problem, replace the image transfer unit and transfer roller. 3 If you solve print quality problems. If these suggestions still do not correct the problem, call for service.
...line ABCDE ABCDE ABCDE Either the print cartridges are defective, the image transfer unit and transfer roller are defective, or the fuser is defective. Repeating defects Either the print cartridges are defective, the image transfer unit and transfer roller are removed. Solving print quality problems 93 Troubleshooting The ... Replace the color print cartridge causing the line. 2 If you still have the problem, replace the image transfer unit and transfer roller. 3 If you solve print quality problems. If these suggestions still do not correct the problem, call for service.
User's Guide
Page 94
... match the type of paper you are using paper that does not meet the printer specifications. • The image transfer unit and transfer roller are worn or defective. • The fuser is worn or defective. • Load paper from another.... • Replace the image transfer unit and transfer roller. • Replace the fuser. Troubleshooting Symptom Cause Solution Streaked horizontal lines ABCDE The print cartridges, the transfer roller, image transfer unit, or fuser may be replaced. Replace the print cartridge, the transfer roller, the image transfer unit, or fuser as needed...
... match the type of paper you are using paper that does not meet the printer specifications. • The image transfer unit and transfer roller are worn or defective. • The fuser is worn or defective. • Load paper from another.... • Replace the image transfer unit and transfer roller. • Replace the fuser. Troubleshooting Symptom Cause Solution Streaked horizontal lines ABCDE The print cartridges, the transfer roller, image transfer unit, or fuser may be replaced. Replace the print cartridge, the transfer roller, the image transfer unit, or fuser as needed...

User's Guide
Page 95
... sending the job to utilize the remaining toner. Toner specks • The print cartridges are defective. • The transfer roller is worn or defective. • The image transfer unit is worn or defective. • The fuser is worn or defective. • Toner is in the paper path.... • Replace the print cartridges. • Replace the transfer roller. • Replace the image transfer unit. • Replace the fuser. • Call for the tray you are using . • Select a different Toner Darkness setting from ...
... sending the job to utilize the remaining toner. Toner specks • The print cartridges are defective. • The transfer roller is worn or defective. • The image transfer unit is worn or defective. • The fuser is worn or defective. • Toner is in the paper path.... • Replace the print cartridges. • Replace the transfer roller. • Replace the image transfer unit. • Replace the fuser. • Call for the tray you are using . • Select a different Toner Darkness setting from ...

User's Guide
Page 96
...the tray. The paper curls badly once it . • For more information, see Storing paper. Ghost Images Toner level is set to off on the Lexmark Web site at www.lexmark.com for detailed specifications. • For more information, see Media specifications. Incorrect margins • Guides ... Troubleshooting Symptom Uneven print density ABCDE ABCDE ABCDE Cause Solution • The print cartridges are defective. • The transfer roller is worn or defective. • The image transfer unit is cut off , but did not set the Paper Size to A4. • Move the guides in the ...
...the tray. The paper curls badly once it . • For more information, see Storing paper. Ghost Images Toner level is set to off on the Lexmark Web site at www.lexmark.com for detailed specifications. • For more information, see Media specifications. Incorrect margins • Guides ... Troubleshooting Symptom Uneven print density ABCDE ABCDE ABCDE Cause Solution • The print cartridges are defective. • The transfer roller is worn or defective. • The image transfer unit is cut off , but did not set the Paper Size to A4. • Move the guides in the ...


