User's Guide
Page 30
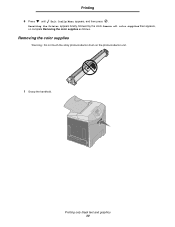
Removing the color supplies Warning: Do not touch the shiny photoconductor drum on the photoconductor unit. 1 Grasp the handhold. Printing only black text and graphics 30 Resetting the Printer appears briefly, followed by the clock. Printing 6 Press until Exit Config Menu appears, and then press . Remove all color supplies then appears, so complete Removing the color supplies as follows.
Removing the color supplies Warning: Do not touch the shiny photoconductor drum on the photoconductor unit. 1 Grasp the handhold. Printing only black text and graphics 30 Resetting the Printer appears briefly, followed by the clock. Printing 6 Press until Exit Config Menu appears, and then press . Remove all color supplies then appears, so complete Removing the color supplies as follows.
User's Guide
Page 31
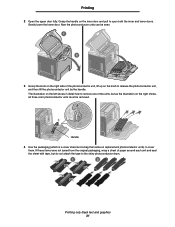
The illustration on the left shows in detail how to remove one of the photoconductor unit, lift up on the knob to the shiny photoconductor drum. 1 2 Printing only black text and graphics 31 If these items were not saved from the original packaging, wrap a sheet of paper around each unit and ...
The illustration on the left shows in detail how to remove one of the photoconductor unit, lift up on the knob to the shiny photoconductor drum. 1 2 Printing only black text and graphics 31 If these items were not saved from the original packaging, wrap a sheet of paper around each unit and ...
User's Guide
Page 81
... not store toner cartridges and photoconductor units in: • Temperatures greater than directly on a flat surface so the edges do not touch the shiny photoconductor drum. they rest on the floor. • If individual packages of media out of the media packages. • Leave media in its package until the time...
... not store toner cartridges and photoconductor units in: • Temperatures greater than directly on a flat surface so the edges do not touch the shiny photoconductor drum. they rest on the floor. • If individual packages of media out of the media packages. • Leave media in its package until the time...


