User's Guide
Page 3
Contents Chapter 1: Overview ...8 Basic models ...8 Configured model ...9 Illustrations in this publication ...9 Chapter 2: Installing drivers for local printing 10 Windows ...10 Using Windows Server 2003, Windows 2000, Windows XP, Windows 98 SE, ..., Windows NT 4.0, Windows 2000, Windows XP, or Windows Server 2003 ...18 Shared printing using Windows NT 4.0, Windows 2000, Windows XP, or Windows Server 2003 ......... 19 Configuring Drag'N'Print ...21 Macintosh ...21 Mac OS X ...21 Mac OS 9.x ...22 UNIX/Linux ...23 NetWare ...23 Chapter 4: Printing ...24 Tips for successful printing ...24 Tips...
Contents Chapter 1: Overview ...8 Basic models ...8 Configured model ...9 Illustrations in this publication ...9 Chapter 2: Installing drivers for local printing 10 Windows ...10 Using Windows Server 2003, Windows 2000, Windows XP, Windows 98 SE, ..., Windows NT 4.0, Windows 2000, Windows XP, or Windows Server 2003 ...18 Shared printing using Windows NT 4.0, Windows 2000, Windows XP, or Windows Server 2003 ......... 19 Configuring Drag'N'Print ...21 Macintosh ...21 Mac OS X ...21 Mac OS 9.x ...22 UNIX/Linux ...23 NetWare ...23 Chapter 4: Printing ...24 Tips for successful printing ...24 Tips...
User's Guide
Page 4
... Printing a font sample list ...28 Printing the Print Quality Test Pages ...29 Printing only black text and graphics ...29 Configuring the printer for black-only printing 29 Removing the color supplies ...30 Configuring the printer for color printing and replacing the supplies 33 Chapter 5: Media specifications 35 Media guidelines ...35 Paper ...35...
... Printing a font sample list ...28 Printing the Print Quality Test Pages ...29 Printing only black text and graphics ...29 Configuring the printer for black-only printing 29 Removing the color supplies ...30 Configuring the printer for color printing and replacing the supplies 33 Chapter 5: Media specifications 35 Media guidelines ...35 Paper ...35...

User's Guide
Page 6
Contents Disabling Power Saver ...108 Encrypting the disk ...108 Configuring printer alerts ...109 Adjusting operator panel contrast ...109 Memory requirements ...110 Using the Print and Hold function ...110 Selecting a user name ...110 Printing and deleting ...
Contents Disabling Power Saver ...108 Encrypting the disk ...108 Configuring printer alerts ...109 Adjusting operator panel contrast ...109 Memory requirements ...110 Using the Print and Hold function ...110 Selecting a user name ...110 Printing and deleting ...

User's Guide
Page 9
Overview Configured model The following illustration shows the option available for C522 with the multipurpose feeder. Optional 500-sheet drawer Illustrations in this publication Illustrations in this publication are predominantly for C524 with the manual feed slot are only shown for loading and clearing jams instructions. Configured model 9 Illustrations for the Lexmark C522 and C524.
Overview Configured model The following illustration shows the option available for C522 with the multipurpose feeder. Optional 500-sheet drawer Illustrations in this publication Illustrations in this publication are predominantly for C524 with the manual feed slot are only shown for loading and clearing jams instructions. Configured model 9 Illustrations for the Lexmark C522 and C524.
User's Guide
Page 16
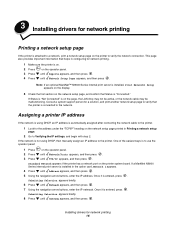
.... 2 Press until Network/Ports appears, and then press . 3 Press until TCP/IP appears, and then press . This page also provides important information that helps in configuring for network printing. 1 Make sure the printer is on. 2 Press on the page, the LAN drop may not be active, or the network cable may...
.... 2 Press until Network/Ports appears, and then press . 3 Press until TCP/IP appears, and then press . This page also provides important information that helps in configuring for network printing. 1 Make sure the printer is on. 2 Press on the page, the LAN drop may not be active, or the network cable may...
User's Guide
Page 17
...TCP/IP settings are available on each network computer. However, using Windows 2000). Windows In Windows environments, network printers can be configured for use a system network printer port, such as printer status alerts. Updated system and custom drivers are assigned and verified, ...Selection appears briefly. 10 Press until the printer returns to Ready. Supported printer drivers • Windows system printer driver • Lexmark custom printer driver System drivers are built into Windows operating systems. Custom drivers are correct. The system printer driver and port allow ...
...TCP/IP settings are available on each network computer. However, using Windows 2000). Windows In Windows environments, network printers can be configured for use a system network printer port, such as printer status alerts. Updated system and custom drivers are assigned and verified, ...Selection appears briefly. 10 Press until the printer returns to Ready. Supported printer drivers • Windows system printer driver • Lexmark custom printer driver System drivers are built into Windows operating systems. Custom drivers are correct. The system printer driver and port allow ...
User's Guide
Page 18
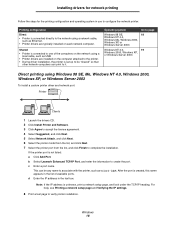
...b Select Lexmark Enhanced TCP/IP Port, and enter the information to complete the installation. d Enter the IP address in the list of the computers on each network computer. Installing drivers for network printing Follow the steps for the printing configuration and operating ...system in use to configure the network printer: Printing configuration Direct • Printer is connected directly to the network using a network cable, such as Ethernet...
...b Select Lexmark Enhanced TCP/IP Port, and enter the information to complete the installation. d Enter the IP address in the list of the computers on each network computer. Installing drivers for network printing Follow the steps for the printing configuration and operating ...system in use to configure the network printer: Printing configuration Direct • Printer is connected directly to the network using a network cable, such as Ethernet...
User's Guide
Page 19
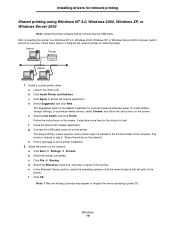
... the instructions on the network." After connecting the printer to a Windows NT 4.0, Windows 2000, Windows XP, or Windows Server 2003 computer (which will print to configure the network printer for network printing Shared printing using Windows NT 4.0, Windows 2000, Windows XP, or Windows Server 2003 Note: Install the printer software before...
... the instructions on the network." After connecting the printer to a Windows NT 4.0, Windows 2000, Windows XP, or Windows Server 2003 computer (which will print to configure the network printer for network printing Shared printing using Windows NT 4.0, Windows 2000, Windows XP, or Windows Server 2003 Note: Install the printer software before...
User's Guide
Page 21
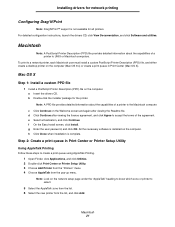
For detailed configuration instructions, launch the drivers CD, click View Documentation, and click Software and utilities. h Click Close when installation is not available for all printers. Note: Look .... a Insert the drivers CD. g Enter the user password, and click OK. Step 2: Create a print queue in Print Center (Mac OS X). Installing drivers for network printing Configuring Drag'N'Print Note: Drag'N'Print™ support is complete. Mac OS X Step 1: Install a custom PPD file 1 Install a PostScript Printer Description (PPD) file on the computer...
For detailed configuration instructions, launch the drivers CD, click View Documentation, and click Software and utilities. h Click Close when installation is not available for all printers. Note: Look .... a Insert the drivers CD. g Enter the user password, and click OK. Step 2: Create a print queue in Print Center (Mac OS X). Installing drivers for network printing Configuring Drag'N'Print Note: Drag'N'Print™ support is complete. Mac OS X Step 1: Install a custom PPD file 1 Install a PostScript Printer Description (PPD) file on the computer...
User's Guide
Page 29
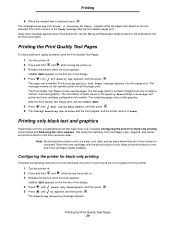
... contain graphics. Printing the Print Quality Test Pages 29 CONFIG MENU appears on . 3 Release the buttons when the clock appears. Configuring the printer for more information. The message Printing PCL Fonts. The pages are formatted. Printing only black text and graphics If planning... removing all the pages print. The printer returns to Ready. Note: Store the photoconductor units in Settings, and printer and toner cartridge configuration information. or Printing PS Fonts. This saves the matching toner cartridges (cyan, magenta, and yellow) and photoconductor units from the printer....
... contain graphics. Printing the Print Quality Test Pages 29 CONFIG MENU appears on . 3 Release the buttons when the clock appears. Configuring the printer for more information. The message Printing PCL Fonts. The pages are formatted. Printing only black text and graphics If planning... removing all the pages print. The printer returns to Ready. Note: Store the photoconductor units in Settings, and printer and toner cartridge configuration information. or Printing PS Fonts. This saves the matching toner cartridges (cyan, magenta, and yellow) and photoconductor units from the printer....
User's Guide
Page 33
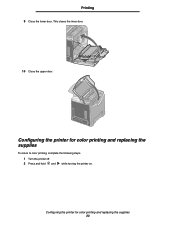
Configuring the printer for color printing and replacing the supplies 33 Configuring the printer for color printing and replacing the supplies To return to color printing, complete the following steps. 1 Turn the printer off. 2 Press and hold and while turning the printer on. Printing 9 Close the lower door. This closes the inner door. 10 Close the upper door.
Configuring the printer for color printing and replacing the supplies 33 Configuring the printer for color printing and replacing the supplies To return to color printing, complete the following steps. 1 Turn the printer off. 2 Press and hold and while turning the printer on. Printing 9 Close the lower door. This closes the inner door. 10 Close the upper door.
User's Guide
Page 34
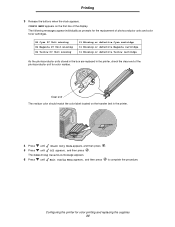
Configuring the printer for color residue. The Submitting Selection message appears. 6 Press until Off appears, and then press . Printing 3 Release the buttons when the clock appears. ...
Configuring the printer for color residue. The Submitting Selection message appears. 6 Press until Off appears, and then press . Printing 3 Release the buttons when the clock appears. ...
User's Guide
Page 91
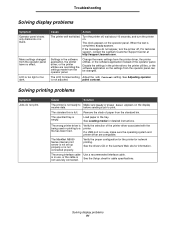
... properly. The specified tray is not adjusted. See the drivers CD or the Lexmark Web site for cable specifications. Solving display problems 91 Turn the printer off . Verify the proper configuration for the printer for detailed instructions. Cause Action The printer self test failed....printing to a file has been tried. Cause Solution The printer is not securely connected. For technical support, contact the Lexmark Customer Support Center at http://support.lexmark.com. Menu settings changed . If a USB port is in use , make sure the operating system and printer ...
... properly. The specified tray is not adjusted. See the drivers CD or the Lexmark Web site for cable specifications. Solving display problems 91 Turn the printer off . Verify the proper configuration for the printer for detailed instructions. Cause Action The printer self test failed....printing to a file has been tried. Cause Solution The printer is not securely connected. For technical support, contact the Lexmark Customer Support Center at http://support.lexmark.com. Menu settings changed . If a USB port is in use , make sure the operating system and printer ...
User's Guide
Page 92
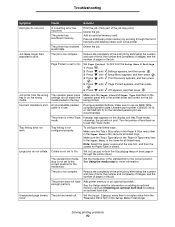
... all linked trays. Large jobs do not match the operator panel and in the Paper Menu is not configured properly. Unexpected page breaks The job has timed out. Add an optional memory card. To configure the linked trays: Make sure the Tray x Size value in the Paper X Size menu item in the... has received Delete the job. media loaded in Hex Trace If Ready Hex appears on to a higher value from the Setup Menu in the job. Lexmark part number 1329605 (10 ft) or 1427498 (20 ft) for the standard parallel port are correct for Paper Type is too complex. The printer does...
... all linked trays. Large jobs do not match the operator panel and in the Paper Menu is not configured properly. Unexpected page breaks The job has timed out. Add an optional memory card. To configure the linked trays: Make sure the Tray x Size value in the Paper X Size menu item in the... has received Delete the job. media loaded in Hex Trace If Ready Hex appears on to a higher value from the Setup Menu in the job. Lexmark part number 1329605 (10 ft) or 1427498 (20 ft) for the standard parallel port are correct for Paper Type is too complex. The printer does...
User's Guide
Page 98
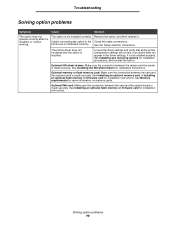
... Installing an optional flash memory or firmware card for installation procedures, and reinstall the option. The printer driver does not recognize that all the printer configuration settings are not attached correctly. See Installing and removing options for installation instructions. See Installing the 500-sheet drawer for more information on memory cards...
... Installing an optional flash memory or firmware card for installation procedures, and reinstall the option. The printer driver does not recognize that all the printer configuration settings are not attached correctly. See Installing and removing options for installation instructions. See Installing the 500-sheet drawer for more information on memory cards...
User's Guide
Page 101
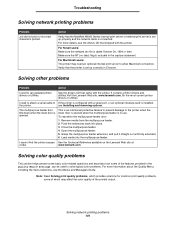
Solving other problems Problem Action I cannot find the printer escape See the Technical Reference available on the Lexmark Web site at codes. I need to attach a serial cable to If the printer is configured with the printer. The multipurpose feeder door tilts down when the lower door is opened when the multipurpose feeder is...
Solving other problems Problem Action I cannot find the printer escape See the Technical Reference available on the Lexmark Web site at codes. I need to attach a serial cable to If the printer is configured with the printer. The multipurpose feeder door tilts down when the lower door is opened when the multipurpose feeder is...
User's Guide
Page 104
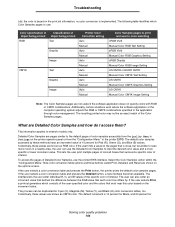
...the specific color of the Color Samples pages. Troubleshooting Off, the color is implemented. Select the Color Samples option within the "Configuration Menu." This information applies to the default pages of object being printed object being printed RGB Text Graphic Image CMYK Text Graphic ... (Y), and Black (K) color conversion tables, too. If the user finds a value on the printer operator panel or from the "Configuration Menu'" in the printer EWS. This lets the user print multiple pages of Detailed Color Samples, use for Solving color quality problems ...
...the specific color of the Color Samples pages. Troubleshooting Off, the color is implemented. Select the Color Samples option within the "Configuration Menu." This information applies to the default pages of object being printed object being printed RGB Text Graphic Image CMYK Text Graphic ... (Y), and Black (K) color conversion tables, too. If the user finds a value on the printer operator panel or from the "Configuration Menu'" in the printer EWS. This lets the user print multiple pages of Detailed Color Samples, use for Solving color quality problems ...
User's Guide
Page 109
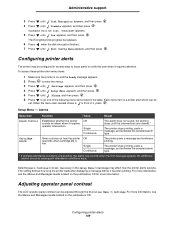
...and activates the selected alarm type. To access these printer alert menu items: 1 Make sure the printer is a printer alert which can be configured in the table. Off Single Continuous The alarm does not sound, but printing stops until Exit Config Menu appears, and then press . Selecting ... 6 Press when the disk encryption finishes. 7 Press until the interventions are pending, the alarm only sounds when the first message appears. Configuring printer alerts The printer may affect how the printer alerts execute. When the menu item needed shows a in front of the following menu ...
...and activates the selected alarm type. To access these printer alert menu items: 1 Make sure the printer is a printer alert which can be configured in the table. Off Single Continuous The alarm does not sound, but printing stops until Exit Config Menu appears, and then press . Selecting ... 6 Press when the disk encryption finishes. 7 Press until the interventions are pending, the alarm only sounds when the first message appears. Configuring printer alerts The printer may affect how the printer alerts execute. When the menu item needed shows a in front of the following menu ...
User's Guide
Page 115
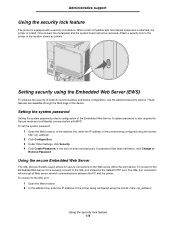
...to the SSL port: 1 Open the Web browser. 2 In the address line, enter the IP address of the printer being configured using the format: http: //ip_address/. 2 Click Configuration. 3 Under Other Settings, click Security. 4 Click Create Password, if one has not been set previously. The SSL port ...allows for Secure mode and confidential communication with a security lock feature. In the address line, enter the IP address of the printer being configured using the Embedded Web Server (EWS) To enhance the security of the device. Attach a security lock to the Web server within the print...
...to the SSL port: 1 Open the Web browser. 2 In the address line, enter the IP address of the printer being configured using the format: http: //ip_address/. 2 Click Configuration. 3 Under Other Settings, click Security. 4 Click Create Password, if one has not been set previously. The SSL port ...allows for Secure mode and confidential communication with a security lock feature. In the address line, enter the IP address of the printer being configured using the Embedded Web Server (EWS) To enhance the security of the device. Attach a security lock to the Web server within the print...

User's Guide
Page 116
... of the signed certificate. Each host must have its identifier in the Subject Alternate Name of three modes: • Disabled - To configure for IPSec: • Shared Key Authentication - In the address line, enter the IP address of authentication are supported for SNMPv3 through ... and no encryption • Authentication with a host, IPSec is not in Secure mode • Unsecured Only - Note: After a device is configured for IPSec with no encryption • Authentication and encryption Note: Only the selected level and higher may be set to this port • Secure...
... of the signed certificate. Each host must have its identifier in the Subject Alternate Name of three modes: • Disabled - To configure for IPSec: • Shared Key Authentication - In the address line, enter the IP address of authentication are supported for SNMPv3 through ... and no encryption • Authentication with a host, IPSec is not in Secure mode • Unsecured Only - Note: After a device is configured for IPSec with no encryption • Authentication and encryption Note: Only the selected level and higher may be set to this port • Secure...

