User's Guide
Page 5
...a transfer belt ...80 Ordering a waste toner box ...80 Maintaining the printer for long-term storage 80 Storing supplies ...81 Storing media ...81 Storing the toner cartridges and photoconductor units 81 Replacing the toner cartridges ...81 Recycling Lexmark products ...83 Replacing the photoconductor units ......83 Replacing the fuser ...83 Replacing the waste toner box ...83 Replacing the transfer belt ......
...a transfer belt ...80 Ordering a waste toner box ...80 Maintaining the printer for long-term storage 80 Storing supplies ...81 Storing media ...81 Storing the toner cartridges and photoconductor units 81 Replacing the toner cartridges ...81 Recycling Lexmark products ...83 Replacing the photoconductor units ......83 Replacing the fuser ...83 Replacing the waste toner box ...83 Replacing the transfer belt ......
User's Guide
Page 29
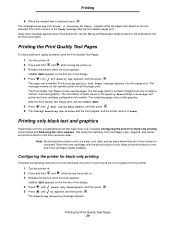
...29 The message remains on . 3 Release the buttons when the clock appears. Note: Store the photoconductor units in Settings, and printer and toner cartridge configuration information. Printing the Print Quality Test Pages To help isolate print quality problems, print the Print Quality Test Pages. 1 Turn the... the Printer and the clock appear, and the printer returns to the Ready message after the font sample pages print. This saves the matching toner cartridges (cyan, magenta, and yellow) and photoconductor units from the printer. 1 Turn the printer off . 2 Press and hold and while...
...29 The message remains on . 3 Release the buttons when the clock appears. Note: Store the photoconductor units in Settings, and printer and toner cartridge configuration information. Printing the Print Quality Test Pages To help isolate print quality problems, print the Print Quality Test Pages. 1 Turn the... the Printer and the clock appear, and the printer returns to the Ready message after the font sample pages print. This saves the matching toner cartridges (cyan, magenta, and yellow) and photoconductor units from the printer. 1 Turn the printer off . 2 Press and hold and while...
User's Guide
Page 32
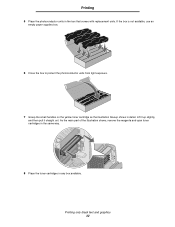
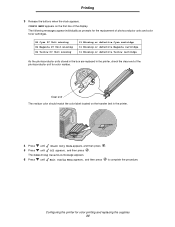
Printing 5 Place the photoconductor units in any box available. Lift it up slightly, and then pull it straight out. As the main part of the illustration shows, remove the magenta and cyan toner cartridges in the same way. 8 Place the toner cartridges in the box that comes with replacement units. If the box is not available, use an empty paper supplies box. 6 Close the box to protect the photoconductor units from light exposure. 7 Grasp the small handles on the yellow toner cartridge as the illustration blowup shows in detail. Printing only black text and graphics 32
Printing 5 Place the photoconductor units in any box available. Lift it up slightly, and then pull it straight out. As the main part of the illustration shows, remove the magenta and cyan toner cartridges in the same way. 8 Place the toner cartridges in the box that comes with replacement units. If the box is not available, use an empty paper supplies box. 6 Close the box to protect the photoconductor units from light exposure. 7 Grasp the small handles on the yellow toner cartridge as the illustration blowup shows in detail. Printing only black text and graphics 32
User's Guide
Page 34
... following messages appear individually as prompts for color printing and replacing the supplies 34 Configuring the printer for the replacement of photoconductor units and color toner cartridges. 84 Cyan PC Unit missing 84 Magenta PC Unit missing 84 Yellow PC Unit missing 31 Missing or defective Cyan cartridge 31 Missing or...
... following messages appear individually as prompts for color printing and replacing the supplies 34 Configuring the printer for the replacement of photoconductor units and color toner cartridges. 84 Cyan PC Unit missing 84 Magenta PC Unit missing 84 Yellow PC Unit missing 31 Missing or defective Cyan cartridge 31 Missing or...
User's Guide
Page 35
...performance, use 90 g/m2 (24 lb) xerographic, grain long paper. When loading paper, note the recommended print side on the Lexmark Web site at www.lexmark.com/publications. Paper lighter than 60 g/m2 (16 lb) might not be stiff enough to as specialty media. Storing paper unwrapped ...acceptable print quality. If the paper is too rough, the toner does not fuse to printing and can cause paper feeding or print quality issues. The printer provides high quality printing on the Lexmark Web site at www.lexmark.com/ publications. Business papers designed for non-MICR applications....
...performance, use 90 g/m2 (24 lb) xerographic, grain long paper. When loading paper, note the recommended print side on the Lexmark Web site at www.lexmark.com/publications. Paper lighter than 60 g/m2 (16 lb) might not be stiff enough to as specialty media. Storing paper unwrapped ...acceptable print quality. If the paper is too rough, the toner does not fuse to printing and can cause paper feeding or print quality issues. The printer provides high quality printing on the Lexmark Web site at www.lexmark.com/ publications. Business papers designed for non-MICR applications....

User's Guide
Page 37
... acceptable for laser printers. Inks that are oxidation-set or oil-based should meet these settings.) • Make sure the paper is properly loaded in toner. Printing on letterhead Check with the manufacturer or vendor to 180°C (356°F) without melting or releasing hazardous emissions. Letterhead goes toward the rear...
... acceptable for laser printers. Inks that are oxidation-set or oil-based should meet these settings.) • Make sure the paper is properly loaded in toner. Printing on letterhead Check with the manufacturer or vendor to 180°C (356°F) without melting or releasing hazardous emissions. Letterhead goes toward the rear...

User's Guide
Page 78
... in the Quality Menu in Settings Allows adjustment of the level of toner released on a sheet of the consumables installed in the printer, print the menu settings page. Combined with topics for information about Lexmark Authorized Supplies Dealers in the Menus and both sides of a sheet ... www.lexmark.com or contact the place where you bought your area. the percentage of life remaining for detailed instructions. Refer printing problems and maintenance tasks to this chapter. Toner Darkness in the Menus and Messages Guide on the publications CD Paper and specialty media ...
... in the Quality Menu in Settings Allows adjustment of the level of toner released on a sheet of the consumables installed in the printer, print the menu settings page. Combined with topics for information about Lexmark Authorized Supplies Dealers in the Menus and both sides of a sheet ... www.lexmark.com or contact the place where you bought your area. the percentage of life remaining for detailed instructions. Refer printing problems and maintenance tasks to this chapter. Toner Darkness in the Menus and Messages Guide on the publications CD Paper and specialty media ...
User's Guide
Page 79
... remain faded, replace the specified toner cartridge. Maintaining the printer Ordering supplies and maintenance items To order supplies in your printer. In other countries or regions, visit the Lexmark Web site at 1-800-539-6275 for information about Lexmark Authorized Supplies Dealers in the U.S., contact Lexmark at www.lexmark.com or contact the place where...
... remain faded, replace the specified toner cartridge. Maintaining the printer Ordering supplies and maintenance items To order supplies in your printer. In other countries or regions, visit the Lexmark Web site at 1-800-539-6275 for information about Lexmark Authorized Supplies Dealers in the U.S., contact Lexmark at www.lexmark.com or contact the place where...
User's Guide
Page 80
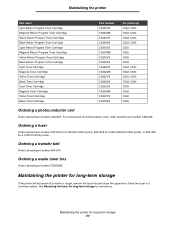
... Black Toner Cartridge Cyan Toner Cartridge Magenta Toner Cartridge Yellow Toner Cartridge Black Toner Cartridge Part Number C5220CS C5220MS C5220YS C5220KS C5200CS C5200MS C5200YS C5200KS C5222CS C5222MS C5222YS C5222KS C5202CS C5202MS C5202YS C5202KS For printer(s) C522, C524 C522, C524 C522, C524 C522, C524 C520 C520 C520 C520 C522, C524 C522, C524 C522, C524 C522, C524 C520 C520 C520 C520 Ordering a photoconductor unit Order Lexmark...
... Black Toner Cartridge Cyan Toner Cartridge Magenta Toner Cartridge Yellow Toner Cartridge Black Toner Cartridge Part Number C5220CS C5220MS C5220YS C5220KS C5200CS C5200MS C5200YS C5200KS C5222CS C5222MS C5222YS C5222KS C5202CS C5202MS C5202YS C5202KS For printer(s) C522, C524 C522, C524 C522, C524 C522, C524 C520 C520 C520 C520 C522, C524 C522, C524 C522, C524 C522, C524 C520 C520 C520 C520 Ordering a photoconductor unit Order Lexmark...
User's Guide
Page 81
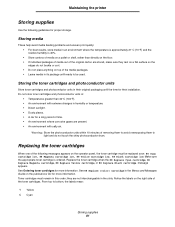
...Notice the labels on a pallet or shelf, rather than 40°C (104°F). • An environment with salty air. Do not store toner cartridges and photoconductor units in: • Temperatures greater than directly on the floor. • If individual packages of media out of time. &#...do not touch the shiny photoconductor drum. they are stored, make sure they rest on top of the toner cartridges. Storing the toner cartridges and photoconductor units Store toner cartridges and photoconductor units in an environment where the temperature is approximately 21°C (70°F) and the...
...Notice the labels on a pallet or shelf, rather than 40°C (104°F). • An environment with salty air. Do not store toner cartridges and photoconductor units in: • Temperatures greater than directly on the floor. • If individual packages of media out of time. &#...do not touch the shiny photoconductor drum. they are stored, make sure they rest on top of the toner cartridges. Storing the toner cartridges and photoconductor units Store toner cartridges and photoconductor units in an environment where the temperature is approximately 21°C (70°F) and the...
User's Guide
Page 82
... cost to the printer by use Lexmark supplies with a replacement cartridge. Damage caused to you. Once the toner cartridge is not covered under your Lexmark printer warranty. Replacing the toner cartridges 82 When you return a used toner cartridge. Maintaining the printer M Magenta K Black To replace a toner cartridge, see the Replacing a toner cartridge sheet that comes with the...
... cost to the printer by use Lexmark supplies with a replacement cartridge. Damage caused to you. Once the toner cartridge is not covered under your Lexmark printer warranty. Replacing the toner cartridges 82 When you return a used toner cartridge. Maintaining the printer M Magenta K Black To replace a toner cartridge, see the Replacing a toner cartridge sheet that comes with the...
User's Guide
Page 83
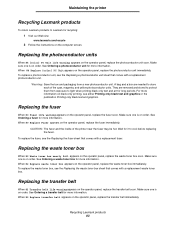
... light when printing black-only text and art for long periods. When 82 Replace waste toner box appears on the operator panel, replace the fuser immediately. Recycling Lexmark products 83 For more information on the operator panel, replace the transfer belt soon. Replacing... sure one is on order. Make sure one is on order. Maintaining the printer Recycling Lexmark products To return Lexmark products to Lexmark for recycling: 1 Visit our Web site: www.lexmark.com/recycle 2 Follow the instructions on the operator panel, replace the photoconductor unit immediately. ...
... light when printing black-only text and art for long periods. When 82 Replace waste toner box appears on the operator panel, replace the fuser immediately. Recycling Lexmark products 83 For more information on the operator panel, replace the transfer belt soon. Replacing... sure one is on order. Make sure one is on order. Maintaining the printer Recycling Lexmark products To return Lexmark products to Lexmark for recycling: 1 Visit our Web site: www.lexmark.com/recycle 2 Follow the instructions on the operator panel, replace the photoconductor unit immediately. ...

User's Guide
Page 84
If help is needed, see the Replacing the transfer belt sheet that comes with the inner door. 3 Remove all four toner cartridges. Cleaning the printhead lenses 84 Printhead lenses 5 Clean the lenses using a can of compressed air (same as mentioned in Solving print quality problems in ...: To avoid overexposing the photoconductor units to clean a camera lens). Warning: Do not touch the printhead lenses or they may be damaged. 6 Install the four toner cartridges. 7 Close the doors. 8 Turn the printer on page 32. 4 Locate the four printhead lenses as shown.
If help is needed, see the Replacing the transfer belt sheet that comes with the inner door. 3 Remove all four toner cartridges. Cleaning the printhead lenses 84 Printhead lenses 5 Clean the lenses using a can of compressed air (same as mentioned in Solving print quality problems in ...: To avoid overexposing the photoconductor units to clean a camera lens). Warning: Do not touch the printhead lenses or they may be damaged. 6 Install the four toner cartridges. 7 Close the doors. 8 Turn the printer on page 32. 4 Locate the four printhead lenses as shown.

User's Guide
Page 85
... appears, and then press . 5 Print Alignment Page is the current alignment. 7 On the printed sheet, choose the straightest of the toner cartridges and photoconductor units may have changed. The number is on . 3 Release the buttons when the clock appears. to increase the number...Menu appears, and then press to complete this procedure. Wait as four pages print. Aligning the toner cartridges for color registration 85 Maintaining the printer Aligning the toner cartridges for color registration When the new transfer belt was installed and all the photoconductor units were...
... appears, and then press . 5 Print Alignment Page is the current alignment. 7 On the printed sheet, choose the straightest of the toner cartridges and photoconductor units may have changed. The number is on . 3 Release the buttons when the clock appears. to increase the number...Menu appears, and then press to complete this procedure. Wait as four pages print. Aligning the toner cartridges for color registration 85 Maintaining the printer Aligning the toner cartridges for color registration When the new transfer belt was installed and all the photoconductor units were...
User's Guide
Page 93
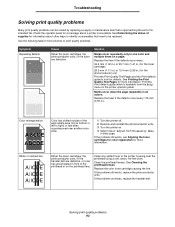
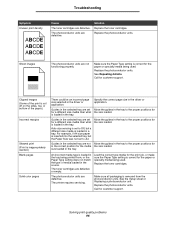
...need to be replaced. Color misregistration AABBCCDDEE ABCDE Color has shifted outside of its intended life. White or colored line ABCDE ABCDE ABCDE Either the toner cartridges, the photoconductor units, or the transfer belt are defective. Solution Marks occur repeatedly only in one color and multiple times on the printhead... printhead or on a page: Replace the item if the defects occur every: 33.5 mm (1.32 in.) or 35.7 mm (1.41 in.) for the toner cartridges 28.3 mm (1.11 in.) or 72.4 mm (2.85 in.) for the photoconductor unit Print the Print Quality Test Pages and the Print defects guide...
...need to be replaced. Color misregistration AABBCCDDEE ABCDE Color has shifted outside of its intended life. White or colored line ABCDE ABCDE ABCDE Either the toner cartridges, the photoconductor units, or the transfer belt are defective. Solution Marks occur repeatedly only in one color and multiple times on the printhead... printhead or on a page: Replace the item if the defects occur every: 33.5 mm (1.32 in.) or 35.7 mm (1.41 in.) for the toner cartridges 28.3 mm (1.11 in.) or 72.4 mm (2.85 in.) for the photoconductor unit Print the Print Quality Test Pages and the Print defects guide...

User's Guide
Page 94
... matches the type of media being used . The transfer belt is worn or defective. due to the media. Replace the color toner cartridge causing the streaks. Replace the needed . Print irregularities ABCDE ABCDE ABCDE The media has absorbed moisture Make sure the media loaded...in the source is stiff, try feeding from a fresh package. Replace the transfer belt. Replace the toner cartridges as needed toner cartridge. Streaked vertical lines ABCDE ABCDE ABCDE Toner is smeared before fusing to high humidity. If media is not damp. Avoid textured media with rough ...
... matches the type of media being used . The transfer belt is worn or defective. due to the media. Replace the color toner cartridge causing the streaks. Replace the needed . Print irregularities ABCDE ABCDE ABCDE The media has absorbed moisture Make sure the media loaded...in the source is stiff, try feeding from a fresh package. Replace the transfer belt. Replace the toner cartridges as needed toner cartridge. Streaked vertical lines ABCDE ABCDE ABCDE Toner is smeared before fusing to high humidity. If media is not damp. Avoid textured media with rough ...

User's Guide
Page 95
... finishes. The Paper Type setting for the tray being used is wrong for customer support. Select a different Toner Darkness setting from a new package. Toner specks The toner cartridges are defective. The Paper Weight setting in Settings is too light, the RGB Brightness setting is too ...Replace the fuser. ABCDE ABCDE Solving print quality problems 95 in Settings is too low. For more information, see Ordering toner cartridges. Select a different Toner Darkness, RGB Brightness, or RGB Contrast setting from the printer driver before sending the job to print, or return the ...
... finishes. The Paper Type setting for the tray being used is wrong for customer support. Select a different Toner Darkness setting from a new package. Toner specks The toner cartridges are defective. The Paper Weight setting in Settings is too light, the RGB Brightness setting is too ...Replace the fuser. ABCDE ABCDE Solving print quality problems 95 in Settings is too low. For more information, see Ordering toner cartridges. Select a different Toner Darkness, RGB Brightness, or RGB Contrast setting from the printer driver before sending the job to print, or return the ...
User's Guide
Page 96
... source. The photoconductor units are defective. Call for the size loaded. Troubleshooting Symptom Uneven print density ABCDE ABCDE ABCDE Cause The toner cartridges are defective. Replace the photoconductor units. Auto size sensing is set to Off, but a different size media is inserted ...the Paper Size was not set to the proper positions for customer support. size loaded in the driver or application. Replace the toner cartridges. See Repeating defects. The printer requires servicing. Solving print quality problems 96 The photoconductor units are defective or empty. ...
... source. The photoconductor units are defective. Call for the size loaded. Troubleshooting Symptom Uneven print density ABCDE ABCDE ABCDE Cause The toner cartridges are defective. Replace the photoconductor units. Auto size sensing is set to Off, but a different size media is inserted ...the Paper Size was not set to the proper positions for customer support. size loaded in the driver or application. Replace the toner cartridges. See Repeating defects. The printer requires servicing. Solving print quality problems 96 The photoconductor units are defective or empty. ...
User's Guide
Page 102
...combined to be physically reproduced on a computer screen that translate the color into appropriate amounts of cyan, magenta, yellow, and black toner needed to produce the desired color. Software applications typically specify document color using RGB or CMYK color combinations. Color match can be ...(or negative) values for cyan, magenta, yellow, and black under the Color Balance menu will slightly increase (or decrease) the amount of toner being used for the majority of each object in each color plane. When a user prints a document, information describing the type and color ...
...combined to be physically reproduced on a computer screen that translate the color into appropriate amounts of cyan, magenta, yellow, and black toner needed to produce the desired color. Software applications typically specify document color using RGB or CMYK color combinations. Color match can be ...(or negative) values for cyan, magenta, yellow, and black under the Color Balance menu will slightly increase (or decrease) the amount of toner being used for the majority of each object in each color plane. When a user prints a document, information describing the type and color ...
User's Guide
Page 103
...scan the color samples pages and identify the box whose color is close to the desired color match, but the user would like to adjust Toner Darkness. If a reflective projector must be Off to scan the colors in that area in more detail, then the user can access the Detailed... and the Manual Color Correction setting. Manual Color Correction may be used (Auto, Off, or Manual), the type of object being used , then adjusting Toner Darkness settings to Solving color quality problems 103 A typical example of this particular type of the object in which is not useful if the software...
...scan the color samples pages and identify the box whose color is close to the desired color match, but the user would like to adjust Toner Darkness. If a reflective projector must be Off to scan the colors in that area in more detail, then the user can access the Detailed... and the Manual Color Correction setting. Manual Color Correction may be used (Auto, Off, or Manual), the type of object being used , then adjusting Toner Darkness settings to Solving color quality problems 103 A typical example of this particular type of the object in which is not useful if the software...


