Lexmark 4227 User's Guide
Page 85
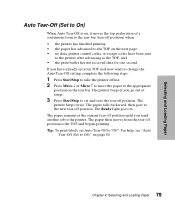
... position. The paper rolls backward, then goes to the new tear-off position until you go out of a continuous form to the tear bar (tear-off position) when: • the printer has finished printing; • the paper has advanced to the TOF on . For help, see "Auto Tear-Off (Set to Off)" on... the tear bar. The printer beeps if you send another job to the printer. The paper then moves from the tear-off position. Tip: To print labels, set and save the tear-off position to the TOF and begins...
... position. The paper rolls backward, then goes to the new tear-off position until you go out of a continuous form to the tear bar (tear-off position) when: • the printer has finished printing; • the paper has advanced to the TOF on . For help, see "Auto Tear-Off (Set to Off)" on... the tear bar. The printer beeps if you send another job to the printer. The paper then moves from the tear-off position. Tip: To print labels, set and save the tear-off position to the TOF and begins...

Lexmark 4227 User's Guide
Page 157
...83, 85 extended paper guides 83 parallel cable 83 printer stand 83 serial cable 83 tractor 2 feeder 83, 96 P paper advancing 46 loading auto sheet feeder 90 tractor 2 feeder 102 sizes 56-58 types continuous forms 57 envelopes 58 labels 55 single sheets 56 Paper Hand Options 41 paper... jams 117 parallel cable, connecting 10 pitch, selecting or locking 51 power cord, connecting 9 Print Adjust 45 Print Demo 39 Print Settings 39 printer driver 23 features and functions 25 function ...
...83, 85 extended paper guides 83 parallel cable 83 printer stand 83 serial cable 83 tractor 2 feeder 83, 96 P paper advancing 46 loading auto sheet feeder 90 tractor 2 feeder 102 sizes 56-58 types continuous forms 57 envelopes 58 labels 55 single sheets 56 Paper Hand Options 41 paper... jams 117 parallel cable, connecting 10 pitch, selecting or locking 51 power cord, connecting 9 Print Adjust 45 Print Demo 39 Print Settings 39 printer driver 23 features and functions 25 function ...
Lexmark 4227 Plus User's Guide
Page 49
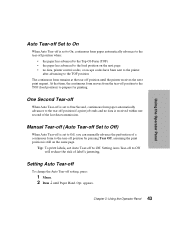
... On When Auto Tear-off is set Auto Tear-off to Off. Tip: To print labels, set to On, continuous form paper automatically advances to the tear-off position when: • the paper has advanced to the Top-Of-Form (TOF) • the paper has advanced to the load position on the same ... Second Tear-off When Auto Tear-off is set to One Second, continuous form paper automatically advances to the tear-off position if a print job ends and no data, printer control codes, or escape codes have been sent to the printer after advancing to the tear-off setting, press: 1 Menu. 2 Item ↓ until...
... On When Auto Tear-off is set Auto Tear-off to Off. Tip: To print labels, set to On, continuous form paper automatically advances to the tear-off position when: • the paper has advanced to the Top-Of-Form (TOF) • the paper has advanced to the load position on the same ... Second Tear-off When Auto Tear-off is set to One Second, continuous form paper automatically advances to the tear-off position if a print job ends and no data, printer control codes, or escape codes have been sent to the printer after advancing to the tear-off setting, press: 1 Menu. 2 Item ↓ until...

Lexmark 4227 Plus User's Guide
Page 88
Printing begins at the [A symbol. Margin Guide Left Paper Guide The distance from the [A symbol to the left paper guide determines the left margin. 8 Move the right paper guide to match the paper width you want aligns with the symbol [A printed on the inside of the Auto Sheet Feeder. Printer Options label located on the margin guide of the paper holder. 7 Move the paper guide so the print start position you are using. 82 Chapter 5: Printer Options
Printing begins at the [A symbol. Margin Guide Left Paper Guide The distance from the [A symbol to the left paper guide determines the left margin. 8 Move the right paper guide to match the paper width you want aligns with the symbol [A printed on the inside of the Auto Sheet Feeder. Printer Options label located on the margin guide of the paper holder. 7 Move the paper guide so the print start position you are using. 82 Chapter 5: Printer Options

Lexmark 4227 Plus User's Guide
Page 137
...75, 76 extended paper guides 75 parallel cable 75 printer stand 75 serial cable 75 tractor 2 feeder 75, 85 P paper advancing 42 loading auto sheet feeder 80 tractor 2 feeder 90 sizes 50-51 types continuous forms 50 envelopes 51 labels 49 single sheets 50 Paper Hand Options 37 paper... jams 102 parallel cable, connecting 8 pitch, selecting or locking 46 power cord, connecting 11 Print Adjust 41 Print Demo 34 Print Settings 34 printer driver 19 features and functions 21 function ...
...75, 76 extended paper guides 75 parallel cable 75 printer stand 75 serial cable 75 tractor 2 feeder 75, 85 P paper advancing 42 loading auto sheet feeder 80 tractor 2 feeder 90 sizes 50-51 types continuous forms 50 envelopes 51 labels 49 single sheets 50 Paper Hand Options 37 paper... jams 102 parallel cable, connecting 8 pitch, selecting or locking 46 power cord, connecting 11 Print Adjust 41 Print Demo 34 Print Settings 34 printer driver 19 features and functions 21 function ...

Service Manual
Page 4
4227-300 Operator panel service check 2-20 Paper feed service check 2-21 POST service check 2-24 Power failure service check 2-25 Print quality service check 2-27 Print wire drive failure service check 2-28 Ribbon drive service check 2-30 Tractor 2 service check 2-31 Diagnostic aids 3-1 Power-On ...pulley plate assembly removal 4-11 Base assembly removal 4-11 Carrier removal 4-12 Carrier motor assembly removal 4-15 Carrier plate removal 4-16 Label jam removal 4-16 Lower feed roller removal 4-17 Lower pinch roller removal 4-21 Main logic board removal 4-21 Memory Module removal ...
4227-300 Operator panel service check 2-20 Paper feed service check 2-21 POST service check 2-24 Power failure service check 2-25 Print quality service check 2-27 Print wire drive failure service check 2-28 Ribbon drive service check 2-30 Tractor 2 service check 2-31 Diagnostic aids 3-1 Power-On ...pulley plate assembly removal 4-11 Base assembly removal 4-11 Carrier removal 4-12 Carrier motor assembly removal 4-15 Carrier plate removal 4-16 Label jam removal 4-16 Lower feed roller removal 4-17 Lower pinch roller removal 4-21 Main logic board removal 4-21 Memory Module removal ...

Service Manual
Page 62
... print on medium thickness forms. Leaving the printer in no beep. Factory Setting Factory Setting allows the selection of the printhead pins to use the left tractor. Printhead Bank This allows the 18-wire printhead to be set to be changed. This allows the printer to continue to Non-U.S. 4227-...striking force of the default page length and code page from U.S. Three selections are possible. • Normal Auto-This is used , such as labels. Impact force of the impact force. High pin force is the default value. Log clear Clears the error log. 3-4 Service Manual Pressing multiple...
... print on medium thickness forms. Leaving the printer in no beep. Factory Setting Factory Setting allows the selection of the printhead pins to use the left tractor. Printhead Bank This allows the 18-wire printhead to be set to be changed. This allows the printer to continue to Non-U.S. 4227-...striking force of the default page length and code page from U.S. Three selections are possible. • Normal Auto-This is used , such as labels. Impact force of the impact force. High pin force is the default value. Log clear Clears the error log. 3-4 Service Manual Pressing multiple...

Service Manual
Page 75
... label. Remove the tractor assembly. 2. See "Top cover removal" on page 4-5. 3. Slide the pulley plate to the right and off the lug. 5. Remove the top cover. Repair information 4-11 See "Top cover removal" on page 4-5. 2. Remove the print unit. 4. Remove the tractor cable and bracket. 7. Remove the main logic board. 6. Turn the printer...
... label. Remove the tractor assembly. 2. See "Top cover removal" on page 4-5. 3. Slide the pulley plate to the right and off the lug. 5. Remove the top cover. Repair information 4-11 See "Top cover removal" on page 4-5. 2. Remove the print unit. 4. Remove the tractor cable and bracket. 7. Remove the main logic board. 6. Turn the printer...

Service Manual
Page 80
Remove the top cover. Remove the paper separator. Carefully remove the label from its bracket. 7. Remove the top cover. Remove the print unit. 3. Remove the right side frame. 9. See "Print unit removal" on page 4-38. 2. See "Upper feed roller removal" on page 4-29. 4. Remove ... portion of the paper guide/platen assembly, carefully remove the label without scratching either surface. 4-16 Service Manual See "Paper separator removal" on page 4-5. 2. 4227-300 Carrier plate removal 1. Label jam removal When a pressure-sensitive label separates from the paper separator.
Remove the top cover. Remove the paper separator. Carefully remove the label from its bracket. 7. Remove the top cover. Remove the print unit. 3. Remove the right side frame. 9. See "Print unit removal" on page 4-38. 2. See "Upper feed roller removal" on page 4-29. 4. Remove ... portion of the paper guide/platen assembly, carefully remove the label without scratching either surface. 4-16 Service Manual See "Paper separator removal" on page 4-5. 2. 4227-300 Carrier plate removal 1. Label jam removal When a pressure-sensitive label separates from the paper separator.

Service Manual
Page 140
...ASF Problems 2-5 Operator Panel Problems 2-8 Paper Feed Problems 2-6 Power Problems 2-8 Print Quality Problems 2-9 6XX Error Indications 2-5 4227-300 Carrier 4-12 Carrier Motor Assembly 4-15 Carrier Plate 4-16 Jammed Label 4-16 Label Jam 4-16 Lower Feed Roller 4-17 Main Logic Board 4-21 Memory Module ...Intermittent Problem 2-16 No Print 2-19 Operator Panel 2-20 Paper Feed 2-21 POST 2-24 Power Failure 2-25 Print Quality 2-27 I-2 Service Manual Print Wire Drive Failure 2-28 Ribbon Drive 2-30 Tractor 2 2-31 Setting Printer Functions 1-7 Signal Connections 6-7 Block Diagram (4227-300) 6-16 Main ...
...ASF Problems 2-5 Operator Panel Problems 2-8 Paper Feed Problems 2-6 Power Problems 2-8 Print Quality Problems 2-9 6XX Error Indications 2-5 4227-300 Carrier 4-12 Carrier Motor Assembly 4-15 Carrier Plate 4-16 Jammed Label 4-16 Label Jam 4-16 Lower Feed Roller 4-17 Main Logic Board 4-21 Memory Module ...Intermittent Problem 2-16 No Print 2-19 Operator Panel 2-20 Paper Feed 2-21 POST 2-24 Power Failure 2-25 Print Quality 2-27 I-2 Service Manual Print Wire Drive Failure 2-28 Ribbon Drive 2-30 Tractor 2 2-31 Setting Printer Functions 1-7 Signal Connections 6-7 Block Diagram (4227-300) 6-16 Main ...


