Setup Guide
Page 3
Contents Step 1: Get started 1 Step 2: Assemble paper handling options 4 Step 3: Set up the printer 17 Step 4: Install the scanner 23 Step 5: Install the output tray and raise the feed tray . . . 24 Step 6: Attach cables and power cords 25 Step 7: Turn on the scanner and printer 27 Step 8: Change your default copy settings 30 Step 9: Set send and receive fax information 32 Step 10: Set up network scanning 37 Step 11: Verify MFP setup 40 Step 12: Distribute MFP user instructions 41 Solve setup problems 42 Contents iii
Contents Step 1: Get started 1 Step 2: Assemble paper handling options 4 Step 3: Set up the printer 17 Step 4: Install the scanner 23 Step 5: Install the output tray and raise the feed tray . . . 24 Step 6: Attach cables and power cords 25 Step 7: Turn on the scanner and printer 27 Step 8: Change your default copy settings 30 Step 9: Set send and receive fax information 32 Step 10: Set up network scanning 37 Step 11: Verify MFP setup 40 Step 12: Distribute MFP user instructions 41 Solve setup problems 42 Contents iii
Setup Guide
Page 5
If you set up the printer, see the "Solve setup problems" on page 42 or visit our Web site at www.lexmark.com. Step 1: Get started 1 If you are installing a scanner after initial printer setup, turn them off as well and unplug their power cords. Turning off and unplug the power cord from... while setting up your printer, refer to the documentation that portion of the setup guide and continue to assemble an option or your printer and scanner (MFP option).
If you set up the printer, see the "Solve setup problems" on page 42 or visit our Web site at www.lexmark.com. Step 1: Get started 1 If you are installing a scanner after initial printer setup, turn them off as well and unplug their power cords. Turning off and unplug the power cord from... while setting up your printer, refer to the documentation that portion of the setup guide and continue to assemble an option or your printer and scanner (MFP option).
Setup Guide
Page 7
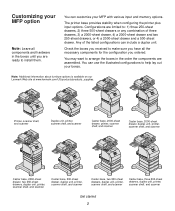
... site at www.lexmark.com/US/products/products_supplies. Configurations are ready to install them. You can use the illustrated configurations to : 1) three 250-sheet drawers, 2) three 500-sheet drawers or any combination of the listed configurations can customize your MFP with various input and memory options. Any of three drawers, 3) a 2000-sheet...
... site at www.lexmark.com/US/products/products_supplies. Configurations are ready to install them. You can use the illustrated configurations to : 1) three 250-sheet drawers, 2) three 500-sheet drawers or any combination of the listed configurations can customize your MFP with various input and memory options. Any of three drawers, 3) a 2000-sheet...
Setup Guide
Page 8
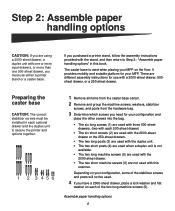
... be used. 4 If you must be installed in each optional drawer and the duplex unit to Step 2: "Assemble paper handling options" in this scanner. Preparing the caster base CAUTION: The correct stabilizer screws must use with one or more input drawers, or more than one 500-sheet drawer, you... using a 2000-sheet drawer, a duplex unit with a 2000-sheet drawer, 500sheet drawer, or a 250-sheet drawer. There are different assembly instructions for your MFP on each 500-sheet drawer) • The six short screws (2) are used with the 2000-sheet drawer or the 250-sheet drawers. • The two...
... be used. 4 If you must be installed in each optional drawer and the duplex unit to Step 2: "Assemble paper handling options" in this scanner. Preparing the caster base CAUTION: The correct stabilizer screws must use with one or more input drawers, or more than one 500-sheet drawer, you... using a 2000-sheet drawer, a duplex unit with a 2000-sheet drawer, 500sheet drawer, or a 250-sheet drawer. There are different assembly instructions for your MFP on each 500-sheet drawer) • The six short screws (2) are used with the 2000-sheet drawer or the 250-sheet drawers. • The two...
Setup Guide
Page 9
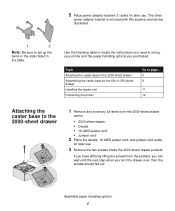
The other power adapter bracket is not used with this scanner and can wait until the next step when you purchased. If you have difficulty lifting the screws from the 2000-sheet drawer carton. • 2000-...
The other power adapter bracket is not used with this scanner and can wait until the next step when you purchased. If you have difficulty lifting the screws from the 2000-sheet drawer carton. • 2000-...
Setup Guide
Page 25
... the printer to the Ready state. Look under the "TCP/IP" heading and make sure the IP address, netmask, and gateway are finished. Attaching the scanner shelf 1 Turn the printer off. 2 Unplug the 16 AWG power cord or printer power cord from the grounded outlet. Press Select when you are what...
... the printer to the Ready state. Look under the "TCP/IP" heading and make sure the IP address, netmask, and gateway are finished. Attaching the scanner shelf 1 Turn the printer off. 2 Unplug the 16 AWG power cord or printer power cord from the grounded outlet. Press Select when you are what...
Setup Guide
Page 26
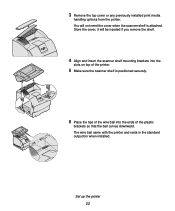
You will be needed if you remove the shelf. 4 Align and insert the scanner shelf mounting brackets into the slots on top of the printer. 5 Make sure the scanner shelf is attached. The wire bail came with the printer and rests in the standard output bin when installed. Set up the printer 22 Store the cover, it will not need the cover when the scanner shelf is positioned securely. 6 Place the tips of the wire bail into the ends of the plastic brackets so that the bail curves downward. 3 Remove the top cover or any previously installed print media handling options from the printer.
You will be needed if you remove the shelf. 4 Align and insert the scanner shelf mounting brackets into the slots on top of the printer. 5 Make sure the scanner shelf is attached. The wire bail came with the printer and rests in the standard output bin when installed. Set up the printer 22 Store the cover, it will not need the cover when the scanner shelf is positioned securely. 6 Place the tips of the wire bail into the ends of the plastic brackets so that the bail curves downward. 3 Remove the top cover or any previously installed print media handling options from the printer.
Setup Guide
Page 27
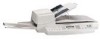
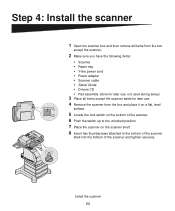
... and then remove all items from the box except the scanner. 2 Make sure you have the following items: • Scanner • Paper tray • Y-line power cord • Power adapter • Scanner cable • Setup Guide • Drivers CD • Pad assembly (store for later use, not used ...during setup) 3 Place all items except the scanner aside for later use. 4 Remove the scanner from the box and place it on a flat, level surface...
... and then remove all items from the box except the scanner. 2 Make sure you have the following items: • Scanner • Paper tray • Y-line power cord • Power adapter • Scanner cable • Setup Guide • Drivers CD • Pad assembly (store for later use, not used ...during setup) 3 Place all items except the scanner aside for later use. 4 Remove the scanner from the box and place it on a flat, level surface...

Setup Guide
Page 28
Step 5: Install the output tray and raise the feed tray Note: The automatic document feeder and the feed tray are attached to the scanner before it is shipped. 1 Attach the output paper tray to an upright position. Automatic document feeder Feed tray Output paper tray Support bar Install the output tray and raise the feed tray 24 Make sure the tray snaps into place and lies flat. 2 Lift the feed tray and raise the support bar to the automatic document feeder.
Step 5: Install the output tray and raise the feed tray Note: The automatic document feeder and the feed tray are attached to the scanner before it is shipped. 1 Attach the output paper tray to an upright position. Automatic document feeder Feed tray Output paper tray Support bar Install the output tray and raise the feed tray 24 Make sure the tray snaps into place and lies flat. 2 Lift the feed tray and raise the support bar to the automatic document feeder.
Setup Guide
Page 29
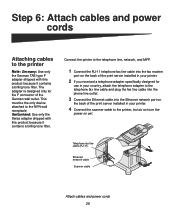
... and MFP. 1 Connect the RJ-11 telephone fax line cable into the fax modem port on the back of the print server installed in your printer. 2 If you received a telephone adapter specifically designed for the F connector of the print server installed in your printer. 4 Connect the scanner cable to...only the Swiss adapter shipped with this product because it contains a billing tone filter. Telephone fax line cable (RJ-11) Ethernet network cable Scanner cable Attach cables and power cords 25 The adapter is designed only for use in your country, attach the telephone adapter to the telephone ...
... and MFP. 1 Connect the RJ-11 telephone fax line cable into the fax modem port on the back of the print server installed in your printer. 2 If you received a telephone adapter specifically designed for the F connector of the print server installed in your printer. 4 Connect the scanner cable to...only the Swiss adapter shipped with this product because it contains a billing tone filter. Telephone fax line cable (RJ-11) Ethernet network cable Scanner cable Attach cables and power cords 25 The adapter is designed only for use in your country, attach the telephone adapter to the telephone ...
Setup Guide
Page 30
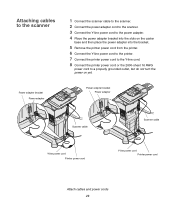
... cord Y-line power cord Printer power cord Attach cables and power cords 26 Attaching cables to the scanner Power adapter bracket Power adapter 1 Connect the scanner cable to the scanner. 2 Connect the power adapter cord to the scanner. 3 Connect the Y-line power cord to the power adapter. 4 Place the power adapter bracket into the...
... cord Y-line power cord Printer power cord Attach cables and power cords 26 Attaching cables to the scanner Power adapter bracket Power adapter 1 Connect the scanner cable to the scanner. 2 Connect the power adapter cord to the scanner. 3 Connect the Y-line power cord to the power adapter. 4 Place the power adapter bracket into the...
Setup Guide
Page 31
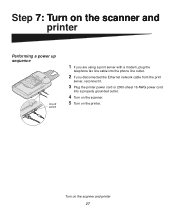
Turn on the printer. Step 7: Turn on the scanner and printer Performing a power up sequence On/off switch 1 If you are using a print server with a modem, plug the telephone fax line cable into the phone line outlet. 2 If you disconnected the Ethernet network cable from the print server, reconnect it. 3 Plug the printer power cord or 2000-sheet 16 AWG power cord into a properly grounded outlet. 4 Turn on the scanner. 5 Turn on the scanner and printer 27
Turn on the printer. Step 7: Turn on the scanner and printer Performing a power up sequence On/off switch 1 If you are using a print server with a modem, plug the telephone fax line cable into the phone line outlet. 2 If you disconnected the Ethernet network cable from the print server, reconnect it. 3 Plug the printer power cord or 2000-sheet 16 AWG power cord into a properly grounded outlet. 4 Turn on the scanner. 5 Turn on the scanner and printer 27
Setup Guide
Page 32
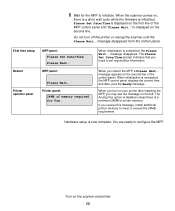
...required fax information. When you turn off the printer or unplug the scanner until the Please Wait... Please Set Date/Time is displayed on the second line. is displayed on your printer after installing the MFP, you restart the MFP, a Please Wait... message disappears from the control panel. When ...requirement. Do not turn on the first line of printer memory. Turn on the second line of memory required for the MFP to configure the MFP. message appears on the scanner and printer 28 Printer panel: 24MB of the control panel. When you may see the message on , there is a...
...required fax information. When you turn off the printer or unplug the scanner until the Please Wait... Please Set Date/Time is displayed on the second line. is displayed on your printer after installing the MFP, you restart the MFP, a Please Wait... message disappears from the control panel. When ...requirement. Do not turn on the first line of printer memory. Turn on the second line of memory required for the MFP to configure the MFP. message appears on the scanner and printer 28 Printer panel: 24MB of the control panel. When you may see the message on , there is a...
Setup Guide
Page 33
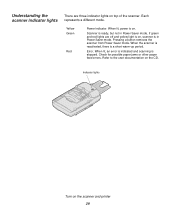
... not in Power Saver mode. Each represents a different mode. When lit, power is on top of the scanner. If green and red lights are three indicator lights on . Pressing a button removes the scanner from Power Saver mode. Check for possible paper jams or other paper feed errors. When lit, an error... is indicated and scanning is a short warm-up period. Error. Understanding the scanner indicator lights There are off and yellow light is on, scanner is in Power Saver mode. Yellow Green Red Power indicator. When the...
... not in Power Saver mode. Each represents a different mode. When lit, power is on top of the scanner. If green and red lights are three indicator lights on . Pressing a button removes the scanner from Power Saver mode. Check for possible paper jams or other paper feed errors. When lit, an error... is indicated and scanning is a short warm-up period. Error. Understanding the scanner indicator lights There are off and yellow light is on, scanner is in Power Saver mode. Yellow Green Red Power indicator. When the...
Setup Guide
Page 35
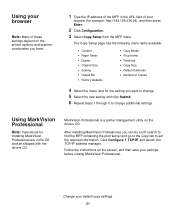
... before closing MarkVision Professional. Using your browser Note: Many of these settings depend on the printer, options, and scanner combination you have. 1 Type the IP address of the MFP in the CD booklet shipped with the drivers CD. The Copy Setup page has the following menu items available:... Copies 4 Select the menu item for example, http://192.168.236.24), and then press Enter. 2 Click Configuration. 3 Select Copy Setup from the MFP menu. After installing MarkVision Professional, you want to change. 5 Select the new setting and click Submit. 6 Repeat steps 1 through 5 to set the ...
... before closing MarkVision Professional. Using your browser Note: Many of these settings depend on the printer, options, and scanner combination you have. 1 Type the IP address of the MFP in the CD booklet shipped with the drivers CD. The Copy Setup page has the following menu items available:... Copies 4 Select the menu item for example, http://192.168.236.24), and then press Enter. 2 Click Configuration. 3 Select Copy Setup from the MFP menu. After installing MarkVision Professional, you want to change. 5 Select the new setting and click Submit. 6 Repeat steps 1 through 5 to set the ...
Setup Guide
Page 44
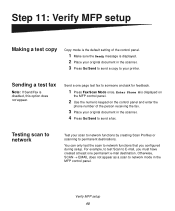
...If Send/Fax is displayed. 2 Place your original document in the scanner. 3 Press Go/Send to send a copy to your printer. Testing scan to network Test your original document in the MFP control panel. Enter Phone # is displayed on the MFP control panel. 2 Use the numeric keypad on the control panel and...Scan Mode once. Send a one page test fax to E-mail, you configured during setup. You can only test the scan to network mode in the scanner. 4 Press Go/Send to permanent destinations. Otherwise, SCAN → EMAIL does not appear as a scan to network functions that you must have created...
...If Send/Fax is displayed. 2 Place your original document in the scanner. 3 Press Go/Send to send a copy to your printer. Testing scan to network Test your original document in the MFP control panel. Enter Phone # is displayed on the MFP control panel. 2 Use the numeric keypad on the control panel and...Scan Mode once. Send a one page test fax to E-mail, you configured during setup. You can only test the scan to network mode in the scanner. 4 Press Go/Send to permanent destinations. Otherwise, SCAN → EMAIL does not appear as a scan to network functions that you must have created...
Setup Guide
Page 46
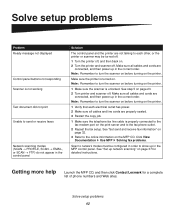
... up network scanning" on page 37 for a complete list of phone numbers and Web sites. Getting more help Launch the MFP CD, and then click Contact Lexmark for detailed instructions. Note: Remember to the fax phone outlet. 2 Repeat the fax setup. Make sure the printer is not... . Solve setup problems 42 Solve setup problems Problem Ready message not displayed Control panel buttons not responding Scanner is turned on. Click View Documentation Use MFP Solving fax problems. Scan to send or receive faxes Network scanning modes (SCAN → PROFILE, SCAN → EMAIL, or SCAN &#...
... up network scanning" on page 37 for a complete list of phone numbers and Web sites. Getting more help Launch the MFP CD, and then click Contact Lexmark for detailed instructions. Note: Remember to the fax phone outlet. 2 Repeat the fax setup. Make sure the printer is not... . Solve setup problems 42 Solve setup problems Problem Ready message not displayed Control panel buttons not responding Scanner is turned on. Click View Documentation Use MFP Solving fax problems. Scan to send or receive faxes Network scanning modes (SCAN → PROFILE, SCAN → EMAIL, or SCAN &#...
Setup Guide
Page 47
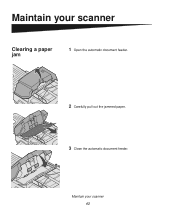
Maintain your scanner 43 Maintain your scanner Clearing a paper jam 1 Open the automatic document feeder. 2 Carefully pull out the jammed paper. 3 Close the automatic document feeder.
Maintain your scanner 43 Maintain your scanner Clearing a paper jam 1 Open the automatic document feeder. 2 Carefully pull out the jammed paper. 3 Close the automatic document feeder.
Setup Guide
Page 48
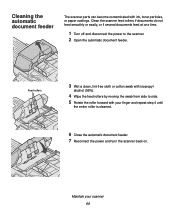
...3 Wet a clean, lint-free cloth or cotton swab with isopropyl alcohol (95%). 4 Wipe the feed rollers by moving the swab from side to the scanner. 2 Open the automatic document feeder. Maintain your finger and repeat step 4 until the entire roller is cleaned. 6 Close the automatic document feeder. 7 ...Reconnect the power and turn the scanner back on. Clean the scanner feed rollers if documents do not feed smoothly or easily, or if several documents feed at one time. 1 Turn off and disconnect ...
...3 Wet a clean, lint-free cloth or cotton swab with isopropyl alcohol (95%). 4 Wipe the feed rollers by moving the swab from side to the scanner. 2 Open the automatic document feeder. Maintain your finger and repeat step 4 until the entire roller is cleaned. 6 Close the automatic document feeder. 7 ...Reconnect the power and turn the scanner back on. Clean the scanner feed rollers if documents do not feed smoothly or easily, or if several documents feed at one time. 1 Turn off and disconnect ...
Setup Guide
Page 49
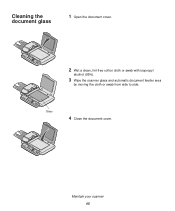
Glass 4 Close the document cover. Maintain your scanner 45 Cleaning the document glass 1 Open the document cover. 2 Wet a clean, lint-free cotton cloth or swab with isopropyl alcohol (95%). 3 Wipe the scanner glass and automatic document feeder area by moving the cloth or swab from side to side.
Glass 4 Close the document cover. Maintain your scanner 45 Cleaning the document glass 1 Open the document cover. 2 Wet a clean, lint-free cotton cloth or swab with isopropyl alcohol (95%). 3 Wipe the scanner glass and automatic document feeder area by moving the cloth or swab from side to side.


