
Setup Guide
Page 2
... your product is installed, you . Do not set up this agreement are periodically made at private expense. In other replacement parts. • When installing the print server containing the fax modem port, follow all safety precautions of any existing intellectual property ...right may be incorporated in this symbol , it believes appropriate without incurring any of their respective owners. © Copyright 2003 Lexmark International, Inc. References in later editions. Any reference to a product, program, or service is designed, tested, and approved to ...
... your product is installed, you . Do not set up this agreement are periodically made at private expense. In other replacement parts. • When installing the print server containing the fax modem port, follow all safety precautions of any existing intellectual property ...right may be incorporated in this symbol , it believes appropriate without incurring any of their respective owners. © Copyright 2003 Lexmark International, Inc. References in later editions. Any reference to a product, program, or service is designed, tested, and approved to ...
Setup Guide
Page 48
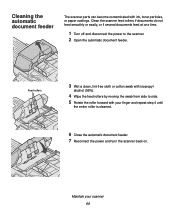
... entire roller is cleaned. 6 Close the automatic document feeder. 7 Reconnect the power and turn the scanner back on. Cleaning the automatic document feeder The scanner parts can become contaminated with your scanner 44 Feed rollers 3 Wet a clean, lint-free cloth or cotton swab with isopropyl alcohol (95%). 4 Wipe the feed rollers...
... entire roller is cleaned. 6 Close the automatic document feeder. 7 Reconnect the power and turn the scanner back on. Cleaning the automatic document feeder The scanner parts can become contaminated with your scanner 44 Feed rollers 3 Wet a clean, lint-free cloth or cotton swab with isopropyl alcohol (95%). 4 Wipe the feed rollers...
Setup Guide
Page 51
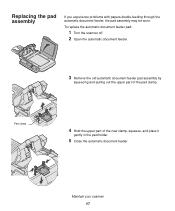
Replacing the pad assembly If you experience problems with papers double-feeding through the automatic document feeder, the pad assembly may be worn. Maintain your scanner 47 To replace the automatic document feeder pad: 1 Turn the scanner off. 2 Open the automatic document feeder. 3 Remove the old automatic document feeder pad assembly by squeezing and pulling out the upper part of the new clamp, squeeze, and place it gently in the pad holder. 5 Close the automatic document feeder. Pad clamp 4 Hold the upper part of the pad clamp.
Replacing the pad assembly If you experience problems with papers double-feeding through the automatic document feeder, the pad assembly may be worn. Maintain your scanner 47 To replace the automatic document feeder pad: 1 Turn the scanner off. 2 Open the automatic document feeder. 3 Remove the old automatic document feeder pad assembly by squeezing and pulling out the upper part of the new clamp, squeeze, and place it gently in the pad holder. 5 Close the automatic document feeder. Pad clamp 4 Hold the upper part of the pad clamp.
Setup Guide
Page 52
... Class A limits are assigned to your telephone line, this device may not ring in order to determine how many RENs are designed to machine type 4036-306. Unauthorized changes or modifications could void the user's authority to Part 15 of the FCC Rules. Industry Canada ICES-003 This Class A digital apparatus complies with...
... Class A limits are assigned to your telephone line, this device may not ring in order to determine how many RENs are designed to machine type 4036-306. Unauthorized changes or modifications could void the user's authority to Part 15 of the FCC Rules. Industry Canada ICES-003 This Class A digital apparatus complies with...


