
Menu Map
Page 1
... General Settings Setup Menu Finishing Menu Quality Menu Utilities Menu XPS Menu PDF Menu PostScript Menu PCL Emul Menu HTML Menu Image Menu Understanding the printer control panel The following diagram shows the printer control panel: Network/Ports Active NIC Network Menu USB Menu Parallel Menu SMTP Menu
... General Settings Setup Menu Finishing Menu Quality Menu Utilities Menu XPS Menu PDF Menu PostScript Menu PCL Emul Menu HTML Menu Image Menu Understanding the printer control panel The following diagram shows the printer control panel: Network/Ports Active NIC Network Menu USB Menu Parallel Menu SMTP Menu

Menu Map
Page 2
...offering a list of 4 The following diagrams and tables provide more information about the printer control panel items: Item Description 1 Menus button ( ) Opens the menus Note: The menus are available only when the printer is needed. Menu map Page 2 of settings that you may select. 4 Indicator ...light Indicates the printer status: • Off-The power is off. • Blinking green-The printer is warming up, processing data, or printing. • Solid green-The printer is on, but idle. • Solid red-Operator intervention is in...
...offering a list of 4 The following diagrams and tables provide more information about the printer control panel items: Item Description 1 Menus button ( ) Opens the menus Note: The menus are available only when the printer is needed. Menu map Page 2 of settings that you may select. 4 Indicator ...light Indicates the printer status: • Off-The power is off. • Blinking green-The printer is warming up, processing data, or printing. • Solid green-The printer is on, but idle. • Solid red-Operator intervention is in...

Menu Map
Page 3
Settings chosen from a software program can also change or override the user default settings selected from the printer control panel. 3, 4, 5, 6 Navigation buttons Press the up or down arrow buttons to scroll through text that must be resolved. The current user default...and displays the available values or settings. Menu map Page 3 of 4 Item Description 1 Display Shows messages that communicate the status of the printer or that indicate possible printer problems that rolls to another screen. Press the right or left arrow buttons to increase or decrease a value or to perform a task ...
Settings chosen from a software program can also change or override the user default settings selected from the printer control panel. 3, 4, 5, 6 Navigation buttons Press the up or down arrow buttons to scroll through text that must be resolved. The current user default...and displays the available values or settings. Menu map Page 3 of 4 Item Description 1 Display Shows messages that communicate the status of the printer or that indicate possible printer problems that rolls to another screen. Press the right or left arrow buttons to increase or decrease a value or to perform a task ...
User Guide
Page 2
... up wireless printing...31 Information you will need to set up the printer on a wireless network 31 Installing the printer on a wireless network (Windows 31 Installing the printer on a wireless network (Macintosh 33 Installing the printer on a wired network 36 Minimizing your printer's environmental impact 39 Saving paper and toner...39 Using recycled paper ...39...
... up wireless printing...31 Information you will need to set up the printer on a wireless network 31 Installing the printer on a wireless network (Windows 31 Installing the printer on a wireless network (Macintosh 33 Installing the printer on a wired network 36 Minimizing your printer's environmental impact 39 Saving paper and toner...39 Using recycled paper ...39...
User Guide
Page 3
Contents 3 Adjusting Power Saver ...41 Recycling...42 Recycling Lexmark products ...42 Recycling Lexmark packaging...42 Returning Lexmark cartridges for reuse or recycling 43 Loading paper and specialty media 44 Setting the paper size and type...44 Configuring Universal ...office papers 59 Storing paper ...59 Supported paper sizes, types, weights, and capacities 60 Paper types and weights supported by the printer 60 Paper sizes supported by the printer...61 Paper tray capacities...62 Printing...63 Printing a document...63 Printing a document ...63 Printing on specialty media...64 Tips on...
Contents 3 Adjusting Power Saver ...41 Recycling...42 Recycling Lexmark products ...42 Recycling Lexmark packaging...42 Returning Lexmark cartridges for reuse or recycling 43 Loading paper and specialty media 44 Setting the paper size and type...44 Configuring Universal ...office papers 59 Storing paper ...59 Supported paper sizes, types, weights, and capacities 60 Paper types and weights supported by the printer 60 Paper sizes supported by the printer...61 Paper tray capacities...62 Printing...63 Printing a document...63 Printing a document ...63 Printing on specialty media...64 Tips on...

User Guide
Page 4
... a directory list...69 Printing the print quality test pages ...69 Canceling a print job...70 Canceling a print job from the printer control panel 70 Canceling a print job from the computer ...70 Understanding printer menus 72 Menus list...72 Paper menu...73 Default Source menu ...73 Paper Size/Type menu ...73 Configure MP menu...
... a directory list...69 Printing the print quality test pages ...69 Canceling a print job...70 Canceling a print job from the printer control panel 70 Canceling a print job from the computer ...70 Understanding printer menus 72 Menus list...72 Paper menu...73 Default Source menu ...73 Paper Size/Type menu ...73 Configure MP menu...
User Guide
Page 5
...menu...106 PostScript menu...106 PCL Emul menu ...106 HTML menu ...109 Image menu ...110 Maintaining the printer 111 Cleaning the exterior of the printer...111 Storing supplies...111 Checking the status of supplies from a network computer 111 Ordering supplies...112 Ordering ... Replacing supplies...113 Replacing the toner cartridge ...113 Replacing the photoconductor kit ...115 Moving the printer...118 Moving the printer to another location...118 Shipping the printer ...118 Administrative support 119 Finding advanced networking and administrator information 119 Using the Embedded Web Server...
...menu...106 PostScript menu...106 PCL Emul menu ...106 HTML menu ...109 Image menu ...110 Maintaining the printer 111 Cleaning the exterior of the printer...111 Storing supplies...111 Checking the status of supplies from a network computer 111 Ordering supplies...112 Ordering ... Replacing supplies...113 Replacing the toner cartridge ...113 Replacing the photoconductor kit ...115 Moving the printer...118 Moving the printer to another location...118 Shipping the printer ...118 Administrative support 119 Finding advanced networking and administrator information 119 Using the Embedded Web Server...

User Guide
Page 6
Contents 6 Understanding jam messages and locations 124 200 paper jam...126 201 paper jam...128 202 paper jam...129 231 paper jam...130 233 paper jam...132 234 paper jam...132 235 paper jam...133 24x paper jam...133 251 paper jam...134 Troubleshooting 136 Understanding printer messages...136 Calibrating ...136 Cartridge Life Exceeded ...136 Change to ...136 Change to ...136 Change to ...137 Change to ...137 Close front door ...137 Load with ...137 Load with ...138 Load with ...138 Load with ...138 Load Manual Feeder with
Contents 6 Understanding jam messages and locations 124 200 paper jam...126 201 paper jam...128 202 paper jam...129 231 paper jam...130 233 paper jam...132 234 paper jam...132 235 paper jam...133 24x paper jam...133 251 paper jam...134 Troubleshooting 136 Understanding printer messages...136 Calibrating ...136 Cartridge Life Exceeded ...136 Change to ...136 Change to ...136 Change to ...137 Change to ...137 Close front door ...137 Load with ...137 Load with ...138 Load with ...138 Load with ...138 Load Manual Feeder with
User Guide
Page 7
... 84 PC Kit life warning ...145 84 Replace PC Kit ...145 88 Cartridge low ...145 1565 Emulation error, load emulation option 146 Solving basic printer problems...146 Printer control panel display is blank or displays only diamonds 146 Solving printing problems...146 Jobs do not print ...146 Confidential and other held jobs...
... 84 PC Kit life warning ...145 84 Replace PC Kit ...145 88 Cartridge low ...145 1565 Emulation error, load emulation option 146 Solving basic printer problems...146 Printer control panel display is blank or displays only diamonds 146 Solving printing problems...146 Jobs do not print ...146 Confidential and other held jobs...
User Guide
Page 9
... according to abrasion or stress. Refer service or repairs, other devices attached to a professional service person. Do not set up the printer, then turn them off , and unplug the power cord from the wall outlet before inspecting it only with the use the fax feature...If you have any cable or electrical connection. CAUTION-POTENTIAL INJURY: There is a danger of such problems. Remove the power cord from the printer before making any other than those described in ports. Replace it . Do not recharge, disassemble, or incinerate a lithium battery. The manufacturer...
... according to abrasion or stress. Refer service or repairs, other devices attached to a professional service person. Do not set up the printer, then turn them off , and unplug the power cord from the wall outlet before inspecting it only with the use the fax feature...If you have any cable or electrical connection. CAUTION-POTENTIAL INJURY: There is a danger of such problems. Remove the power cord from the printer before making any other than those described in ports. Replace it . Do not recharge, disassemble, or incinerate a lithium battery. The manufacturer...
User Guide
Page 10
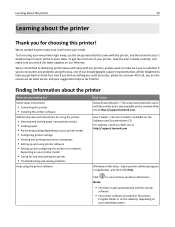
... setup materials that came with the printer software. • The printer software is available on your printer, read the User's Guide carefully, and make sure you're satisfied. To start using printer software • Setting up and configuring the printer on a network, depending on the Lexmark Web site at http://support.lexmark.com. After all, you are...
... setup materials that came with the printer software. • The printer software is available on your printer, read the User's Guide carefully, and make sure you're satisfied. To start using printer software • Setting up and configuring the printer on a network, depending on the Lexmark Web site at http://support.lexmark.com. After all, you are...
User Guide
Page 11
... or country can be found on the Support Web site or on the store receipt and the back of the printer), and have it here Lexmark Support Web site- Learning about the printer 11 What are you faster: • Machine Type number • Serial number • Date purchased • Store where purchased Warranty... information varies by country or region: • In the US-See the Statement of Limited Warranty included with this printer, or at http://support.lexmark.com. • Rest of the world-See the printed warranty that came with your...
... or country can be found on the Support Web site or on the store receipt and the back of the printer), and have it here Lexmark Support Web site- Learning about the printer 11 What are you faster: • Machine Type number • Serial number • Date purchased • Store where purchased Warranty... information varies by country or region: • In the US-See the Statement of Limited Warranty included with this printer, or at http://support.lexmark.com. • Rest of the world-See the printed warranty that came with your...

User Guide
Page 12
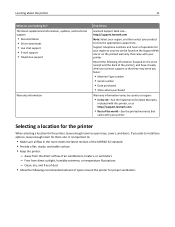
Learning about the printer 12 5 1 4 3 2 1 Rear 300 mm (12 in.) 2 Right side 200 mm (8 in.) 3 Front 300 mm (12 in.) 4 Left side 12.7 mm (0.5 in.) 5 Top 300 mm (12 in.) Printer configurations Basic model The following illustration shows the printer front with its basic features or parts:
Learning about the printer 12 5 1 4 3 2 1 Rear 300 mm (12 in.) 2 Right side 200 mm (8 in.) 3 Front 300 mm (12 in.) 4 Left side 12.7 mm (0.5 in.) 5 Top 300 mm (12 in.) Printer configurations Basic model The following illustration shows the printer front with its basic features or parts:

User Guide
Page 13
Learning about the printer 13 1 Front door release button 2 Paper stop 3 Standard exit bin 4 Printer control panel 5 System board door 6 Standard 250‑sheet tray (Tray 1) 7 Multipurpose feeder door 8 Front door The following illustration shows the printer back with its basic features or parts:
Learning about the printer 13 1 Front door release button 2 Paper stop 3 Standard exit bin 4 Printer control panel 5 System board door 6 Standard 250‑sheet tray (Tray 1) 7 Multipurpose feeder door 8 Front door The following illustration shows the printer back with its basic features or parts:

User Guide
Page 14
Learning about the printer 14 1 Rear door 2 Ethernet port 3 USB port 4 Parallel port Note: Not available on all models. 5 Printer power cord socket 6 Power switch 7 Security slot
Learning about the printer 14 1 Rear door 2 Ethernet port 3 USB port 4 Parallel port Note: Not available on all models. 5 Printer power cord socket 6 Power switch 7 Security slot

User Guide
Page 15
Learning about the printer 15 Configured models The following illustration shows the printer configured with an optional drawer: 1 Front door release button 2 Paper stop 3 Standard exit bin 4 Printer control panel 5 System board door 6 Standard 250‑sheet tray (Tray 1) 7 Optional 250‑ or 550‑sheet drawer (Tray 2) 8 Multipurpose feeder door 9 Front door Understanding the printer control panel The following diagram shows the printer control panel:
Learning about the printer 15 Configured models The following illustration shows the printer configured with an optional drawer: 1 Front door release button 2 Paper stop 3 Standard exit bin 4 Printer control panel 5 System board door 6 Standard 250‑sheet tray (Tray 1) 7 Optional 250‑ or 550‑sheet drawer (Tray 2) 8 Multipurpose feeder door 9 Front door Understanding the printer control panel The following diagram shows the printer control panel:

User Guide
Page 16
Then the Stopped screen appears offering a list of settings that you may select. Learning about the printer 16 The following diagrams and tables provide more information about the printer control panel items: Item Description 1 Menus button ( ) Opens the menus Note: The menus are available only when the printer is in the Ready state. 2 Back button ( ) Returns the display to the previous screen 3 Stop button ( ) Stops all printer activity When printing, pressing causes Stopping to appear momentarily.
Then the Stopped screen appears offering a list of settings that you may select. Learning about the printer 16 The following diagrams and tables provide more information about the printer control panel items: Item Description 1 Menus button ( ) Opens the menus Note: The menus are available only when the printer is in the Ready state. 2 Back button ( ) Returns the display to the previous screen 3 Stop button ( ) Stops all printer activity When printing, pressing causes Stopping to appear momentarily.

User Guide
Page 17
...increase or decrease a value or to another screen. Item Description 1 Display Shows messages that communicate the status of the printer or that indicate possible printer problems that rolls to scroll through menus, menu items, or settings (also called a menu item) • Opens a...item and displays the available values or settings. Settings chosen from a software program can also change or override the user default settings selected from the printer control panel. 3, 4, 5, 6 Navigation buttons Press the up or down arrow buttons moves you how to perform a task like clearing a jam....
...increase or decrease a value or to another screen. Item Description 1 Display Shows messages that communicate the status of the printer or that indicate possible printer problems that rolls to scroll through menus, menu items, or settings (also called a menu item) • Opens a...item and displays the available values or settings. Settings chosen from a software program can also change or override the user default settings selected from the printer control panel. 3, 4, 5, 6 Navigation buttons Press the up or down arrow buttons moves you how to perform a task like clearing a jam....

User Guide
Page 18
The paper stop The standard exit bin holds up to 150 sheets of 20 lb paper. Using the standard exit bin and paper stop also aids in neater stacking of the paper. To open the paper stop that accepts these entries. The standard exit bin includes a paper stop , pull it so it stacks. Learning about the printer 18 Item Description 1 Keypad Enter numbers or symbols if the display screen has a field that keeps paper from sliding out the front of the bin as it flips forward. It collects print jobs facedown.
The paper stop The standard exit bin holds up to 150 sheets of 20 lb paper. Using the standard exit bin and paper stop also aids in neater stacking of the paper. To open the paper stop that accepts these entries. The standard exit bin includes a paper stop , pull it so it stacks. Learning about the printer 18 Item Description 1 Keypad Enter numbers or symbols if the display screen has a field that keeps paper from sliding out the front of the bin as it flips forward. It collects print jobs facedown.

User Guide
Page 19
Learning about the printer 19 Notes: • Do not leave the paper stop is closed. Doing so may cause creases in the transparencies. • When moving the printer to another location, make sure the paper stop in the open position if you are printing on transparencies.
Learning about the printer 19 Notes: • Do not leave the paper stop is closed. Doing so may cause creases in the transparencies. • When moving the printer to another location, make sure the paper stop in the open position if you are printing on transparencies.


