Quick Reference
Page 1
... Reference Make a simple copy 1 Make sure the MFP control panel is in copy mode and the Ready status message is displayed. (If necessary, press Stop/Clear to enter copy mode.) 2 Use the drawing on the scanner as staple or punch if available. • Make sure the light is available) • .... If prompted to Place Next Or Stop, place the next page and then press Go/Send to the scan destination. 5 Press Go/Send. ©Copyright Lexmark International, Inc., 2002. b Press Fax/Scan Mode repeatedly until you see SCAN → EMAIL or SCAN → FTP. Cancel a fax Press Stop/Clear ...
... Reference Make a simple copy 1 Make sure the MFP control panel is in copy mode and the Ready status message is displayed. (If necessary, press Stop/Clear to enter copy mode.) 2 Use the drawing on the scanner as staple or punch if available. • Make sure the light is available) • .... If prompted to Place Next Or Stop, place the next page and then press Go/Send to the scan destination. 5 Press Go/Send. ©Copyright Lexmark International, Inc., 2002. b Press Fax/Scan Mode repeatedly until you see SCAN → EMAIL or SCAN → FTP. Cancel a fax Press Stop/Clear ...
Setup Guide
Page 3
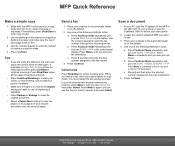
Contents Step 1: Get started 1 Step 2: Assemble paper handling options 4 Step 3: Set up the printer 17 Step 4: Install the scanner 23 Step 5: Install the output tray and raise the feed tray . . . 24 Step 6: Attach cables and power cords 25 Step 7: Turn on the scanner and printer 27 Step 8: Change your default copy settings 30 Step 9: Set send and receive fax information 32 Step 10: Set up network scanning 37 Step 11: Verify MFP setup 40 Step 12: Distribute MFP user instructions 41 Solve setup problems 42 Contents iii
Contents Step 1: Get started 1 Step 2: Assemble paper handling options 4 Step 3: Set up the printer 17 Step 4: Install the scanner 23 Step 5: Install the output tray and raise the feed tray . . . 24 Step 6: Attach cables and power cords 25 Step 7: Turn on the scanner and printer 27 Step 8: Change your default copy settings 30 Step 9: Set send and receive fax information 32 Step 10: Set up network scanning 37 Step 11: Verify MFP setup 40 Step 12: Distribute MFP user instructions 41 Solve setup problems 42 Contents iii
Setup Guide
Page 5
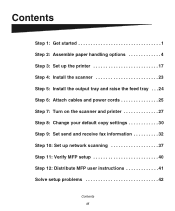
...or visit our Web site at www.lexmark.com. If you encounter a problem while setting up your printer and then return to this book This book is intended to help you can skip that came with the option or your printer and scanner (MFP option). Get started Using this guide and ...continue setup. If you are installing a scanner after initial printer setup, turn them off and unplug the power cord from both the...
...or visit our Web site at www.lexmark.com. If you encounter a problem while setting up your printer and then return to this book This book is intended to help you can skip that came with the option or your printer and scanner (MFP option). Get started Using this guide and ...continue setup. If you are installing a scanner after initial printer setup, turn them off and unplug the power cord from both the...
Setup Guide
Page 7
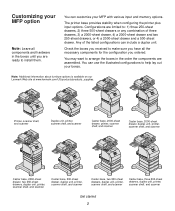
... your MFP with various input and memory options. You can include a duplex unit. Note: Additional information about furniture options is available on our Lexmark Web site at www.lexmark.com/US/products/products_supplies. Check the boxes you ordered. Printer, scanner shelf, and scanner Duplex unit, printer, scanner shelf, and scanner Caster base, 2000-sheet drawer, printer, scanner shelf, and scanner Caster...
... your MFP with various input and memory options. You can include a duplex unit. Note: Additional information about furniture options is available on our Lexmark Web site at www.lexmark.com/US/products/products_supplies. Check the boxes you ordered. Printer, scanner shelf, and scanner Duplex unit, printer, scanner shelf, and scanner Caster base, 2000-sheet drawer, printer, scanner shelf, and scanner Caster...
Setup Guide
Page 8
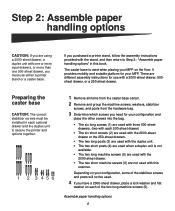
...drawers. (two with each of the stabilizer screws and posts will not be installed in each optional drawer and the duplex unit to Step 2: "Assemble paper handling options" in this scanner. Assemble paper handling options 4 If you purchased a printer stand, follow the assembly instructions provided with the duplex unit... . 4 If you need for your configuration, some of the two long machine screws (5). It provides mobility and a stable platform for your MFP on each 500-sheet drawer) • The six short screws (2) are used with the 2000-sheet drawer or the 250-sheet drawers. •...
...drawers. (two with each of the stabilizer screws and posts will not be installed in each optional drawer and the duplex unit to Step 2: "Assemble paper handling options" in this scanner. Assemble paper handling options 4 If you purchased a printer stand, follow the assembly instructions provided with the duplex unit... . 4 If you need for your configuration, some of the two long machine screws (5). It provides mobility and a stable platform for your MFP on each 500-sheet drawer) • The six short screws (2) are used with the 2000-sheet drawer or the 250-sheet drawers. •...
Setup Guide
Page 29
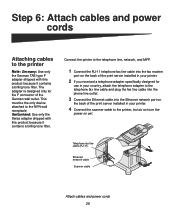
...on the back of the German wall outlet. Telephone fax line cable (RJ-11) Ethernet network cable Scanner cable Attach cables and power cords 25 Connect the printer to the telephone line, network, and MFP. 1 Connect the RJ-11 telephone fax line cable into the fax modem port on the back ...of the print server installed in your printer. 2 If you received a telephone adapter specifically designed for the F connector of the print server installed in your printer. 4 Connect the scanner cable to the...
...on the back of the German wall outlet. Telephone fax line cable (RJ-11) Ethernet network cable Scanner cable Attach cables and power cords 25 Connect the printer to the telephone line, network, and MFP. 1 Connect the RJ-11 telephone fax line cable into the fax modem port on the back ...of the print server installed in your printer. 2 If you received a telephone adapter specifically designed for the F connector of the print server installed in your printer. 4 Connect the scanner cable to the...
Setup Guide
Page 32
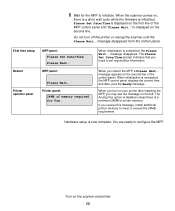
...MFP ...MFP, you restart the MFP, a Please Wait... When you turn off the printer or unplug the scanner... until the Please Wait... Printer panel: 24MB of the control panel. When initialization is completed, the Please Wait... Turn on , there is a short wait cycle while the firmware is displayed on the second line of memory required for the MFP to configure the MFP. When the scanner... comes on the scanner...MFP control panel and "Please Wait..." 6 Wait for Fax... Please Set Date/Time is initialized. First time setup Restart MFP...
...MFP ...MFP, you restart the MFP, a Please Wait... When you turn off the printer or unplug the scanner... until the Please Wait... Printer panel: 24MB of the control panel. When initialization is completed, the Please Wait... Turn on , there is a short wait cycle while the firmware is displayed on the second line of memory required for the MFP to configure the MFP. When the scanner... comes on the scanner...MFP control panel and "Please Wait..." 6 Wait for Fax... Please Set Date/Time is initialized. First time setup Restart MFP...
Setup Guide
Page 35
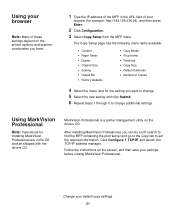
....236.24), and then press Enter. 2 Click Configuration. 3 Select Copy Setup from the MFP menu. Using your browser Note: Many of these settings depend on the printer, options, and scanner combination you have. 1 Type the IP address of the MFP in the CD booklet shipped with the drivers CD. MarkVision Professional is a printer management... MarkVision Professional are in the URL field of Copies 4 Select the menu item for the setting you can do an IP search to find the MFP containing the print server and go to the Copy tab to change additional settings.
....236.24), and then press Enter. 2 Click Configuration. 3 Select Copy Setup from the MFP menu. Using your browser Note: Many of these settings depend on the printer, options, and scanner combination you have. 1 Type the IP address of the MFP in the CD booklet shipped with the drivers CD. MarkVision Professional is a printer management... MarkVision Professional are in the URL field of Copies 4 Select the menu item for the setting you can do an IP search to find the MFP containing the print server and go to the Copy tab to change additional settings.
Setup Guide
Page 44
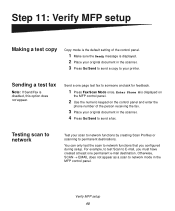
...MFP setup Making a test copy Copy mode is the default setting of the person receiving the fax. 3 Place your original document in the scanner.... 4 Press Go/Send to send a fax. Send a one permanent e-mail destination. Otherwise, SCAN → EMAIL does not appear as a scan to network Test your printer. Sending a test fax Note: If Send/Fax is displayed. 2 Place your original document in the MFP...Mode once. Testing scan to network mode in the scanner. 3 Press Go/Send to send a copy .... Enter Phone # is displayed on the MFP control panel. 2 Use the numeric keypad on...
...MFP setup Making a test copy Copy mode is the default setting of the person receiving the fax. 3 Place your original document in the scanner.... 4 Press Go/Send to send a fax. Send a one permanent e-mail destination. Otherwise, SCAN → EMAIL does not appear as a scan to network Test your printer. Sending a test fax Note: If Send/Fax is displayed. 2 Place your original document in the MFP...Mode once. Testing scan to network mode in the scanner. 3 Press Go/Send to send a copy .... Enter Phone # is displayed on the MFP control panel. 2 Use the numeric keypad on...
Setup Guide
Page 46
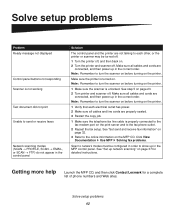
... the correct order. See "Set send and receive fax information" on the printer. 1 Make sure the scanner is turned on page 23. 2 Turn printer and scanner off . Click View Documentation Use MFP Solving fax problems. Scan to network modes must be turned off. 1 Turn the printer off, and then... before turning on the printer. 1 Verify that each other, or the printer or scanner may be configured in the MFP control panel. Getting more help Launch the MFP CD, and then click Contact Lexmark for detailed instructions. Solve setup problems 42 See step 5 on . Make sure all cables and cords ...
... the correct order. See "Set send and receive fax information" on the printer. 1 Make sure the scanner is turned on page 23. 2 Turn printer and scanner off . Click View Documentation Use MFP Solving fax problems. Scan to network modes must be turned off. 1 Turn the printer off, and then... before turning on the printer. 1 Verify that each other, or the printer or scanner may be configured in the MFP control panel. Getting more help Launch the MFP CD, and then click Contact Lexmark for detailed instructions. Solve setup problems 42 See step 5 on . Make sure all cables and cords ...
User's Reference
Page 6
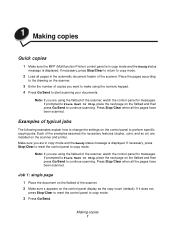
...Send to copy mode. 2 Load all the pages have been scanned. Press Stop/Clear when all pages in the automatic document feeder of the scanner, watch the control panel for messages. If necessary, press Stop/Clear to reset the control panel to copy mode. 3 Press Go/Send. Examples... of the scanner. 2 Make sure 1 appears on the scanner and printer. 1 Making copies Quick copies 1 Make sure the MFP (Multifunction Printer) control panel is in copy mode and the Ready status message is displayed. If necessary,...
...Send to copy mode. 2 Load all the pages have been scanned. Press Stop/Clear when all pages in the automatic document feeder of the scanner, watch the control panel for messages. If necessary, press Stop/Clear to reset the control panel to copy mode. 3 Press Go/Send. Examples... of the scanner. 2 Make sure 1 appears on the scanner and printer. 1 Making copies Quick copies 1 Make sure the MFP (Multifunction Printer) control panel is in copy mode and the Ready status message is displayed. If necessary,...
User's Reference
Page 13
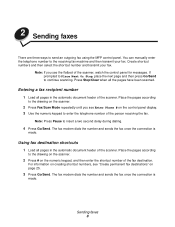
.... Press Stop/Clear when all pages in the automatic document feeder of the fax destination. Note: Press Pause to send an outgoing fax using the MFP control panel. For information on creating shortcut numbers, see Enter Phone # on page 25. 3 Press Go/Send. The fax modem dials the number ... Sending faxes 8 If prompted to Place Next Or Stop, place the next page and then press Go/Send to enter the telephone number of the scanner, watch the control panel for messages. Using fax destination shortcuts 1 Load all the pages have been scanned. Create shortcut numbers and then select the ...
.... Press Stop/Clear when all pages in the automatic document feeder of the fax destination. Note: Press Pause to send an outgoing fax using the MFP control panel. For information on creating shortcut numbers, see Enter Phone # on page 25. 3 Press Go/Send. The fax modem dials the number ... Sending faxes 8 If prompted to Place Next Or Stop, place the next page and then press Go/Send to enter the telephone number of the scanner, watch the control panel for messages. Using fax destination shortcuts 1 Load all the pages have been scanned. Create shortcut numbers and then select the ...
User's Reference
Page 14
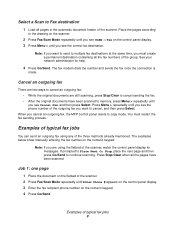
... cancel, and then press Select. Examples of the three methods already mentioned. You must create a permanent destination containing all the fax numbers of the scanner. Press Stop/Clear when all pages in the automatic document feeder of the group. Job 1: one page 1 Place the document on the flatbed of... the control panel display for help. 4 Press Go/Send. When you cancel an outgoing fax, the MFP control panel resets to the drawing on the scanner. 2 Press Fax/Scan Mode repeatedly until you see SCAN → Fax on the control panel display. 3 Press Menu > until you see Cancel Fax, ...
... cancel, and then press Select. Examples of the three methods already mentioned. You must create a permanent destination containing all the fax numbers of the scanner. Press Stop/Clear when all pages in the automatic document feeder of the group. Job 1: one page 1 Place the document on the flatbed of... the control panel display for help. 4 Press Go/Send. When you cancel an outgoing fax, the MFP control panel resets to the drawing on the scanner. 2 Press Fax/Scan Mode repeatedly until you see SCAN → Fax on the control panel display. 3 Press Menu > until you see Cancel Fax, ...
User's Reference
Page 17
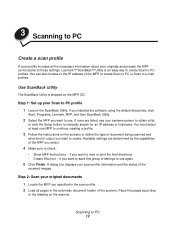
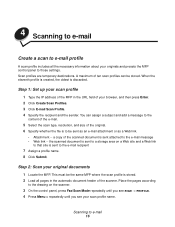
...Click Finish. if you want to the drawing on the MFP CD. Lexmark™ ScanBack™ Utility is shipped on the scanner. Step 2: Scan your original documents 1 Locate the MFP you want to save this group of the MFP you want to PC profiles. Use ScanBack utility The ... final directions • Create Shortcut -- If you installed the software using the default directories, click Start, Programs, Lexmark, MFP, and then ScanBack Utility. 2 Select the MFP you specified in the scan profile. 2 Load all the necessary information about your scan profile information and the status...
...Click Finish. if you want to the drawing on the MFP CD. Lexmark™ ScanBack™ Utility is shipped on the scanner. Step 2: Scan your original documents 1 Locate the MFP you want to save this group of the MFP you want to PC profiles. Use ScanBack utility The ... final directions • Create Shortcut -- If you installed the software using the default directories, click Start, Programs, Lexmark, MFP, and then ScanBack Utility. 2 Select the MFP you specified in the scan profile. 2 Load all the necessary information about your scan profile information and the status...
User's Reference
Page 18
... to PC settings" on page 14. 5 Click Next. Step 1: Set up your scan profile 1 Type the IP address of the MFP in the automatic document feeder of the scanner, watch the control panel for saving the scan output file somewhere on the MarkNet print server installed in your desktop, find the... appropriate directory, and type in the SCAN → PROFILE list on the flatbed and then press Go/Send to your MFP. Note: If you...
... to PC settings" on page 14. 5 Click Next. Step 1: Set up your scan profile 1 Type the IP address of the MFP in the automatic document feeder of the scanner, watch the control panel for saving the scan output file somewhere on the MarkNet print server installed in your desktop, find the... appropriate directory, and type in the SCAN → PROFILE list on the flatbed and then press Go/Send to your MFP. Note: If you...
User's Reference
Page 20
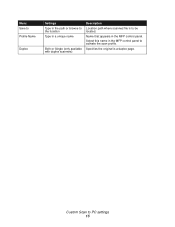
Specifies the original is to be located. Name that appears in the MFP control panel. Custom Scan to activate the scan profile. Select this name in the MFP control panel to PC settings 15 Menu Save to Profile Name Duplex Settings Type in the path or browse to the location Type in a unique name Both or Single (only available with duplex scanners) Description Location path where scanned file is a duplex page.
Specifies the original is to be located. Name that appears in the MFP control panel. Custom Scan to activate the scan profile. Select this name in the MFP control panel to PC settings 15 Menu Save to Profile Name Duplex Settings Type in the path or browse to the location Type in a unique name Both or Single (only available with duplex scanners) Description Location path where scanned file is a duplex page.
User's Reference
Page 21
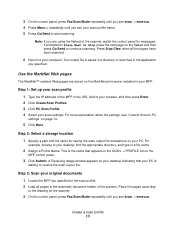
... is sent attached to a storage area on the scanner. 3 On the control panel, press Fax/Scan Mode repeatedly until you see SCAN → PROFILE. 4 Press Menu > repeatedly until you see your scan profile 1 Type the IP address of the MFP in the automatic document feeder of your browser, and...Click Create Scan Profiles. 3 Click E-mail Scan Profile. 4 Specify the recipient and the sender. Scan profiles are temporary destinations. You can be the same MFP where the scan profile is sent to the e-mail message • Web link -- Scanning to those settings. This must be stored. Step 1: Set up...
... is sent attached to a storage area on the scanner. 3 On the control panel, press Fax/Scan Mode repeatedly until you see SCAN → PROFILE. 4 Press Menu > repeatedly until you see your scan profile 1 Type the IP address of the MFP in the automatic document feeder of your browser, and...Click Create Scan Profiles. 3 Click E-mail Scan Profile. 4 Specify the recipient and the sender. Scan profiles are temporary destinations. You can be the same MFP where the scan profile is sent to the e-mail message • Web link -- Scanning to those settings. This must be stored. Step 1: Set up...
User's Reference
Page 22
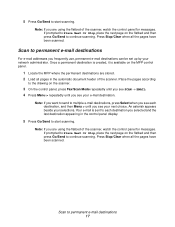
...have been scanned. Note: If you see your selections. Note: If you selected and the last destination appearing in the automatic document feeder of the scanner. Scan to continue scanning. Once a permanent destination is created, it is sent to each destination, and then Menu > until you frequently use, permanent...Press Stop/Clear when all the pages have been scanned. If prompted to Place Next Or Stop, place the next page on the MFP control panel. 1 Locate the MFP where the permanent destinations are using the flatbed of the scanner, watch the control panel for messages.
...have been scanned. Note: If you see your selections. Note: If you selected and the last destination appearing in the automatic document feeder of the scanner. Scan to continue scanning. Once a permanent destination is created, it is sent to each destination, and then Menu > until you frequently use, permanent...Press Stop/Clear when all the pages have been scanned. If prompted to Place Next Or Stop, place the next page on the MFP control panel. 1 Locate the MFP where the permanent destinations are using the flatbed of the scanner, watch the control panel for messages.

User's Reference
Page 23
This must be the MFP configured with your FTP destination. 2 Load all the pages have been scanned. Note: If you see SCAN &#...scanning. If prompted to Place Next Or Stop, place the next page on the scanner. 3 Press Fax/Scan Mode repeatedly until you are using the flatbed of the scanner, watch the control panel for messages. FTP confirmation page FTP server: rome.gre.... the destination becomes available as a network scanning choice in the automatic document feeder of the scanner. Press Stop/Clear when all pages in the MFP control panel. 1 Locate the MFP you want to FTP 18
This must be the MFP configured with your FTP destination. 2 Load all the pages have been scanned. Note: If you see SCAN &#...scanning. If prompted to Place Next Or Stop, place the next page on the scanner. 3 Press Fax/Scan Mode repeatedly until you are using the flatbed of the scanner, watch the control panel for messages. FTP confirmation page FTP server: rome.gre.... the destination becomes available as a network scanning choice in the automatic document feeder of the scanner. Press Stop/Clear when all pages in the MFP control panel. 1 Locate the MFP you want to FTP 18
User's Reference
Page 27
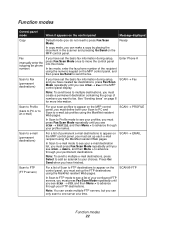
... e-mail (permanent destinations) For a list of numbers you must create a permanent destination containing the group of permanent e-mail destinations to appear on the MFP control panel, and then press Go/Send to move the control panel into this mode. SCAN ® FTP Function modes 22 Enter Phone # Scan...basic fax information during setup, and you must press Fax/Scan Mode repeatedly until you see SCAN → Fax in the scanner and pressing Go/Send on the MFP control panel. In fax mode, enter the fax phone number of Scan to FTP destinations to see a list of your ...
... e-mail (permanent destinations) For a list of numbers you must create a permanent destination containing the group of permanent e-mail destinations to appear on the MFP control panel, and then press Go/Send to move the control panel into this mode. SCAN ® FTP Function modes 22 Enter Phone # Scan...basic fax information during setup, and you must press Fax/Scan Mode repeatedly until you see SCAN → Fax in the scanner and pressing Go/Send on the MFP control panel. In fax mode, enter the fax phone number of Scan to FTP destinations to see a list of your ...


