
User Manual
Page 6
... ...117 Replacing a black and color imaging kit ...123 Replacing a toner cartridge...128 Replacing a developer unit ...130 Cleaning the exterior of the printer...135 Recycling Lexmark products...136 Moving the printer...136 Before moving the printer...136 Moving the printer to another location...136 Shipping the printer ...136 Administrative support 137 Restoring the factory default settings...137 Adjusting...
... ...117 Replacing a black and color imaging kit ...123 Replacing a toner cartridge...128 Replacing a developer unit ...130 Cleaning the exterior of the printer...135 Recycling Lexmark products...136 Moving the printer...136 Before moving the printer...136 Moving the printer to another location...136 Shipping the printer ...136 Administrative support 137 Restoring the factory default settings...137 Adjusting...
User Manual
Page 57
Have windows, holes, perforations, cutouts, or embossing - Partial sheets also contaminate the printer and the cartridge with adhesive, and could void the printer and cartridge warranties. • Do not use labels with slick backing material. • Use full label sheets. All-cotton ...samples on the envelopes being considered for use before buying large quantities. When printing on labels: • From MarkVision Professional, the printer software, or the printer control panel, set the Paper Type to verify that : - Have excessive curl or twist - Have metal clasps, string ties...
Have windows, holes, perforations, cutouts, or embossing - Partial sheets also contaminate the printer and the cartridge with adhesive, and could void the printer and cartridge warranties. • Do not use labels with slick backing material. • Use full label sheets. All-cotton ...samples on the envelopes being considered for use before buying large quantities. When printing on labels: • From MarkVision Professional, the printer software, or the printer control panel, set the Paper Type to verify that : - Have excessive curl or twist - Have metal clasps, string ties...
User Manual
Page 70
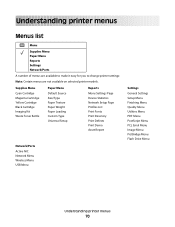
Supplies Menu Cyan Cartridge Magenta Cartridge Yellow Cartridge Black Cartridge Imaging Kit Waste Toner Bottle Paper Menu Default Source Size/Type Paper Texture Paper Weight Paper Loading Custom Type Universal Setup Reports Menu Settings Page ... Settings Setup Menu Finishing Menu Quality Menu Utilities Menu PDF Menu PostScript Menu PCL Emul Menu Image Menu PictBridge Menu Flash Drive Menu Understanding printer menus 70 Understanding printer menus Menus list Menu Supplies Menu Paper Menu Reports Settings Network/Ports A number of menus are available to make it easy for you...
Supplies Menu Cyan Cartridge Magenta Cartridge Yellow Cartridge Black Cartridge Imaging Kit Waste Toner Bottle Paper Menu Default Source Size/Type Paper Texture Paper Weight Paper Loading Custom Type Universal Setup Reports Menu Settings Page ... Settings Setup Menu Finishing Menu Quality Menu Utilities Menu PDF Menu PostScript Menu PCL Emul Menu Image Menu PictBridge Menu Flash Drive Menu Understanding printer menus 70 Understanding printer menus Menus list Menu Supplies Menu Paper Menu Reports Settings Network/Ports A number of menus are available to make it easy for you...
User Manual
Page 71
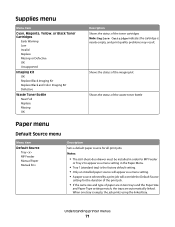
Supplies menu Menu item Cyan, Magenta, Yellow, or Black Toner Cartridges Early Warning Low Invalid Replace Missing or Defective OK Unsupported Imaging Kit OK Replace Black Imaging Kit Replace Black and Color Imaging Kit Defective Waste ... a print job will override the Default Source setting for the duration of the print job. • If the same size and type of the toner cartridges Note: Replace Cartridge indicates the cartridge is empty, the job prints using the linked tray. Understanding printer menus 71
Supplies menu Menu item Cyan, Magenta, Yellow, or Black Toner Cartridges Early Warning Low Invalid Replace Missing or Defective OK Unsupported Imaging Kit OK Replace Black Imaging Kit Replace Black and Color Imaging Kit Defective Waste ... a print job will override the Default Source setting for the duration of the print job. • If the same size and type of the toner cartridges Note: Replace Cartridge indicates the cartridge is empty, the job prints using the linked tray. Understanding printer menus 71
User Manual
Page 87
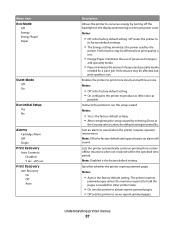
...Energy Energy/Paper Paper Quiet Mode Off On Run Initial Setup Yes No Alarms Cartridge Alarm Off Single Print Recovery Auto Continue Disabled 5 sec -255 sec Print Recovery Jam Recovery On Off Auto Description Allows the printer to conserve energy by turning off the backlight on the display and entering .... • The Energy setting minimizes the power used by selecting Done at the Country select screen, the default setting becomes No. Off resets the printer to print more slowly and with less noise Notes: • Off is not. • Energy/Paper minimizes the use of power and of paper...
...Energy Energy/Paper Paper Quiet Mode Off On Run Initial Setup Yes No Alarms Cartridge Alarm Off Single Print Recovery Auto Continue Disabled 5 sec -255 sec Print Recovery Jam Recovery On Off Auto Description Allows the printer to conserve energy by turning off the backlight on the display and entering .... • The Energy setting minimizes the power used by selecting Done at the Country select screen, the default setting becomes No. Off resets the printer to print more slowly and with less noise Notes: • Off is not. • Energy/Paper minimizes the use of power and of paper...
User Manual
Page 101
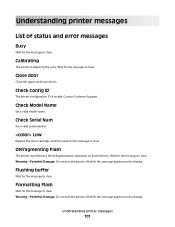
...number. Warning-Potential Damage: Do not turn the printer off while this message appears on the display. Understanding printer messages 101 Understanding printer messages List of status and error messages Busy Wait for the message to clear. Low Replace the toner cartridge, and then wait for the message to clear.... Wait for the message to clear. Flushing buffer Wait for the message to clear. Wait for the message to clear. Close door Close the upper and lower doors. Defragmenting Flash The printer is performing the...
...number. Warning-Potential Damage: Do not turn the printer off while this message appears on the display. Understanding printer messages 101 Understanding printer messages List of status and error messages Busy Wait for the message to clear. Low Replace the toner cartridge, and then wait for the message to clear.... Wait for the message to clear. Flushing buffer Wait for the message to clear. Wait for the message to clear. Close door Close the upper and lower doors. Defragmenting Flash The printer is performing the...

User Manual
Page 104
... to clear the message and continue processing the second side of the following : • Remove paper from the toner cartridges. Understanding printer messages 104 Reload printed pages in Tray • Press to clear. Wait for the message to print. Remote Management Active The...job. Tray Missing Insert the specified tray into the printer. Programming Flash Fonts and macros are being written to clear the message and continue printing. Replace cartridge Replace the toner cartridge, and then press to flash. Ready The printer is offline while it configures settings. Tray Low ...
... to clear the message and continue processing the second side of the following : • Remove paper from the toner cartridges. Understanding printer messages 104 Reload printed pages in Tray • Press to clear. Wait for the message to print. Remote Management Active The...job. Tray Missing Insert the specified tray into the printer. Programming Flash Fonts and macros are being written to clear the message and continue printing. Replace cartridge Replace the toner cartridge, and then press to flash. Ready The printer is offline while it configures settings. Tray Low ...

User Manual
Page 105
... Do not turn the printer off while this message appears on the display. Press to clear the message and continue printing. 30.yy cartridge missing Insert the missing toner cartridge to clear the message and continue printing. 31.yy Defective Cartridge Replace the defective toner cartridge with a new one.... 31.yy Defective Imaging Kit Replace the defective imaging kit with a new one. 32.yy Replace Unsupported Cartridge Replace the unsupported toner cartridge with a supported one. 34 Short paper Try one or more of the following : • Press to cancel printing. Try one...
... Do not turn the printer off while this message appears on the display. Press to clear the message and continue printing. 30.yy cartridge missing Insert the missing toner cartridge to clear the message and continue printing. 31.yy Defective Cartridge Replace the defective toner cartridge with a new one.... 31.yy Defective Imaging Kit Replace the defective imaging kit with a new one. 32.yy Replace Unsupported Cartridge Replace the unsupported toner cartridge with a supported one. 34 Short paper Try one or more of the following : • Press to cancel printing. Try one...

User Manual
Page 106
... 37 Insufficient memory for Flash memory Defragment operation The printer cannot defragment flash memory because the memory used to store undeleted flash resources is too complex to cancel printing. 40 Invalid refill, change cartridge Replace the toner cartridge with a new one or more of text or graphics... on a page and deleting unnecessary downloaded fonts or macros. • Install additional printer memory. 39 Complex page, some data may not be ...
... 37 Insufficient memory for Flash memory Defragment operation The printer cannot defragment flash memory because the memory used to store undeleted flash resources is too complex to cancel printing. 40 Invalid refill, change cartridge Replace the toner cartridge with a new one or more of text or graphics... on a page and deleting unnecessary downloaded fonts or macros. • Install additional printer memory. 39 Complex page, some data may not be ...
User Manual
Page 108
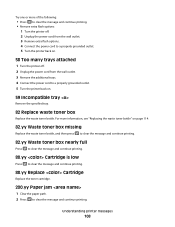
...toner bottle. For more of the following: • Press to clear the message and continue printing. • Remove extra flash options: 1 Turn the printer off. 2 Unplug the power cord from the wall outlet. 3 Remove extra flash options. 4 Connect the power cord to a properly grounded outlet. 5 Turn the.... 82.yy Waste toner box nearly full Press to clear the message and continue printing. 88.yy Cartridge is low Press to clear the message and continue printing. 88.yy Replace Cartridge Replace the toner cartridge. 200.yy Paper jam 1 Clear the paper path. 2 Press to clear the message and continue ...
...toner bottle. For more of the following: • Press to clear the message and continue printing. • Remove extra flash options: 1 Turn the printer off. 2 Unplug the power cord from the wall outlet. 3 Remove extra flash options. 4 Connect the power cord to a properly grounded outlet. 5 Turn the.... 82.yy Waste toner box nearly full Press to clear the message and continue printing. 88.yy Cartridge is low Press to clear the message and continue printing. 88.yy Replace Cartridge Replace the toner cartridge. 200.yy Paper jam 1 Clear the paper path. 2 Press to clear the message and continue ...
User Manual
Page 110
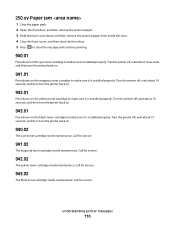
...properly. Call for service. Turn the printer off , wait about 10 seconds, and then turn the printer back on the magenta toner cartridge to make sure it is installed properly. Call for service. 943.02 The black toner cartridge needs maintenance. Understanding printer messages 110 250.yy Paper jam 1...Press down on the black toner cartridge to make sure it is installed properly. Turn the printer off , wait about 10 seconds, and then turn the printer back on. 942.01 Press down on 940.02 The cyan toner cartridge needs maintenance. Turn the printer off , wait about 10 ...
...properly. Call for service. Turn the printer off , wait about 10 seconds, and then turn the printer back on the magenta toner cartridge to make sure it is installed properly. Call for service. 943.02 The black toner cartridge needs maintenance. Understanding printer messages 110 250.yy Paper jam 1...Press down on the black toner cartridge to make sure it is installed properly. Turn the printer off , wait about 10 seconds, and then turn the printer back on. 942.01 Press down on 940.02 The cyan toner cartridge needs maintenance. Turn the printer off , wait about 10 ...

User Manual
Page 112
... page appears, displaying a summary of your area. or A4-size plain paper. When 88 Replace Cyan Cartridge, 88 Replace Magenta Cartridge, 88 Replace Yellow Cartridge, or 88 Replace Black Cartridge appears, you purchased the printer. Note: All life estimates for information about Lexmark authorized supplies dealers in the TCP/IP section. 2 Click Device Status. Ordering toner...
... page appears, displaying a summary of your area. or A4-size plain paper. When 88 Replace Cyan Cartridge, 88 Replace Magenta Cartridge, 88 Replace Yellow Cartridge, or 88 Replace Black Cartridge appears, you purchased the printer. Note: All life estimates for information about Lexmark authorized supplies dealers in the TCP/IP section. 2 Click Device Status. Ordering toner...
User Manual
Page 113
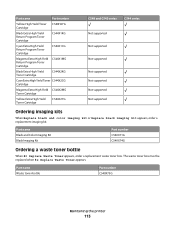
... High Yield Return Program Toner Cartridge C544X1KG Cyan Extra High Yield Return Program Toner Cartridge C544X1CG Magenta Extra High Yield C544X1MG Return Program Toner Cartridge Black Extra High Yield Toner Cartridge C544X2KG Cyan Extra High Yield Toner C544X2CG Cartridge Magenta Extra High Yield C544X2MG Toner Cartridge Yellow Extra High Yield Toner Cartridge C544X2YG C540 and C543 series... black and color imaging kit or Replace black imaging kit appears, order a replacement imaging kit. Part name Waste toner bottle Part number C540X75G Maintaining the printer 113
... High Yield Return Program Toner Cartridge C544X1KG Cyan Extra High Yield Return Program Toner Cartridge C544X1CG Magenta Extra High Yield C544X1MG Return Program Toner Cartridge Black Extra High Yield Toner Cartridge C544X2KG Cyan Extra High Yield Toner C544X2CG Cartridge Magenta Extra High Yield C544X2MG Toner Cartridge Yellow Extra High Yield Toner Cartridge C544X2YG C540 and C543 series... black and color imaging kit or Replace black imaging kit appears, order a replacement imaging kit. Part name Waste toner bottle Part number C540X75G Maintaining the printer 113

User Manual
Page 118
Maintaining the printer 118 2 Open the top door. 3 Remove the toner cartridges by lifting the handles, and then gently pulling away from the imaging kit. 4 Remove the right side cover.
Maintaining the printer 118 2 Open the top door. 3 Remove the toner cartridges by lifting the handles, and then gently pulling away from the imaging kit. 4 Remove the right side cover.

User Manual
Page 122
Maintaining the printer 122 17 Replace the waste toner bottle. 18 Replace the right side cover. 19 Replace the toner cartridges.
Maintaining the printer 122 17 Replace the waste toner bottle. 18 Replace the right side cover. 19 Replace the toner cartridges.

User Manual
Page 124
Maintaining the printer 124 2 Open the top door. 3 Remove the toner cartridges by lifting the handles, and then gently pulling away from the imaging kit. 4 Remove the right side cover.
Maintaining the printer 124 2 Open the top door. 3 Remove the toner cartridges by lifting the handles, and then gently pulling away from the imaging kit. 4 Remove the right side cover.

User Manual
Page 127
Maintaining the printer 127 14 Replace the waste toner bottle. 15 Replace the right side cover. 16 Replace the toner cartridges.
Maintaining the printer 127 14 Replace the waste toner bottle. 15 Replace the right side cover. 16 Replace the toner cartridges.
User Manual
Page 128
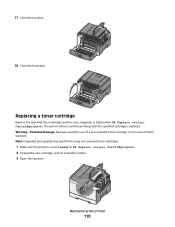
... Damage: Damage caused by use of a non-Lexmark toner cartridge is on and Ready or 88 Replace Cartridge appears. 2 Unpack the new cartridge, and set it near the printer. 3 Open the top door. Replacing a toner cartridge Replace the specified toner cartridge (yellow, cyan, magenta, or black) when 88 Replace Cartridge appears. 17 Close the top door. 18 Close...
... Damage: Damage caused by use of a non-Lexmark toner cartridge is on and Ready or 88 Replace Cartridge appears. 2 Unpack the new cartridge, and set it near the printer. 3 Open the top door. Replacing a toner cartridge Replace the specified toner cartridge (yellow, cyan, magenta, or black) when 88 Replace Cartridge appears. 17 Close the top door. 18 Close...

User Manual
Page 129
Y K M C 5 Align the new toner cartridge, and then press down until it is all the way into the slot. Y C M K 4 Remove the toner cartridge by lifting the handle, and then gently pulling away from the imaging kit. Y K M C Maintaining the printer 129 Y C M K
Y K M C 5 Align the new toner cartridge, and then press down until it is all the way into the slot. Y C M K 4 Remove the toner cartridge by lifting the handle, and then gently pulling away from the imaging kit. Y K M C Maintaining the printer 129 Y C M K
User Manual
Page 131
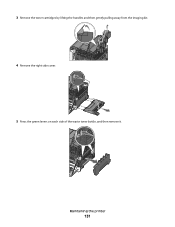
Maintaining the printer 131 3 Remove the toner cartridges by lifting the handles and then gently pulling away from the imaging kit. 4 Remove the right side cover. 5 Press the green levers on each side of the waste toner bottle, and then remove it.
Maintaining the printer 131 3 Remove the toner cartridges by lifting the handles and then gently pulling away from the imaging kit. 4 Remove the right side cover. 5 Press the green levers on each side of the waste toner bottle, and then remove it.


