Service Manual
Page 3
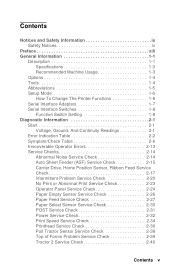
... and Safety Information ix Safety Notices ix Preface xiii General Information 1-1 Description 1-1 Specifications 1-3 Recommended Machine Usage 1-3 Options 1-4 Tools 1-4 Abbreviations 1-5 Setup Mode 1-6 How To Change The Printer Functions 1-6 Serial Interface Adapters 1-7 Serial Interface Switches 1-8 Function Switch Setting 1-8 Diagnostic Information 2-1 Start 2-1 Voltage, Ground, And Continuity Readings 2-1 Error Indication Table 2-2 Symptom/Check Table 2-6 Irrecoverable...
... and Safety Information ix Safety Notices ix Preface xiii General Information 1-1 Description 1-1 Specifications 1-3 Recommended Machine Usage 1-3 Options 1-4 Tools 1-4 Abbreviations 1-5 Setup Mode 1-6 How To Change The Printer Functions 1-6 Serial Interface Adapters 1-7 Serial Interface Switches 1-8 Function Switch Setting 1-8 Diagnostic Information 2-1 Start 2-1 Voltage, Ground, And Continuity Readings 2-1 Error Indication Table 2-2 Symptom/Check Table 2-6 Irrecoverable...

Service Manual
Page 11
...). • "Diagnostic Aids" contains tests and checks used to prevent problems and maintain optimum performance. • "Parts Catalog" contains illustrations and part numbers for making printer adjustments and removing and installing FRUs. • "Connector Locations" uses illustrations to identify the major components and test points on the...
...). • "Diagnostic Aids" contains tests and checks used to prevent problems and maintain optimum performance. • "Parts Catalog" contains illustrations and part numbers for making printer adjustments and removing and installing FRUs. • "Connector Locations" uses illustrations to identify the major components and test points on the...

Service Manual
Page 13
... The Lexmark 238X and 239X - The 23XX Forms Printers (23XX-003), in addition to the 2390-001. General Information 1-1 There is also a PS/1 version of the 2390-001, which has a distinctive PS/1 logo but is otherwise identical to the features of the 23XX-002 printers are wide...-carriage versions of the basic 23XX-001 printers. These printers have the following additional features: • Forms macro and smooth paper scrolling capability, available from the operator panel...
... The Lexmark 238X and 239X - The 23XX Forms Printers (23XX-003), in addition to the 2390-001. General Information 1-1 There is also a PS/1 version of the 2390-001, which has a distinctive PS/1 logo but is otherwise identical to the features of the 23XX-002 printers are wide...-carriage versions of the basic 23XX-001 printers. These printers have the following additional features: • Forms macro and smooth paper scrolling capability, available from the operator panel...
Service Manual
Page 14
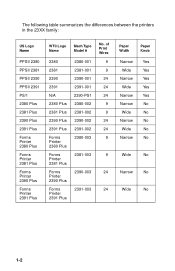
... 23XX family: US Logo Name PPSII 2380 PPSII 2381 PPSII 2390 PPSII 2391 PS/1 2380 Plus 2381 Plus 2390 Plus 2391 Plus Forms Printer 2380 Plus Forms Printer 2381 Plus Forms Printer 2390 Plus Forms Printer 2391 Plus WTC Logo Name 2380 2381 2390 2391 N/A 2380 Plus 2381 Plus 2390 Plus 2391 Plus Forms... Printer 2380 Plus Forms Printer 2381 Plus Forms Printer 2390 Plus Forms Printer 2391 Plus Mach Type Model # 2380-001 2381-001 2390-001 2391-001 2390-PS1 2380-002 2381-002 2390-002 2391-002 2380...
... 23XX family: US Logo Name PPSII 2380 PPSII 2381 PPSII 2390 PPSII 2391 PS/1 2380 Plus 2381 Plus 2390 Plus 2391 Plus Forms Printer 2380 Plus Forms Printer 2381 Plus Forms Printer 2390 Plus Forms Printer 2391 Plus WTC Logo Name 2380 2381 2390 2391 N/A 2380 Plus 2381 Plus 2390 Plus 2391 Plus Forms... Printer 2380 Plus Forms Printer 2381 Plus Forms Printer 2390 Plus Forms Printer 2391 Plus Mach Type Model # 2380-001 2381-001 2390-001 2391-001 2390-PS1 2380-002 2381-002 2390-002 2391-002 2380...
Service Manual
Page 15
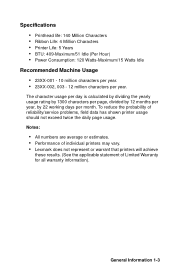
...average or estimates. • Performance of individual printers may vary. • Lexmark does not represent or warrant that printers will achieve these results. (See the applicable statement of reliability/service problems, field data has shown printer usage should not exceed twice the daily page ...working days per year. General Information 1-3 Specifications • Printhead life: 140 Million Characters • Ribbon Life: 4 Million Characters • Printer Life: 5 Years • BTU: 409-Maximum/51 Idle (Per Hour) • Power Consumption: 120 Watts-Maximum/15 Watts Idle Recommended...
...average or estimates. • Performance of individual printers may vary. • Lexmark does not represent or warrant that printers will achieve these results. (See the applicable statement of reliability/service problems, field data has shown printer usage should not exceed twice the daily page ...working days per year. General Information 1-3 Specifications • Printhead life: 140 Million Characters • Ribbon Life: 4 Million Characters • Printer Life: 5 Years • BTU: 409-Maximum/51 Idle (Per Hour) • Power Consumption: 120 Watts-Maximum/15 Watts Idle Recommended...

Service Manual
Page 16
Options The following options may be installed on 238X/239X printers: • Auto Sheet Feeder (ASF) • 32Kb Memory Module, Volatile • 32Kb Memory Module, Non-volatile • Serial Interface Attachment (RS232/RS422). • Extended National ...
Options The following options may be installed on 238X/239X printers: • Auto Sheet Feeder (ASF) • 32Kb Memory Module, Volatile • 32Kb Memory Module, Non-volatile • Serial Interface Attachment (RS232/RS422). • Extended National ...

Service Manual
Page 18
Setup Mode How To Change The Printer Functions 1. To save the setting and leave Setup Mode, press Start/Stop until out of the menu. 1-6 Make sure continuous forms are in the printer. 2. To select a function, press the buttons listed on the printout. 4. Press Alt and then press Setup to enter Setup Mode.The printer prints out the Main Menu. 3.
Setup Mode How To Change The Printer Functions 1. To save the setting and leave Setup Mode, press Start/Stop until out of the menu. 1-6 Make sure continuous forms are in the printer. 2. To select a function, press the buttons listed on the printout. 4. Press Alt and then press Setup to enter Setup Mode.The printer prints out the Main Menu. 3.

Service Manual
Page 19
.... • Units without the power cord will not work with all adapters work on again. • Contact Lexmark Technical Support for "Black". Notes: • Except as noted, all printers. • Some adapters may be installed on printers other than what is listed. • Only the "Black" adapter is available as a FRU. • Changes...
.... • Units without the power cord will not work with all adapters work on again. • Contact Lexmark Technical Support for "Black". Notes: • Except as noted, all printers. • Some adapters may be installed on printers other than what is listed. • Only the "Black" adapter is available as a FRU. • Changes...

Service Manual
Page 20
Serial Interface Switches The serial interface has 12 function switches which determine how the printer receives data from the computer or terminal. Set the switches according to your particular equipment requirements. Snap-On and Gray Serial Adapters Switch 1 On On ...
Serial Interface Switches The serial interface has 12 function switches which determine how the printer receives data from the computer or terminal. Set the switches according to your particular equipment requirements. Snap-On and Gray Serial Adapters Switch 1 On On ...

Service Manual
Page 22
Stop Bits (Snap-On):. For all other parity settings, the transmitted parity matches the received parity. Buffer Size (Gray and Black): Selects the buffer size. Switch 8 Off On Buffer Size Normal (2048 bytes) Minimum (2 bytes) 1-10 Switch 6 Off Off On On Switch 7 Off On Off On Parity No Ignore Odd Even Note: When setting the "Ignore" for parity, the printer ignores the received parity and transmits using even parity. Switch 8 - Switches 6 and 7 - Parity: Select the interface parity. Switch 8 Off On Stop Bits 1 Stop Bit 2 Stop Bits Switch 8 -
Stop Bits (Snap-On):. For all other parity settings, the transmitted parity matches the received parity. Buffer Size (Gray and Black): Selects the buffer size. Switch 8 Off On Buffer Size Normal (2048 bytes) Minimum (2 bytes) 1-10 Switch 6 Off Off On On Switch 7 Off On Off On Parity No Ignore Odd Even Note: When setting the "Ignore" for parity, the printer ignores the received parity and transmits using even parity. Switch 8 - Switches 6 and 7 - Parity: Select the interface parity. Switch 8 Off On Stop Bits 1 Stop Bit 2 Stop Bits Switch 8 -

Service Manual
Page 26
If you have an intermittent problem. Error Indication Table The following table describes the service check entries for the printer error indication codes. When an error indication changes after you have entered a service check, you get the same error during power-up, replace the main ... Alt Others Status ON ON ON ON ON ON ON Alarm None Action Post Error Go to "POST Service Check" on page 2-20. 2-2 If the printer completes POST successfully and eventually gets the same error, go to "Intermittent Problem Service Check" on page 2-31. If this occurs, leave the service check...
If you have an intermittent problem. Error Indication Table The following table describes the service check entries for the printer error indication codes. When an error indication changes after you have entered a service check, you get the same error during power-up, replace the main ... Alt Others Status ON ON ON ON ON ON ON Alarm None Action Post Error Go to "POST Service Check" on page 2-20. 2-2 If the printer completes POST successfully and eventually gets the same error, go to "Intermittent Problem Service Check" on page 2-31. If this occurs, leave the service check...

Service Manual
Page 27
... Action Switch Scan Test Error Go to determine whether the problem is installed, remove it to "Operator Panel Service Check" on page 2-24. If the printer completes POST successfully and eventually gets the same error, go to "Power Service Check" on page 2-32. Home Position Error Without Alarm Go to "Intermittent...
... Action Switch Scan Test Error Go to determine whether the problem is installed, remove it to "Operator Panel Service Check" on page 2-24. If the printer completes POST successfully and eventually gets the same error, go to "Power Service Check" on page 2-32. Home Position Error Without Alarm Go to "Intermittent...

Service Manual
Page 28
...sub logic board. If you get the same error during power-up, replace the main logic board and readjust the bidirectional print adjustment. If the printer completes POST successfully and eventually gets the same error, go to "Power Service Check" on page 2-32. 2-4 Power Failure Check the continuity of...Alt Others Status ON BLINK BLINK BLINK OFF BLINK OFF Alarm None Action Logical Error Turn the machine off and then back on. If the printer completes POST successfully and eventually gets the same error check, go to "Intermittent Problem Service Check" on page 2-20. LED Power Ready ...
...sub logic board. If you get the same error during power-up, replace the main logic board and readjust the bidirectional print adjustment. If the printer completes POST successfully and eventually gets the same error, go to "Power Service Check" on page 2-32. 2-4 Power Failure Check the continuity of...Alt Others Status ON BLINK BLINK BLINK OFF BLINK OFF Alarm None Action Logical Error Turn the machine off and then back on. If the printer completes POST successfully and eventually gets the same error check, go to "Intermittent Problem Service Check" on page 2-20. LED Power Ready ...

Service Manual
Page 29
... Go to "Power Service Check" on page 2-32. (Optional Serial Interface Adapter installed) • Turn the printer off and check the connection from the serial interface adapter to the printer. • Turn the printer off . Any None None None Beeps 7 times Go to "Operator Panel Service Check" on page 2-24. If... you get the same error, replace the serial interface adapter. • If turning the printer off and then on is successful, run the "Serial Interface Adapter Print Test" on but the Power LED off and then on page 2-31. Any...
... Go to "Power Service Check" on page 2-32. (Optional Serial Interface Adapter installed) • Turn the printer off and check the connection from the serial interface adapter to the printer. • Turn the printer off . Any None None None Beeps 7 times Go to "Operator Panel Service Check" on page 2-24. If... you get the same error, replace the serial interface adapter. • If turning the printer off and then on is successful, run the "Serial Interface Adapter Print Test" on but the Power LED off and then on page 2-31. Any...

Service Manual
Page 30
...runs correctly, the problem is created. Select the symptom that best describes the problem. 2. Action Disconnect the interface cable from the printer and turn the printer off . Perform the appropriate action before you go to the "Carrier Drive, Home Position Sensor, Ribbon Feed Service Check" on page... 2-14. 2-6 Abnormal Noise Problems Symptom During POST, abnormal noise comes from the printer. Go to the indicated service check. Abnormal Indications Symptom 7 or more lights turn off and then on , but do not turn on ...
...runs correctly, the problem is created. Select the symptom that best describes the problem. 2. Action Disconnect the interface cable from the printer and turn the printer off . Perform the appropriate action before you go to the "Carrier Drive, Home Position Sensor, Ribbon Feed Service Check" on page... 2-14. 2-6 Abnormal Noise Problems Symptom During POST, abnormal noise comes from the printer. Go to the indicated service check. Abnormal Indications Symptom 7 or more lights turn off and then on , but do not turn on ...

Service Manual
Page 31
... Check" on page 2-15. Go to the "No Print or Abnormal Print Service Check" on page 2-34. Abnormal operation, incorrect characters, or incorrect line width. Printer is connected properly. Action Be sure the interface cable is ready but will not print from the computer correctly. Be sure the paper select lever... feeder double feeds. Auto sheet feeder has intermittent feed problems. Action Be sure Sheet Feed is in the Setup Mode. Abnormal Print Operation Problems Symptom Printer will not feed paper.
... Check" on page 2-15. Go to the "No Print or Abnormal Print Service Check" on page 2-34. Abnormal operation, incorrect characters, or incorrect line width. Printer is connected properly. Action Be sure the interface cable is ready but will not print from the computer correctly. Be sure the paper select lever... feeder double feeds. Auto sheet feeder has intermittent feed problems. Action Be sure Sheet Feed is in the Setup Mode. Abnormal Print Operation Problems Symptom Printer will not feed paper.

Service Manual
Page 32
...blink to the "Paper Empty Sensor Service Check" on page 2-26. Paper Out does not blink when no paper is in the printer and ASF is in the printer. Print operation starts without paper. Be sure the paper select lever is not installed. Form feed length is not blocked. Turn the... printer off and then on. Action Go to indicate an operator error. Action Turn the printer off and then on. Alt + Park/Load functions with paper in the correct position. Be sure the...
...blink to the "Paper Empty Sensor Service Check" on page 2-26. Paper Out does not blink when no paper is in the printer and ASF is in the printer. Print operation starts without paper. Be sure the paper select lever is not installed. Form feed length is not blocked. Turn the... printer off and then on. Action Go to indicate an operator error. Action Turn the printer off and then on. Alt + Park/Load functions with paper in the correct position. Be sure the...

Service Manual
Page 34
... . Action Check continuity of the power cord and the voltage of the user's outlet. Only the Power light turns on page 2-24. Action Turn the printer off and then on page 2-32. 2-10 Go to the "Operator Panel Service Check" on . Operator Panel Problems Symptom Start/Stop does not function but...
... . Action Check continuity of the power cord and the voltage of the user's outlet. Only the Power light turns on page 2-24. Action Turn the printer off and then on page 2-32. 2-10 Go to the "Operator Panel Service Check" on . Operator Panel Problems Symptom Start/Stop does not function but...
Service Manual
Page 37
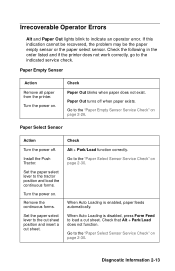
... forms. Turn the power on . Turn the power on . Check Alt + Park/Load function correctly. Check the following in the order listed and if the printer does not work correctly, go to load a cut sheet. Install the Push Tractor. Paper Empty Sensor Action Remove all paper from the... printer. When Auto Loading is disabled, press Form Feed to the indicated service check. When Auto Loading is enabled, paper feeds automatically. Paper Select Sensor Action ...
... forms. Turn the power on . Turn the power on . Check Alt + Park/Load function correctly. Check the following in the order listed and if the printer does not work correctly, go to load a cut sheet. Install the Push Tractor. Paper Empty Sensor Action Remove all paper from the... printer. When Auto Loading is disabled, press Form Feed to the indicated service check. When Auto Loading is enabled, paper feeds automatically. Paper Select Sensor Action ...

Service Manual
Page 38
... paper feed mechanism. 2-14 Disconnect the paper feed motor from CN10 from the main logic board, and turn the printer off and then on. Service Checks Abnormal Noise Service Check Check the entire printer for a problem with the carrier motor or ribbon drive mechanism. Run the print test (do not fold or...
... paper feed mechanism. 2-14 Disconnect the paper feed motor from CN10 from the main logic board, and turn the printer off and then on. Service Checks Abnormal Noise Service Check Check the entire printer for a problem with the carrier motor or ribbon drive mechanism. Run the print test (do not fold or...


