
User's Guide
Page 2
...other products, programs, or services, except those described in the user documentation, to a professional service person. Lexmark and Lexmark with this publication may be addressed to Lexmark International, Inc., Department F95/032-2, 740 West New Circle Road, Lexington, Kentucky 40550, U.S.A. Improvements or changes...local law: LEXMARK INTERNATIONAL, INC., PROVIDES THIS PUBLICATION "AS IS" WITHOUT WARRANTY OF ANY KIND, EITHER EXPRESS OR IMPLIED, INCLUDING, BUT NOT LIMITED TO, THE IMPLIED WARRANTIES OF MERCHANTABILITY OR FITNESS FOR A PARTICULAR PURPOSE. CAUTION: Do not set up this ...
...other products, programs, or services, except those described in the user documentation, to a professional service person. Lexmark and Lexmark with this publication may be addressed to Lexmark International, Inc., Department F95/032-2, 740 West New Circle Road, Lexington, Kentucky 40550, U.S.A. Improvements or changes...local law: LEXMARK INTERNATIONAL, INC., PROVIDES THIS PUBLICATION "AS IS" WITHOUT WARRANTY OF ANY KIND, EITHER EXPRESS OR IMPLIED, INCLUDING, BUT NOT LIMITED TO, THE IMPLIED WARRANTIES OF MERCHANTABILITY OR FITNESS FOR A PARTICULAR PURPOSE. CAUTION: Do not set up this ...
User's Guide
Page 4
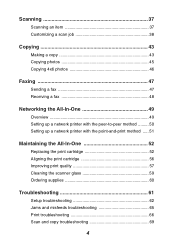
... 4x6 photos 46 Faxing 47 Sending a fax 47 Receiving a fax 48 Networking the All-In-One 49 Overview 49 Setting up a network printer with the peer-to-peer method ......... 50 Setting up a network printer with the point-and-print method ..... 51 Maintaining the All-In-One 52 Replacing the print cartridge 52 Aligning the...
... 4x6 photos 46 Faxing 47 Sending a fax 47 Receiving a fax 48 Networking the All-In-One 49 Overview 49 Setting up a network printer with the peer-to-peer method ......... 50 Setting up a network printer with the point-and-print method ..... 51 Maintaining the All-In-One 52 Replacing the print cartridge 52 Aligning the...
User's Guide
Page 7
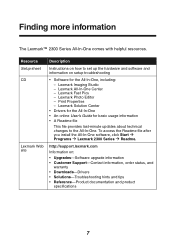
... information • A Readme file This file provides last-minute updates about technical changes to the All-In-One. Resource Setup sheet CD Lexmark Web site Description Instructions on how to set up the hardware and software and information on : • Upgrades-Software upgrade information • Customer Support-Contact information, order status, and...
... information • A Readme file This file provides last-minute updates about technical changes to the All-In-One. Resource Setup sheet CD Lexmark Web site Description Instructions on how to set up the hardware and software and information on : • Upgrades-Software upgrade information • Customer Support-Contact information, order status, and...

User's Guide
Page 8
Unpacking the All-In-One To set up the All-In-One, follow the instructions on page 62. If problems occur, see "Setup troubleshooting" on the Lexmark 2300 Series Setup sheet. Opening the box These items are in the box with the All-In-One: Note: A USB cable may or may not be included. 5 1 2 43 1 Power supply cord 2 USB cable 3 Print cartridge 4 Setup sheet 5 Software CD 8
Unpacking the All-In-One To set up the All-In-One, follow the instructions on page 62. If problems occur, see "Setup troubleshooting" on the Lexmark 2300 Series Setup sheet. Opening the box These items are in the box with the All-In-One: Note: A USB cable may or may not be included. 5 1 2 43 1 Power supply cord 2 USB cable 3 Print cartridge 4 Setup sheet 5 Software CD 8
User's Guide
Page 12
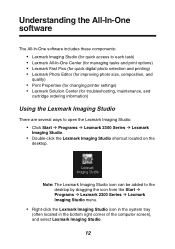
... (for managing tasks and print options) • Lexmark Fast Pics (for quick digital photo selection and printing) • Lexmark Photo Editor (for improving photo size, composition, and quality) • Print Properties (for changing printer settings) • Lexmark Solution Center (for troubleshooting, maintenance, and cartridge ordering information) Using the Lexmark Imaging Studio There are several ways to...
... (for managing tasks and print options) • Lexmark Fast Pics (for quick digital photo selection and printing) • Lexmark Photo Editor (for improving photo size, composition, and quality) • Print Properties (for changing printer settings) • Lexmark Solution Center (for troubleshooting, maintenance, and cartridge ordering information) Using the Lexmark Imaging Studio There are several ways to...
User's Guide
Page 14
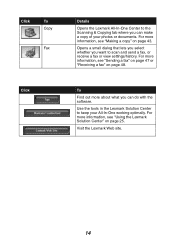
... more about what you can make a copy of your All-In-One working optimally. For more information, see "Using the Lexmark Solution Center" on page 43. Use the tools in the Lexmark Solution Center to the Scanning & Copying tab where you want to scan and send a fax, or receive a fax or ...view settings/history. For more information, see "Sending a fax" on page 47 or "Receiving a fax" on page 48. Opens a small dialog that ...
... more about what you can make a copy of your All-In-One working optimally. For more information, see "Using the Lexmark Solution Center" on page 43. Use the tools in the Lexmark Solution Center to the Scanning & Copying tab where you want to scan and send a fax, or receive a fax or ...view settings/history. For more information, see "Sending a fax" on page 47 or "Receiving a fax" on page 48. Opens a small dialog that ...
User's Guide
Page 16
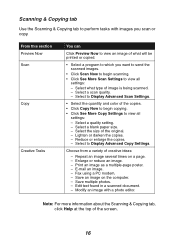
...with images you want to send the scanned images. • Click Scan Now to begin copying. • Click See More Copy Settings to view all settings: - Note: For more information about the Scanning & Copying tab, click Help at the top of creative ideas: - Select what ... page. - Select the size of the copies. • Click Copy Now to begin scanning. • Click See More Scan Settings to view all settings: - Select to Display Advanced Scan Settings. • Select the quantity and color of the original. - Select a blank paper size. - Lighten or darken the copies....
...with images you want to send the scanned images. • Click Scan Now to begin copying. • Click See More Copy Settings to view all settings: - Note: For more information about the Scanning & Copying tab, click Help at the top of creative ideas: - Select what ... page. - Select the size of the copies. • Click Copy Now to begin scanning. • Click See More Scan Settings to view all settings: - Select to Display Advanced Scan Settings. • Select the quantity and color of the original. - Select a blank paper size. - Lighten or darken the copies....
User's Guide
Page 17
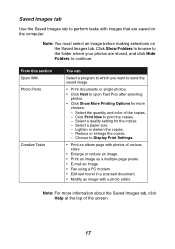
...single photos. • Click Next to open Fast Pics after selecting photos. • Click Show More Printing Options for the copies. - Choose to Display Print Settings. • Print an album page with photos of various sizes. • Enlarge or reduce an image. • Print an image as a multiple-page ...are stored, and click Hide Folders to continue. Saved Images tab Use the Saved Images tab to perform tasks with a photo editor. Select a quality setting for more information about the Saved Images tab, click Help at the top of the copies. - Reduce or enlarge the copies. - Select the ...
...single photos. • Click Next to open Fast Pics after selecting photos. • Click Show More Printing Options for the copies. - Choose to Display Print Settings. • Print an album page with photos of various sizes. • Enlarge or reduce an image. • Print an image as a multiple-page ...are stored, and click Hide Folders to continue. Saved Images tab Use the Saved Images tab to perform tasks with a photo editor. Select a quality setting for more information about the Saved Images tab, click Help at the top of the copies. - Reduce or enlarge the copies. - Select the ...
User's Guide
Page 22
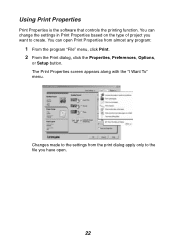
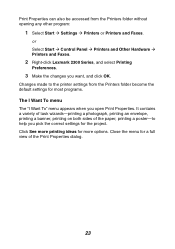
The Print Properties screen appears along with the "I Want To" menu. Changes made to create. You can open . 22 You can change the settings in Print Properties based on the type of project you have open Print Properties from the print dialog apply only to the file you want to the settings from almost any program: 1 From the program "File" menu, click Print. 2 From the Print dialog, click the Properties, Preferences, Options, or Setup button. Using Print Properties Print Properties is the software that controls the printing function.
The Print Properties screen appears along with the "I Want To" menu. Changes made to create. You can open . 22 You can change the settings in Print Properties based on the type of project you have open Print Properties from the print dialog apply only to the file you want to the settings from almost any program: 1 From the program "File" menu, click Print. 2 From the Print dialog, click the Properties, Preferences, Options, or Setup button. Using Print Properties Print Properties is the software that controls the printing function.
User's Guide
Page 23
... program: 1 Select Start Æ Settings Æ Printers or Printers and Faxes. It contains a variety of task wizards-printing a photograph, printing an envelope, printing a banner, printing on both sides of the Print Properties dialog. 23 or Select Start Æ Control Panel Æ Printers and Other Hardware Æ Printers and Faxes. 2 Right-click Lexmark 2300 Series, and select...
... program: 1 Select Start Æ Settings Æ Printers or Printers and Faxes. It contains a variety of task wizards-printing a photograph, printing an envelope, printing a banner, printing on both sides of the Print Properties dialog. 23 or Select Start Æ Control Panel Æ Printers and Other Hardware Æ Printers and Faxes. 2 Right-click Lexmark 2300 Series, and select...
User's Guide
Page 24
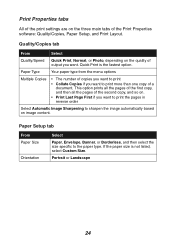
Print Properties tabs All of the print settings are on the three main tabs of the second copy, and so on. • Print Last Page First if you want to print the pages ...
Print Properties tabs All of the print settings are on the three main tabs of the second copy, and so on. • Print Last Page First if you want to print the pages ...
User's Guide
Page 25
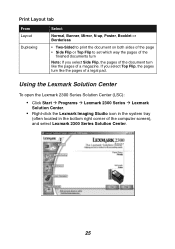
... Series Solution Center (LSC): • Click Start Æ Programs Æ Lexmark 2300 Series Æ Lexmark Solution Center. • Right-click the Lexmark Imaging Studio icon in the system tray (often located in the bottom right corner of a magazine. Print Layout tab From Layout Duplexing Select Normal, Banner, ..., N-up, Poster, Booklet or Borderless • Two-Sided to print the document on both sides of the page • Side Flip or Top Flip to set which way the pages of the finished documents turn Note: If you select Top Flip, the pages turn like the pages of a legal pad. If...
... Series Solution Center (LSC): • Click Start Æ Programs Æ Lexmark 2300 Series Æ Lexmark Solution Center. • Right-click the Lexmark Imaging Studio icon in the system tray (often located in the bottom right corner of a magazine. Print Layout tab From Layout Duplexing Select Normal, Banner, ..., N-up, Poster, Booklet or Borderless • Two-Sided to print the document on both sides of the page • Side Flip or Top Flip to set which way the pages of the finished documents turn Note: If you select Top Flip, the pages turn like the pages of a legal pad. If...
User's Guide
Page 26
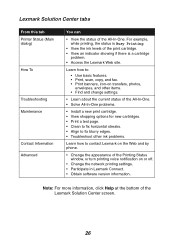
...is a cartridge problem. • Access the Lexmark Web site. Learn how to: • Use basic features. • Print, scan, copy, and fax. • Print banners, iron-on transfers, photos, envelopes, and other items. • Find and change settings. • Learn about the current status ...off. • Change the network printing settings. • Participate in Lexmark Connect. • Obtain software version information. Note: For more information, click Help at the bottom of the All-In-One. Lexmark Solution Center tabs From this tab Printer Status (Main dialog) How To Troubleshooting ...
...is a cartridge problem. • Access the Lexmark Web site. Learn how to: • Use basic features. • Print, scan, copy, and fax. • Print banners, iron-on transfers, photos, envelopes, and other items. • Find and change settings. • Learn about the current status ...off. • Change the network printing settings. • Participate in Lexmark Connect. • Obtain software version information. Note: For more information, click Help at the bottom of the All-In-One. Lexmark Solution Center tabs From this tab Printer Status (Main dialog) How To Troubleshooting ...

User's Guide
Page 29
... and slide the paper guide to 25 sheets of the cards. 29 Note: Failure to the left edge of the banner paper. See "Changing print settings" on or behind the All-In-One, with instructions, you need to print the banner. • You load the leading edge of the banner paper...
... and slide the paper guide to 25 sheets of the cards. 29 Note: Failure to the left edge of the banner paper. See "Changing print settings" on or behind the All-In-One, with instructions, you need to print the banner. • You load the leading edge of the banner paper...
User's Guide
Page 33
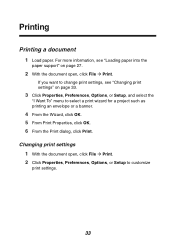
... the document open , click File Æ Print. For more information, see "Changing print settings" on page 27. 2 With the document open , click File Æ Print. 2 Click Properties, Preferences, Options, or Setup to select a print wizard for a project such as ... envelope or a banner. 4 From the Wizard, click OK. 5 From Print Properties, click OK. 6 From the Print dialog, click Print. If you want to change print settings, see "Loading paper into the paper support" on page 33. 3 Click Properties, Preferences, Options, or Setup, and select the "I Want To" menu to customize print...
... the document open , click File Æ Print. For more information, see "Changing print settings" on page 27. 2 With the document open , click File Æ Print. 2 Click Properties, Preferences, Options, or Setup to select a print wizard for a project such as ... envelope or a banner. 4 From the Wizard, click OK. 5 From Print Properties, click OK. 6 From the Print dialog, click Print. If you want to change print settings, see "Loading paper into the paper support" on page 33. 3 Click Properties, Preferences, Options, or Setup, and select the "I Want To" menu to customize print...
User's Guide
Page 34
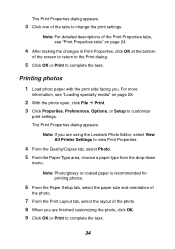
... paper size and orientation of the photo. 7 From the Print Layout tab, select the layout of the photo. 8 When you are using the Lexmark Photo Editor, select View All Printer Settings to view Print Properties. 4 From the Quality/Copies tab, select Photo. 5 From the Paper Type area, choose a paper type from the drop...
... paper size and orientation of the photo. 7 From the Print Layout tab, select the layout of the photo. 8 When you are using the Lexmark Photo Editor, select View All Printer Settings to view Print Properties. 4 From the Quality/Copies tab, select Photo. 5 From the Paper Type area, choose a paper type from the drop...
User's Guide
Page 35
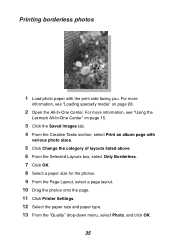
... Borderless. 7 Click OK. 8 Select a paper size for the photos. 9 From the Page Layout, select a page layout. 10 Drag the photos onto the page. 11 Click Printer Settings. 12 Select the paper size and paper type. 13 From the "Quality" drop-down menu, select Photo, and click OK. 35 For more information, see... "Using the Lexmark All-In-One Center" on page 28. 2 Open the All-In-One Center. For more information, see "Loading specialty media" on page 15. 3 Click the...
... Borderless. 7 Click OK. 8 Select a paper size for the photos. 9 From the Page Layout, select a page layout. 10 Drag the photos onto the page. 11 Click Printer Settings. 12 Select the paper size and paper type. 13 From the "Quality" drop-down menu, select Photo, and click OK. 35 For more information, see... "Using the Lexmark All-In-One Center" on page 28. 2 Open the All-In-One Center. For more information, see "Loading specialty media" on page 15. 3 Click the...

User's Guide
Page 36
Printing other projects The "I Want To" menu. 3 Select one of the available projects, or click See more printing ideas. 4 Follow the instructions on an envelope, print a banner, make a poster, create a booklet, or print a greeting card. 1 With the document open, click File Æ Print. 2 Click Properties, Preferences, Options, or Setup to complete the project. 36 The Print Properties dialog appears along with the "I Want To" menu provides wizards for creating projects. You can print a photo, print on the computer screen to customize print settings. 14 Click Print Now.
Printing other projects The "I Want To" menu. 3 Select one of the available projects, or click See more printing ideas. 4 Follow the instructions on an envelope, print a banner, make a poster, create a booklet, or print a greeting card. 1 With the document open, click File Æ Print. 2 Click Properties, Preferences, Options, or Setup to complete the project. 36 The Print Properties dialog appears along with the "I Want To" menu provides wizards for creating projects. You can print a photo, print on the computer screen to customize print settings. 14 Click Print Now.

User's Guide
Page 38
... 38. 8 Click Scan Now to complete the scan. 7 Customize the scan settings. For a description of the tabs, see "Using the Lexmark All-In-One Center" on page 39. 7 When you are finished customizing the scan settings, click OK to make changes as needed. For more information, see "Advanced Scan... Settings" on page 15. 2 From the Scanning & Copying tab, click See More Scan Settings. 3 From the ...
... 38. 8 Click Scan Now to complete the scan. 7 Customize the scan settings. For a description of the tabs, see "Using the Lexmark All-In-One Center" on page 39. 7 When you are finished customizing the scan settings, click OK to make changes as needed. For more information, see "Advanced Scan... Settings" on page 15. 2 From the Scanning & Copying tab, click See More Scan Settings. 3 From the ...
User's Guide
Page 39
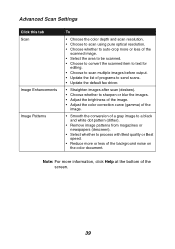
Note: For more or less of the screen. 39 Advanced Scan Settings Click this tab Scan Image Enhancements Image Patterns To • Choose the color depth and scan resolution. • Choose to scan using pure optical resolution. &#... brightness of the image. • Adjust the color correction curve (gamma) of the image. • Smooth the conversion of a gray image to a black and white dot pattern (dither). • Remove image patterns from magazines or newspapers (descreen). • Select whether to process with Best quality or Best speed. • Reduce more...
Note: For more or less of the screen. 39 Advanced Scan Settings Click this tab Scan Image Enhancements Image Patterns To • Choose the color depth and scan resolution. • Choose to scan using pure optical resolution. &#... brightness of the image. • Adjust the color correction curve (gamma) of the image. • Smooth the conversion of a gray image to a black and white dot pattern (dither). • Remove image patterns from magazines or newspapers (descreen). • Select whether to process with Best quality or Best speed. • Reduce more...

