
Service Manual
Page 17
... Electrostatic Discharge Field Replaceable Unit High Voltage Power Supply Local Area Network Liquid Crystal Display Light-Emitting Diode Low Voltage Power Supply Nonvolatile Random Access Memory Original Equipment Manufacturer Power-On Reset Power-On Self Test Print Quality Enhancement Technology Read-Only Storage Static Random Access Memory Used Parts Replacement Volts alternating...
... Electrostatic Discharge Field Replaceable Unit High Voltage Power Supply Local Area Network Liquid Crystal Display Light-Emitting Diode Low Voltage Power Supply Nonvolatile Random Access Memory Original Equipment Manufacturer Power-On Reset Power-On Self Test Print Quality Enhancement Technology Read-Only Storage Static Random Access Memory Used Parts Replacement Volts alternating...

Service Manual
Page 30
...feeding paper, abnormal noise is on page 2-31. Go to the "POST Service Check" on , but do not turn the printer off . Abnormal Indications Symptom 7 or more lights turn on page 2-14. 2-6 Symptom/Check Table 1. Go to "Abnormal Noise Service Check" on but POST will not run. ..., Ribbon Feed Service Check" on . Go to the indicated service check. Action Disconnect the interface cable from the printer and turn off and then on page 2-17. During printing or POST, abnormal noise is in the computer or interface cable. Select the symptom that best describes the problem. ...
...feeding paper, abnormal noise is on page 2-31. Go to the "POST Service Check" on , but do not turn the printer off . Abnormal Indications Symptom 7 or more lights turn on page 2-14. 2-6 Symptom/Check Table 1. Go to "Abnormal Noise Service Check" on but POST will not run. ..., Ribbon Feed Service Check" on . Go to the indicated service check. Action Disconnect the interface cable from the printer and turn off and then on page 2-17. During printing or POST, abnormal noise is in the computer or interface cable. Select the symptom that best describes the problem. ...
Service Manual
Page 32
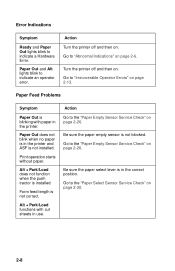
... Feed Problems Symptom Paper Out is blinking with cut sheets in the printer and ASF is in the printer. Form feed length is installed. Go to the "Paper Select Sensor Service Check" on page 2-13. Turn the printer off and then on. Be sure the paper select lever is not... Sensor Service Check" on . Action Turn the printer off and then on page 2-26. Alt + Park/Load does not function when the push tractor is not correct. Print operation starts without paper. Error Indications Symptom Ready and Paper Out lights blink to indicate an operator error. Action Go ...
... Feed Problems Symptom Paper Out is blinking with cut sheets in the printer and ASF is in the printer. Form feed length is installed. Go to the "Paper Select Sensor Service Check" on page 2-13. Turn the printer off and then on. Be sure the paper select lever is not... Sensor Service Check" on . Action Turn the printer off and then on page 2-26. Alt + Park/Load does not function when the push tractor is not correct. Print operation starts without paper. Error Indications Symptom Ready and Paper Out lights blink to indicate an operator error. Action Go ...

Service Manual
Page 35
...and shield. Go to the "Carrier Drive, Home Position Sensor, Ribbon Feed Service Check" on page 2-34. Extra dots or lines printing. Specific dots missing. Action Adjust the form thickness lever to the printhead and the sub logic board. Go to be replaced. Diagnostic Information 2-11...life or is connected properly. If the ribbon has reached its end of life or is light. Fuzzy print. Set the form thickness lever to be replaced. Uneven print density across the print line. Scattered ink smearing, blurred characters. Check the ribbon cartridge for binds or damage....
...and shield. Go to the "Carrier Drive, Home Position Sensor, Ribbon Feed Service Check" on page 2-34. Extra dots or lines printing. Specific dots missing. Action Adjust the form thickness lever to the printhead and the sub logic board. Go to be replaced. Diagnostic Information 2-11...life or is connected properly. If the ribbon has reached its end of life or is light. Fuzzy print. Set the form thickness lever to be replaced. Uneven print density across the print line. Scattered ink smearing, blurred characters. Check the ribbon cartridge for binds or damage....

Service Manual
Page 57
... cables disconnected from the sub logic board, there is a short in the printhead or printhead cables. Reset the bidirectional print adjustment; If the power LED lights correctly only with the carrier motor disconnected, replace the carrier motor. 5 Paper Feed Motor Disconnect the paper feed motor ... If the power LED lights correctly only with other components but the printer still has a power problem, replace the main logic board. Disconnect the printhead cable from the sub logic board and make sure none of the leads on the cable are shorted to "Bidirectional Print Adjustment" on page ...
... cables disconnected from the sub logic board, there is a short in the printhead or printhead cables. Reset the bidirectional print adjustment; If the power LED lights correctly only with the carrier motor disconnected, replace the carrier motor. 5 Paper Feed Motor Disconnect the paper feed motor ... If the power LED lights correctly only with other components but the printer still has a power problem, replace the main logic board. Disconnect the printhead cable from the sub logic board and make sure none of the leads on the cable are shorted to "Bidirectional Print Adjustment" on page ...

Service Manual
Page 59
... the head gap sensor asm from connector CN3 on the sub logic board. listen for the printer to 7 and back while printing the Demo Page Alt + Demo. Resistance should be 0 ohms at forms thickness position 7 and infinite at positions 1 through 6. 2 Head Gap Sensor Check the function... power on with the Alt + Macro 23XX-003 buttons pressed. • With the forms thickness lever at 1, Macro LED 1 will light. • With the forms thickness lever at 2 and 3, Macro LED 2 will light. Disconnect the head gap sensor asm from 6 to slow down in position 7. Diagnostic ...
... the head gap sensor asm from connector CN3 on the sub logic board. listen for the printer to 7 and back while printing the Demo Page Alt + Demo. Resistance should be 0 ohms at forms thickness position 7 and infinite at positions 1 through 6. 2 Head Gap Sensor Check the function... power on with the Alt + Macro 23XX-003 buttons pressed. • With the forms thickness lever at 1, Macro LED 1 will light. • With the forms thickness lever at 2 and 3, Macro LED 2 will light. Disconnect the head gap sensor asm from 6 to slow down in position 7. Diagnostic ...


