User's Guide
Page 26
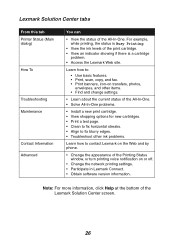
...Busy Printing. • View the ink levels of the Lexmark Solution Center screen. 26 For example, while printing, the status is a cartridge problem. • Access the Lexmark Web site. Lexmark Solution Center tabs From this tab Printer Status (Main dialog) How To Troubleshooting Maintenance Contact Information...; Find and change settings. • Learn about the current status of the All-In-One. • Solve All-In-One problems. • Install a new print cartridge. • View shopping options for new cartridges. • Print a test page. • Clean to fix horizontal streaks. ...
...Busy Printing. • View the ink levels of the Lexmark Solution Center screen. 26 For example, while printing, the status is a cartridge problem. • Access the Lexmark Web site. Lexmark Solution Center tabs From this tab Printer Status (Main dialog) How To Troubleshooting Maintenance Contact Information...; Find and change settings. • Learn about the current status of the All-In-One. • Solve All-In-One problems. • Install a new print cartridge. • View shopping options for new cartridges. • Print a test page. • Clean to fix horizontal streaks. ...

User's Guide
Page 49
Peer-to print. See "Setting up a network printer with the point-and-print method" on any time the client wants to -peer Requirements: • You must install the driver software on all computers that will use the All-In-One. • The host computer must be networked in one of ...sharing resources, such as printers, files, or an Internet connection. Point-and-print Requirements: The ...
Peer-to print. See "Setting up a network printer with the point-and-print method" on any time the client wants to -peer Requirements: • You must install the driver software on all computers that will use the All-In-One. • The host computer must be networked in one of ...sharing resources, such as printers, files, or an Internet connection. Point-and-print Requirements: The ...
User's Guide
Page 50
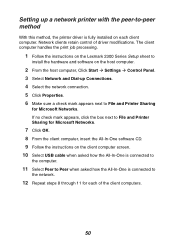
... asked how the All-In-One is connected to the computer. 11 Select Peer to Peer when asked how the All-In-One is fully installed on the host computer. 2 From the host computer, Click Start Æ Settings Æ Control Panel. 3 Select Network and Dial-up Connections.... network connection. 5 Click Properties. 6 Make sure a check mark appears next to File and Printer Sharing for each client computer. The client computer handles the print job processing. 1 Follow the instructions on the Lexmark 2300 Series Setup sheet to the network. 12 Repeat steps 8 through 11 for Microsoft Networks. ...
... asked how the All-In-One is connected to the computer. 11 Select Peer to Peer when asked how the All-In-One is fully installed on the host computer. 2 From the host computer, Click Start Æ Settings Æ Control Panel. 3 Select Network and Dial-up Connections.... network connection. 5 Click Properties. 6 Make sure a check mark appears next to File and Printer Sharing for each client computer. The client computer handles the print job processing. 1 Follow the instructions on the Lexmark 2300 Series Setup sheet to the network. 12 Repeat steps 8 through 11 for Microsoft Networks. ...
User's Guide
Page 51
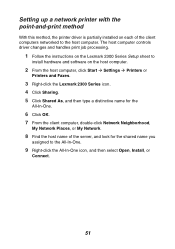
... the point-and-print method With this method, the printer driver is partially installed on the host computer. 2 From the host computer, click Start Æ Settings Æ Printers or Printers and Faxes. 3 Right-click the Lexmark 2300 Series icon. 4 Click Sharing. 5 Click Shared As, and then type a distinctive name for the shared name you assigned...
... the point-and-print method With this method, the printer driver is partially installed on the host computer. 2 From the host computer, click Start Æ Settings Æ Printers or Printers and Faxes. 3 Right-click the Lexmark 2300 Series icon. 4 Click Sharing. 5 Click Shared As, and then type a distinctive name for the shared name you assigned...
User's Guide
Page 63
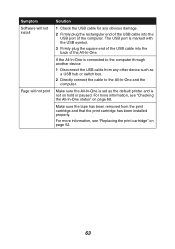
...Directly connect the cable to the computer through another device: 1 Disconnect the USB cable from the print cartridge and that the print cartridge has been installed properly. Make sure the tape has been removed from any obvious damage. 2 Firmly plug the rectangular end of the USB cable into the back...For more information, see "Replacing the print cartridge" on page 68. Symptom Software will not install Page will not print Solution 1 Check the USB cable for any other device such as the default printer and is marked with the USB symbol. 3 Firmly plug the square end of the USB cable...
...Directly connect the cable to the computer through another device: 1 Disconnect the USB cable from the print cartridge and that the print cartridge has been installed properly. Make sure the tape has been removed from any obvious damage. 2 Firmly plug the rectangular end of the USB cable into the back...For more information, see "Replacing the print cartridge" on page 68. Symptom Software will not install Page will not print Solution 1 Check the USB cable for any other device such as the default printer and is marked with the USB symbol. 3 Firmly plug the square end of the USB cable...

User's Guide
Page 76
Printer Status 26 Troubleshooting 26 Lexmark Web site 60 loading 4 x 6 cards 29 banner paper 29 documents on ... lit 62 power supply cord 8 preserving print cartridges 59 Preview section 16 print cartridge aligning 56 cleaning 57 installing 54 ordering 60 preserving 59 removing 52 replacing 52 Print Layout tab 25 Print Properties I Want To menu... 23 using 22 Print Properties tabs 24 print settings changing 33 customizing 33 print troubleshooting 66 Printer Status tab 26 printing borderless photos 35 documents 33 photos 34 projects collating copies 36 creating a booklet 36 faxing...
Printer Status 26 Troubleshooting 26 Lexmark Web site 60 loading 4 x 6 cards 29 banner paper 29 documents on ... lit 62 power supply cord 8 preserving print cartridges 59 Preview section 16 print cartridge aligning 56 cleaning 57 installing 54 ordering 60 preserving 59 removing 52 replacing 52 Print Layout tab 25 Print Properties I Want To menu... 23 using 22 Print Properties tabs 24 print settings changing 33 customizing 33 print troubleshooting 66 Printer Status tab 26 printing borderless photos 35 documents 33 photos 34 projects collating copies 36 creating a booklet 36 faxing...


