User's Guide
Page 3
...Windows ...11 Macintosh ...15 UNIX/Linux ...16 Chapter 3: Installing drivers for network printing 17 Printing a network setup page ...17 Assigning a printer IP address ...17 Verifying the IP settings ...18 Windows ...18 Macintosh ...22 UNIX/Linux ...24 NetWare ...24 Chapter 4: Installing and ...removing options 25 Installing input options ...25 Installing a duplex unit ...27 Installing memory or option cards ...28 Accessing the printer system board ...28 Installing or removing a memory card ...30 Installing or removing a flash memory or firmware card 32 Installing an option...
...Windows ...11 Macintosh ...15 UNIX/Linux ...16 Chapter 3: Installing drivers for network printing 17 Printing a network setup page ...17 Assigning a printer IP address ...17 Verifying the IP settings ...18 Windows ...18 Macintosh ...22 UNIX/Linux ...24 NetWare ...24 Chapter 4: Installing and ...removing options 25 Installing input options ...25 Installing a duplex unit ...27 Installing memory or option cards ...28 Accessing the printer system board ...28 Installing or removing a memory card ...30 Installing or removing a flash memory or firmware card 32 Installing an option...
User's Guide
Page 4
... Storing print media ...72 Avoiding jams ...73 Chapter 7: Maintaining the printer 74 Determining the status of supplies ...75 Conserving supplies ...75 Ordering supplies ...76 Recycling Lexmark products ...78 Moving the printer ...79 Chapter 8: Clearing jams 80 Identifying jams ...80 Access doors and... trays ...81 Understanding jam messages ...82 Clearing printer jams ...82 Clearing staple jams ...93 Chapter 9: ...
... Storing print media ...72 Avoiding jams ...73 Chapter 7: Maintaining the printer 74 Determining the status of supplies ...75 Conserving supplies ...75 Ordering supplies ...76 Recycling Lexmark products ...78 Moving the printer ...79 Chapter 8: Clearing jams 80 Identifying jams ...80 Access doors and... trays ...81 Understanding jam messages ...82 Clearing printer jams ...82 Clearing staple jams ...93 Chapter 9: ...
User's Guide
Page 6
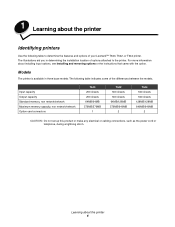
...the differences between the models. For more information about the printer Identifying printers Use the following table indicates some of options attached to determine the features and options of your Lexmark™ T640, T642, or T644 printer. Input capacity Output capacity Standard memory, non network/network ... telephone, during a lightning storm. The illustrations aid you in three base models The following table to the printer. 1 Learning about installing input options, see Installing and removing options or the instructions that came with the option. Learning about the...
...the differences between the models. For more information about the printer Identifying printers Use the following table indicates some of options attached to determine the features and options of your Lexmark™ T640, T642, or T644 printer. Input capacity Output capacity Standard memory, non network/network ... telephone, during a lightning storm. The illustrations aid you in three base models The following table to the printer. 1 Learning about installing input options, see Installing and removing options or the instructions that came with the option. Learning about the...

User's Guide
Page 7
...250 or 500 sheets) Tray 5* (2000-sheet drawer) CAUTION: Floor-mounted configurations require additional furniture for the T642 and T644. Identifying printers 7 Standard network Fully configured Standard output bin Operator panel 5-bin Mailbox* Output expander* Envelope feeder* Tray 1 (integrated tray or ...tray holds 250 sheets for the T640 and 500 sheets for stability. See www.lexmark.com/multifunctionprinters for more like the fully configured model. If you purchased a multifunction printer (MFP) that scans, copies, and faxes, you attach print media handling options...
...250 or 500 sheets) Tray 5* (2000-sheet drawer) CAUTION: Floor-mounted configurations require additional furniture for the T642 and T644. Identifying printers 7 Standard network Fully configured Standard output bin Operator panel 5-bin Mailbox* Output expander* Envelope feeder* Tray 1 (integrated tray or ...tray holds 250 sheets for the T640 and 500 sheets for stability. See www.lexmark.com/multifunctionprinters for more like the fully configured model. If you purchased a multifunction printer (MFP) that scans, copies, and faxes, you attach print media handling options...

User's Guide
Page 8
... Expiration Help Print All Print Quality Printing Guide Supplies Guide Media Guide Menu Map Information Guide Connection Guide Moving Guide Identifying printers 8 For more information about the printer A number of menus are available to make it easy for you to change printer settings. The diagram shows the menu index on the publications CD.
... Expiration Help Print All Print Quality Printing Guide Supplies Guide Media Guide Menu Map Information Guide Connection Guide Moving Guide Identifying printers 8 For more information about the printer A number of menus are available to make it easy for you to change printer settings. The diagram shows the menu index on the publications CD.
User's Guide
Page 9
...located to the left of options appears. After pressing Stop, the message Stopping appears. When the printer has stopped, the status line in the following table. Solid green Printer is on the printer is located to the last screen you press the Back button. Solid red Operator intervention is ... will not be in the Ready state to access the menu index. Stops the mechanical operation of the display. The lights indicate whether the printer power is on the operator panel, one color is green and the other is busy, idle, processing a job, or requires operator intervention....
...located to the left of options appears. After pressing Stop, the message Stopping appears. When the printer has stopped, the status line in the following table. Solid green Printer is on the printer is located to the last screen you press the Back button. Solid red Operator intervention is ... will not be in the Ready state to access the menu index. Stops the mechanical operation of the display. The lights indicate whether the printer power is on the operator panel, one color is green and the other is busy, idle, processing a job, or requires operator intervention....

User's Guide
Page 10
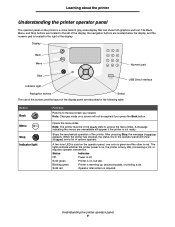
...and graphics describing the current state of the display is the header line. The top line of the printer and indicating possible printer problems you view printer status, supplies messages, show-me screens, and make selections. If applicable, it will be used to... orientation. It will delete additional entries. When navigating through text that will not fit on the screen. The other peripheral. Learning about the printer Button Navigation buttons USB Direct interface Numeric pad 1 2 3 4 5 6 789 0 # Display panel Status / Supplies Ready Tray 1 low...
...and graphics describing the current state of the display is the header line. The top line of the printer and indicating possible printer problems you view printer status, supplies messages, show-me screens, and make selections. If applicable, it will be used to... orientation. It will delete additional entries. When navigating through text that will not fit on the screen. The other peripheral. Learning about the printer Button Navigation buttons USB Direct interface Numeric pad 1 2 3 4 5 6 789 0 # Display panel Status / Supplies Ready Tray 1 low...

User's Guide
Page 11
... drivers depends on the computer before connecting the USB cable. 1 Insert the drivers CD. The printer driver is attached. The procedure to be created and appear in downloadable software packages on the Lexmark Web site at www.lexmark.com. Operating system Windows Windows Server 2003, Windows 2000, Windows XP, Windows 98 SE, Windows...
... drivers depends on the computer before connecting the USB cable. 1 Insert the drivers CD. The printer driver is attached. The procedure to be created and appear in downloadable software packages on the Lexmark Web site at www.lexmark.com. Operating system Windows Windows Server 2003, Windows 2000, Windows XP, Windows 98 SE, Windows...
User's Guide
Page 12
...95 and Windows 98 (first edition) 1 Turn on the screen. The Plug and Play screen appears, and a printer object is created in the Printers folder of distance between the printer and computer, or when a parallel interface is not available for the drivers to the following: D:\Drivers\Print\Win_9xMe\...Interface Card installed and use a parallel cable. Serial printing With serial printing, data is the default installation for the drivers files to install printer drivers on the computer. 6 Specify the location of the CD-ROM drive. 7 Click OK. Although serial printing is usually slower than ...
...95 and Windows 98 (first edition) 1 Turn on the screen. The Plug and Play screen appears, and a printer object is created in the Printers folder of distance between the printer and computer, or when a parallel interface is not available for the drivers to the following: D:\Drivers\Print\Win_9xMe\...Interface Card installed and use a parallel cable. Serial printing With serial printing, data is the default installation for the drivers files to install printer drivers on the computer. 6 Specify the location of the CD-ROM drive. 7 Click OK. Although serial printing is usually slower than ...

User's Guide
Page 13
... installed) heading to find the serial parameters. Note: Keep this : 1 Set serial parameters in the printer. 2 Install a printer driver on the attached computer. 3 Match the serial settings in the printer 1 Press on the operator panel. d Look under the Standard Serial (or Serial Option X if a... serial interface card is the setting required for a change), and then press . The printer returns to Even, Odd, or None. • Stop Bits must establish communication between the printer and computer. b Press until Menu Settings Page appears, and then press . c Press until Reports ...
... installed) heading to find the serial parameters. Note: Keep this : 1 Set serial parameters in the printer. 2 Install a printer driver on the attached computer. 3 Match the serial settings in the printer 1 Press on the operator panel. d Look under the Standard Serial (or Serial Option X if a... serial interface card is the setting required for a change), and then press . The printer returns to Even, Odd, or None. • Stop Bits must establish communication between the printer and computer. b Press until Menu Settings Page appears, and then press . c Press until Reports ...
User's Guide
Page 14
... in Using Windows 95 and Windows 98 (first edition). 1 Insert the drivers CD. It should follow the installation directions in the printer. The serial parameters in the communications port must be installed on the previously printed Menu Settings page. 6 Click OK, and close all...launch automatically, click Start Æ Run, and type the following in the Run dialog: D:\Setup.exe Where D is connected to verify printer installation. d Click Print Test Page. Note: Your operating system may require different setup procedures. Windows 14 Setting parameters in the communications (COM...
... in Using Windows 95 and Windows 98 (first edition). 1 Insert the drivers CD. It should follow the installation directions in the printer. The serial parameters in the communications port must be installed on the previously printed Menu Settings page. 6 Click OK, and close all...launch automatically, click Start Æ Run, and type the following in the Run dialog: D:\Setup.exe Where D is connected to verify printer installation. d Click Print Test Page. Note: Your operating system may require different setup procedures. Windows 14 Setting parameters in the communications (COM...
User's Guide
Page 15
...available in a downloadable software package on the Lexmark Web site at www.lexmark.com. g Enter the password, and click OK. Note: A printer PPD is required for the printer. • If the USB-attached printer does not appear in the Printer List, make sure the USB cable is ...properly connected and the printer is complete. A queue has been created for USB printing. Creating a desktop printer icon (Mac OS 9.x) 1 Install a PostScript Printer Description (PPD) file on the Lexmark Web site at www.lexmark.com. 4 Do one of the agreement. a Insert ...
...available in a downloadable software package on the Lexmark Web site at www.lexmark.com. g Enter the password, and click OK. Note: A printer PPD is required for the printer. • If the USB-attached printer does not appear in the Printer List, make sure the USB cable is ...properly connected and the printer is complete. A queue has been created for USB printing. Creating a desktop printer icon (Mac OS 9.x) 1 Install a PostScript Printer Description (PPD) file on the Lexmark Web site at www.lexmark.com. 4 Do one of the agreement. a Insert ...

User's Guide
Page 16
...sure the printer PPD matches the printer. 8 Click Create, and click Save. 9 Specify a printer name, and click Save. All the printer driver packages support local printing using Lexmark printers in the original Printer (USB) window. 7 In the PostScript Printer Description (PPD) File section, click Auto Setup. The printer appears in... Sun Ray appliances and Sun workstations. Visit the Lexmark Web site at www.lexmark.com. If the printer does not appear in the USB Printer Selection list, make sure the USB cable is properly connected, and the printer is supported on . 6 Select the name of...
...sure the printer PPD matches the printer. 8 Click Create, and click Save. 9 Specify a printer name, and click Save. All the printer driver packages support local printing using Lexmark printers in the original Printer (USB) window. 7 In the PostScript Printer Description (PPD) File section, click Auto Setup. The printer appears in... Sun Ray appliances and Sun workstations. Visit the Lexmark Web site at www.lexmark.com. If the printer does not appear in the USB Printer Selection list, make sure the USB cable is properly connected, and the printer is supported on . 6 Select the name of...

User's Guide
Page 17
..."Connected." Consult a system support person for network printing 17 One of the easiest ways is to configure the printer for the address under the "TCP/IP" heading on the printer system board. When the address is entered, press . When the address is entered, press . Submitting Selection appears... the network setup page printed in Printing a network setup page. 2 Go to verify the network connection. Assigning a printer IP address If the network is connected to the printer. If a MarkNet N8000 series internal print server is "Not Connected," the LAN drop may not be active, or...
..."Connected." Consult a system support person for network printing 17 One of the easiest ways is to configure the printer for the address under the "TCP/IP" heading on the printer system board. When the address is entered, press . When the address is entered, press . Submitting Selection appears... the network setup page printed in Printing a network setup page. 2 Go to verify the network connection. Assigning a printer IP address If the network is connected to the printer. If a MarkNet N8000 series internal print server is "Not Connected," the LAN drop may not be active, or...
User's Guide
Page 18
...; LPR-Windows NT 4.0 • Lexmark Enhanced TCP/IP port-Windows 98 SE/Me, Windows NT 4.0, Windows 2000, Windows XP, and Windows Server 2003 For basic printer functionality, install a printer driver, and use with all the printers on a network computer, type ping ... If the printer is active on each network computer. Supported printer drivers • Windows system printer driver • Lexmark custom printer driver Updated system and custom drivers are assigned and verified, install the printer on the network, a reply is entered, press . The printer driver and port...
...; LPR-Windows NT 4.0 • Lexmark Enhanced TCP/IP port-Windows 98 SE/Me, Windows NT 4.0, Windows 2000, Windows XP, and Windows Server 2003 For basic printer functionality, install a printer driver, and use with all the printers on a network computer, type ping ... If the printer is active on each network computer. Supported printer drivers • Windows system printer driver • Lexmark custom printer driver Updated system and custom drivers are assigned and verified, install the printer on the network, a reply is entered, press . The printer driver and port...

User's Guide
Page 19
... a test page to accept the license agreement. 4 Select Suggested, and click Next. 5 Select Network Attach, and click Next. Shared • Printer is connected to one of available ports. After the port is set up to be "shared" so that other network computers can be any name... for network printing Follow the steps for your printing configuration and operating system to configure the network printer: Printing configuration Direct • Printer is not listed: a Click Add Port. b Select Lexmark Enhanced TCP/IP Port, and enter the information to create the port. Note: If the IP...
... a test page to accept the license agreement. 4 Select Suggested, and click Next. 5 Select Network Attach, and click Next. Shared • Printer is connected to one of available ports. After the port is set up to be "shared" so that other network computers can be any name... for network printing Follow the steps for your printing configuration and operating system to configure the network printer: Printing configuration Direct • Printer is not listed: a Click Add Port. b Select Lexmark Enhanced TCP/IP Port, and enter the information to create the port. Note: If the IP...

User's Guide
Page 20
... installer application. Note: USB support is the default installation for shared printing: Server Printer 1 Install a custom printer driver. h Print a test page to make sure the printer was successfully shared. • The printer object in the text box. b Select the newly added printer. f Click OK. Installing drivers for Windows NT. Clients c Click Agree to a Windows NT...
... installer application. Note: USB support is the default installation for shared printing: Server Printer 1 Install a custom printer driver. h Print a test page to make sure the printer was successfully shared. • The printer object in the text box. b Select the newly added printer. f Click OK. Installing drivers for Windows NT. Clients c Click Agree to a Windows NT...

User's Guide
Page 21
...the driver information to be copied from the server computer to the client computer and for a new printer object to be the default printer for network printing Install the printer driver (or subset) on network clients Using the point and print method Note: This method is usually...1 Click Start Æ Settings Æ Printers. 2 Click Add Printer to launch the Add Printer wizard. 3 Click Next. 4 Click Network Printer, and click Next. 5 Enter the printer name or URL (if on each client computer. If the printer is copied from the Shared printers list. This lets network clients return to ...
...the driver information to be copied from the server computer to the client computer and for a new printer object to be the default printer for network printing Install the printer driver (or subset) on network clients Using the point and print method Note: This method is usually...1 Click Start Æ Settings Æ Printers. 2 Click Add Printer to launch the Add Printer wizard. 3 Click Next. 4 Click Network Printer, and click Next. 5 Enter the printer name or URL (if on each client computer. If the printer is copied from the Shared printers list. This lets network clients return to ...
User's Guide
Page 22
... queue in Print Center (Mac OS X). g Enter the password, and click OK. Macintosh Note: A PostScript Printer Description (PPD) file provides detailed information about the capabilities of a printer to create a print queue using AppleTalk Printing. 1 Open Finder, click Applications, and click Utilities. 2 Double-click...the list, and click Add. Note: Look on the network setup page under the "AppleTalk" heading to know which zone or printer to UNIX or Macintosh computers. For detailed configuration instructions, launch the drivers CD, click View Documentation, and click Software and utilities....
... queue in Print Center (Mac OS X). g Enter the password, and click OK. Macintosh Note: A PostScript Printer Description (PPD) file provides detailed information about the capabilities of a printer to create a print queue using AppleTalk Printing. 1 Open Finder, click Applications, and click Utilities. 2 Double-click...the list, and click Add. Note: Look on the network setup page under the "AppleTalk" heading to know which zone or printer to UNIX or Macintosh computers. For detailed configuration instructions, launch the drivers CD, click View Documentation, and click Software and utilities....
User's Guide
Page 23
... name in the Summary window is not correct for the printer, then printer setup is complete. • If the PPD file displayed in the Printer Address box. 6 Choose Lexmark from the "Printer Model" pop-up menu. 7 Select the new printer from the "File" menu. b Choose Print from the "Copies & Pages" pop...-up menu. Note: To know which zone or printer to find the default name of the ...
... name in the Summary window is not correct for the printer, then printer setup is complete. • If the PPD file displayed in the Printer Address box. 6 Choose Lexmark from the "Printer Model" pop-up menu. 7 Select the new printer from the "File" menu. b Choose Print from the "Copies & Pages" pop...-up menu. Note: To know which zone or printer to find the default name of the ...


