
Getting Started
Page 3
......18 Making a copy...18 Printing a photo or selected photos...19 Scanning a document ...19 Sending a fax using the control panel ...20 Ordering supplies...21 Ordering print cartridges ...21 Ordering paper and other supplies...21 Getting the printer ready to fax 23 Choosing a fax connection...23 Connecting directly to a telephone wall jack...24...
......18 Making a copy...18 Printing a photo or selected photos...19 Scanning a document ...19 Sending a fax using the control panel ...20 Ordering supplies...21 Ordering print cartridges ...21 Ordering paper and other supplies...21 Getting the printer ready to fax 23 Choosing a fax connection...23 Connecting directly to a telephone wall jack...24...
Getting Started
Page 9
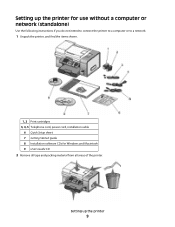
Setting up the printer 9 Setting up the printer for use without a computer or network (standalone) Use the following instructions if you do not intend to connect the printer to a computer or to a network. 1 Unpack the printer, and find the items shown. 1, 2 Print cartridges 3, 4, 5 Telephone cord, power cord, installation cable 6 Quick Setup sheet 7 Getting Started guide 8 Installation software CDs for Windows and Macintosh 9 User's Guide CD 2 Remove all tape and packing material from all areas of the printer.
Setting up the printer 9 Setting up the printer for use without a computer or network (standalone) Use the following instructions if you do not intend to connect the printer to a computer or to a network. 1 Unpack the printer, and find the items shown. 1, 2 Print cartridges 3, 4, 5 Telephone cord, power cord, installation cable 6 Quick Setup sheet 7 Getting Started guide 8 Installation software CDs for Windows and Macintosh 9 User's Guide CD 2 Remove all tape and packing material from all areas of the printer.
Getting Started
Page 11
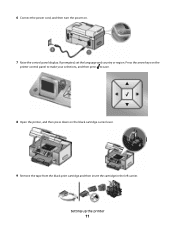
Press the arrow keys on the printer control panel to make your selections, and then press to save. 8 Open the printer, and then press down on . 7 Raise the control panel display. Setting up the printer 11 If prompted, set the language and country or region. 6 Connect the power cord, and then turn the power on the black cartridge carrier lever. 9 Remove the tape from the black print cartridge and then insert the cartridge in the left carrier.
Press the arrow keys on the printer control panel to make your selections, and then press to save. 8 Open the printer, and then press down on . 7 Raise the control panel display. Setting up the printer 11 If prompted, set the language and country or region. 6 Connect the power cord, and then turn the power on the black cartridge carrier lever. 9 Remove the tape from the black print cartridge and then insert the cartridge in the left carrier.
Getting Started
Page 12
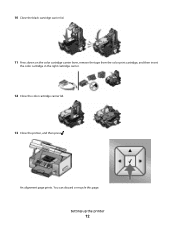
You can discard or recycle this page. An alignment page prints. Setting up the printer 12 10 Close the black cartridge carrier lid. 11 Press down on the color cartridge carrier lever, remove the tape from the color print cartridge, and then insert the color cartridge in the right cartridge carrier. 12 Close the color cartridge carrier lid. 13 Close the printer, and then press .
You can discard or recycle this page. An alignment page prints. Setting up the printer 12 10 Close the black cartridge carrier lid. 11 Press down on the color cartridge carrier lever, remove the tape from the color print cartridge, and then insert the color cartridge in the right cartridge carrier. 12 Close the color cartridge carrier lid. 13 Close the printer, and then press .
Getting Started
Page 16
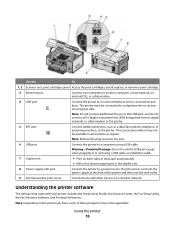
... that came with port Connect the printer to remove paper jams in all countries or regions. install, replace, or remove a print cartridge. 3 Ethernet port Connect your printer includes the Productivity Studio, the Solution Center, the Fax Setup Utility, the Fax Solutions Software, and... Printing Preferences. Use the To 1, 2 Scanner unit, print cartridge carrier Access the print cartridges; The printer must be available in the duplex unit. 8 Power supply with your computer to another computer, a local network, an...
... that came with port Connect the printer to remove paper jams in all countries or regions. install, replace, or remove a print cartridge. 3 Ethernet port Connect your printer includes the Productivity Studio, the Solution Center, the Fax Setup Utility, the Fax Solutions Software, and... Printing Preferences. Use the To 1, 2 Scanner unit, print cartridge carrier Access the print cartridges; The printer must be available in the duplex unit. 8 Power supply with your computer to another computer, a local network, an...
Getting Started
Page 17
...one of the following: • In Windows Vista, click . • In Windows XP and earlier, click Start. 2 Click Programs or All Programs ªLexmark 9500 Series. 3 Select Productivity Studio. • Scan, copy, fax, e-mail, or print a photo or document. • Transfer photos. • ... Access the phone book. • View sample cover pages. • Click toolbar items to print photos, troubleshoot printing problems, install print cartridges, and perform maintenance tasks. To access the Fax Setup Utility, select Fax History and Settings on the Productivity Studio Welcome Screen. •...
...one of the following: • In Windows Vista, click . • In Windows XP and earlier, click Start. 2 Click Programs or All Programs ªLexmark 9500 Series. 3 Select Productivity Studio. • Scan, copy, fax, e-mail, or print a photo or document. • Transfer photos. • ... Access the phone book. • View sample cover pages. • Click toolbar items to print photos, troubleshoot printing problems, install print cartridges, and perform maintenance tasks. To access the Fax Setup Utility, select Fax History and Settings on the Productivity Studio Welcome Screen. •...
Getting Started
Page 18
... original document faceup into the Automatic Document Feeder (ADF) or facedown on the scanner glass in the upper left corner. Printer Utility • Install print cartridges and perform other maintenance tasks. • Contact customer support. Note: Do not load postcards, photos, small items, transparencies, photo paper, or thin media (such as...
... original document faceup into the Automatic Document Feeder (ADF) or facedown on the scanner glass in the upper left corner. Printer Utility • Install print cartridges and perform other maintenance tasks. • Contact customer support. Note: Do not load postcards, photos, small items, transparencies, photo paper, or thin media (such as...
Getting Started
Page 21
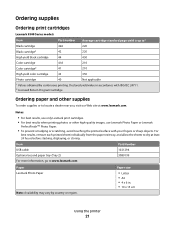
...; A4 • 4 x 6 in accordance with ISO/IEC 24711. 2 Licensed Return Program Cartridge Ordering paper and other high-quality images, use Lexmark Photo Paper or Lexmark PerfectFinishTM Photo Paper. • To prevent smudging or scratching, avoid touching the printed surface with your... cartridges Lexmark 9500 Series models Item Part number Average cartridge standard page yield is up to1 Black cartridge 42A 220 Black cartridge2 42 220 High yield black cartridge 44 450 Color cartridge 41A 210 Color cartridge2 41 210 High yield color cartridge 43 350 Photo cartridge ...
...; A4 • 4 x 6 in accordance with ISO/IEC 24711. 2 Licensed Return Program Cartridge Ordering paper and other high-quality images, use Lexmark Photo Paper or Lexmark PerfectFinishTM Photo Paper. • To prevent smudging or scratching, avoid touching the printed surface with your... cartridges Lexmark 9500 Series models Item Part number Average cartridge standard page yield is up to1 Black cartridge 42A 220 Black cartridge2 42 220 High yield black cartridge 44 450 Color cartridge 41A 210 Color cartridge2 41 210 High yield color cartridge 43 350 Photo cartridge ...
Getting Started
Page 40
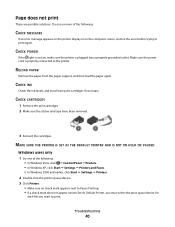
... appears on the printer display or on , make sure the printer is properly connected to the printer. CHECK CARTRIDGES 1 Remove the print cartridges. 2 Make sure the sticker and tape have been removed. 3 Reinsert the cartridges. RELOAD PAPER Remove the paper from the paper support, and then load the paper again. Try one of... the light is not on the computer screen, resolve the error before trying to print. CHECK INK Check the ink levels, and install new print cartridges if necessary.
... appears on the printer display or on , make sure the printer is properly connected to the printer. CHECK CARTRIDGES 1 Remove the print cartridges. 2 Make sure the sticker and tape have been removed. 3 Reinsert the cartridges. RELOAD PAPER Remove the paper from the paper support, and then load the paper again. Try one of... the light is not on the computer screen, resolve the error before trying to print. CHECK INK Check the ink levels, and install new print cartridges if necessary.

Getting Started
Page 57
... different numbers are spaced such that automatic calls to your acceptance of another. Die Verwendung des Lexmark Filters ist obligatorisch, da in allen analogen Telefonleitungen in Svizzera. A replacement cartridge sold without these terms is required. Utilisation de ce produit en Suisse Cet appareil nécessite...on any line which receives metering pulses in the cartridge when replacement is available at www.lexmark.com. If you do not accept the terms of this single use the print cartridge terminates, and the used cartridge must be used in conjunction with this single use,...
... different numbers are spaced such that automatic calls to your acceptance of another. Die Verwendung des Lexmark Filters ist obligatorisch, da in allen analogen Telefonleitungen in Svizzera. A replacement cartridge sold without these terms is required. Utilisation de ce produit en Suisse Cet appareil nécessite...on any line which receives metering pulses in the cartridge when replacement is available at www.lexmark.com. If you do not accept the terms of this single use the print cartridge terminates, and the used cartridge must be used in conjunction with this single use,...

