
Lexmark 4227 Plus User's Guide
Page 3
... 32 Menu Options 34 Setting the Printer Online or Offline 41 Stopping the Printer 42 Advancing the Paper 42 Using Tear-off 42 Auto Tear-off Set to do Next 19 Chapter 2 - Using the Operator Panel 27 Buttons 28 Lights 30 Using the Function Menus 31 Overview of Printer 25 Supplies 26 Chapter 3 - Contents Contents Chapter 1 - Getting Started 1 Unpacking 1 Installing the Ribbon Cartridge 3 Connecting the Parallel Cable 8 Connecting the Serial Cable 10 Connecting the Power Cord 11 Changing the Serial Settings 11 Verifying Serial Interface Settings 13 Printing...
... 32 Menu Options 34 Setting the Printer Online or Offline 41 Stopping the Printer 42 Advancing the Paper 42 Using Tear-off 42 Auto Tear-off Set to do Next 19 Chapter 2 - Using the Operator Panel 27 Buttons 28 Lights 30 Using the Function Menus 31 Overview of Printer 25 Supplies 26 Chapter 3 - Contents Contents Chapter 1 - Getting Started 1 Unpacking 1 Installing the Ribbon Cartridge 3 Connecting the Parallel Cable 8 Connecting the Serial Cable 10 Connecting the Power Cord 11 Changing the Serial Settings 11 Verifying Serial Interface Settings 13 Printing...

Lexmark 4227 Plus User's Guide
Page 4
... Selecting or Locking a Font or Pitch 46 Setting and Using a Macro 47 Disabling/Enabling the Operator Panel 48 Chapter 4 - Selecting and Loading Paper 49 Paper Types and Sizes 49 Single Sheets 50 Multiple Part Single Sheets 50 Single Continuous Forms 50 Multiple Part Continuous Forms 51 Envelopes 51 Multiple Part Forms 51 Loading a Single Sheet or Envelope 52 Loading a Single Sheet or Envelope into the Manual Feed . . . 52 Setting Auto Cut Sheet Load 56 Loading a Single Sheet or Envelope With Continuous Forms Already Loaded 57 Loading Continuous Forms 62 Aligning the Left Margin...
... Selecting or Locking a Font or Pitch 46 Setting and Using a Macro 47 Disabling/Enabling the Operator Panel 48 Chapter 4 - Selecting and Loading Paper 49 Paper Types and Sizes 49 Single Sheets 50 Multiple Part Single Sheets 50 Single Continuous Forms 50 Multiple Part Continuous Forms 51 Envelopes 51 Multiple Part Forms 51 Loading a Single Sheet or Envelope 52 Loading a Single Sheet or Envelope into the Manual Feed . . . 52 Setting Auto Cut Sheet Load 56 Loading a Single Sheet or Envelope With Continuous Forms Already Loaded 57 Loading Continuous Forms 62 Aligning the Left Margin...

Lexmark 4227 Plus User's Guide
Page 29
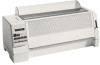
Enables manual feed of cut form sheet. 23 Chapter 2: Features and Functions Aligns the margins of a cut forms. Indicates printer status and makes control of Printer Operator Panel Top Cover Manual Feed Door Paper Supports Acoustic Cover Features and Functions Paper Guides Front Cover Paper Select Lever Power Switch Part Name Acoustic cover Front cover Manual feed door Operator panel Paper guides Function Lowers noise level produced by the printer. Front View of printer functions simple and convenient. Covers the continuous forms tractor.
Enables manual feed of cut form sheet. 23 Chapter 2: Features and Functions Aligns the margins of a cut forms. Indicates printer status and makes control of Printer Operator Panel Top Cover Manual Feed Door Paper Supports Acoustic Cover Features and Functions Paper Guides Front Cover Paper Select Lever Power Switch Part Name Acoustic cover Front cover Manual feed door Operator panel Paper guides Function Lowers noise level produced by the printer. Front View of printer functions simple and convenient. Covers the continuous forms tractor.

Lexmark 4227 Plus User's Guide
Page 39
... AutoGap Uni-Dir Print Auto Rdy Cut Sht Paper Out Alarm TOF Read Menu Language Press Next Data Options Control Options Interface Serial Select* Data Speed* Data Bits* Parity* Stop Bits* Protocol* Honor DSR* Polarity* Emulation Opt. Opt. Print Adjust Trace Mode Press Next Buffer Size Automatic LF Automatic CR Slashed Zero FF Enable Code Page Sub Press Next Emulation Character Table* Int'l Character* Press Next Draft Courier 33 Chapter 3: Using the Operator Panel Ld. Form Length Left Margin Right Margin Press Next Bottom Margin Lines Per Inch Eject by FF...
... AutoGap Uni-Dir Print Auto Rdy Cut Sht Paper Out Alarm TOF Read Menu Language Press Next Data Options Control Options Interface Serial Select* Data Speed* Data Bits* Parity* Stop Bits* Protocol* Honor DSR* Polarity* Emulation Opt. Opt. Print Adjust Trace Mode Press Next Buffer Size Automatic LF Automatic CR Slashed Zero FF Enable Code Page Sub Press Next Emulation Character Table* Int'l Character* Press Next Draft Courier 33 Chapter 3: Using the Operator Panel Ld. Form Length Left Margin Right Margin Press Next Bottom Margin Lines Per Inch Eject by FF...

Lexmark 4227 Plus User's Guide
Page 43
... Options Secondary Options Paper Handling Options Auto Tear-off On, Off, One Second If "Enable" is selected in the macro options Auto Cut Sheet Load On, Off menu. Auto Sheet Feed On, Off Automatically feeds cut sheets into the printer. Automatically ejects your print job when it has finished printing. 37 Chapter 3: Using the Operator Panel These settings are using Auto Sheet Feeder. A4/296.3 mm Left Margin* 0", 1", 2", 3" Right Margin* 4", 5", 6", 7", 8", 13.6" Bottom Margin* 0", ½", 1", 2", 3" Lines Per Inch 3, 4, 6, 8 Adjusts the number of 132LPP/22...
... Options Secondary Options Paper Handling Options Auto Tear-off On, Off, One Second If "Enable" is selected in the macro options Auto Cut Sheet Load On, Off menu. Auto Sheet Feed On, Off Automatically feeds cut sheets into the printer. Automatically ejects your print job when it has finished printing. 37 Chapter 3: Using the Operator Panel These settings are using Auto Sheet Feeder. A4/296.3 mm Left Margin* 0", 1", 2", 3" Right Margin* 4", 5", 6", 7", 8", 13.6" Bottom Margin* 0", ½", 1", 2", 3" Lines Per Inch 3, 4, 6, 8 Adjusts the number of 132LPP/22...

Lexmark 4227 Plus User's Guide
Page 48
... Tear-off . Auto Tear-off position, pressing Form Feed will feed the paper one second, then feeds to the Tear Off position. • Press LineFeed to advance the paper to the tear bar. Using the Operator Panel Stopping the Printer To temporarily stop printing, press Start/Stop until the Ready light is on. To resume printing, press Start/Stop until the Ready light is off function advances the perforation of a continuous form to the next line. • Press Micro...
... Tear-off . Auto Tear-off position, pressing Form Feed will feed the paper one second, then feeds to the Tear Off position. • Press LineFeed to advance the paper to the tear bar. Using the Operator Panel Stopping the Printer To temporarily stop printing, press Start/Stop until the Ready light is on. To resume printing, press Start/Stop until the Ready light is off function advances the perforation of a continuous form to the next line. • Press Micro...

Lexmark 4227 Plus User's Guide
Page 77
... to save the position you want . Selecting and Loading Paper The operator panel displays a Press Start message. 3 Move the paper select lever up to the single sheets position. 4 Load a cut sheet of Form. The Ready light comes on the next page; • no data, printer control codes, or escape codes have been sent to the printer after advancing to the TOF; • continuous paper is loaded by pressing Start/Stop. For help , see "Setting TOF for Continuous Forms" on...
... to save the position you want . Selecting and Loading Paper The operator panel displays a Press Start message. 3 Move the paper select lever up to the single sheets position. 4 Load a cut sheet of Form. The Ready light comes on the next page; • no data, printer control codes, or escape codes have been sent to the printer after advancing to the TOF; • continuous paper is loaded by pressing Start/Stop. For help , see "Setting TOF for Continuous Forms" on...

Lexmark 4227 Plus User's Guide
Page 82
... install the Auto Sheet Feeder, change the Auto Sheet Feeder setting on top of the feeder. If you can also print on continuous forms loaded in the printer's tractor feeder while the Auto Sheet Feeder is located on the printer, and load paper in a tray instead of manually feeding each sheet. Note: The Auto Sheet Feeder does not support multi-part forms. You can print from single sheets of paper stacked in the Auto Sheet Feeder. The Auto Sheet Feeder attaches to manually feed...
... install the Auto Sheet Feeder, change the Auto Sheet Feeder setting on top of the feeder. If you can also print on continuous forms loaded in the printer's tractor feeder while the Auto Sheet Feeder is located on the printer, and load paper in a tray instead of manually feeding each sheet. Note: The Auto Sheet Feeder does not support multi-part forms. You can print from single sheets of paper stacked in the Auto Sheet Feeder. The Auto Sheet Feeder attaches to manually feed...

Lexmark 4227 Plus User's Guide
Page 88
Margin Guide Left Paper Guide The distance from the [A symbol to the left paper guide determines the left margin. 8 Move the right paper guide to match the paper width you want aligns with the symbol [A printed on the inside of the Auto Sheet Feeder. Printer Options label located on the margin guide of the paper holder. 7 Move the paper guide so the print start position you are using. 82 Chapter 5: Printer Options Printing begins at the [A symbol.
Margin Guide Left Paper Guide The distance from the [A symbol to the left paper guide determines the left margin. 8 Move the right paper guide to match the paper width you want aligns with the symbol [A printed on the inside of the Auto Sheet Feeder. Printer Options label located on the margin guide of the paper holder. 7 Move the paper guide so the print start position you are using. 82 Chapter 5: Printer Options Printing begins at the [A symbol.

Lexmark 4227 Plus User's Guide
Page 91
... [A symbol to manually feed cut sheets or envelopes while the feeder is installed.) Printer Options Chapter 5: Printer Options 85 Left Paper Guide Printing begins at the same time. (A convenient manual feed tray on top of the feeder allows you to the left paper guide determines the left margin. Tractor 2 Feeder The Tractor 2 Feeder attaches to the front of your printer and provides dual tractor capability with a second tractor feed for continuous forms. This option lets...
... [A symbol to manually feed cut sheets or envelopes while the feeder is installed.) Printer Options Chapter 5: Printer Options 85 Left Paper Guide Printing begins at the same time. (A convenient manual feed tray on top of the feeder allows you to the left paper guide determines the left margin. Tractor 2 Feeder The Tractor 2 Feeder attaches to the front of your printer and provides dual tractor capability with a second tractor feed for continuous forms. This option lets...

Lexmark 4227 Plus User's Guide
Page 96
... Attach cables removed in previous step. 16 Turn the PC and the printer On after plugging both continuous forms in the Tractor 2 Feeder and single sheet or envelopes in the manual feed tray. 90 Chapter 5: Printer Options See "Loading Paper in . Loading Paper in the Tractor 2 Feeder The Tractor 2 Feeder has a tractor feeder for continuous forms and a manual feed tray for single sheets and single-part forms. This section includes directions for loading both...
... Attach cables removed in previous step. 16 Turn the PC and the printer On after plugging both continuous forms in the Tractor 2 Feeder and single sheet or envelopes in the manual feed tray. 90 Chapter 5: Printer Options See "Loading Paper in . Loading Paper in the Tractor 2 Feeder The Tractor 2 Feeder has a tractor feeder for continuous forms and a manual feed tray for single sheets and single-part forms. This section includes directions for loading both...

Lexmark 4227 Plus User's Guide
Page 108
... "Installing the Ribbon Cartridge" on the display. When jams occur, the Check light is on and the 002 Paper Jam message appears on page 3. 5 Make sure all paper is removed from your country. Solving Printer Problems To run a printer test: 1 Turn the printer On. 2 Press Menu. 3 Press Item ↓ until Print Settings appears. 4 Press Start. If this happens, follow these steps to clear the jam: 1 Open the top cover and tear off the forms at...
... "Installing the Ribbon Cartridge" on the display. When jams occur, the Check light is on and the 002 Paper Jam message appears on page 3. 5 Make sure all paper is removed from your country. Solving Printer Problems To run a printer test: 1 Turn the printer On. 2 Press Menu. 3 Press Item ↓ until Print Settings appears. 4 Press Start. If this happens, follow these steps to clear the jam: 1 Open the top cover and tear off the forms at...
Lexmark 4227 Plus User's Guide
Page 113
... light is not installed. Action: Check your software user documentation. Solving Printer Problems Printing and Print Quality Problems Symptom Printer does not print. Check that the printer cable is not correct. Turn the computer and printer on page 10). • Ribbon cartridge is off the computer and the printer. Action: Reset the interface mode setting (see "Connecting the Parallel Cable" on page 8 or "Connecting the Serial Cable" on . • Interface mode setting is sending the wrong printer command. Action: Insert the media more firmly into manual feed area...
... light is not installed. Action: Check your software user documentation. Solving Printer Problems Printing and Print Quality Problems Symptom Printer does not print. Check that the printer cable is not correct. Turn the computer and printer on page 10). • Ribbon cartridge is off the computer and the printer. Action: Reset the interface mode setting (see "Connecting the Parallel Cable" on page 8 or "Connecting the Serial Cable" on . • Interface mode setting is sending the wrong printer command. Action: Insert the media more firmly into manual feed area...

Lexmark 4227 Plus User's Guide
Page 114
... 3. • Printhead is folded. For help to remind you of ribbon cartridge replacement. Solving Printer Problems Symptom Printing is set incorrectly. Action: Replace the ribbon cartridge. For help , see "Installing the Ribbon Cartridge" on page 3. • AutoGap is set incorrectly. Forms are missing. For help , see "Installing the Ribbon Cartridge" on page. Action: Adjust AutoGap (see page 35). • Auto Sheet Feeder is installed and AutoGap is too light or blurred. Action: Replace the ribbon cartridge. Tip...
... 3. • Printhead is folded. For help to remind you of ribbon cartridge replacement. Solving Printer Problems Symptom Printing is set incorrectly. Action: Replace the ribbon cartridge. For help , see "Installing the Ribbon Cartridge" on page 3. • AutoGap is set incorrectly. Forms are missing. For help , see "Installing the Ribbon Cartridge" on page. Action: Adjust AutoGap (see page 35). • Auto Sheet Feeder is installed and AutoGap is too light or blurred. Action: Replace the ribbon cartridge. Tip...
Lexmark 4227 Plus User's Guide
Page 117
...loaded. The printer paper is printing a demo or adjustment pattern. Chapter 6: Solving Printer Problems 111 Data transmission error in the incorrect position. Check the serial settings on page 48. Courier font is selected. Proportional Spacing is selected. To enable the operator panel, see the printer registration card for the number appropriate for you to save your country. Top Cover is disabled. A hardware error occurred. The operator panel is open or not properly closed. Solving Printer Problems Message 002 Paper Jam Remove Paper 005 Cover Open Close Cover...
...loaded. The printer paper is printing a demo or adjustment pattern. Chapter 6: Solving Printer Problems 111 Data transmission error in the incorrect position. Check the serial settings on page 48. Courier font is selected. Proportional Spacing is selected. To enable the operator panel, see the printer registration card for the number appropriate for you to save your country. Top Cover is disabled. A hardware error occurred. The operator panel is open or not properly closed. Solving Printer Problems Message 002 Paper Jam Remove Paper 005 Cover Open Close Cover...

Lexmark 4227 Plus User's Guide
Page 129
...; Is manufactured from new parts, or new and serviceable used with such machine. Appendix B: 123 Warranty Lexmark warrants that user. When warranty service involves the exchange of a machine or part, the item replaced becomes the property of the original machine. Statement of Limited Warranty Appendix B Statement of Limited Warranty Lexmark International, Inc., Lexington, KY Lexmark 4227 plus Forms Printer This Statement of Limited...
...; Is manufactured from new parts, or new and serviceable used with such machine. Appendix B: 123 Warranty Lexmark warrants that user. When warranty service involves the exchange of a machine or part, the item replaced becomes the property of the original machine. Statement of Limited Warranty Appendix B Statement of Limited Warranty Lexmark International, Inc., Lexington, KY Lexmark 4227 plus Forms Printer This Statement of Limited...

Lexmark 4227 Plus User's Guide
Page 131
... software. automatic interface switching. also called compressed print mode. 125 bps. The number of 256 graphic designs (characters) associated with unique code values from 0 through 255. The number of a printer. A set of characters printed within an inch horizontally across a page. Paper size that are printed in which character spacing is activated when an event occurs that senses the active interface. audible alarm. Printer function that may require operator attention or intervention for printer operation. B bidirectional. buffer...
... software. automatic interface switching. also called compressed print mode. 125 bps. The number of 256 graphic designs (characters) associated with unique code values from 0 through 255. The number of a printer. A set of characters printed within an inch horizontally across a page. Paper size that are printed in which character spacing is activated when an event occurs that senses the active interface. audible alarm. Printer function that may require operator attention or intervention for printer operation. B bidirectional. buffer...

Lexmark 4227 Plus User's Guide
Page 135
...paper 42 aligning left margin 66 application software, installing 18 auto cut sheet load 37 setting 56 auto sheet feeder described 76 installing 77 loading paper automatic feed 81 manual feed 83 rollers, cleaning 113 setting left margin 84 Auto Tear-Off Set to Off 72 AutoGap 38, 44 Off (manual) 44 On 44 Single 46 automatic interface switching 22 B bidirectional alignment 72 buttons, operator panel 28 C changing tractor feeders 97 check light 41 cleaning auto sheet feeder rollers 113 printer 113 clearing jams 102 configuring the printer 18 connecting parallel cable 8 power cord 11 serial cable...
...paper 42 aligning left margin 66 application software, installing 18 auto cut sheet load 37 setting 56 auto sheet feeder described 76 installing 77 loading paper automatic feed 81 manual feed 83 rollers, cleaning 113 setting left margin 84 Auto Tear-Off Set to Off 72 AutoGap 38, 44 Off (manual) 44 On 44 Single 46 automatic interface switching 22 B bidirectional alignment 72 buttons, operator panel 28 C changing tractor feeders 97 check light 41 cleaning auto sheet feeder rollers 113 printer 113 clearing jams 102 configuring the printer 18 connecting parallel cable 8 power cord 11 serial cable...

Lexmark 4227 Plus User's Guide
Page 137
...-Of-Form 69 stopping the printer 42 using Tear-Off 42-44 options auto sheet feeder 75, 76 extended paper guides 75 parallel cable 75 printer stand 75 serial cable 75 tractor 2 feeder 75, 85 P paper advancing 42 loading auto sheet feeder 80 tractor 2 feeder 90 sizes 50-51 types continuous forms 50 envelopes 51 labels 49 single sheets 50 Paper Hand Options 37 paper jams 102 parallel cable, connecting 8 pitch, selecting or locking 46 power cord, connecting 11 Print Adjust 41 Print Demo 34 Print Settings 34 printer driver 19...
...-Of-Form 69 stopping the printer 42 using Tear-Off 42-44 options auto sheet feeder 75, 76 extended paper guides 75 parallel cable 75 printer stand 75 serial cable 75 tractor 2 feeder 75, 85 P paper advancing 42 loading auto sheet feeder 80 tractor 2 feeder 90 sizes 50-51 types continuous forms 50 envelopes 51 labels 49 single sheets 50 Paper Hand Options 37 paper jams 102 parallel cable, connecting 8 pitch, selecting or locking 46 power cord, connecting 11 Print Adjust 41 Print Demo 34 Print Settings 34 printer driver 19...
Lexmark 4227 Plus User's Guide
Page 138
...paper jams 102 display message list 110 error codes or messages 103 operator panel buttons 110 paper feed 106 power 110 printer test 101 printing and print quality 107 stopping the printer 42 supplies 26 installing 86 loading paper continuous forms 91 cut sheets 94 manual feed 94 parking continuous forms 97 removing 99 setting left margin 93 troubleshooting 101, 113 U unpacking 1 using macros 47 T Tear-Off. see Auto Tear-Off test page. Index paper 49 pitch 46 serial cable, connecting 10 Set Top of Form 34 Setting 72 setting AutoGap 44 operator panel language 16 printer online or offline...
...paper jams 102 display message list 110 error codes or messages 103 operator panel buttons 110 paper feed 106 power 110 printer test 101 printing and print quality 107 stopping the printer 42 supplies 26 installing 86 loading paper continuous forms 91 cut sheets 94 manual feed 94 parking continuous forms 97 removing 99 setting left margin 93 troubleshooting 101, 113 U unpacking 1 using macros 47 T Tear-Off. see Auto Tear-Off test page. Index paper 49 pitch 46 serial cable, connecting 10 Set Top of Form 34 Setting 72 setting AutoGap 44 operator panel language 16 printer online or offline...

