

User Manual
Page 3
...Printing a network setup page...14 Printing from Windows or DOS...14 Using IBM emulation mode...15 Using Epson emulation mode...16 Using Okidata MICROLINE emulation mode...16 Using the control panel 17 Understanding the control panel buttons...17 Understanding the control panel lights...19 Setting the printer online or offline...20 Advancing paper...20 Using the Load/Unload function...20 Locking and unlocking the control panel...20 Selecting a Tractor mode...21 Selecting and locking a font...21 Disabling Font Lock...21 Selecting and locking a pitch...22 Disabling Pitch Lock...22 Loading paper...
...Printing a network setup page...14 Printing from Windows or DOS...14 Using IBM emulation mode...15 Using Epson emulation mode...16 Using Okidata MICROLINE emulation mode...16 Using the control panel 17 Understanding the control panel buttons...17 Understanding the control panel lights...19 Setting the printer online or offline...20 Advancing paper...20 Using the Load/Unload function...20 Locking and unlocking the control panel...20 Selecting a Tractor mode...21 Selecting and locking a font...21 Disabling Font Lock...21 Selecting and locking a pitch...22 Disabling Pitch Lock...22 Loading paper...
User Manual
Page 4
... Data options ...52 Control options...54 Emulation options ...55 Interface options...56 Maintaining the printer 57 Ordering supplies...57 Removing the ribbon cartridge...57 Cleaning the printer...57 Recycling Lexmark products...58 Administrative support 59 Restoring the factory default settings...59 Supporting IPSec...60 Supporting SNMPv3...60 Using 802.1x authentication...60 Contents 4 Loading a cut form or envelope manually ...37 Aligning the left margin ...39 Setting Top-of-Form...40 Setting Top-Of-Form for continuous forms in push mode...
... Data options ...52 Control options...54 Emulation options ...55 Interface options...56 Maintaining the printer 57 Ordering supplies...57 Removing the ribbon cartridge...57 Cleaning the printer...57 Recycling Lexmark products...58 Administrative support 59 Restoring the factory default settings...59 Supporting IPSec...60 Supporting SNMPv3...60 Using 802.1x authentication...60 Contents 4 Loading a cut form or envelope manually ...37 Aligning the left margin ...39 Setting Top-of-Form...40 Setting Top-Of-Form for continuous forms in push mode...

User Manual
Page 5
... the power light is on, but does not print ...67 Printer alarm sounds...67 Printer goes to the right during printing ...68 Incorrect line length; lines do not start at the left margin 68 Printer speed slows ...68 Incorrect characters print, left margin changes, or printing stops 69 Printing continues beyond the edges of the continuous forms 69 Selected font or pitch is not printing or is changing ...69 Solving paper feed problems...69 Paper is jammed in the printer ...69 Paper is jammed in the Auto Sheet...
... the power light is on, but does not print ...67 Printer alarm sounds...67 Printer goes to the right during printing ...68 Incorrect line length; lines do not start at the left margin 68 Printer speed slows ...68 Incorrect characters print, left margin changes, or printing stops 69 Printing continues beyond the edges of the continuous forms 69 Selected font or pitch is not printing or is changing ...69 Solving paper feed problems...69 Paper is jammed in the printer ...69 Paper is jammed in the Auto Sheet...

User Manual
Page 11
... tractor • Pull tractor Limits control panel functions to the Start/Stop, FormFeed, Tear Off, and Load/Unload buttons only, thus limiting the potential that untrained operators may accidentally change forms settings Contains the inked fabric ribbon • Power-on Self Test • Printer test page-Determines whether your machine has print problems • Demonstration Print Prints tables, charts, and other graphics as shown on cut sheets Tear Off bar Adjustable tractor Control panel disable Ribbon cartridge Printer tests Box and line drawings Greek and math symbols Code...
... tractor • Pull tractor Limits control panel functions to the Start/Stop, FormFeed, Tear Off, and Load/Unload buttons only, thus limiting the potential that untrained operators may accidentally change forms settings Contains the inked fabric ribbon • Power-on Self Test • Printer test page-Determines whether your machine has print problems • Demonstration Print Prints tables, charts, and other graphics as shown on cut sheets Tear Off bar Adjustable tractor Control panel disable Ribbon cartridge Printer tests Box and line drawings Greek and math symbols Code...

User Manual
Page 14
... the Font button. Note: This function is disabled if a USB cable is connected. 1 Make sure the printer is on , and the demonstration page prints. If the status is useful in situations where the Address changes. Printing from Windows or DOS Windows When printing from a Windows application, use the Windows Forms Printer 2500 Series driver available from the Lexmark Web site at www.lexmark.com. Warning-Potential Damage: Do not touch the Network connector except when the printer is loaded. 2 With a paper...
... the Font button. Note: This function is disabled if a USB cable is connected. 1 Make sure the printer is on , and the demonstration page prints. If the status is useful in situations where the Address changes. Printing from Windows or DOS Windows When printing from a Windows application, use the Windows Forms Printer 2500 Series driver available from the Lexmark Web site at www.lexmark.com. Warning-Potential Damage: Do not touch the Network connector except when the printer is loaded. 2 With a paper...

User Manual
Page 22
... select a pitch, open the control panel to layer 2. 1 2 3 4 Power Set TOF LineFeed Macro Micro Micro Setup Pitch Lock 10 20 12 24 15 17 2 Press Pitch repeatedly until the pitch light comes on next to print. The pitch is locked until the Pitch Lock light turns off and the pitch you want is selected. 2 Close the control panel. 3 If the printer is turned off. Using the control panel 22 Disabling Pitch Lock 1 To disable Pitch Lock, press Pitch repeatedly until the printer is offline, press Start/Stop. When the Ready light comes...
... select a pitch, open the control panel to layer 2. 1 2 3 4 Power Set TOF LineFeed Macro Micro Micro Setup Pitch Lock 10 20 12 24 15 17 2 Press Pitch repeatedly until the pitch light comes on next to print. The pitch is locked until the Pitch Lock light turns off and the pitch you want is selected. 2 Close the control panel. 3 If the printer is turned off. Using the control panel 22 Disabling Pitch Lock 1 To disable Pitch Lock, press Pitch repeatedly until the printer is offline, press Start/Stop. When the Ready light comes...

User Manual
Page 26
... Top-Of-Form and begins printing. The factory default setting for paper loading instructions. 1 Turn the printer on the next page. • No data, printer control codes, or escape codes have the push tractor installed or the pull tractor installed. The light blinks. 3 Open the control panel cover to access layer 2. 4 Press Micro or Micro to move the paper to the Top-Of-Form. • The print buffer has not received data for one second. Loading paper 26 Setting the Tear Off position When Auto Tear Off is the push tractor position.
... Top-Of-Form and begins printing. The factory default setting for paper loading instructions. 1 Turn the printer on the next page. • No data, printer control codes, or escape codes have the push tractor installed or the pull tractor installed. The light blinks. 3 Open the control panel cover to access layer 2. 4 Press Micro or Micro to move the paper to the Top-Of-Form. • The print buffer has not received data for one second. Loading paper 26 Setting the Tear Off position When Auto Tear Off is the push tractor position.

User Manual
Page 36
... left margin on the paper with the [A symbol printed on solid. Loading paper 36 Note: Top-Of-Form is not saved if the printer is turned off or runs out of paper when using the pull tractor. 18 Make sure the printer is online, and the Ready light is on solid. Move the tractor to the paper width, load the paper, and then lock the right tractor. 10 Close the left and right tractor doors. 11 Replace the ribbon access cover. 12 Move the tractor to align...
... left margin on the paper with the [A symbol printed on solid. Loading paper 36 Note: Top-Of-Form is not saved if the printer is turned off or runs out of paper when using the pull tractor. 18 Make sure the printer is online, and the Ready light is on solid. Move the tractor to the paper width, load the paper, and then lock the right tractor. 10 Close the left and right tractor doors. 11 Replace the ribbon access cover. 12 Move the tractor to align...

User Manual
Page 40
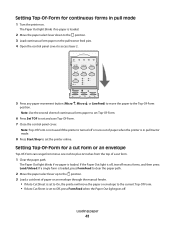
... Auto Tear Off is off, tear off . 5 Open the control panel cover to access layer 2. 1 2 3 4 Power Set TOF LineFeed Macro Micro Micro Setup Pitch Lock 10 20 12 24 15 17 6 Press any paper movement button (LineFeed, Micro , Micro ) to align the horizontal lines located on the push tractor feed pins (or the Tractor 2 feed pins if you are using the optional Tractor 2 Feeder). 4 Press FormFeed. Use the control panel to save your Top-of print. Setting Top-Of-Form for each macro enabled. The Paper Out light blinks if...
... Auto Tear Off is off, tear off . 5 Open the control panel cover to access layer 2. 1 2 3 4 Power Set TOF LineFeed Macro Micro Micro Setup Pitch Lock 10 20 12 24 15 17 6 Press any paper movement button (LineFeed, Micro , Micro ) to align the horizontal lines located on the push tractor feed pins (or the Tractor 2 feed pins if you are using the optional Tractor 2 Feeder). 4 Press FormFeed. Use the control panel to save your Top-of print. Setting Top-Of-Form for each macro enabled. The Paper Out light blinks if...
User Manual
Page 41
... forms in pull tractor mode. 8 Press Start/Stop to set the printer online. The Paper Out light blinks if no paper is loaded. If a single form is loaded, press FormFeed to clear the paper path. 2 Move the paper select lever up to the position. 3 Load a cut form. 1 Clear the paper path. Loading paper 41 If the Paper Out light is off, tear off or runs out of paper when the printer is in pull mode 1 Turn the printer on the pull tractor feed pins. 4 Open the control panel cover to access layer 2. 1 2 3 4 Power Set TOF LineFeed Macro Micro Micro Setup Pitch Lock...
... forms in pull tractor mode. 8 Press Start/Stop to set the printer online. The Paper Out light blinks if no paper is loaded. If a single form is loaded, press FormFeed to clear the paper path. 2 Move the paper select lever up to the position. 3 Load a cut form. 1 Clear the paper path. Loading paper 41 If the Paper Out light is off, tear off or runs out of paper when the printer is in pull mode 1 Turn the printer on the pull tractor feed pins. 4 Open the control panel cover to access layer 2. 1 2 3 4 Power Set TOF LineFeed Macro Micro Micro Setup Pitch Lock...

User Manual
Page 51
... available pitches listed. To print a list of all fonts. • Pitch Lock-Select Yes to your needs. Forms Macro options Note: Use Setup mode to configure the printer according to set Font Lock as the default even after the printer has been turned off and back on . • Code Page-Select one of the following options to select character option changes, as the default from the Main menu. Forms Macro Options Forms Macro Options customizes macros to print a variety of forms. Data Options Data...
... available pitches listed. To print a list of all fonts. • Pitch Lock-Select Yes to your needs. Forms Macro options Note: Use Setup mode to configure the printer according to set Font Lock as the default even after the printer has been turned off and back on . • Code Page-Select one of the following options to select character option changes, as the default from the Main menu. Forms Macro Options Forms Macro Options customizes macros to print a variety of forms. Data Options Data...

User Manual
Page 63
... Normal operating conditions. Using Hex Trace mode Hex Trace mode prints the control codes that needs to be corrected by turning the printer off and back on . Use this mode to help diagnose software/driver problems. 1 Make sure the paper is loaded, and the ribbon cartridge is in the buffer that are printing continuous forms, make sure the paper select lever is installed. 2 Turn the printer off. 3 Press and hold Tractor while turning the printer on. 4 Release Tractor when the lights go out. 5 Turn the printer off...
... Normal operating conditions. Using Hex Trace mode Hex Trace mode prints the control codes that needs to be corrected by turning the printer off and back on . Use this mode to help diagnose software/driver problems. 1 Make sure the paper is loaded, and the ribbon cartridge is in the buffer that are printing continuous forms, make sure the paper select lever is installed. 2 Turn the printer off. 3 Press and hold Tractor while turning the printer on. 4 Release Tractor when the lights go out. 5 Turn the printer off...

User Manual
Page 64
... turning the printer on , run the printer test. Contact Customer Support. Troubleshooting 64 b Turn the printer off , contact Customer Support. Note: If the printer is not beeping, there is installed correctly. The paper select lever has been changed while the paper was loaded. Make sure the Tractor 2 option is a power supply problem. a Replace the ribbon cartridge, and make sure paper is parked or unloaded before changing the position of paper. 4 Make sure the carrier packing tape has been removed. 5 With the printer on . Check...
... turning the printer on , run the printer test. Contact Customer Support. Troubleshooting 64 b Turn the printer off , contact Customer Support. Note: If the printer is not beeping, there is installed correctly. The paper select lever has been changed while the paper was loaded. Make sure the Tractor 2 option is a power supply problem. a Replace the ribbon cartridge, and make sure paper is parked or unloaded before changing the position of paper. 4 Make sure the carrier packing tape has been removed. 5 With the printer on . Check...

User Manual
Page 65
... loaded in the printer. • Make sure the factory default setting for the Uni-Dir Printing menu option is set to Off (bidirectional). • Make sure the default macro is set to adjust the alignment of the print wires. Troubleshooting 65 If the control panel light sequence returns, contact Customer Support. For more information, see "Forms Macro options" on page 51. 1 Turn the printer off . 2 Turn the printer on your printer. Control panel lights Power Ready Paper Out Font Lock All lights on solid Panel Lock Power Ready Tractor 2 Paper Out Font Lock Power...
... loaded in the printer. • Make sure the factory default setting for the Uni-Dir Printing menu option is set to Off (bidirectional). • Make sure the default macro is set to adjust the alignment of the print wires. Troubleshooting 65 If the control panel light sequence returns, contact Customer Support. For more information, see "Forms Macro options" on page 51. 1 Turn the printer off . 2 Turn the printer on your printer. Control panel lights Power Ready Paper Out Font Lock All lights on solid Panel Lock Power Ready Tractor 2 Paper Out Font Lock Power...

User Manual
Page 67
... the printer. • Make sure the printer is on a level, sturdy surface. • Close the ribbon access cover. • Close the front cover. Printer goes to the Tear Off position before the print job finishes Set Auto Tear Off to On: 1 Press Start/Stop. 2 Press and hold Tear Off until the printer beeps and the light blinks. 3 Open the control panel to access layer 2. 4 Press Micro or Micro to move the paper to the desired position. Try...
... the printer. • Make sure the printer is on a level, sturdy surface. • Close the ribbon access cover. • Close the front cover. Printer goes to the Tear Off position before the print job finishes Set Auto Tear Off to On: 1 Press Start/Stop. 2 Press and hold Tear Off until the printer beeps and the light blinks. 3 Open the control panel to access layer 2. 4 Press Micro or Micro to move the paper to the desired position. Try...

User Manual
Page 69
... problem, your software is properly shielded and correctly connected at www.lexmark.com. - Incorrect characters print, left and right tractor doors, and then remove the paper. 7 Remove the ribbon access cover to align with the paper being used. • Make sure the ribbon cartridge is correctly installed. • Clear any paper jam. • Turn the printer off . 2 Detach any torn paper. 8 Remove torn perforation strips or bits of the Main menu. • Select another pitch from the Lexmark Web site at both ends. • Select the correct driver...
... problem, your software is properly shielded and correctly connected at www.lexmark.com. - Incorrect characters print, left and right tractor doors, and then remove the paper. 7 Remove the ribbon access cover to align with the paper being used. • Make sure the ribbon cartridge is correctly installed. • Clear any paper jam. • Turn the printer off . 2 Detach any torn paper. 8 Remove torn perforation strips or bits of the Main menu. • Select another pitch from the Lexmark Web site at both ends. • Select the correct driver...
User Manual
Page 73
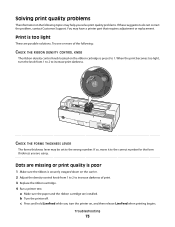
... solve print quality problems. If these suggestions do not correct the problem, contact Customer Support. Try one or more of print. 3 Replace the ribbon cartridge. 4 Run a printer test. b Turn the printer off. Print is preset to 1. If so, move it to the correct number for the form thickness you are using...Dots are missing or print quality is poor 1 Make sure the ribbon is securely snapped down on the carrier. 2 Adjust the density control knob...
... solve print quality problems. If these suggestions do not correct the problem, contact Customer Support. Try one or more of print. 3 Replace the ribbon cartridge. 4 Run a printer test. b Turn the printer off. Print is preset to 1. If so, move it to the correct number for the form thickness you are using...Dots are missing or print quality is poor 1 Make sure the ribbon is securely snapped down on the carrier. 2 Adjust the density control knob...

User Manual
Page 81
... not warrant uninterrupted or error-free operation of any product or the durability or longevity of the Remarketer or Lexmark. Limited warranty service The warranty period starts on the date of original purchase as toners and inks), software, or interfaces not furnished by Lexmark Notices 81 Remote technical support is not free of all print cartridges, programs, data, and removable storage media (unless directed...
... not warrant uninterrupted or error-free operation of any product or the durability or longevity of the Remarketer or Lexmark. Limited warranty service The warranty period starts on the date of original purchase as toners and inks), software, or interfaces not furnished by Lexmark Notices 81 Remote technical support is not free of all print cartridges, programs, data, and removable storage media (unless directed...

User Manual
Page 83
... 60 A aligning left margin 39 B bidirectional alignment adjusting 65 buttons, control panel printer status 17 C calling Customer Support 75 character alignment adjusting 65 checking an unresponsive printer 62 cleaning printer 57 contacting Customer Support 75 continuous forms bottom loading 32 front loading 29 loading 26 Control options 54 control panel button functions 17 lights 19 locking 20 unlocking 20 control panel overlays applying 9 converting pull tractor 46 push tractor 44 cut form loading 37 D Data options 52 demonstration page, printing 13 disabling font lock 21 pitch lock 22 DOS...
... 60 A aligning left margin 39 B bidirectional alignment adjusting 65 buttons, control panel printer status 17 C calling Customer Support 75 character alignment adjusting 65 checking an unresponsive printer 62 cleaning printer 57 contacting Customer Support 75 continuous forms bottom loading 32 front loading 29 loading 26 Control options 54 control panel button functions 17 lights 19 locking 20 unlocking 20 control panel overlays applying 9 converting pull tractor 46 push tractor 44 cut form loading 37 D Data options 52 demonstration page, printing 13 disabling font lock 21 pitch lock 22 DOS...
User Manual
Page 84
... paper feed, troubleshooting Auto Sheet Feeder feeds at incorrect rate 71 paper paths pull tractor 25 push tractor 25 paper sizes supported by the printer 43 paper types supported by the printer 43 pitch locking 22 selecting 22 pitch lock disabling 22 print quality troubleshooting characters are wrong or missing 74 dots are missing or print quality is poor 73 graphics do not print 74 incorrect line length 68 incorrect line spacing or overprinting occurs 75 incorrect number of lines on a page 74 lines do not start at left margin...
... paper feed, troubleshooting Auto Sheet Feeder feeds at incorrect rate 71 paper paths pull tractor 25 push tractor 25 paper sizes supported by the printer 43 paper types supported by the printer 43 pitch locking 22 selecting 22 pitch lock disabling 22 print quality troubleshooting characters are wrong or missing 74 dots are missing or print quality is poor 73 graphics do not print 74 incorrect line length 68 incorrect line spacing or overprinting occurs 75 incorrect number of lines on a page 74 lines do not start at left margin...

