Lenovo H3 Series Hardware Maintenance Manual V2.0
Page 2
... the hard disk drive 37 Replacing the system fan 39 Replacing the heat sink 41 Replacing the CPU 42 Replacing the graphic card 45 Replacing the audio & USB connectors 46 Replacing the card reader module 46 Replacing the motherboard 47 Replacing the Power supply 48 Replacing the keyboard 50 Replacing the mouse 51...
... the hard disk drive 37 Replacing the system fan 39 Replacing the heat sink 41 Replacing the CPU 42 Replacing the graphic card 45 Replacing the audio & USB connectors 46 Replacing the card reader module 46 Replacing the motherboard 47 Replacing the Power supply 48 Replacing the keyboard 50 Replacing the mouse 51...
Lenovo H3 Series Hardware Maintenance Manual V2.0
Page 47
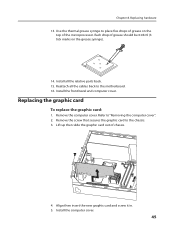
... computer cover". 2. Remove the computer cover. Install the front bezel and computer cover. Refer to the motherboard. 16. Replacing the graphic card To replace the graphic card: 1. Remove the screw that secures the graphic card to place five drops of grease on the grease syringe). 14. Each drop of grease should be 0.03ml (3 tick marks on...
... computer cover". 2. Remove the computer cover. Install the front bezel and computer cover. Refer to the motherboard. 16. Replacing the graphic card To replace the graphic card: 1. Remove the screw that secures the graphic card to place five drops of grease on the grease syringe). 14. Each drop of grease should be 0.03ml (3 tick marks on...
Lenovo H3 Series Hardware Maintenance Manual V2.0
Page 48
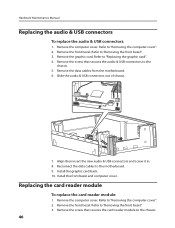
... audio & USB connectors: 1. Remove the front bezel. Remove the screw that secures the card reader module to the chassis. 5. Install the graphic card back. 10. Remove the graphic card. Install the front bezel and computer cover. Slide the audio & USB connectors out of chassis..."Removing the computer cover". 2. Refer to "Removing the front bezel". 3. Replacing the card reader module To replace the card reader module: 1. Remove the computer cover. Refer to "Replacing the graphic card". 4. Remove the computer cover. Align then insert the new audio & USB connectors and...
... audio & USB connectors: 1. Remove the front bezel. Remove the screw that secures the card reader module to the chassis. 5. Install the graphic card back. 10. Remove the graphic card. Install the front bezel and computer cover. Slide the audio & USB connectors out of chassis..."Removing the computer cover". 2. Refer to "Removing the front bezel". 3. Replacing the card reader module To replace the card reader module: 1. Remove the computer cover. Refer to "Replacing the graphic card". 4. Remove the computer cover. Align then insert the new audio & USB connectors and...

Lenovo H3 Series Hardware Maintenance Manual V2.0
Page 50
Refer to "Replacing the heatsink". 8. Refer to "Replacing the system fan". 7. Remove the graphic card. Refer to "Replacing the optical disk drive". 4. Install all the cables from the motherboard. 12. Remove the optical disk drive. Refer to "Replacing ...the CPU". 10. Remove the heatsink. Refer to the new motherboard. 15. Reconnect all the cables to "Replacing the graphic card". 9. Hardware Maintenance Manual 6. Refer to "Replacing the hard disk drive". 48 Remove the hard disk drive. Remove all the relative parts back. 16. ...
Refer to "Replacing the heatsink". 8. Refer to "Replacing the system fan". 7. Remove the graphic card. Refer to "Replacing the optical disk drive". 4. Install all the cables from the motherboard. 12. Remove the optical disk drive. Refer to "Replacing ...the CPU". 10. Remove the heatsink. Refer to the new motherboard. 15. Reconnect all the cables to "Replacing the graphic card". 9. Hardware Maintenance Manual 6. Refer to "Replacing the hard disk drive". 48 Remove the hard disk drive. Remove all the relative parts back. 16. ...

Lenovo H3 Series Hardware Maintenance Manual V2.0
Page 51
Refer to "Replacing the motherboard". 11. Refer to "Replacing a memory module". 8. Refer to "Replacing the graphic card". 9. Remove the memory module. Refer to "Replacing the system fan". 6. Remove the heatsink. Refer to the chassis. 49 Remove the 5 screws that secure the Power supply to "Replacing the heatsink". 7. Remove the motherboard. Remove the graphic card. Remove the CPU. Refer to "Replacing the CPU". 10. Chapter 8. Replacing hardware 5. Remove the system fan.
Refer to "Replacing the motherboard". 11. Refer to "Replacing a memory module". 8. Refer to "Replacing the graphic card". 9. Remove the memory module. Refer to "Replacing the system fan". 6. Remove the heatsink. Refer to the chassis. 49 Remove the 5 screws that secure the Power supply to "Replacing the heatsink". 7. Remove the motherboard. Remove the graphic card. Remove the CPU. Refer to "Replacing the CPU". 10. Chapter 8. Replacing hardware 5. Remove the system fan.
Lenovo H330 User Guide V2.0
Page 29
Check that the signal cable to the monitor is securely connected to the connector on the computer graphics card; Check to see the program's documentation. From here, select the appropriate options to the monitor. 3. if not, press the Power button. 2. if not, shut down ... and colors by using Display Settings options. 24 User Guide This message may not apply if you set your computer: • If you troubleshoot your Lenovo® computer to the Windows Classic view. 4.1 Troubleshooting Display Problems Problem: Blank screen or no image is displayed on the monitor.
Check that the signal cable to the monitor is securely connected to the connector on the computer graphics card; Check to see the program's documentation. From here, select the appropriate options to the monitor. 3. if not, press the Power button. 2. if not, shut down ... and colors by using Display Settings options. 24 User Guide This message may not apply if you set your computer: • If you troubleshoot your Lenovo® computer to the Windows Classic view. 4.1 Troubleshooting Display Problems Problem: Blank screen or no image is displayed on the monitor.


