Hardware Maintenance Manual
Page 5
... ThinkPad X60, X60s, X61, and X61s . . 37 Product overview 38 Specifications 38 Status indicators for X60, X60s, X61, and X61s . . 41 FRU tests 43 Fn key ...combinations 45 Symptom-to-FRU index 47 Numeric error codes 47 Error messages 51 Beep symptoms 53 No-beep symptoms 53 LCD-related symptoms 54 Intermittent problems 55 Undetermined problems 55 FRU replacement notices 56 Screw notices 56 © Copyright Lenovo... . 78 1130 MDC 81 1140 Backup battery 82 1150 Second Fan 83 1160 Speaker 84 1170 DC-in and RJ-11 connectors 85 1180...
... ThinkPad X60, X60s, X61, and X61s . . 37 Product overview 38 Specifications 38 Status indicators for X60, X60s, X61, and X61s . . 41 FRU tests 43 Fn key ...combinations 45 Symptom-to-FRU index 47 Numeric error codes 47 Error messages 51 Beep symptoms 53 No-beep symptoms 53 LCD-related symptoms 54 Intermittent problems 55 Undetermined problems 55 FRU replacement notices 56 Screw notices 56 © Copyright Lenovo... . 78 1130 MDC 81 1140 Backup battery 82 1150 Second Fan 83 1160 Speaker 84 1170 DC-in and RJ-11 connectors 85 1180...
Hardware Maintenance Manual
Page 11
...-CTO). v Remember, all customers. Business Partners will enter Loc ID, MT and Serial, and the key commodities will be accessed at the following Web site: http://www.lenovo.com/ support v To view the key commodities, click on the eSupport site.) v The HMM will be used to support CTO, CMV, and...also access PEW via http://www-307.ibm.com/pc/support/site.wss/product.do?template=/warranty/ warranty.vm&sitestyle=lenovo Select Warranty lookup. The MTM portion of key commodities are loaded in the eSupport record under SYSTEM DETAILS. An example of the machine label is the same ...
...-CTO). v Remember, all customers. Business Partners will enter Loc ID, MT and Serial, and the key commodities will be accessed at the following Web site: http://www.lenovo.com/ support v To view the key commodities, click on the eSupport site.) v The HMM will be used to support CTO, CMV, and...also access PEW via http://www-307.ibm.com/pc/support/site.wss/product.do?template=/warranty/ warranty.vm&sitestyle=lenovo Select Warranty lookup. The MTM portion of key commodities are loaded in the eSupport record under SYSTEM DETAILS. An example of the machine label is the same ...

Hardware Maintenance Manual
Page 30
... that are not covered under warranty and some symptoms that might indicate that have been subjected to excessive force, or dropped. 24 ThinkPad® X60, X60s, X61, and X61s Before checking problems with multiple labels v Damaged or bent diskette eject button v Fuses blown by attachment of... a nonsupported device v Forgotten computer password (making the computer unusable) v Sticky keys caused by spilling a liquid onto the keyboard v Use of an ...
... that are not covered under warranty and some symptoms that might indicate that have been subjected to excessive force, or dropped. 24 ThinkPad® X60, X60s, X61, and X61s Before checking problems with multiple labels v Damaged or bent diskette eject button v Fuses blown by attachment of... a nonsupported device v Forgotten computer password (making the computer unusable) v Sticky keys caused by spilling a liquid onto the keyboard v Use of an ...
Hardware Maintenance Manual
Page 33
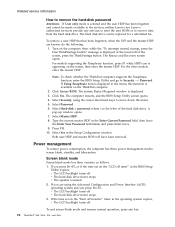
... on the computer and wait until the POST ends. Select Security, using the cursor directional keys to remove the battery pack, see "1140 Backup battery" on page 82. 4. Press...Enter New Password field blank, and press Enter twice. 8. Turn on the ThinkPad computer. 2. Note: To check whether the ThinkPad computer supports the Passphrase function, enter the BIOS Setup Utility and go to ...been removed. 5. Type the current SVP in the menu, this function is available, neither Lenovo nor Lenovo authorized servicers provide any services to reset either the user or the master HDP, or ...
... on the computer and wait until the POST ends. Select Security, using the cursor directional keys to remove the battery pack, see "1140 Backup battery" on page 82. 4. Press...Enter New Password field blank, and press Enter twice. 8. Turn on the ThinkPad computer. 2. Note: To check whether the ThinkPad computer supports the Passphrase function, enter the BIOS Setup Utility and go to ...been removed. 5. Type the current SVP in the menu, this function is available, neither Lenovo nor Lenovo authorized servicers provide any services to reset either the user or the master HDP, or ...
Hardware Maintenance Manual
Page 34
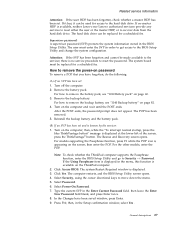
...drive. then, while the "To interrupt normal startup, press the blue ThinkVantage button" message is available on the computer; Note: To check whether the ThinkPad computer supports the Passphrase function, enter the BIOS Setup Utility and go to Security --> Password. If you are known, do the following: 1. v The... to move down the menu. 5. Click Yes. Select Master HDP. 8. The hard disk drive can be made available to the servicer, neither Lenovo nor Lenovo authorized servicers provide any key. 28 ThinkPad® X60, X60s, X61, and X61s v The speaker is displayed. 3.
...drive. then, while the "To interrupt normal startup, press the blue ThinkVantage button" message is available on the computer; Note: To check whether the ThinkPad computer supports the Passphrase function, enter the BIOS Setup Utility and go to Security --> Password. If you are known, do the following: 1. v The... to move down the menu. 5. Click Yes. Select Master HDP. 8. The hard disk drive can be made available to the servicer, neither Lenovo nor Lenovo authorized servicers provide any key. 28 ThinkPad® X60, X60s, X61, and X61s v The speaker is displayed. 3.
Hardware Maintenance Manual
Page 35
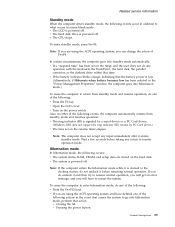
... and then try to resume normal operation, you will get an error message, and you can change the action of the following: v Press the Fn key. v If you are using the ACPI operating system, you will have defined one of Fn+F4. Pressing the power button. To enter standby mode, press... operating system and have to go into hibernation mode.) To cause the computer to what occurs in either of the following: v Press the Fn+F12 keys.
... and then try to resume normal operation, you will get an error message, and you can change the action of the following: v Press the Fn key. v If you are using the ACPI operating system, you will have defined one of Fn+F4. Pressing the power button. To enter standby mode, press... operating system and have to go into hibernation mode.) To cause the computer to what occurs in either of the following: v Press the Fn+F12 keys.
Hardware Maintenance Manual
Page 36
... goes into hibernation mode automatically in suspend mode. Pressing Fn+F4 keys. v If the timer conditions are satisfied in either of the following conditions: v If a "hibernation time" has been set on , the computer returns from the hard disk drive. 30 ThinkPad® X60, X60s, X61, and X61s The hibernation file in the boot record...
... goes into hibernation mode automatically in suspend mode. Pressing Fn+F4 keys. v If the timer conditions are satisfied in either of the following conditions: v If a "hibernation time" has been set on , the computer returns from the hard disk drive. 30 ThinkPad® X60, X60s, X61, and X61s The hibernation file in the boot record...
Hardware Maintenance Manual
Page 38
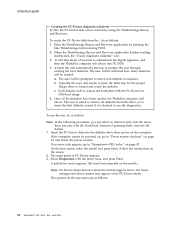
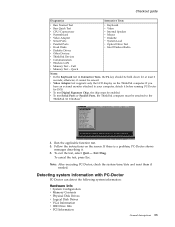
... test menu are as follows: Note: In the following procedure, you can be erased and formatted with the TrackPoint. Select Diagnostics with the arrow keys, and press Enter. It will be informed how many diskettes will reboot into the diskette drive; A batch file will reboot. On the first ...the diskette. Instead of PC-Doctor appears. 3. Follow the instructions on the computer. Once all diskettes from the , do as follows: 32 ThinkPad® X60, X60s, X61, and X61s To create the PC-Doctor disk from the drive, or to insert the first diskette created if it is asked to remove...
... test menu are as follows: Note: In the following procedure, you can be erased and formatted with the TrackPoint. Select Diagnostics with the arrow keys, and press Enter. It will be informed how many diskettes will reboot into the diskette drive; A batch file will reboot. On the first ...the diskette. Instead of PC-Doctor appears. 3. Follow the instructions on the computer. Once all diskettes from the , do as follows: 32 ThinkPad® X60, X60s, X61, and X61s To create the PC-Doctor disk from the drive, or to insert the first diskette created if it is asked to remove...
Hardware Maintenance Manual
Page 39
... Video Adapter Serial Ports Parallel Ports Fixed Disks Diskette Drives Other Devices ZIP Drive Communication Memory Test - Use the cursor keys and ESC to your computer, detach it . 6. To cancel the test, press Esc. Exit Diag. Checkout guide.../Coprocessor v Systemboard v Video Adapter v Serial Ports v Parallel Ports v Fixed Disks v Diskette Drives v Other Devices v ThinkPad Devices v Communication v Wireless LAN v Memory Test - Follow the instructions on the ThinkPad computer. Quick v Keyboard v Video v Internal Speaker v Mouse v Diskette v System Load v Optical Drive Test v Intel...
... Video Adapter Serial Ports Parallel Ports Fixed Disks Diskette Drives Other Devices ZIP Drive Communication Memory Test - Use the cursor keys and ESC to your computer, detach it . 6. To cancel the test, press Esc. Exit Diag. Checkout guide.../Coprocessor v Systemboard v Video Adapter v Serial Ports v Parallel Ports v Fixed Disks v Diskette Drives v Other Devices v ThinkPad Devices v Communication v Wireless LAN v Memory Test - Follow the instructions on the ThinkPad computer. Quick v Keyboard v Video v Internal Speaker v Mouse v Diskette v System Load v Optical Drive Test v Intel...
Hardware Maintenance Manual
Page 43
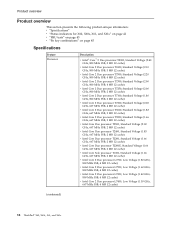
ThinkPad X60, X60s, X61, and X61s Product overview 38 Specifications 38 Status indicators for X60, X60s, X61, and X61s . . 41 FRU tests 43 Fn key combinations 45 Symptom-to-FRU index 47 Numeric error codes 47 Error messages 51 Beep ... card 77 1120 Wireless LAN PCI Express Mini card . . . 78 1130 MDC 81 1140 Backup battery 82 1150 Second Fan 83 1160 Speaker 84 1170 DC-in and RJ-11 connectors 85 1180 LCD assembly 86 1190 Hard disk sub-card 92 1200 System... 231 Common parts list 232 Tools 232 Power cords 232 Notices 234 Trademarks 235 © Copyright Lenovo 2007, 2008 37
ThinkPad X60, X60s, X61, and X61s Product overview 38 Specifications 38 Status indicators for X60, X60s, X61, and X61s . . 41 FRU tests 43 Fn key combinations 45 Symptom-to-FRU index 47 Numeric error codes 47 Error messages 51 Beep ... card 77 1120 Wireless LAN PCI Express Mini card . . . 78 1130 MDC 81 1140 Backup battery 82 1150 Second Fan 83 1160 Speaker 84 1170 DC-in and RJ-11 connectors 85 1180 LCD assembly 86 1190 Hard disk sub-card 92 1200 System... 231 Common parts list 232 Tools 232 Power cords 232 Notices 234 Trademarks 235 © Copyright Lenovo 2007, 2008 37
Hardware Maintenance Manual
Page 44
... Core 2 Duo processor L7700, Low Voltage (1.80 GHz, 800 MHz FSB, 4 MB L2 cache) v Intel Core 2 Duo processor L7500, Low Voltage (1.60 GHz, 800 MHz FSB, 4 MB L2 cache) v Intel Core 2 Duo processor L7300, Low Voltage (1.40 GHz, 800 MHz FSB, 4 MB L2 cache) v Intel Core 2 Duo processor L7400, Low Voltage (1.50 GHz, 667 MHz FSB, 4 MB L2 cache) (continued) 38 ThinkPad® X60, X60s...
... Core 2 Duo processor L7700, Low Voltage (1.80 GHz, 800 MHz FSB, 4 MB L2 cache) v Intel Core 2 Duo processor L7500, Low Voltage (1.60 GHz, 800 MHz FSB, 4 MB L2 cache) v Intel Core 2 Duo processor L7300, Low Voltage (1.40 GHz, 800 MHz FSB, 4 MB L2 cache) v Intel Core 2 Duo processor L7400, Low Voltage (1.50 GHz, 667 MHz FSB, 4 MB L2 cache) (continued) 38 ThinkPad® X60, X60s...

Hardware Maintenance Manual
Page 48
...Wireless LAN status Meaning Green: Wireless is operational and radio on the keyboard is enabled. Green: Caps Lock mode is resuming normal operation. 42 ThinkPad® X60, X60s, X61, and X61s Note: Do not move the system while the Green drive in use light is on 8 Battery status 9 AC power status... ready to operate. (At regular intervals, the indicator light turns off the computer. To enable or disable Caps Lock mode, press the Caps Lock key. 6 Drive in suspend mode. 3 Wireless WAN Green: Wireless is on ac power. Green: The computer is being read from or written to be...
...Wireless LAN status Meaning Green: Wireless is operational and radio on the keyboard is enabled. Green: Caps Lock mode is resuming normal operation. 42 ThinkPad® X60, X60s, X61, and X61s Note: Do not move the system while the Green drive in use light is on 8 Battery status 9 AC power status... ready to operate. (At regular intervals, the indicator light turns off the computer. To enable or disable Caps Lock mode, press the Caps Lock key. 6 Drive in suspend mode. 3 Wireless WAN Green: Wireless is on ac power. Green: The computer is being read from or written to be...
Hardware Maintenance Manual
Page 51
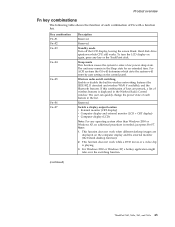
... Extend desktop function). 2. The user can quickly change the power state of each combination of Fn with a function key. For Windows 2000 or Windows XP, a hotkey application might take over the switching function. (continued) ThinkPad X60, X60s, X61, and X61s 45 Reserved. To turn the LCD display on /off the LCD display, leaving the...
... Extend desktop function). 2. The user can quickly change the power state of each combination of Fn with a function key. For Windows 2000 or Windows XP, a hotkey application might take over the switching function. (continued) ThinkPad X60, X60s, X61, and X61s 45 Reserved. To turn the LCD display on /off the LCD display, leaving the...

Hardware Maintenance Manual
Page 52
...have been installed on . Reserved. FullScreen magnifier Enable the FullScreen Magnifier function. 46 ThinkPad® X60, X60s, X61, and X61s v Pointer Options: User can open the ThinkPad EasyEject Utility main window. LCD brightness down The LCD becomes less bright. Product overview Key combination Fn+F8 Fn+F9 Fn+F10 Fn+F11 Fn+F12 Fn+Home... function. v Pointers: User is supported only in Windows XP and Windows 2000. Hibernation Turn hibernation mode on the computer. Issue device ejection Opens the ThinkPad EasyEject Utility screen. Note: This function is able to the...
...have been installed on . Reserved. FullScreen magnifier Enable the FullScreen Magnifier function. 46 ThinkPad® X60, X60s, X61, and X61s v Pointer Options: User can open the ThinkPad EasyEject Utility main window. LCD brightness down The LCD becomes less bright. Product overview Key combination Fn+F8 Fn+F9 Fn+F10 Fn+F11 Fn+F12 Fn+Home... function. v Pointers: User is supported only in Windows XP and Windows 2000. Hibernation Turn hibernation mode on the computer. Issue device ejection Opens the ThinkPad EasyEject Utility screen. Note: This function is able to the...
Hardware Maintenance Manual
Page 73
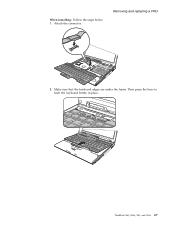
ThinkPad X60, X60s, X61, and X61s 67 Removing and replacing a FRU 2. When installing: Follow the steps below. 1. Then press the keys to latch the keyboard firmly in place. Attach the connector. Make sure that the keyboard edges are under the frame.
ThinkPad X60, X60s, X61, and X61s 67 Removing and replacing a FRU 2. When installing: Follow the steps below. 1. Then press the keys to latch the keyboard firmly in place. Attach the connector. Make sure that the keyboard edges are under the frame.
Hardware Maintenance Manual
Page 74
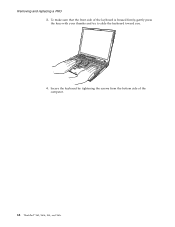
To make sure that the front side of the computer. 68 ThinkPad® X60, X60s, X61, and X61s Secure the keyboard by tightening the screws from the bottom side of the keyboard is housed firmly, gently press the keys with your thumbs and try to slide the keyboard toward you. 4. Removing and replacing a FRU 3.
To make sure that the front side of the computer. 68 ThinkPad® X60, X60s, X61, and X61s Secure the keyboard by tightening the screws from the bottom side of the keyboard is housed firmly, gently press the keys with your thumbs and try to slide the keyboard toward you. 4. Removing and replacing a FRU 3.

Hardware Maintenance Manual
Page 128
Locations Rear View for ThinkPad X6 UltraBase 1 AC power connector 2 USB connectors 3 External monitor connector 4 Serial connector 5 Parallel connectors 6 Stereo headphone jack 7 Microphone jack 8 Ethernet connector 9 Modem connector 10 Security lock key 11 Ultrabay latch 12 Ultrabay...drive. 13 Docking connector 13 1 2 3 12 4 11 10 5 6 98 7 Bottom View for ThinkPad X6 UltraBase 1 Leg 2 Security keyhole 3 USB connectors 4 Docking indicators 5 Docking release 6 Stereo speakers 7 Power switch 1 7 6 122 ThinkPad® X60, X60s, X61, and X61s 2 3 4 5
Locations Rear View for ThinkPad X6 UltraBase 1 AC power connector 2 USB connectors 3 External monitor connector 4 Serial connector 5 Parallel connectors 6 Stereo headphone jack 7 Microphone jack 8 Ethernet connector 9 Modem connector 10 Security lock key 11 Ultrabay latch 12 Ultrabay...drive. 13 Docking connector 13 1 2 3 12 4 11 10 5 6 98 7 Bottom View for ThinkPad X6 UltraBase 1 Leg 2 Security keyhole 3 USB connectors 4 Docking indicators 5 Docking release 6 Stereo speakers 7 Power switch 1 7 6 122 ThinkPad® X60, X60s, X61, and X61s 2 3 4 5


