Hardware Maintenance Manual
Page 5
...replacement notices 56 Screw notices 56 © Copyright Lenovo 2007, 2008 Retaining serial numbers 56 Removing and replacing a FRU 59 1010 Battery pack 60 1020 Hard disk drive (2.5-inch) ...Wireless LAN PCI Express Mini card . . . 78 1130 MDC 81 1140 Backup battery 82 1150 Second Fan 83 1160 Speaker 84 1170 DC-in and RJ-11 connectors 85 1180 LCD assembly ...view for ThinkPad X60, X60s, X61, and X61s 119 Rear view for ThinkPad X60, X60s, X61, and X61s 120 Bottom view for ThinkPad X60, X60s, X61, and X61s 121 Rear View for ThinkPad X6 UltraBase . . . . 122 Bottom View for ThinkPad X6 ...
...replacement notices 56 Screw notices 56 © Copyright Lenovo 2007, 2008 Retaining serial numbers 56 Removing and replacing a FRU 59 1010 Battery pack 60 1020 Hard disk drive (2.5-inch) ...Wireless LAN PCI Express Mini card . . . 78 1130 MDC 81 1140 Backup battery 82 1150 Second Fan 83 1160 Speaker 84 1170 DC-in and RJ-11 connectors 85 1180 LCD assembly ...view for ThinkPad X60, X60s, X61, and X61s 119 Rear view for ThinkPad X60, X60s, X61, and X61s 120 Bottom view for ThinkPad X60, X60s, X61, and X61s 121 Rear View for ThinkPad X6 UltraBase . . . . 122 Bottom View for ThinkPad X6 ...

Hardware Maintenance Manual
Page 24
...Send another person to the safety of any non-ThinkPad alterations. 7. This guide addresses only those items. ... Motor generators and similar units. (This practice ensures correct grounding of non-ThinkPad features or options not covered by this inspection guide is to assist you...were installed to measure third-wire ground continuity for any obvious non-ThinkPad alterations. Use a meter to protect users and service personnel from ... and whether you in the parts list. Check for cracked or bulging batteries. 5. If any potentially unsafe conditions, use good judgment to identify potential...
...Send another person to the safety of any non-ThinkPad alterations. 7. This guide addresses only those items. ... Motor generators and similar units. (This practice ensures correct grounding of non-ThinkPad features or options not covered by this inspection guide is to assist you...were installed to measure third-wire ground continuity for any obvious non-ThinkPad alterations. Use a meter to protect users and service personnel from ... and whether you in the parts list. Check for cracked or bulging batteries. 5. If any potentially unsafe conditions, use good judgment to identify potential...
Hardware Maintenance Manual
Page 40
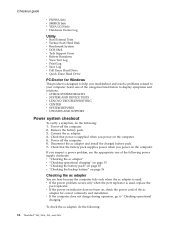
... is designed to help you troubleshoot and resolve problems related to display symptoms and solutions: v CHECK SYSTEM HEALTH v SYSTEM AND DEVICE TESTS v LENOVO TROUBLESHOOTING v CENTER v SYSTEM REPORTS v UPDATES AND SUPPORT Power system checkout To verify a symptom, do the following power supply checkouts: v "... listed below to your computer. If you suspect a power problem, see the appropriate one of the following : 34 ThinkPad® X60, X60s, X61, and X61s Remove the battery pack. 3. Power off the computer. 2. v If the computer does not charge during operation, go to ″...
... is designed to help you troubleshoot and resolve problems related to display symptoms and solutions: v CHECK SYSTEM HEALTH v SYSTEM AND DEVICE TESTS v LENOVO TROUBLESHOOTING v CENTER v SYSTEM REPORTS v UPDATES AND SUPPORT Power system checkout To verify a symptom, do the following power supply checkouts: v "... listed below to your computer. If you suspect a power problem, see the appropriate one of the following : 34 ThinkPad® X60, X60s, X61, and X61s Remove the battery pack. 3. Power off the computer. 2. v If the computer does not charge during operation, go to ″...
Hardware Maintenance Manual
Page 42
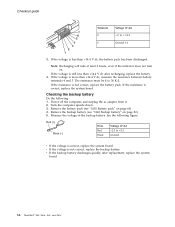
If the voltage is more than +14.4 V dc, measure the resistance between battery terminals 4 and 5. If the voltage is less than +14.4 V dc after replacement, replace the system board. 36 ThinkPad® X60, X60s, X61, and X61s Power off the computer, and unplug the ac adapter from ...it. 2. If the resistance is not correct, replace the battery pack. Remove the battery pack (see "1140 Backup battery" on page 82). 5. See the following : ...
If the voltage is more than +14.4 V dc, measure the resistance between battery terminals 4 and 5. If the voltage is less than +14.4 V dc after replacement, replace the system board. 36 ThinkPad® X60, X60s, X61, and X61s Power off the computer, and unplug the ac adapter from ...it. 2. If the resistance is not correct, replace the battery pack. Remove the battery pack (see "1140 Backup battery" on page 82). 5. See the following : ...
Hardware Maintenance Manual
Page 43
... Memory card 77 1120 Wireless LAN PCI Express Mini card . . . 78 1130 MDC 81 1140 Backup battery 82 1150 Second Fan 83 1160 Speaker 84 1170 DC-in and RJ-11 connectors 85 1180 LCD assembly 86 1190 Hard disk sub-... 117 Locations 119 Front view for ThinkPad X60, X60s, X61, and X61s 119 Rear view for ThinkPad X60, X60s, X61, and X61s 120 Bottom view for ThinkPad X60, X60s, X61, and X61s 121 Rear View for ThinkPad X6 UltraBase . . . . 122 Bottom View for ThinkPad X6 UltraBase . . . 122 ... 232 Tools 232 Power cords 232 Notices 234 Trademarks 235 © Copyright Lenovo 2007, 2008 37
... Memory card 77 1120 Wireless LAN PCI Express Mini card . . . 78 1130 MDC 81 1140 Backup battery 82 1150 Second Fan 83 1160 Speaker 84 1170 DC-in and RJ-11 connectors 85 1180 LCD assembly 86 1190 Hard disk sub-... 117 Locations 119 Front view for ThinkPad X60, X60s, X61, and X61s 119 Rear view for ThinkPad X60, X60s, X61, and X61s 120 Bottom view for ThinkPad X60, X60s, X61, and X61s 121 Rear View for ThinkPad X6 UltraBase . . . . 122 Bottom View for ThinkPad X6 UltraBase . . . 122 ... 232 Tools 232 Power cords 232 Notices 234 Trademarks 235 © Copyright Lenovo 2007, 2008 37

Hardware Maintenance Manual
Page 46
... v Stereo headphone jack v 56.6 Kbps v Internal monaural speaker v Software control volume v IrDA 1.1 Note: The infrared port is only for ThinkPad X60s and X61s computer. The standard and hybrid batteries require a spacer when used with ThinkPad X60s and X61s computer. v Windows XP Professional v Windows XP Home Edition v Windows Vista™ Business (32 bit) v Windows Vista Business...
... v Stereo headphone jack v 56.6 Kbps v Internal monaural speaker v Software control volume v IrDA 1.1 Note: The infrared port is only for ThinkPad X60s and X61s computer. The standard and hybrid batteries require a spacer when used with ThinkPad X60s and X61s computer. v Windows XP Professional v Windows XP Home Edition v Windows Vista™ Business (32 bit) v Windows Vista Business...

Hardware Maintenance Manual
Page 48
...the computer is on and is not in suspend mode. 3 Wireless WAN Green: Wireless is operational and radio on state. Blinking orange: The battery needs to operate. (At regular intervals, the indicator light turns off the computer. When the indicator starts blinking orange, the computer beeps three... times. Green: Caps Lock mode is resuming normal operation. 42 ThinkPad® X60, X60s, X61, and X61s Green: The computer is on and ready to the hard disk drive, or the drive in standby mode. Blinking green...
...the computer is on and is not in suspend mode. 3 Wireless WAN Green: Wireless is operational and radio on state. Blinking orange: The battery needs to operate. (At regular intervals, the indicator light turns off the computer. When the indicator starts blinking orange, the computer beeps three... times. Green: Caps Lock mode is resuming normal operation. 42 ThinkPad® X60, X60s, X61, and X61s Green: The computer is on and ready to the hard disk drive, or the drive in standby mode. Blinking green...
Hardware Maintenance Manual
Page 49
Diagnostics --> Systemboard 3. Power Diagnostics --> ThinkPad Devices --> AC Adapter, Battery 1 (Battery 2) LCD unit 1. Interactive Tests --> Video Modem, MDC1.5 1. Diagnostics --> Systemboard --> Keyboard 2. After you use the TrackPoint, the pointer ...drift can occur when a slight, steady pressure is disabled, select Enable to the ThinkPad computer, undock it . This symptom is necessary. Product overview FRU tests The following : v Interactive Tests --> Mouse (continued) ThinkPad X60, X60s, X61, and X61s 43 Interactive Tests --> Keyboard TrackPoint or pointing If the TrackPoint...
Diagnostics --> Systemboard 3. Power Diagnostics --> ThinkPad Devices --> AC Adapter, Battery 1 (Battery 2) LCD unit 1. Interactive Tests --> Video Modem, MDC1.5 1. Diagnostics --> Systemboard --> Keyboard 2. After you use the TrackPoint, the pointer ...drift can occur when a slight, steady pressure is disabled, select Enable to the ThinkPad computer, undock it . This symptom is necessary. Product overview FRU tests The following : v Interactive Tests --> Mouse (continued) ThinkPad X60, X60s, X61, and X61s 43 Interactive Tests --> Keyboard TrackPoint or pointing If the TrackPoint...

Hardware Maintenance Manual
Page 54
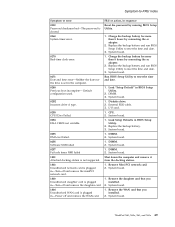
...System board. 01C8 Two or more modem devices are found. Press to reset the time and date. 48 ThinkPad® X60, X60s, X61, and X61s Remove one specified in sequence 0190 Critical low-battery error 1. Load Setup Defaults in BIOS Setup Utility. 0230 Shadow RAM error-Shadow RAM fails at offset ...hard disk is dead. 1. Reseat the hard disk drive. 2. Extended RAM error- Extended RAM fails 2. at offset nnnn. 1. Replace the backup battery and run BIOS Setup Utility to reset the time and date. 0251 System CMOS checksum bad- System board. 0199 System Security- Remove all but one...
...System board. 01C8 Two or more modem devices are found. Press to reset the time and date. 48 ThinkPad® X60, X60s, X61, and X61s Remove one specified in sequence 0190 Critical low-battery error 1. Load Setup Defaults in BIOS Setup Utility. 0230 Shadow RAM error-Shadow RAM fails at offset ...hard disk is dead. 1. Reseat the hard disk drive. 2. Extended RAM error- Extended RAM fails 2. at offset nnnn. 1. Replace the backup battery and run BIOS Setup Utility to reset the time and date. 0251 System CMOS checksum bad- System board. 0199 System Security- Remove all but one...
Hardware Maintenance Manual
Page 55
... run BIOS Setup Utility to reset the time and date. 3. Diskette drive. 2. CPU. 2. Replace the backup battery. 3. System board. 1. ThinkPad X60, X60s, X61, and X61s 49 Charge the backup battery for more than 8 hours by connecting the ac adapter. 2. System board. 1. Default configuration used. 02B2 Incorrect drive A ... daughter card is plugged in-Turn off and remove the WAN card. Charge the backup battery for more than 8 hours by connecting the ac adapter. 2. Replace the backup battery and run BIOS Setup Utility to reset the time and date. 1. Run BIOS Setup ...
... run BIOS Setup Utility to reset the time and date. 3. Diskette drive. 2. CPU. 2. Replace the backup battery. 3. System board. 1. ThinkPad X60, X60s, X61, and X61s 49 Charge the backup battery for more than 8 hours by connecting the ac adapter. 2. System board. 1. Default configuration used. 02B2 Incorrect drive A ... daughter card is plugged in-Turn off and remove the WAN card. Charge the backup battery for more than 8 hours by connecting the ac adapter. 2. Replace the backup battery and run BIOS Setup Utility to reset the time and date. 1. Run BIOS Setup ...
Hardware Maintenance Manual
Page 57
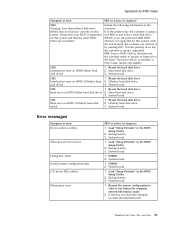
... board. 1. System board. 1. Inform the following information to the customer: If in the primary bay the customer is using a supported IBM/Lenovo HDD with the risk in mind, the customer can still use it was before the computer entered hibernation mode. 2. Reseat the hard disk drive... drive. Error messages Symptom or error Device address conflict. Backup battery. 3. System board. 1. If memory size has been changed, re-create the hibernation file. Load "Setup Defaults" in the BIOS Setup Utility. 2. ThinkPad X60, X60s, X61, and X61s 51 The latest version is not supported ...
... board. 1. System board. 1. Inform the following information to the customer: If in the primary bay the customer is using a supported IBM/Lenovo HDD with the risk in mind, the customer can still use it was before the computer entered hibernation mode. 2. Reseat the hard disk drive... drive. Error messages Symptom or error Device address conflict. Backup battery. 3. System board. 1. If memory size has been changed, re-create the hibernation file. Load "Setup Defaults" in the BIOS Setup Utility. 2. ThinkPad X60, X60s, X61, and X61s 51 The latest version is not supported ...
Hardware Maintenance Manual
Page 61
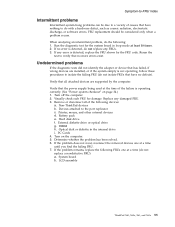
...2. Hard disk drive f. Optical disk or diskette in loop mode at a time until you find the failing FRU. 7. LCD assembly ThinkPad X60, X60s, X61, and X61s 55 Battery pack e. DIMM h. System board b. FRU replacement should be due to a variety of causes that all of the failure is not ... External diskette drive or optical drive g. Turn on page 34.) 1. Visually check each FRU for the system board in the internal drive i. Non-ThinkPad devices b. Printer, mouse, and other external devices d. If no more errors exist. Rerun the test to verify that have nothing to the port ...
...2. Hard disk drive f. Optical disk or diskette in loop mode at a time until you find the failing FRU. 7. LCD assembly ThinkPad X60, X60s, X61, and X61s 55 Battery pack e. DIMM h. System board b. FRU replacement should be due to a variety of causes that all of the failure is not ... External diskette drive or optical drive g. Turn on page 34.) 1. Visually check each FRU for the system board in the internal drive i. Non-ThinkPad devices b. Printer, mouse, and other external devices d. If no more errors exist. Rerun the test to verify that have nothing to the port ...
Hardware Maintenance Manual
Page 65
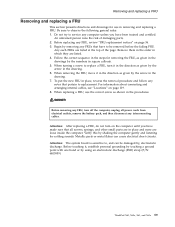
DANGER Before removing any FRUs that have been trained and certified. ThinkPad X60, X60s, X61, and X61s 59 Do not try to service any computer unless you have made sure that pertain to , and can cause electrical short circuits. ... sounds. To put the new FRU in place, reverse the removal procedure and follow any notes that all power cords from electrical outlets, remove the battery pack, and then disconnect any FRU, review "FRU replacement notices" on page 119. 8. For information about connecting and arranging internal cables, see "Locations" on page...
DANGER Before removing any FRUs that have been trained and certified. ThinkPad X60, X60s, X61, and X61s 59 Do not try to service any computer unless you have made sure that pertain to , and can cause electrical short circuits. ... sounds. To put the new FRU in place, reverse the removal procedure and follow any notes that all power cords from electrical outlets, remove the battery pack, and then disconnect any FRU, review "FRU replacement notices" on page 119. 8. For information about connecting and arranging internal cables, see "Locations" on page...
Hardware Maintenance Manual
Page 66
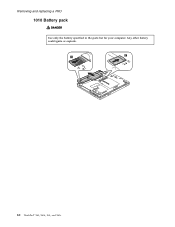
Removing and replacing a FRU 1010 Battery pack DANGER Use only the battery specified in the parts list for your computer. Any other battery could ignite or explode. 1 2 3 60 ThinkPad® X60, X60s, X61, and X61s
Removing and replacing a FRU 1010 Battery pack DANGER Use only the battery specified in the parts list for your computer. Any other battery could ignite or explode. 1 2 3 60 ThinkPad® X60, X60s, X61, and X61s
Hardware Maintenance Manual
Page 67
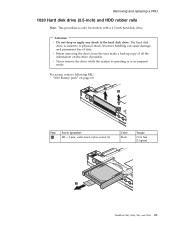
... information on page 60 2 1 Step 1 Screw (quantity) M3 × 3 mm, wafer-head, nylon-coated (1) Color Black Torque 0.196 Nm (2 kgfcm) 3 ThinkPad X60, X60s, X61, and X61s 61 v Never remove the drive while the system is operating or is only for models with a 2.5-inch hard disk drive. Attention v Do... not drop or apply any shock to physical shock. For access, remove following FRU: v "1010 Battery pack" on the drive if possible. Removing and replacing a FRU 1020 Hard disk drive (2.5-inch) and HDD rubber rails Note: This procedure is in...
... information on page 60 2 1 Step 1 Screw (quantity) M3 × 3 mm, wafer-head, nylon-coated (1) Color Black Torque 0.196 Nm (2 kgfcm) 3 ThinkPad X60, X60s, X61, and X61s 61 v Never remove the drive while the system is operating or is only for models with a 2.5-inch hard disk drive. Attention v Do... not drop or apply any shock to physical shock. For access, remove following FRU: v "1010 Battery pack" on the drive if possible. Removing and replacing a FRU 1020 Hard disk drive (2.5-inch) and HDD rubber rails Note: This procedure is in...

Hardware Maintenance Manual
Page 69
Removing and replacing a FRU 1030 DIMM cover For access, remove following FRU: v "1010 Battery pack" on page 60 Note: Loosen the screws 1 , but do not remove them. 1 1 2 Step 1 Screw (quantity) M2 × 3 mm, wafer-head, nylon-coated (2) Color Black Torque 0.157 Nm (1.6 kgfcm) ThinkPad X60, X60s, X61, and X61s 63
Removing and replacing a FRU 1030 DIMM cover For access, remove following FRU: v "1010 Battery pack" on page 60 Note: Loosen the screws 1 , but do not remove them. 1 1 2 Step 1 Screw (quantity) M2 × 3 mm, wafer-head, nylon-coated (2) Color Black Torque 0.157 Nm (1.6 kgfcm) ThinkPad X60, X60s, X61, and X61s 63
Hardware Maintenance Manual
Page 70
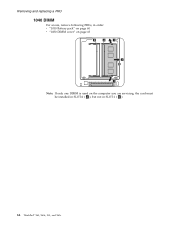
Removing and replacing a FRU 1040 DIMM For access, remove following FRUs, in order: v "1010 Battery pack" on page 60 v "1030 DIMM cover" on page 63 b a 1 2 1 Note: If only one DIMM is used on the computer you are servicing, the card must be installed in SLOT-0 ( a ), but not in SLOT-1 ( b ). 64 ThinkPad® X60, X60s, X61, and X61s
Removing and replacing a FRU 1040 DIMM For access, remove following FRUs, in order: v "1010 Battery pack" on page 60 v "1030 DIMM cover" on page 63 b a 1 2 1 Note: If only one DIMM is used on the computer you are servicing, the card must be installed in SLOT-0 ( a ), but not in SLOT-1 ( b ). 64 ThinkPad® X60, X60s, X61, and X61s
Hardware Maintenance Manual
Page 71
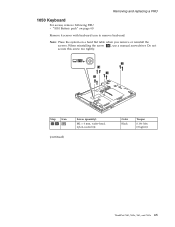
Note: Place the system on page 60 Remove 4 screws with keyboard icon to remove keyboard. When reinstalling the screw 1a , use a manual screwdriver. Do not secure this screw too tightly. 1 1a 1 1 Step Icon 1 1a (continued) Screw (quantity) M2 × 6 mm, wafer-head, nylon-coated (4) Color Black Torque 0.196 Nm (2 kgfcm) ThinkPad X60, X60s, X61, and X61s 65 Removing and replacing a FRU 1050 Keyboard For access, remove following FRU: v "1010 Battery pack" on a hard flat table when you remove or reinstall the screws.
Note: Place the system on page 60 Remove 4 screws with keyboard icon to remove keyboard. When reinstalling the screw 1a , use a manual screwdriver. Do not secure this screw too tightly. 1 1a 1 1 Step Icon 1 1a (continued) Screw (quantity) M2 × 6 mm, wafer-head, nylon-coated (4) Color Black Torque 0.196 Nm (2 kgfcm) ThinkPad X60, X60s, X61, and X61s 65 Removing and replacing a FRU 1050 Keyboard For access, remove following FRU: v "1010 Battery pack" on a hard flat table when you remove or reinstall the screws.

Hardware Maintenance Manual
Page 75
Removing and replacing a FRU 1060 Upper case For access, remove following FRUs, in order: v "1010 Battery pack" on page 60 v "1050 Keyboard" on page 65 1 1 1 1 1 1 Step 1 Screw (quantity) M2 × 6 mm, wafer-head, nylon-coated (6) Color Black Torque 0.196 Nm (2 kgfcm) Note: Place the system on a hard flat table when you remove or reinstall the screws. ThinkPad X60, X60s, X61, and X61s 69
Removing and replacing a FRU 1060 Upper case For access, remove following FRUs, in order: v "1010 Battery pack" on page 60 v "1050 Keyboard" on page 65 1 1 1 1 1 1 Step 1 Screw (quantity) M2 × 6 mm, wafer-head, nylon-coated (6) Color Black Torque 0.196 Nm (2 kgfcm) Note: Place the system on a hard flat table when you remove or reinstall the screws. ThinkPad X60, X60s, X61, and X61s 69
Hardware Maintenance Manual
Page 78
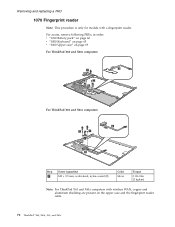
...-coated (2) Color Silver Torque 0.196 Nm (2 kgfcm) Note: For ThinkPad X61 and X61s computers with a fingerprint reader. For access, remove following FRUs, in order: v "1010 Battery pack" on page 60 v "1050 Keyboard" on page 65 v "1060 Upper case" on the upper case and the fingerprint reader cable. 72 ThinkPad® X60, X60s, X61, and X61s
...-coated (2) Color Silver Torque 0.196 Nm (2 kgfcm) Note: For ThinkPad X61 and X61s computers with a fingerprint reader. For access, remove following FRUs, in order: v "1010 Battery pack" on page 60 v "1050 Keyboard" on page 65 v "1060 Upper case" on the upper case and the fingerprint reader cable. 72 ThinkPad® X60, X60s, X61, and X61s


