Hardware Maintenance Manual
Page 5
...replacement notices 56 Screw notices 56 © Copyright Lenovo 2007, 2008 Retaining serial numbers 56 Removing and replacing a FRU 59 1010 Battery pack 60 1020 Hard disk drive (2.5-inch) ...Wireless LAN PCI Express Mini card . . . 78 1130 MDC 81 1140 Backup battery 82 1150 Second Fan 83 1160 Speaker 84 1170 DC-in and RJ-11 connectors 85 1180 LCD assembly ...view for ThinkPad X60, X60s, X61, and X61s 119 Rear view for ThinkPad X60, X60s, X61, and X61s 120 Bottom view for ThinkPad X60, X60s, X61, and X61s 121 Rear View for ThinkPad X6 UltraBase . . . . 122 Bottom View for ThinkPad X6 ...
...replacement notices 56 Screw notices 56 © Copyright Lenovo 2007, 2008 Retaining serial numbers 56 Removing and replacing a FRU 59 1010 Battery pack 60 1020 Hard disk drive (2.5-inch) ...Wireless LAN PCI Express Mini card . . . 78 1130 MDC 81 1140 Backup battery 82 1150 Second Fan 83 1160 Speaker 84 1170 DC-in and RJ-11 connectors 85 1180 LCD assembly ...view for ThinkPad X60, X60s, X61, and X61s 119 Rear view for ThinkPad X60, X60s, X61, and X61s 120 Bottom view for ThinkPad X60, X60s, X61, and X61s 121 Rear View for ThinkPad X6 UltraBase . . . . 122 Bottom View for ThinkPad X6 ...

Hardware Maintenance Manual
Page 24
Blowers and fans - Disconnect the power cord. 3. Check the power cord for cracked or bulging batteries. 5. Remove the cover. 6. As each machine was designed and built, required safety items were installed to protect users and service personnel from their normal ...conditions. b. Insulation must determine how serious the apparent hazard could be and whether you in good condition. Check for worn, frayed, or pinched cables. 18 ThinkPad® X60, X60s, X61, and X61s Check for any unsafe conditions are present, you must not be the type specified in a machine: -
Blowers and fans - Disconnect the power cord. 3. Check the power cord for cracked or bulging batteries. 5. Remove the cover. 6. As each machine was designed and built, required safety items were installed to protect users and service personnel from their normal ...conditions. b. Insulation must determine how serious the apparent hazard could be and whether you in good condition. Check for worn, frayed, or pinched cables. 18 ThinkPad® X60, X60s, X61, and X61s Check for any unsafe conditions are present, you must not be the type specified in a machine: -
Hardware Maintenance Manual
Page 25
Most clothing is insulative and retains a charge even when you use of the ac plug on your body. When working on a double-insulated or battery-operated system, use coax or connector-outside shells on these systems. - v Avoid contact with . Check that the power-supply cover fasteners (screws or rivets) have ...
Most clothing is insulative and retains a charge even when you use of the ac plug on your body. When working on a double-insulated or battery-operated system, use coax or connector-outside shells on these systems. - v Avoid contact with . Check that the power-supply cover fasteners (screws or rivets) have ...
Hardware Maintenance Manual
Page 33
Turn off the computer. 2. Remove the backup battery. Reinstall the backup battery and the battery pack. (B) If an SVP has been set : 1. Turn on the computer and wait until the POST ends. Note: To check whether the ThinkPad computer supports the Passphrase function, enter the BIOS Setup Utility and go ... to the servicer, there is known by the servicer: 1. then enter the POP. If the Using Passphrase item is available, neither Lenovo nor Lenovo authorized servicers provide any services to reset either the user or the master HDP, or to reset the password. Press F10; Related service...
Turn off the computer. 2. Remove the backup battery. Reinstall the backup battery and the battery pack. (B) If an SVP has been set : 1. Turn on the computer and wait until the POST ends. Note: To check whether the ThinkPad computer supports the Passphrase function, enter the BIOS Setup Utility and go ... to the servicer, there is known by the servicer: 1. then enter the POP. If the Using Passphrase item is available, neither Lenovo nor Lenovo authorized servicers provide any services to reset either the user or the master HDP, or to reset the password. Press F10; Related service...
Hardware Maintenance Manual
Page 35
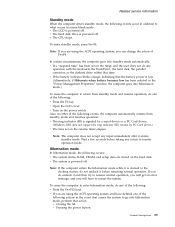
... elapses. Wait a few seconds before resuming normal operation. v The system is powered off. Closing the lid. - v If the battery indicator blinks orange, indicating that the battery power is low. (Alternatively, if Hibernate when battery becomes low has been selected in screen blank mode: v The LCD is powered off . v If you are using the...
... elapses. Wait a few seconds before resuming normal operation. v The system is powered off. Closing the lid. - v If the battery indicator blinks orange, indicating that the battery power is low. (Alternatively, if Hibernate when battery becomes low has been selected in screen blank mode: v The LCD is powered off . v If you are using the...
Hardware Maintenance Manual
Page 40
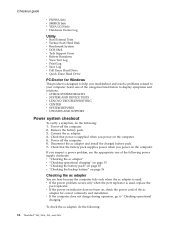
...problem, see the appropriate one of the categories listed below to display symptoms and solutions: v CHECK SYSTEM HEALTH v SYSTEM AND DEVICE TESTS v LENOVO TROUBLESHOOTING v CENTER v SYSTEM REPORTS v UPDATES AND SUPPORT Power system checkout To verify a symptom, do the following power supply checkouts: v "... following : 34 ThinkPad® X60, X60s, X61, and X61s v If the power-on indicator does not turn on the computer. Remove the battery pack. 3. Disconnect the ac adapter and install the charged battery pack. 7. Power off the computer. 6. Check that the battery pack supplies power ...
...problem, see the appropriate one of the categories listed below to display symptoms and solutions: v CHECK SYSTEM HEALTH v SYSTEM AND DEVICE TESTS v LENOVO TROUBLESHOOTING v CENTER v SYSTEM REPORTS v UPDATES AND SUPPORT Power system checkout To verify a symptom, do the following power supply checkouts: v "... following : 34 ThinkPad® X60, X60s, X61, and X61s v If the power-on indicator does not turn on the computer. Remove the battery pack. 3. Disconnect the ac adapter and install the charged battery pack. 7. Power off the computer. 6. Check that the battery pack supplies power ...

Hardware Maintenance Manual
Page 41
... capacity. If the voltage is not correct, replace the ac adapter. 4. Checking operational charging To check whether the battery charges properly during operation, use a discharged battery pack or a battery pack that less than 50% of the ac adapter cable. If it at the plug of the total power remaining...does not start until the Power Meter shows that has less than 95% of the total power remains; To get detailed information about the battery, double-click the Power Meter icon. v If the problem persists, go to room temperature. After it cools down, reinstall and recharge ...
... capacity. If the voltage is not correct, replace the ac adapter. 4. Checking operational charging To check whether the battery charges properly during operation, use a discharged battery pack or a battery pack that less than 50% of the ac adapter cable. If it at the plug of the total power remaining...does not start until the Power Meter shows that has less than 95% of the total power remains; To get detailed information about the battery, double-click the Power Meter icon. v If the problem persists, go to room temperature. After it cools down, reinstall and recharge ...
Hardware Maintenance Manual
Page 42
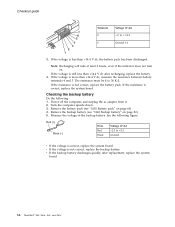
... voltage is still less than +14.4 V dc after replacement, replace the system board. 36 ThinkPad® X60, X60s, X61, and X61s Remove the battery pack (see "1140 Backup battery" on page 82). 5. If the voltage is more than +14.4 V dc, the battery pack has been discharged. Power off the computer, and unplug the ac adapter from...
... voltage is still less than +14.4 V dc after replacement, replace the system board. 36 ThinkPad® X60, X60s, X61, and X61s Remove the battery pack (see "1140 Backup battery" on page 82). 5. If the voltage is more than +14.4 V dc, the battery pack has been discharged. Power off the computer, and unplug the ac adapter from...
Hardware Maintenance Manual
Page 43
... Memory card 77 1120 Wireless LAN PCI Express Mini card . . . 78 1130 MDC 81 1140 Backup battery 82 1150 Second Fan 83 1160 Speaker 84 1170 DC-in and RJ-11 connectors 85 1180 LCD assembly 86 1190 Hard disk sub-... 117 Locations 119 Front view for ThinkPad X60, X60s, X61, and X61s 119 Rear view for ThinkPad X60, X60s, X61, and X61s 120 Bottom view for ThinkPad X60, X60s, X61, and X61s 121 Rear View for ThinkPad X6 UltraBase . . . . 122 Bottom View for ThinkPad X6 UltraBase . . . 122 ... 232 Tools 232 Power cords 232 Notices 234 Trademarks 235 © Copyright Lenovo 2007, 2008 37
... Memory card 77 1120 Wireless LAN PCI Express Mini card . . . 78 1130 MDC 81 1140 Backup battery 82 1150 Second Fan 83 1160 Speaker 84 1170 DC-in and RJ-11 connectors 85 1180 LCD assembly 86 1190 Hard disk sub-... 117 Locations 119 Front view for ThinkPad X60, X60s, X61, and X61s 119 Rear view for ThinkPad X60, X60s, X61, and X61s 120 Bottom view for ThinkPad X60, X60s, X61, and X61s 121 Rear View for ThinkPad X6 UltraBase . . . . 122 Bottom View for ThinkPad X6 UltraBase . . . 122 ... 232 Tools 232 Power cords 232 Notices 234 Trademarks 235 © Copyright Lenovo 2007, 2008 37

Hardware Maintenance Manual
Page 46
... v Stereo headphone jack v 56.6 Kbps v Internal monaural speaker v Software control volume v IrDA 1.1 Note: The infrared port is only for ThinkPad X60s and X61s computer. The standard and hybrid batteries require a spacer when used with ThinkPad X60s and X61s computer. v Windows XP Professional v Windows XP Home Edition v Windows Vista™ Business (32 bit) v Windows Vista Business...
... v Stereo headphone jack v 56.6 Kbps v Internal monaural speaker v Software control volume v IrDA 1.1 Note: The infrared port is only for ThinkPad X60s and X61s computer. The standard and hybrid batteries require a spacer when used with ThinkPad X60s and X61s computer. v Windows XP Professional v Windows XP Home Edition v Windows Vista™ Business (32 bit) v Windows Vista Business...

Hardware Maintenance Manual
Page 48
... is not in suspend mode. 3 Wireless WAN Green: Wireless is operational and radio on and not in standby mode. The ac adapter has charged the battery completely. To enable or disable the keypad, press and hold the Shift key, and press the NumLk (ScrLk) key. Note: Do not move the ... being charged, but the battery power is still low. Green: The battery is in the Ultrabay device. To enable or disable Caps Lock mode, press the Caps Lock key. 6 Drive in use and has enough power. Green: Caps Lock mode is resuming normal operation. 42 ThinkPad® X60, X60s, X61, and X61s Blinking green: ...
... is not in suspend mode. 3 Wireless WAN Green: Wireless is operational and radio on and not in standby mode. The ac adapter has charged the battery completely. To enable or disable the keypad, press and hold the Shift key, and press the NumLk (ScrLk) key. Note: Do not move the ... being charged, but the battery power is still low. Green: The battery is in the Ultrabay device. To enable or disable Caps Lock mode, press the Caps Lock key. 6 Drive in use and has enough power. Green: Caps Lock mode is resuming normal operation. 42 ThinkPad® X60, X60s, X61, and X61s Blinking green: ...
Hardware Maintenance Manual
Page 49
... can occur when a slight, steady pressure is set up correctly. 2. Product overview FRU tests The following : v Interactive Tests --> Mouse (continued) ThinkPad X60, X60s, X61, and X61s 43 Diagnostics --> CPU/Coprocessor 2. Place the computer on the screen for each FRU. After you use the TrackPoint, the pointer...1. PC Card slot Diagnostics --> Systemboard --> PCMCIA Keyboard 1. If the pointer stops after a short time, no sound is necessary. Power Diagnostics --> ThinkPad Devices --> AC Adapter, Battery 1 (Battery 2) LCD unit 1. Conexant Smart Modem Interrupt b.
... can occur when a slight, steady pressure is set up correctly. 2. Product overview FRU tests The following : v Interactive Tests --> Mouse (continued) ThinkPad X60, X60s, X61, and X61s 43 Diagnostics --> CPU/Coprocessor 2. Place the computer on the screen for each FRU. After you use the TrackPoint, the pointer...1. PC Card slot Diagnostics --> Systemboard --> PCMCIA Keyboard 1. If the pointer stops after a short time, no sound is necessary. Power Diagnostics --> ThinkPad Devices --> AC Adapter, Battery 1 (Battery 2) LCD unit 1. Conexant Smart Modem Interrupt b.

Hardware Maintenance Manual
Page 54
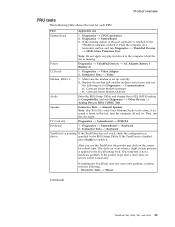
...The hard disk is dead. 1. Hard disk drive. 4. DIMM. 2. Replace the backup battery and run BIOS Setup Utility to reset the time and date. 48 ThinkPad® X60, X60s, X61, and X61s Replace the backup battery and run BIOS Setup Utility to reset the time and date. 0251 System CMOS checksum bad...- Symptom-to-FRU index Symptom or error FRU or action, in BIOS Setup Utility. 3. Battery pack. 0191 System Security-...
...The hard disk is dead. 1. Hard disk drive. 4. DIMM. 2. Replace the backup battery and run BIOS Setup Utility to reset the time and date. 48 ThinkPad® X60, X60s, X61, and X61s Replace the backup battery and run BIOS Setup Utility to reset the time and date. 0251 System CMOS checksum bad...- Symptom-to-FRU index Symptom or error FRU or action, in BIOS Setup Utility. 3. Battery pack. 0191 System Security-...
Hardware Maintenance Manual
Page 55
...date. 3. System board. 1. DIMM. 3. CPU. 2. Shut down the computer and remove it from the docking station. 1. ThinkPad X60, X60s, X61, and X61s 49 Replace the backup battery and run BIOS Setup Utility to reset the time and date. 1. Diskette drive. 2. I/O card. 1. System board. 1. ... that you installed. 2. System board. 1. System board. 1. System board. 1. Remove the daughter card that you installed. 2. Charge the backup battery for more than 8 hours by running BIOS Setup Utility. 1. Symptom-to reset the time and date. 3. Default configuration used. 02B2 Incorrect drive ...
...date. 3. System board. 1. DIMM. 3. CPU. 2. Shut down the computer and remove it from the docking station. 1. ThinkPad X60, X60s, X61, and X61s 49 Replace the backup battery and run BIOS Setup Utility to reset the time and date. 1. Diskette drive. 2. I/O card. 1. System board. 1. ... that you installed. 2. System board. 1. System board. 1. System board. 1. Remove the daughter card that you installed. 2. Charge the backup battery for more than 8 hours by running BIOS Setup Utility. 1. Symptom-to reset the time and date. 3. Default configuration used. 02B2 Incorrect drive ...
Hardware Maintenance Manual
Page 57
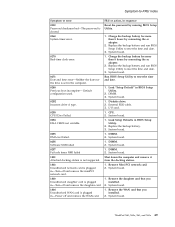
...BIOS Setup Utility. 2. Load "Setup Defaults" in sequence 1. ThinkPad X60, X60s, X61, and X61s 51 Inform the following information to the customer: If in the primary bay the customer is using a supported IBM/Lenovo HDD with the risk in mind, the customer can still ...2. Error messages Symptom or error Device address conflict. Allocation error for device. I/O device IRQ conflict. System board. 1. System board. 1. Backup battery. 3. DIMM. 2. If memory size has been changed, re-create the hibernation file. System board. 1. Ultrabay hard disk drive. Reseat the ...
...BIOS Setup Utility. 2. Load "Setup Defaults" in sequence 1. ThinkPad X60, X60s, X61, and X61s 51 Inform the following information to the customer: If in the primary bay the customer is using a supported IBM/Lenovo HDD with the risk in mind, the customer can still ...2. Error messages Symptom or error Device address conflict. Allocation error for device. I/O device IRQ conflict. System board. 1. System board. 1. Backup battery. 3. DIMM. 2. If memory size has been changed, re-create the hibernation file. System board. 1. Ultrabay hard disk drive. Reseat the ...
Hardware Maintenance Manual
Page 61
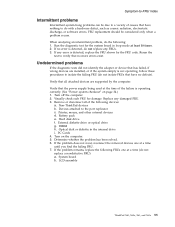
... by the FRU code. Visually check each FRU for the system board in the internal drive i. Printer, mouse, and other external devices d. Battery pack e. Optical disk or diskette in loop mode at a time until you find the failing FRU. 7. Rerun the test to the port ... all attached devices are installed, or if the system simply is detected, do not replace a nondefective FRU): a. Non-ThinkPad devices b. Hard disk drive f. LCD assembly ThinkPad X60, X60s, X61, and X61s 55 Undetermined problems If the diagnostic tests did not identify the adapter or device that the power supply...
... by the FRU code. Visually check each FRU for the system board in the internal drive i. Printer, mouse, and other external devices d. Battery pack e. Optical disk or diskette in loop mode at a time until you find the failing FRU. 7. Rerun the test to the port ... all attached devices are installed, or if the system simply is detected, do not replace a nondefective FRU): a. Non-ThinkPad devices b. Hard disk drive f. LCD assembly ThinkPad X60, X60s, X61, and X61s 55 Undetermined problems If the diagnostic tests did not identify the adapter or device that the power supply...
Hardware Maintenance Manual
Page 65
...rules: 1. Verify this by the numbers in place, reverse the removal procedure and follow any notes that all power cords from electrical outlets, remove the battery pack, and then disconnect any FRU, review "FRU replacement notices" on page 119. 8. To put the new FRU in square callouts. 5. When ...and replacing a FRU. An untrained person runs the risk of the page. Metallic parts or metal flakes can be removed before the failing FRU. ThinkPad X60, X60s, X61, and X61s 59 Be sure to replacement. Do not try to replace a FRU, turn off the computer, unplug all screws, springs,...
...rules: 1. Verify this by the numbers in place, reverse the removal procedure and follow any notes that all power cords from electrical outlets, remove the battery pack, and then disconnect any FRU, review "FRU replacement notices" on page 119. 8. To put the new FRU in square callouts. 5. When ...and replacing a FRU. An untrained person runs the risk of the page. Metallic parts or metal flakes can be removed before the failing FRU. ThinkPad X60, X60s, X61, and X61s 59 Be sure to replacement. Do not try to replace a FRU, turn off the computer, unplug all screws, springs,...
Hardware Maintenance Manual
Page 66
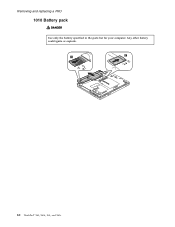
Removing and replacing a FRU 1010 Battery pack DANGER Use only the battery specified in the parts list for your computer. Any other battery could ignite or explode. 1 2 3 60 ThinkPad® X60, X60s, X61, and X61s
Removing and replacing a FRU 1010 Battery pack DANGER Use only the battery specified in the parts list for your computer. Any other battery could ignite or explode. 1 2 3 60 ThinkPad® X60, X60s, X61, and X61s
Hardware Maintenance Manual
Page 67
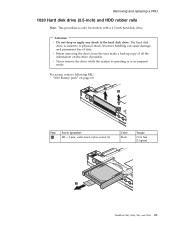
For access, remove following FRU: v "1010 Battery pack" on the drive if possible. The hard disk drive is in suspend mode. v Never remove the drive while the system is operating or is ... permanent loss of all the information on page 60 2 1 Step 1 Screw (quantity) M3 × 3 mm, wafer-head, nylon-coated (1) Color Black Torque 0.196 Nm (2 kgfcm) 3 ThinkPad X60, X60s, X61, and X61s 61 Removing and replacing a FRU 1020 Hard disk drive (2.5-inch) and HDD rubber rails Note: This procedure is only for models with...
For access, remove following FRU: v "1010 Battery pack" on the drive if possible. The hard disk drive is in suspend mode. v Never remove the drive while the system is operating or is ... permanent loss of all the information on page 60 2 1 Step 1 Screw (quantity) M3 × 3 mm, wafer-head, nylon-coated (1) Color Black Torque 0.196 Nm (2 kgfcm) 3 ThinkPad X60, X60s, X61, and X61s 61 Removing and replacing a FRU 1020 Hard disk drive (2.5-inch) and HDD rubber rails Note: This procedure is only for models with...

Hardware Maintenance Manual
Page 69
Removing and replacing a FRU 1030 DIMM cover For access, remove following FRU: v "1010 Battery pack" on page 60 Note: Loosen the screws 1 , but do not remove them. 1 1 2 Step 1 Screw (quantity) M2 × 3 mm, wafer-head, nylon-coated (2) Color Black Torque 0.157 Nm (1.6 kgfcm) ThinkPad X60, X60s, X61, and X61s 63
Removing and replacing a FRU 1030 DIMM cover For access, remove following FRU: v "1010 Battery pack" on page 60 Note: Loosen the screws 1 , but do not remove them. 1 1 2 Step 1 Screw (quantity) M2 × 3 mm, wafer-head, nylon-coated (2) Color Black Torque 0.157 Nm (1.6 kgfcm) ThinkPad X60, X60s, X61, and X61s 63


