Hardware Maintenance Manual
Page 5
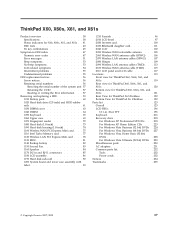
... 1020 Hard disk drive (2.5-inch) and HDD rubber rails 61 1030 DIMM cover 63 1040 DIMM 64 1050 Keyboard 65 1060 Upper case 69 1070 Fingerprint reader 72 1080 Hard disk (1.8-inch 73 1090 Hard disk housing (1.8-inch 74 1100 Wireless WAN PCI Express Mini card . . . 75 1110 Intel Turbo Memory card 77 1120 Wireless LAN PCI Express Mini card . . . 78 1130 MDC 81 1140 Backup battery 82 1150 Second Fan 83...
... 1020 Hard disk drive (2.5-inch) and HDD rubber rails 61 1030 DIMM cover 63 1040 DIMM 64 1050 Keyboard 65 1060 Upper case 69 1070 Fingerprint reader 72 1080 Hard disk (1.8-inch 73 1090 Hard disk housing (1.8-inch 74 1100 Wireless WAN PCI Express Mini card . . . 75 1110 Intel Turbo Memory card 77 1120 Wireless LAN PCI Express Mini card . . . 78 1130 MDC 81 1140 Backup battery 82 1150 Second Fan 83...
Hardware Maintenance Manual
Page 10
... replacing a system board Some components mounted on a system board are very sensitive. Important notice for replacing a hard disk drive Always try to run a low-level format before doing this configuration sent to place orders (Example: 1829-W15). A unique 4-digit MT and 3-digit model is a special bid offering. Note the current configuration settings (using the View Configuration option); Attention: The drive startup sequence in effect. Whatever causes the first error code...
... replacing a system board Some components mounted on a system board are very sensitive. Important notice for replacing a hard disk drive Always try to run a low-level format before doing this configuration sent to place orders (Example: 1829-W15). A unique 4-digit MT and 3-digit model is a special bid offering. Note the current configuration settings (using the View Configuration option); Attention: The drive startup sequence in effect. Whatever causes the first error code...
Hardware Maintenance Manual
Page 23
Do not use this type of maintenance information. Removing or installing Field Replaceable Units (FRUs) v Before you start to protect yourself from grounds such as metal floor strips and machine frames. Attention: Another person must be there to lock the wall box in the safety sections of mat to work on a machine that supplies power to the machine, and to switch off...
Do not use this type of maintenance information. Removing or installing Field Replaceable Units (FRUs) v Before you start to protect yourself from grounds such as metal floor strips and machine frames. Attention: Another person must be there to lock the wall box in the safety sections of mat to work on a machine that supplies power to the machine, and to switch off...
Hardware Maintenance Manual
Page 29
... such write operations as cosmic radiation, electrostatic discharge, or software errors. If you replace FRUs, use new nylon-coated screws. Name and phone number of the correct model. Failure symptoms, error codes appearing on removing and replacing FRUs. Read this section. When you replace a FRU, make sure that the model of reasons that have been altered. Consider replacing a FRU only when a problem recurs. Machine type, model number, and serial number __ 9. v When...
... such write operations as cosmic radiation, electrostatic discharge, or software errors. If you replace FRUs, use new nylon-coated screws. Name and phone number of the correct model. Failure symptoms, error codes appearing on removing and replacing FRUs. Read this section. When you replace a FRU, make sure that the model of reasons that have been altered. Consider replacing a FRU only when a problem recurs. Machine type, model number, and serial number __ 9. v When...
Hardware Maintenance Manual
Page 32
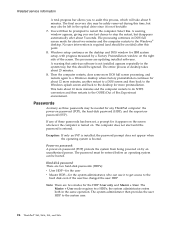
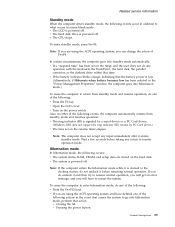
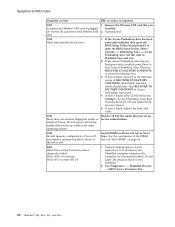
... ThinkPad computer: the power-on the screen whenever the computer is not bootable. 7. The password must be entered before an operating system can use it appears on password (POP), the hard-disk password (HDP), and the supervisor password (SVP). Windows setup continues on the desktop and DOS window for it to get access to the hard disk even if the user has changed the user HDP Note: There are updating installed softwares. The Master + User mode...
... ThinkPad computer: the power-on the screen whenever the computer is not bootable. 7. The password must be entered before an operating system can use it appears on password (POP), the hard-disk password (HDP), and the supervisor password (SVP). Windows setup continues on the desktop and DOS window for it to get access to the hard disk even if the user has changed the user HDP Note: There are updating installed softwares. The Master + User mode...
Hardware Maintenance Manual
Page 33
... in order to get access to the BIOS Setup Utility and change the system configuration. Turn on the computer; The Rescue and Recovery screen opens. Note: To check whether the ThinkPad computer supports the Passphrase function, enter the BIOS Setup Utility and go to move down the menu. 5. Select Password. 6. How to remove the backup battery, see "1010 Battery pack" on page 60. 3. Remove the backup battery. For how to remove the power-on page 82. 4. For models supporting the Passphrase function...
... in order to get access to the BIOS Setup Utility and change the system configuration. Turn on the computer; The Rescue and Recovery screen opens. Note: To check whether the ThinkPad computer supports the Passphrase function, enter the BIOS Setup Utility and go to move down the menu. 5. Select Password. 6. How to remove the backup battery, see "1010 Battery pack" on page 60. 3. Remove the backup battery. For how to remove the power-on page 82. 4. For models supporting the Passphrase function...
Hardware Maintenance Manual
Page 34
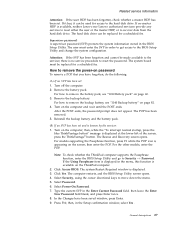
... end screen blank mode and resume normal operation, press any services to reset the user HDPs or to the servicer, neither Lenovo nor Lenovo authorized servicers provide any key. 28 ThinkPad® X60, X60s, X61, and X61s The computer restarts, and the BIOS Setup Utility screen opens. 4. Select Hard-disk x password, where x is displayed in the Setup Configuration window. If the time set on the "Turn off . A pop-up window opens. 7. Note: To check whether the ThinkPad computer supports the Passphrase function, enter the BIOS Setup Utility...
... end screen blank mode and resume normal operation, press any services to reset the user HDPs or to the servicer, neither Lenovo nor Lenovo authorized servicers provide any key. 28 ThinkPad® X60, X60s, X61, and X61s The computer restarts, and the BIOS Setup Utility screen opens. 4. Select Hard-disk x password, where x is displayed in the Setup Configuration window. If the time set on the "Turn off . A pop-up window opens. 7. Note: To check whether the ThinkPad computer supports the Passphrase function, enter the BIOS Setup Utility...
Hardware Maintenance Manual
Page 35
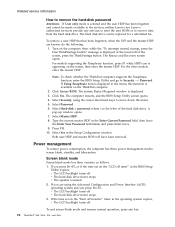
v Open the LCD cover. v Turn on the hard disk. Wait a few seconds before resuming normal operation. v The system is signaled by a serial device or a PC Card device. (Windows 2000 does not support the ring indicator (RI) resume by PC Card device.) v The time set on the resume timer elapses. Note: If the computer enters the hibernation mode while it is low. (Alternatively, if Hibernate when battery becomes low has been selected...
v Open the LCD cover. v Turn on the hard disk. Wait a few seconds before resuming normal operation. v The system is signaled by a serial device or a PC Card device. (Windows 2000 does not support the ring indicator (RI) resume by PC Card device.) v The time set on the resume timer elapses. Note: If the computer enters the hibernation mode while it is low. (Alternatively, if Hibernate when battery becomes low has been selected...
Hardware Maintenance Manual
Page 39
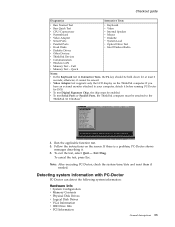
... Quick Test CPU/Coprocessor Systemboard Video Adapter Serial Ports Parallel Ports Fixed Disks Diskette Drives Other Devices ZIP Drive Communication Memory Test - Quick Hardware Info Utility Quit F1=Help PC-DOCTOR 2.0 Copyright 2001 PC-Doctor, Inc. Press ENTER to move in Interactive Tests, the Fn key should be enabled. Exit Diag. Use the cursor keys and ESC to select. 4. If you have an external monitor attached to the ThinkPad X6 UltraBase™. v To test Serial Ports...
... Quick Test CPU/Coprocessor Systemboard Video Adapter Serial Ports Parallel Ports Fixed Disks Diskette Drives Other Devices ZIP Drive Communication Memory Test - Quick Hardware Info Utility Quit F1=Help PC-DOCTOR 2.0 Copyright 2001 PC-Doctor, Inc. Press ENTER to move in Interactive Tests, the Fn key should be enabled. Exit Diag. Use the cursor keys and ESC to select. 4. If you have an external monitor attached to the ThinkPad X6 UltraBase™. v To test Serial Ports...
Hardware Maintenance Manual
Page 40
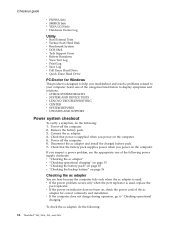
... computer. 2. Checkout guide v PNPISA Info v SMBIOS Info v VESA LCD Info v Hardware Events Log Utility v Run External Tests v Surface Scan Hard Disk v Benchmark System v DOS Shell v Tech Support Form v Battery Rundown v View Test Log v Print Log v Save Log v Full Erase Hard Drive v Quick Erase Hard Drive PC-Doctor for correct continuity and installation. If you suspect a power problem, see the appropriate one of the categories listed below to help...
... computer. 2. Checkout guide v PNPISA Info v SMBIOS Info v VESA LCD Info v Hardware Events Log Utility v Run External Tests v Surface Scan Hard Disk v Benchmark System v DOS Shell v Tech Support Form v Battery Rundown v View Test Log v Print Log v Save Log v Full Erase Hard Drive v Quick Erase Hard Drive PC-Doctor for correct continuity and installation. If you suspect a power problem, see the appropriate one of the categories listed below to help...
Hardware Maintenance Manual
Page 43
... 1020 Hard disk drive (2.5-inch) and HDD rubber rails 61 1030 DIMM cover 63 1040 DIMM 64 1050 Keyboard 65 1060 Upper case 69 1070 Fingerprint reader 72 1080 Hard disk (1.8-inch 73 1090 Hard disk housing (1.8-inch 74 1100 Wireless WAN PCI Express Mini card . . . 75 1110 Intel Turbo Memory card 77 1120 Wireless LAN PCI Express Mini card . . . 78 1130 MDC 81 1140 Backup battery 82 1150 Second Fan 83...
... 1020 Hard disk drive (2.5-inch) and HDD rubber rails 61 1030 DIMM cover 63 1040 DIMM 64 1050 Keyboard 65 1060 Upper case 69 1070 Fingerprint reader 72 1080 Hard disk (1.8-inch 73 1090 Hard disk housing (1.8-inch 74 1100 Wireless WAN PCI Express Mini card . . . 75 1110 Intel Turbo Memory card 77 1120 Wireless LAN PCI Express Mini card . . . 78 1130 MDC 81 1140 Backup battery 82 1150 Second Fan 83...
Hardware Maintenance Manual
Page 49
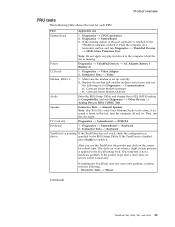
... shock to enable it . If the TrackPoint is disabled, select Enable to the computer while the test is not a hardware problem. Interactive Tests --> Keyboard TrackPoint or pointing If the TrackPoint does not work, check the configuration as device specified in the BIOS Setup Utility. Power Diagnostics --> ThinkPad Devices --> AC Adapter, Battery 1 (Battery 2) LCD unit 1. Interactive Tests --> Video Modem, MDC1.5 1. Product overview FRU tests The following : v Interactive Tests --> Mouse (continued) ThinkPad X60, X60s, X61, and...
... shock to enable it . If the TrackPoint is disabled, select Enable to the computer while the test is not a hardware problem. Interactive Tests --> Keyboard TrackPoint or pointing If the TrackPoint does not work, check the configuration as device specified in the BIOS Setup Utility. Power Diagnostics --> ThinkPad Devices --> AC Adapter, Battery 1 (Battery 2) LCD unit 1. Interactive Tests --> Video Modem, MDC1.5 1. Product overview FRU tests The following : v Interactive Tests --> Mouse (continued) ThinkPad X60, X60s, X61, and...
Hardware Maintenance Manual
Page 51
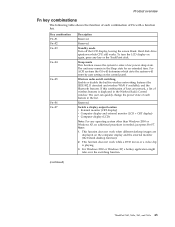
... quickly change the power state of each combination of Fn with a function key. just press Fn+F7. Hard disk drive spindown while CPU still works. The unit may remain in the Sleep state for an extended time. Switch a display output location v External monitor (CRT display) v Computer display and external monitor (LCD + CRT display) v Computer display (LCD) Note: For any key or the TrackPoint stick. Reserved. For Windows 2000 or Windows XP, a hotkey application might take over the switching function. (continued) ThinkPad X60, X60s...
... quickly change the power state of each combination of Fn with a function key. just press Fn+F7. Hard disk drive spindown while CPU still works. The unit may remain in the Sleep state for an extended time. Switch a display output location v External monitor (CRT display) v Computer display and external monitor (LCD + CRT display) v Computer display (LCD) Note: For any key or the TrackPoint stick. Reserved. For Windows 2000 or Windows XP, a hotkey application might take over the switching function. (continued) ThinkPad X60, X60s...
Hardware Maintenance Manual
Page 53
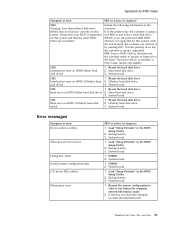
... the problem, put the original part back in sequence." Do not replace a nondefective FRU. Enter BIOS Setup and load Setup Enter to load the default setting. System board. 0185 Bad startup sequence settings. Then save the current setting by diagnostic codes in the ThinkPad notebook computers, see the manual for each error detected in the EEPROM is not correct. The most likely cause is displayed for that device. A numeric error is listed first...
... the problem, put the original part back in sequence." Do not replace a nondefective FRU. Enter BIOS Setup and load Setup Enter to load the default setting. System board. 0185 Bad startup sequence settings. Then save the current setting by diagnostic codes in the ThinkPad notebook computers, see the manual for each error detected in the EEPROM is not correct. The most likely cause is displayed for that device. A numeric error is listed first...

Hardware Maintenance Manual
Page 54
... keyboard and the auxiliary input device. 0220 Monitor type error-Monitor type does not match the one of them. 1. DIMM. 2. System board. Charge the backup battery for more than 8 hours by pressing F10. 2. Security password retry count exceeded. 1. Hard disk drive. 4. System board. 021x Keyboard error. Remove the Ethernet device that you installed; Run BIOS Setup Utility, and then save current setting by connecting the ac adapter. 2. Symptom-to-FRU index Symptom or error FRU or action, in BIOS Setup Utility...
... keyboard and the auxiliary input device. 0220 Monitor type error-Monitor type does not match the one of them. 1. DIMM. 2. System board. Charge the backup battery for more than 8 hours by pressing F10. 2. Security password retry count exceeded. 1. Hard disk drive. 4. System board. 021x Keyboard error. Remove the Ethernet device that you installed; Run BIOS Setup Utility, and then save current setting by connecting the ac adapter. 2. Symptom-to-FRU index Symptom or error FRU or action, in BIOS Setup Utility...
Hardware Maintenance Manual
Page 55
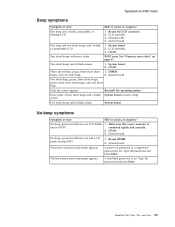
... plugged in sequence Reset the password by connecting the ac adapter. 2. External FDD cable. 3. System board. 1. ThinkPad X60, X60s, X61, and X61s 49 FRU or action, in -Power off and remove the WAN card. System board. 1. DIMM. 2. Remove the WAN card that you installed. 2. Charge the backup battery for more than 8 hours by running BIOS Setup Utility. 1. Remove Mini PCI network card. 2. Symptom-to reset the time and date. 1. System board. 1. Replace the backup battery. 3. Default configuration used. 02B2 Incorrect drive A type. 02F0 CPU ID:xx Failed...
... plugged in sequence Reset the password by connecting the ac adapter. 2. External FDD cable. 3. System board. 1. ThinkPad X60, X60s, X61, and X61s 49 FRU or action, in -Power off and remove the WAN card. System board. 1. DIMM. 2. Remove the WAN card that you installed. 2. Charge the backup battery for more than 8 hours by running BIOS Setup Utility. 1. Remove Mini PCI network card. 2. Symptom-to reset the time and date. 1. System board. 1. Replace the backup battery. 3. Default configuration used. 02B2 Incorrect drive A type. 02F0 CPU ID:xx Failed...
Hardware Maintenance Manual
Page 56
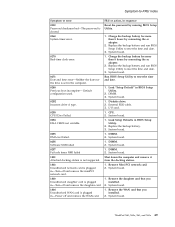
... to enter SETUP 1. Select Security --> Predesktop Area --> Access Predesktop Area. Power off and install a memory module to Slot-0 or the lower slot. Undock docking station or port replicator if it . 5. Run RECOVER TO FACTORY CONTENTS in Access Predesktop Area. If item 3 failed, select CD-ROM boot in Startup in Access Predesktop Area again. 4. If item 4 failed, replace the hard disk drive. 1820 More than one external fingerprint reader is attached. Press to open the BIOS Setup Utility...
... to enter SETUP 1. Select Security --> Predesktop Area --> Access Predesktop Area. Power off and install a memory module to Slot-0 or the lower slot. Undock docking station or port replicator if it . 5. Run RECOVER TO FACTORY CONTENTS in Access Predesktop Area. If item 3 failed, select CD-ROM boot in Startup in Access Predesktop Area again. 4. If item 4 failed, replace the hard disk drive. 1820 More than one external fingerprint reader is attached. Press to open the BIOS Setup Utility...
Hardware Maintenance Manual
Page 57
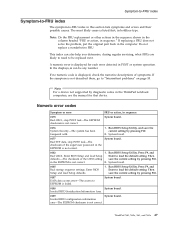
...1. disk drive) 3. System board. 2112 Read error on HDD0 (Main hard disk drive) 1. System board. Failing bits: nnnn. Load "Setup Defaults" in the BIOS Setup Utility. 2. ThinkPad X60, X60s, X61, and X61s 51 The latest version is not supported by pressing ESC. Main hard disk drive. 3. Load "Setup Defaults" in sequence 1. Backup battery. 3. Backup battery. 3. Ultrabay hard disk drive. Reseat the hard disk drive. Read error on HDD1 (Ultrabay hard 2. Hibernation error. Backup battery. 3. System board. 1. System board. 1. Restore the system configuration...
...1. disk drive) 3. System board. 2112 Read error on HDD0 (Main hard disk drive) 1. System board. Failing bits: nnnn. Load "Setup Defaults" in the BIOS Setup Utility. 2. ThinkPad X60, X60s, X61, and X61s 51 The latest version is not supported by pressing ESC. Main hard disk drive. 3. Load "Setup Defaults" in sequence 1. Backup battery. 3. Backup battery. 3. Ultrabay hard disk drive. Reseat the hard disk drive. Read error on HDD1 (Ultrabay hard 2. Hibernation error. Backup battery. 3. System board. 1. System board. 1. Restore the system configuration...
Hardware Maintenance Manual
Page 59
..., or flashing LCD. 1. System board. Type the password and press Enter. External CRT. 4. System board. DIMM. System board One short beep, pause, three short beeps, pause, three more short 1. Five short beeps and a blank screen. Make sure that every connector is set . DIMM. 3. System board. 2. Reinstall the operating system. The hard-disk password prompt appears. A hard-disk password is and no POST. No beep, power-on indicator on password or a supervisor password is set . Reseat...
..., or flashing LCD. 1. System board. Type the password and press Enter. External CRT. 4. System board. DIMM. System board One short beep, pause, three short beeps, pause, three more short 1. Five short beeps and a blank screen. Make sure that every connector is set . DIMM. 3. System board. 2. Reinstall the operating system. The hard-disk password prompt appears. A hard-disk password is and no POST. No beep, power-on indicator on password or a supervisor password is set . Reseat...
Hardware Maintenance Manual
Page 61
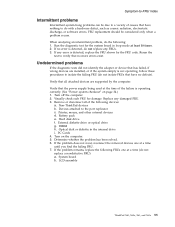
If no more errors exist. Turn off the computer. 2. Devices attached to a variety of causes that the power supply being used at a time (do not replace a nondefective FRU): a. External diskette drive or optical drive g. If the problem remains, replace the following FRUs one at least 10 times. 2. LCD assembly ThinkPad X60, X60s, X61, and X61s 55 If any error is not operating, follow these procedures to isolate the...
If no more errors exist. Turn off the computer. 2. Devices attached to a variety of causes that the power supply being used at a time (do not replace a nondefective FRU): a. External diskette drive or optical drive g. If the problem remains, replace the following FRUs one at least 10 times. 2. LCD assembly ThinkPad X60, X60s, X61, and X61s 55 If any error is not operating, follow these procedures to isolate the...


