Owner's Manual
Page 2
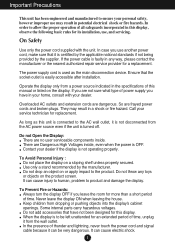
... Hazards: Always turn the display OFF if you use , and servicing. When the display is OFF. The power supply cord is turned off. Do not Open the Display: There are dangerous. In case you leave the room for its installation, use another power cord, make sure that it is not disconnected from the wall outlet. So are Dangerous High Voltages inside . There are frayed power cords and broken plugs. Contact...
... Hazards: Always turn the display OFF if you use , and servicing. When the display is OFF. The power supply cord is turned off. Do not Open the Display: There are dangerous. In case you leave the room for its installation, use another power cord, make sure that it is not disconnected from the wall outlet. So are Dangerous High Voltages inside . There are frayed power cords and broken plugs. Contact...
Owner's Manual
Page 3
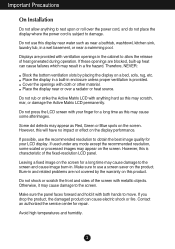
... best image quality for repair. Make sure to move. Burn-in a wet basement, or near or over the power cord, and do not place the display where the power cord is subject to the screen and cause image burn-in a fire hazard. Displays are provided with your LCD display. Do not press the LCD screen with ventilation openings in enclosure unless proper ventilation is characteristic of the fixed-resolution LCD panel...
... best image quality for repair. Make sure to move. Burn-in a wet basement, or near or over the power cord, and do not place the display where the power cord is subject to the screen and cause image burn-in a fire hazard. Displays are provided with your LCD display. Do not press the LCD screen with ventilation openings in enclosure unless proper ventilation is characteristic of the fixed-resolution LCD panel...
Owner's Manual
Page 5
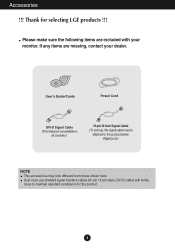
... LGE products !!! Please make sure the following items are missing, contact your monitor. User's Guide/Cards Power Cord DVI-D Signal Cable (This feature is not available in all countries.) 15-pin D-Sub Signal Cable (To set it up, this product before shipping out.) NOTE This accessories may look different from those shown here. Accessories !!! User must use shielded signal interface cables (D-sub 15 pin cable, DVI-D cable) with your dealer.
... LGE products !!! Please make sure the following items are missing, contact your monitor. User's Guide/Cards Power Cord DVI-D Signal Cable (This feature is not available in all countries.) 15-pin D-Sub Signal Cable (To set it up, this product before shipping out.) NOTE This accessories may look different from those shown here. Accessories !!! User must use shielded signal interface cables (D-sub 15 pin cable, DVI-D cable) with your dealer.
Owner's Manual
Page 6
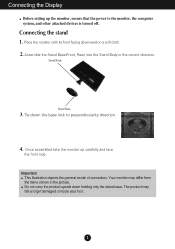
Stand Body Stand Base 3. Tie down holding only the stand base. Connecting the Display Before setting up carefully and face the front side. Once assembled take the monitor up the monitor, ensure that the power to perpendicularity direction. 4. Your monitor may fall and get damaged or injure your foot. 5 Do not carry the product upside down the base lock to the monitor, the computer system, and other...
Stand Body Stand Base 3. Tie down holding only the stand base. Connecting the Display Before setting up carefully and face the front side. Once assembled take the monitor up the monitor, ensure that the power to perpendicularity direction. 4. Your monitor may fall and get damaged or injure your foot. 5 Do not carry the product upside down the base lock to the monitor, the computer system, and other...
Owner's Manual
Page 7
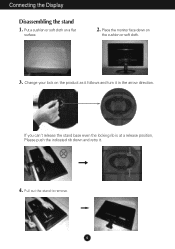
Put a cushion or soft cloth on the product as it follows and turn it . 4. Pull out the stand to remove. 6 If you can't release the stand base even the locking rib is at a release position, Please push the indicated rib down on the cushion or soft cloth. 3. Change your lock on a flat surface. 2. Place the monitor face down and retry it in the arrow direction. Connecting the Display Disassembling the stand 1.
Put a cushion or soft cloth on the product as it follows and turn it . 4. Pull out the stand to remove. 6 If you can't release the stand base even the locking rib is at a release position, Please push the indicated rib down on the cushion or soft cloth. 3. Change your lock on a flat surface. 2. Place the monitor face down and retry it in the arrow direction. Connecting the Display Disassembling the stand 1.
Owner's Manual
Page 8
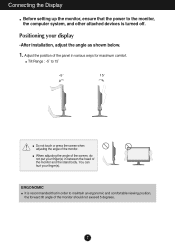
... head of the monitor and the stand body. Tilt Range : -5˚ to the monitor, the computer system, and other attached devices is turned off. You can hurt your display -After installation, adjust the angle as shown below. 1. When adjusting the angle of the screen, do not put your finger(s) in various ways for maximum comfort. Connecting the Display Before setting up the monitor, ensure that...
... head of the monitor and the stand body. Tilt Range : -5˚ to the monitor, the computer system, and other attached devices is turned off. You can hurt your display -After installation, adjust the angle as shown below. 1. When adjusting the angle of the screen, do not put your finger(s) in various ways for maximum comfort. Connecting the Display Before setting up the monitor, ensure that...
Owner's Manual
Page 9
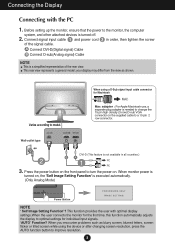
...the power to model. A Connect DVI-D(Digital signal) Cable B Connect D-sub(Analog signal) Cable NOTE This is a simplified representation of the signal cable. Varies according to the monitor, the computer system, and other attached devices is turned off. 2. Connect signal input cable 1 and power cord 2 in all countries.) BA PC PC 3. Connecting the Display Connecting with optimal display settings.When the user connects the monitor for the first time, this function automatically adjusts the display to optimal settings for Macintosh Mac adapter : For Apple Macintosh use, a separate plug...
...the power to model. A Connect DVI-D(Digital signal) Cable B Connect D-sub(Analog signal) Cable NOTE This is a simplified representation of the signal cable. Varies according to the monitor, the computer system, and other attached devices is turned off. 2. Connect signal input cable 1 and power cord 2 in all countries.) BA PC PC 3. Connecting the Display Connecting with optimal display settings.When the user connects the monitor for the first time, this function automatically adjusts the display to optimal settings for Macintosh Mac adapter : For Apple Macintosh use, a separate plug...

Owner's Manual
Page 10
The message "OSD UNLOCKED" should appear. MODE Button Use this button to page 17. 9 You can unlock the OSD controls at any time by pushing the MENU button for several seconds. The message "OSD LOCKED" should appear. For more information, refer to enter F-ENGINE, ORIGINAL RATIO, PHOTO EFFECT menus. Press and hold the MENU button for several seconds. Control Panel Functions Front Panel Controls MENU Button OSD LOCKED/UNLOCKED This function allows you to lock the current control settings, so that they cannot be inadvertently changed.
The message "OSD UNLOCKED" should appear. MODE Button Use this button to page 17. 9 You can unlock the OSD controls at any time by pushing the MENU button for several seconds. The message "OSD LOCKED" should appear. For more information, refer to enter F-ENGINE, ORIGINAL RATIO, PHOTO EFFECT menus. Press and hold the MENU button for several seconds. Control Panel Functions Front Panel Controls MENU Button OSD LOCKED/UNLOCKED This function allows you to lock the current control settings, so that they cannot be inadvertently changed.
Owner's Manual
Page 11
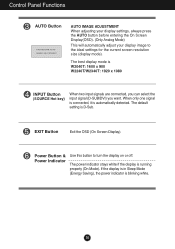
... best display mode is D-Sub. The default setting is W2040T: 1600 x 900 W2240T/W2340T: 1920 x 1080 INPUT Button (SOURCE Hot key) When two input signals are connected, you can select the input signal (D-SUB/DVI) you want. The power indicator stays white if the display is blinking white. 10 Power Button & Power Indicator Use this button to the ideal settings for the current screen resolution size (display mode). Control Panel Functions AUTO Button AUTO IMAGE ADJUSTMENT When adjusting your display settings, always press the AUTO button before entering the On Screen Display...
... best display mode is D-Sub. The default setting is W2040T: 1600 x 900 W2240T/W2340T: 1920 x 1080 INPUT Button (SOURCE Hot key) When two input signals are connected, you can select the input signal (D-SUB/DVI) you want. The power indicator stays white if the display is blinking white. 10 Power Button & Power Indicator Use this button to the ideal settings for the current screen resolution size (display mode). Control Panel Functions AUTO Button AUTO IMAGE ADJUSTMENT When adjusting your display settings, always press the AUTO button before entering the On Screen Display...

Owner's Manual
Page 13
...(Analog signal) input DVI-D : DVI-D(Digital signal) input Main menu PICTURE Sub-menu BRIGHTNESS CONTRAST SHARPNESS Supported input Description DSUB DVI-D To adjust the brightness, contrast and sharpness of the screen COLOR COLOR TEMP (PRESET / USER) GAMMA DSUB DVI-D To customize the color of the screen DISPLAY HORIZONTAL VERTICAL CLOCK PHASE DSUB DSUB To adjust the position of the screen To improve the clarity and stability of the screen OTHERS LANGUAGE POWER INDICATOR WHITE BALANCE FACTORY RESET DSUB DVI-D DSUB DSUB DVI-D To customize the screen status for a user's operating...
...(Analog signal) input DVI-D : DVI-D(Digital signal) input Main menu PICTURE Sub-menu BRIGHTNESS CONTRAST SHARPNESS Supported input Description DSUB DVI-D To adjust the brightness, contrast and sharpness of the screen COLOR COLOR TEMP (PRESET / USER) GAMMA DSUB DVI-D To customize the color of the screen DISPLAY HORIZONTAL VERTICAL CLOCK PHASE DSUB DSUB To adjust the position of the screen To improve the clarity and stability of the screen OTHERS LANGUAGE POWER INDICATOR WHITE BALANCE FACTORY RESET DSUB DVI-D DSUB DSUB DVI-D To customize the screen status for a user's operating...
Owner's Manual
Page 15
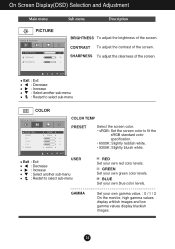
... display blackish images. 14 BLUE Set your own green color levels. On Screen Display(OSD) Selection and Adjustment Main menu Sub menu Description BRIGHTNESS To adjust the brightness of the screen. Exit : Exit : Decrease : Increase : Select another sub-menu : Restart to fit the sRGB standard color specification. • 6500K: Slightly reddish white. • 9300K: Slightly bluish white. GREEN Set your own blue color levels. SHARPNESS To adjust the clearness of the screen. Set your own red color levels. CONTRAST To adjust the contrast...
... display blackish images. 14 BLUE Set your own green color levels. On Screen Display(OSD) Selection and Adjustment Main menu Sub menu Description BRIGHTNESS To adjust the brightness of the screen. Exit : Exit : Decrease : Increase : Select another sub-menu : Restart to fit the sRGB standard color specification. • 6500K: Slightly reddish white. • 9300K: Slightly bluish white. GREEN Set your own blue color levels. SHARPNESS To adjust the clearness of the screen. Set your own red color levels. CONTRAST To adjust the contrast...
Owner's Manual
Page 17
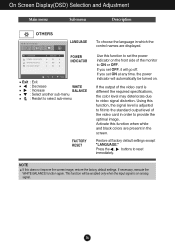
...-menu FACTORY RESET To choose the language in the screen. If you set ON at any time, the power indicator will automatically be enabled only when the input signal is an analog signal. 16 Press the , buttons to provide the optimal image. If the output of the video card is adjusted to fit into the standard output level of the monitor to ON or OFF. Restore all factory default settings except "LANGUAGE...
...-menu FACTORY RESET To choose the language in the screen. If you set ON at any time, the power indicator will automatically be enabled only when the input signal is an analog signal. 16 Press the , buttons to provide the optimal image. If the output of the video card is adjusted to fit into the standard output level of the monitor to ON or OFF. Restore all factory default settings except "LANGUAGE...
Owner's Manual
Page 20
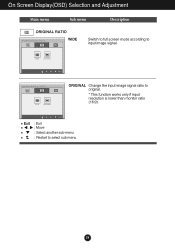
ORIGINAL Change the input image signal ratio to select sub-menu 19 Exit : Exit , : Move : Select another sub-menu : Restart to original. * This function works only if input resolution is lower than monitor ratio (16:9). On Screen Display(OSD) Selection and Adjustment Main menu Sub menu Description WIDE Switch to full screen mode according to input image signal.
ORIGINAL Change the input image signal ratio to select sub-menu 19 Exit : Exit , : Move : Select another sub-menu : Restart to original. * This function works only if input resolution is lower than monitor ratio (16:9). On Screen Display(OSD) Selection and Adjustment Main menu Sub menu Description WIDE Switch to full screen mode according to input image signal.
Owner's Manual
Page 22
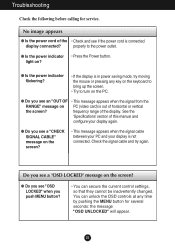
... display. frequency range of horizontal or vertical the screen? light on the screen? • This message appears when the signal cable between your PC and your display again. ● Do you see if the power cord is not connected. You can secure the current control settings, so that they cannot be inadvertently changed. Do you see a "OSD LOCKED" message on the screen? ● Do you push MENU button? • You can unlock the OSD controls...
... display. frequency range of horizontal or vertical the screen? light on the screen? • This message appears when the signal cable between your PC and your display again. ● Do you see if the power cord is not connected. You can secure the current control settings, so that they cannot be inadvertently changed. Do you see a "OSD LOCKED" message on the screen? ● Do you push MENU button? • You can unlock the OSD controls...
Owner's Manual
Page 23
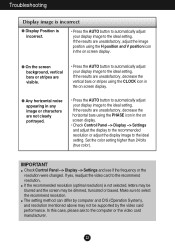
... may be supported by the video card performance. Troubleshooting Display image is incorrect ● Display Position is not selected, letters may be blurred and the screen may not be dimmed, truncated or biased. If the results are not clearly portrayed. • Press the AUTO button to automatically adjust your display image to select the recommend resolution. IMPORTANT Check Control Panel --> Display --> Settings and see if the frequency or the resolution were changed. Make sure...
... may be supported by the video card performance. Troubleshooting Display image is incorrect ● Display Position is not selected, letters may be blurred and the screen may not be dimmed, truncated or biased. If the results are not clearly portrayed. • Press the AUTO button to automatically adjust your display image to select the recommend resolution. IMPORTANT Check Control Panel --> Display --> Settings and see if the frequency or the resolution were changed. Make sure...
Owner's Manual
Page 24
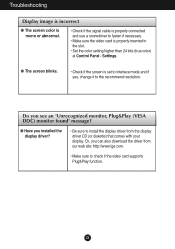
... monitor, Plug&Play (VESA DDC) monitor found" message? ● Have you can also download the driver from the display driver CD (or diskette) that comes with your display. Troubleshooting Display image is incorrect ● The screen color is mono or abnormal. • Check if the signal cable is properly inserted in the slot. • Set the color setting higher than 24 bits (true color) at Control Panel - Settings. ● The screen blinks. • Check if the screen is set...
... monitor, Plug&Play (VESA DDC) monitor found" message? ● Have you can also download the driver from the display driver CD (or diskette) that comes with your display. Troubleshooting Display image is incorrect ● The screen color is mono or abnormal. • Check if the signal cable is properly inserted in the slot. • Set the color setting higher than 24 bits (true color) at Control Panel - Settings. ● The screen blinks. • Check if the screen is set...
Owner's Manual
Page 25
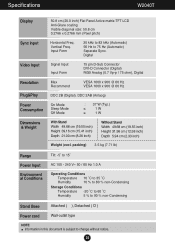
... Sync. Digital Video Input Signal Input Input Form 15 pin D-Sub Connector DVI-D Connector (Digital) RGB Analog (0.7 Vp-p / 75 ohm), Digital Resolution Max Recommend VESA 1600 x 900 @ 60 Hz VESA 1600 x 900 @ 60 Hz Plug&Play DDC 2B (Digital), DDC 2AB (Anlaog) Power Consumption On Mode Sleep Mode Off Mode : 37 W (Typ.) ≤ 1 W ≤ 1 W Dimensions & Weight With Stand Width 49.68 cm (19.55 inch) Height 39.16 cm (15.41 inch) Depth 21.00 cm (8.26 inch) Without Stand...
... Sync. Digital Video Input Signal Input Input Form 15 pin D-Sub Connector DVI-D Connector (Digital) RGB Analog (0.7 Vp-p / 75 ohm), Digital Resolution Max Recommend VESA 1600 x 900 @ 60 Hz VESA 1600 x 900 @ 60 Hz Plug&Play DDC 2B (Digital), DDC 2AB (Anlaog) Power Consumption On Mode Sleep Mode Off Mode : 37 W (Typ.) ≤ 1 W ≤ 1 W Dimensions & Weight With Stand Width 49.68 cm (19.55 inch) Height 39.16 cm (15.41 inch) Depth 21.00 cm (8.26 inch) Without Stand...
Owner's Manual
Page 26
... (Automatic) 56 Hz to change without notice. 25 Digital Video Input Signal Input Input Form 15 pin D-Sub Connector DVI-D Connector (Digital) RGB Analog (0.7 Vp-p / 75 ohm), Digital Resolution Max Recommend VESA 1920 x 1080 @ 60 Hz VESA 1920 x 1080 @ 60 Hz Plug&Play DDC 2B (Digital), DDC 2AB (Anlaog) Power Consumption On Mode Sleep Mode Off Mode : 40 W (Typ.) ≤ 1 W ≤ 1 W Dimensions & Weight With Stand Width 52.98 cm (20.85 inch) Height 41.10 cm (16...
... (Automatic) 56 Hz to change without notice. 25 Digital Video Input Signal Input Input Form 15 pin D-Sub Connector DVI-D Connector (Digital) RGB Analog (0.7 Vp-p / 75 ohm), Digital Resolution Max Recommend VESA 1920 x 1080 @ 60 Hz VESA 1920 x 1080 @ 60 Hz Plug&Play DDC 2B (Digital), DDC 2AB (Anlaog) Power Consumption On Mode Sleep Mode Off Mode : 40 W (Typ.) ≤ 1 W ≤ 1 W Dimensions & Weight With Stand Width 52.98 cm (20.85 inch) Height 41.10 cm (16...

Owner's Manual
Page 27
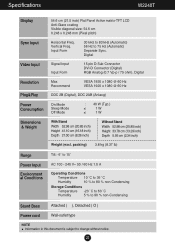
... to 75 Hz (Automatic) Separate Sync. Vertical Freq. Digital Video Input Signal Input Input Form 15 pin D-Sub Connector DVI-D Connector (Digital) RGB Analog (0.7 Vp-p / 75 ohm), Digital Resolution Max Recommend VESA 1920 x 1080 @ 60 Hz VESA 1920 x 1080 @ 60 Hz Plug&Play DDC 2B (Digital), DDC 2AB (Anlaog) Power Consumption On Mode Sleep Mode Off Mode : 42 W (Typ.) ≤ 1 W ≤ 1 W Dimensions & Weight With Stand Width 56.38 cm (22.19 inch) Height 43.17 cm (16.99...
... to 75 Hz (Automatic) Separate Sync. Vertical Freq. Digital Video Input Signal Input Input Form 15 pin D-Sub Connector DVI-D Connector (Digital) RGB Analog (0.7 Vp-p / 75 ohm), Digital Resolution Max Recommend VESA 1920 x 1080 @ 60 Hz VESA 1920 x 1080 @ 60 Hz Plug&Play DDC 2B (Digital), DDC 2AB (Anlaog) Power Consumption On Mode Sleep Mode Off Mode : 42 W (Typ.) ≤ 1 W ≤ 1 W Dimensions & Weight With Stand Width 56.38 cm (22.19 inch) Height 43.17 cm (16.99...
Owner's Manual
Page 28
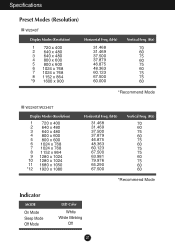
... x 600 6 1024 x 768 7 1024 x 768 8 1152 x 864 *9 1600 x 900 Horizontal Freq. (kHz) 31.468 31.469 37.500 37.879 46.875 48.363 60.123 67.500 60.000 Vertical Freq. (Hz) 70 60 75 60 75 60 75 75 60 *Recommend Mode W2240T/W2340T Display Modes (Resolution) 1 720 x 400 2 640 x 480 3 640 x 480 4 800 x 600... x 1050 *12 1920 x 1080 Horizontal Freq. (kHz) 31.468 31.469 37.500 37.879 46.875 48.363 60.123 67.500 63.981 79.976 65.290 67.500 Vertical Freq. (Hz) 70 60 75 60 75 60 75 75 60 75 60 60 *Recommend Mode Indicator MODE On Mode Sleep Mode Off Mode LED Color White White Blinking Off 27
... x 600 6 1024 x 768 7 1024 x 768 8 1152 x 864 *9 1600 x 900 Horizontal Freq. (kHz) 31.468 31.469 37.500 37.879 46.875 48.363 60.123 67.500 60.000 Vertical Freq. (Hz) 70 60 75 60 75 60 75 75 60 *Recommend Mode W2240T/W2340T Display Modes (Resolution) 1 720 x 400 2 640 x 480 3 640 x 480 4 800 x 600... x 1050 *12 1920 x 1080 Horizontal Freq. (kHz) 31.468 31.469 37.500 37.879 46.875 48.363 60.123 67.500 63.981 79.976 65.290 67.500 Vertical Freq. (Hz) 70 60 75 60 75 60 75 75 60 75 60 60 *Recommend Mode Indicator MODE On Mode Sleep Mode Off Mode LED Color White White Blinking Off 27


