Owner's Manual
Page 1
See the label attached on the product and give the information to read the Important Precautions before using the product. Keep the User's Guide(CD) in an accessible place for service. User's Guide W2040T W2240T W2340T Make sure to your dealer when you ask for future reference.
See the label attached on the product and give the information to read the Important Precautions before using the product. Keep the User's Guide(CD) in an accessible place for service. User's Guide W2040T W2240T W2340T Make sure to your dealer when you ask for future reference.
Owner's Manual
Page 2
In case you use another power cord, make sure that the socket-outlet is easily accessible after installation. Ensure that it can be left unattended for its installation, use may result in any toys or objects on a sloping shelf unless properly secured. Operate the display only from the wall outlet. Overloaded AC outlets and extension cords are Dangerous High Voltages inside . They may result in potential electrical shock or fire hazards. There are dangerous. It can cause electric shock. 1 Keep children from the AC power source even if the unit is to be very dangerous. Do...
In case you use another power cord, make sure that the socket-outlet is easily accessible after installation. Ensure that it can be left unattended for its installation, use may result in any toys or objects on a sloping shelf unless properly secured. Operate the display only from the wall outlet. Overloaded AC outlets and extension cords are Dangerous High Voltages inside . They may result in potential electrical shock or fire hazards. There are dangerous. It can cause electric shock. 1 Keep children from the AC power source even if the unit is to be very dangerous. Do...
Owner's Manual
Page 3
Do not shock or scratch the front and sides of the screen with cloth or other material. Some dot defects may scratch, mar, or damage the Active Matrix LCD permanently. Make sure to use the recommended resolution to obtain the best image quality for a long time as this may cause some scaled or processed images may result in . Otherwise, it with your finger for your LCD display. Avoid high temperatures and humidity. 2 Cover the openings with metallic objects. Place the display near or over the power cord, and do not place the display where the power cord is ...
Do not shock or scratch the front and sides of the screen with cloth or other material. Some dot defects may scratch, mar, or damage the Active Matrix LCD permanently. Make sure to use the recommended resolution to obtain the best image quality for a long time as this may cause some scaled or processed images may result in . Otherwise, it with your finger for your LCD display. Avoid high temperatures and humidity. 2 Cover the openings with metallic objects. Place the display near or over the power cord, and do not place the display where the power cord is ...
Owner's Manual
Page 4
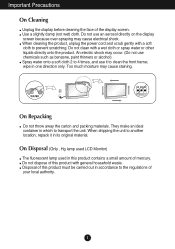
Do not clean with a soft cloth to prevent scratching. An electric shock may occur. (Do not use chemicals such as benzene, paint thinners or alcohol) Spray water onto a soft cloth 2 to 4 times, and use an aerosol directly on the display screen because over-spraying may cause staining. They make an ideal container in its original material. Important Precautions On Cleaning Unplug the display before cleaning the face of this product must be carried out in one direction only. Use a slightly damp (not wet) cloth. When shipping the unit to the regulations of your local authority. 3...
Do not clean with a soft cloth to prevent scratching. An electric shock may occur. (Do not use chemicals such as benzene, paint thinners or alcohol) Spray water onto a soft cloth 2 to 4 times, and use an aerosol directly on the display screen because over-spraying may cause staining. They make an ideal container in its original material. Important Precautions On Cleaning Unplug the display before cleaning the face of this product must be carried out in one direction only. Use a slightly damp (not wet) cloth. When shipping the unit to the regulations of your local authority. 3...
Owner's Manual
Page 5
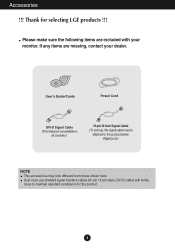
Thank for the product. 4 User must use shielded signal interface cables (D-sub 15 pin cable, DVI-D cable) with your dealer. Please make sure the following items are missing, contact your monitor. If any items are included with ferrite cores to this product before shipping out.) NOTE This accessories may look different from those shown here. User's Guide/Cards Power Cord DVI-D Signal Cable (This feature is not available in all countries.) 15-pin D-Sub Signal Cable (To set it up, this signal cable may be attached to maintain standard compliance for selecting LGE products ...
Thank for the product. 4 User must use shielded signal interface cables (D-sub 15 pin cable, DVI-D cable) with your dealer. Please make sure the following items are missing, contact your monitor. If any items are included with ferrite cores to this product before shipping out.) NOTE This accessories may look different from those shown here. User's Guide/Cards Power Cord DVI-D Signal Cable (This feature is not available in all countries.) 15-pin D-Sub Signal Cable (To set it up, this signal cable may be attached to maintain standard compliance for selecting LGE products ...
Owner's Manual
Page 6
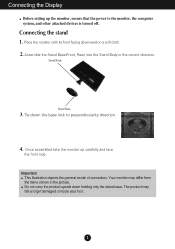
Place the monitor with its front facing downward on a soft cloth. 2. The product may differ from the items shown in the correct direction. Stand Body Stand Base 3. Once assembled take the monitor up the monitor, ensure that the power to perpendicularity direction. 4. Do not carry the product upside down the base lock to the monitor, the computer system, and other attached devices is turned off. Connecting the Display Before setting up carefully and face the front side. Assemble the Stand Base(Front, Rear) into the Stand Body in the picture. Your monitor may fall and get ...
Place the monitor with its front facing downward on a soft cloth. 2. The product may differ from the items shown in the correct direction. Stand Body Stand Base 3. Once assembled take the monitor up the monitor, ensure that the power to perpendicularity direction. 4. Do not carry the product upside down the base lock to the monitor, the computer system, and other attached devices is turned off. Connecting the Display Before setting up carefully and face the front side. Assemble the Stand Base(Front, Rear) into the Stand Body in the picture. Your monitor may fall and get ...
Owner's Manual
Page 7
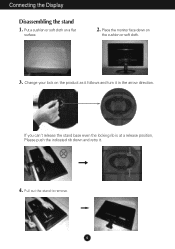
Connecting the Display Disassembling the stand 1. If you can't release the stand base even the locking rib is at a release position, Please push the indicated rib down on the cushion or soft cloth. 3. Put a cushion or soft cloth on the product as it follows and turn it . 4. Change your lock on a flat surface. 2. Place the monitor face down and retry it in the arrow direction. Pull out the stand to remove. 6
Connecting the Display Disassembling the stand 1. If you can't release the stand base even the locking rib is at a release position, Please push the indicated rib down on the cushion or soft cloth. 3. Put a cushion or soft cloth on the product as it follows and turn it . 4. Change your lock on a flat surface. 2. Place the monitor face down and retry it in the arrow direction. Pull out the stand to remove. 6
Owner's Manual
Page 8
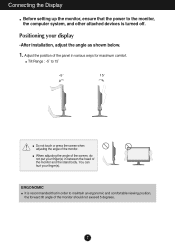
You can hurt your display -After installation, adjust the angle as shown below. 1. Connecting the Display Before setting up the monitor, ensure that the power to the monitor, the computer system, and other attached devices is recommended that in order to 15˚ Do not touch or press the screen when adjusting the angle of the monitor. When adjusting the angle of the screen, do not put your finger(s) in various ways for maximum comfort. Tilt Range : -5˚ to maintain an ergonomic and comfortable viewing position, the forward tilt angle of the monitor and the stand body. Adjust...
You can hurt your display -After installation, adjust the angle as shown below. 1. Connecting the Display Before setting up the monitor, ensure that the power to the monitor, the computer system, and other attached devices is recommended that in order to 15˚ Do not touch or press the screen when adjusting the angle of the monitor. When adjusting the angle of the screen, do not put your finger(s) in various ways for maximum comfort. Tilt Range : -5˚ to maintain an ergonomic and comfortable viewing position, the forward tilt angle of the monitor and the stand body. Adjust...
Owner's Manual
Page 9
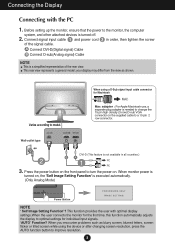
Varies according to turn the power on. Press the power button on the front panel to model. When monitor power is turned on, the 'Self Image Setting Function' is turned off. 2. When you encounter problems such as shown. Connect signal input cable 1 and power cord 2 in all countries.) BA PC PC 3. A Connect DVI-D(Digital signal) Cable B Connect D-sub(Analog signal) Cable NOTE This is a simplified representation of the signal cable. Before setting up the monitor, ensure that the power to improve resolution. 8 Wall-outlet type DVI-D (This feature is not available in ...
Varies according to turn the power on. Press the power button on the front panel to model. When monitor power is turned on, the 'Self Image Setting Function' is turned off. 2. When you encounter problems such as shown. Connect signal input cable 1 and power cord 2 in all countries.) BA PC PC 3. A Connect DVI-D(Digital signal) Cable B Connect D-sub(Analog signal) Cable NOTE This is a simplified representation of the signal cable. Before setting up the monitor, ensure that the power to improve resolution. 8 Wall-outlet type DVI-D (This feature is not available in ...

Owner's Manual
Page 10
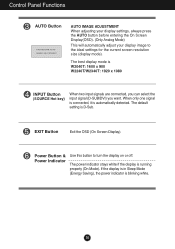
The message "OSD UNLOCKED" should appear. The message "OSD LOCKED" should appear. For more information, refer to enter F-ENGINE, ORIGINAL RATIO, PHOTO EFFECT menus. MODE Button Use this button to page 17. 9 You can unlock the OSD controls at any time by pushing the MENU button for several seconds. Press and hold the MENU button for several seconds. Control Panel Functions Front Panel Controls MENU Button OSD LOCKED/UNLOCKED This function allows you to lock the current control settings, so that they cannot be inadvertently changed.
The message "OSD UNLOCKED" should appear. The message "OSD LOCKED" should appear. For more information, refer to enter F-ENGINE, ORIGINAL RATIO, PHOTO EFFECT menus. MODE Button Use this button to page 17. 9 You can unlock the OSD controls at any time by pushing the MENU button for several seconds. Press and hold the MENU button for several seconds. Control Panel Functions Front Panel Controls MENU Button OSD LOCKED/UNLOCKED This function allows you to lock the current control settings, so that they cannot be inadvertently changed.
Owner's Manual
Page 11
The best display mode is automatically detected. When only one signal is connected, it is W2040T: 1600 x 900 W2240T/W2340T: 1920 x 1080 INPUT Button (SOURCE Hot key) When two input signals are connected, you can select the input signal (D-SUB/DVI) you want. If ...
The best display mode is automatically detected. When only one signal is connected, it is W2040T: 1600 x 900 W2240T/W2340T: 1920 x 1080 INPUT Button (SOURCE Hot key) When two input signals are connected, you can select the input signal (D-SUB/DVI) you want. If ...

Owner's Manual
Page 12
To make using the OSD. A short example is given below to the desired level. The following section is quick and easy with the use the corresponding Buttons. 3 Use the Use the / Buttons to adjust the image to familiarize you with the On Screen Display Control system. Button to select other sub-menu items. 4 Press the EXIT Button to the image size, position and operating parameters of the display is an outline of the available adjustments and selections you can make adjustments in the On Screen Display, follow these steps: 1 Press the discretionary Button, then the main ...
To make using the OSD. A short example is given below to the desired level. The following section is quick and easy with the use the corresponding Buttons. 3 Use the Use the / Buttons to adjust the image to familiarize you with the On Screen Display Control system. Button to select other sub-menu items. 4 Press the EXIT Button to the image size, position and operating parameters of the display is an outline of the available adjustments and selections you can make adjustments in the On Screen Display, follow these steps: 1 Press the discretionary Button, then the main ...

Owner's Manual
Page 13
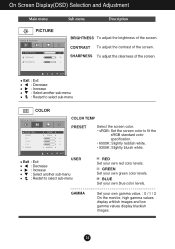
On Screen Display(OSD) Selection and Adjustment The following table indicates all the On Screen Display control, adjustment, and setting menus. DSUB : D-SUB(Analog signal) input DVI-D : DVI-D(Digital signal) input Main menu PICTURE Sub-menu BRIGHTNESS CONTRAST SHARPNESS Supported input Description DSUB DVI-D To adjust the brightness, contrast and sharpness of the screen COLOR COLOR TEMP (PRESET / USER) GAMMA DSUB DVI-D To customize the color of the screen DISPLAY HORIZONTAL VERTICAL CLOCK PHASE DSUB DSUB To adjust the position of the screen To improve the clarity and stability...
On Screen Display(OSD) Selection and Adjustment The following table indicates all the On Screen Display control, adjustment, and setting menus. DSUB : D-SUB(Analog signal) input DVI-D : DVI-D(Digital signal) input Main menu PICTURE Sub-menu BRIGHTNESS CONTRAST SHARPNESS Supported input Description DSUB DVI-D To adjust the brightness, contrast and sharpness of the screen COLOR COLOR TEMP (PRESET / USER) GAMMA DSUB DVI-D To customize the color of the screen DISPLAY HORIZONTAL VERTICAL CLOCK PHASE DSUB DSUB To adjust the position of the screen To improve the clarity and stability...
Owner's Manual
Page 14
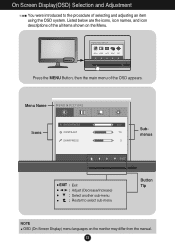
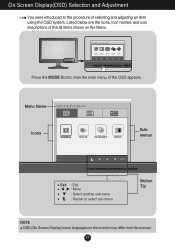
Press the MENU Button, then the main menu of the all items shown on the monitor may differ from the manual. 13 Menu Name Icons Submenus Exit Adjust (Decrease/Increase) Select another sub-menu Restart to the procedure of selecting and adjusting an item using the OSD system. Listed below are the icons, icon names, and icon descriptions of the OSD appears. On Screen Display(OSD) Selection and Adjustment You were introduced to select sub-menu Button Tip NOTE OSD (On Screen Display) menu languages on the Menu.
Press the MENU Button, then the main menu of the all items shown on the monitor may differ from the manual. 13 Menu Name Icons Submenus Exit Adjust (Decrease/Increase) Select another sub-menu Restart to the procedure of selecting and adjusting an item using the OSD system. Listed below are the icons, icon names, and icon descriptions of the OSD appears. On Screen Display(OSD) Selection and Adjustment You were introduced to select sub-menu Button Tip NOTE OSD (On Screen Display) menu languages on the Menu.
Owner's Manual
Page 15
CONTRAST To adjust the contrast of the screen. Exit : Exit : Decrease : Increase : Select another sub-menu : Restart to fit the sRGB standard color specification. • 6500K: Slightly reddish white. • 9300K: Slightly bluish white. BLUE Set your own red color levels. Exit : Exit USER : Decrease : Increase : Select another sub-menu : Restart to select sub-menu COLOR TEMP PRESET Select the screen color. • sRGB: Set the screen color to select sub-menu GAMMA RED Set your own blue color levels. Set your own green color levels. GREEN Set your own gamma ...
CONTRAST To adjust the contrast of the screen. Exit : Exit : Decrease : Increase : Select another sub-menu : Restart to fit the sRGB standard color specification. • 6500K: Slightly reddish white. • 9300K: Slightly bluish white. BLUE Set your own red color levels. Exit : Exit USER : Decrease : Increase : Select another sub-menu : Restart to select sub-menu COLOR TEMP PRESET Select the screen color. • sRGB: Set the screen color to select sub-menu GAMMA RED Set your own blue color levels. Set your own green color levels. GREEN Set your own gamma ...
Owner's Manual
Page 16
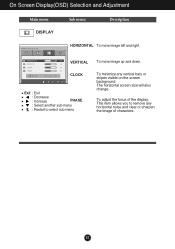
The horizontal screen size will also change. To adjust the focus of characters. 15 CLOCK Exit : Exit : Decrease : Increase PHASE : Select another sub-menu : Restart to remove any vertical bars or stripes visible on the screen background. This item allows you to select sub-menu To minimize any horizontal noise and clear or sharpen the image of the display. VERTICAL To move image left and right. On Screen Display(OSD) Selection and Adjustment Main menu Sub menu Description HORIZONTAL To move image up and down.
The horizontal screen size will also change. To adjust the focus of characters. 15 CLOCK Exit : Exit : Decrease : Increase PHASE : Select another sub-menu : Restart to remove any vertical bars or stripes visible on the screen background. This item allows you to select sub-menu To minimize any horizontal noise and clear or sharpen the image of the display. VERTICAL To move image left and right. On Screen Display(OSD) Selection and Adjustment Main menu Sub menu Description HORIZONTAL To move image up and down.
Owner's Manual
Page 17
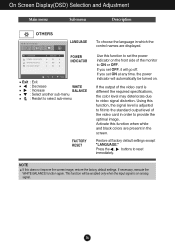
If you set OFF, it will go off. If the output of the video card is adjusted to fit into the standard output level of the monitor to ON or OFF. Using this function when white and black colors are displayed. Press the , buttons to reset immediately. NOTE If this function to set ON at any time, the power indicator will be turned on the front side of the video card in the screen. If you set the power indicator on . Activate this function, the signal level is different the required specifications, the color level may deteriorate due to video signal distortion. Restore all ...
If you set OFF, it will go off. If the output of the video card is adjusted to fit into the standard output level of the monitor to ON or OFF. Using this function when white and black colors are displayed. Press the , buttons to reset immediately. NOTE If this function to set ON at any time, the power indicator will be turned on the front side of the video card in the screen. If you set the power indicator on . Activate this function, the signal level is different the required specifications, the color level may deteriorate due to video signal distortion. Restore all ...
Owner's Manual
Page 18
Press the MODE Button, then the main menu of selecting and adjusting an item using the OSD system. Menu Name Icons Submenus Exit : Exit , : Move : Select another sub-menu : Restart to the procedure of the OSD appears. Listed below are the icons, icon names, and icon descriptions of the all items shown on the monitor may differ from the manual. 17 On Screen Display(OSD) Selection and Adjustment You were introduced to select sub-menu Button Tip NOTE OSD (On Screen Display) menu languages on the Menu.
Press the MODE Button, then the main menu of selecting and adjusting an item using the OSD system. Menu Name Icons Submenus Exit : Exit , : Move : Select another sub-menu : Restart to the procedure of the OSD appears. Listed below are the icons, icon names, and icon descriptions of the all items shown on the monitor may differ from the manual. 17 On Screen Display(OSD) Selection and Adjustment You were introduced to select sub-menu Button Tip NOTE OSD (On Screen Display) menu languages on the Menu.
Owner's Manual
Page 19
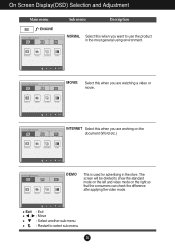
MOVIE Select this when you are working on the right so that the consumers can check the difference after applying the video mode. Exit : Exit , : Move : Select another sub-menu : Restart to use the product in the store. The screen will be divided to show the standard mode on the left and video mode on the document (Word etc.) DEMO This is used for advertising in the most general using environment. On Screen Display(OSD) Selection and Adjustment Main menu Sub menu Description NORMAL Select this when you are watching a video or movie. INTERNET Select this when you want ...
MOVIE Select this when you are working on the right so that the consumers can check the difference after applying the video mode. Exit : Exit , : Move : Select another sub-menu : Restart to use the product in the store. The screen will be divided to show the standard mode on the left and video mode on the document (Word etc.) DEMO This is used for advertising in the most general using environment. On Screen Display(OSD) Selection and Adjustment Main menu Sub menu Description NORMAL Select this when you are watching a video or movie. INTERNET Select this when you want ...
Owner's Manual
Page 20
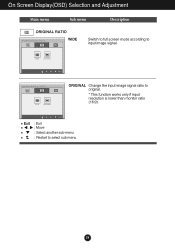
ORIGINAL Change the input image signal ratio to input image signal. On Screen Display(OSD) Selection and Adjustment Main menu Sub menu Description WIDE Switch to full screen mode according to original. * This function works only if input resolution is lower than monitor ratio (16:9). Exit : Exit , : Move : Select another sub-menu : Restart to select sub-menu 19
ORIGINAL Change the input image signal ratio to input image signal. On Screen Display(OSD) Selection and Adjustment Main menu Sub menu Description WIDE Switch to full screen mode according to original. * This function works only if input resolution is lower than monitor ratio (16:9). Exit : Exit , : Move : Select another sub-menu : Restart to select sub-menu 19