
Owner's Manual (English)
Page 5
Your monitor may fall and get damaged or injure your foot. Loosen the screw which is attached to the stand base. Stand Body Stand Base Screw Important This illustration depicts the general model of connection. A4 Assemble the stand base into stand body in the correct direction as shown in ...the picture, then tighten the screw which is attached to the stand base, then take the monitor up carefully and face the front side....
Your monitor may fall and get damaged or injure your foot. Loosen the screw which is attached to the stand base. Stand Body Stand Base Screw Important This illustration depicts the general model of connection. A4 Assemble the stand base into stand body in the correct direction as shown in ...the picture, then tighten the screw which is attached to the stand base, then take the monitor up carefully and face the front side....
Owner's Manual (English)
Page 7
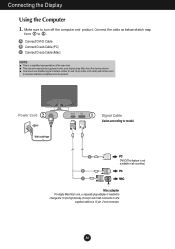
...sub Cable (Mac) NOTE This is needed to change the 15 pin high density (3 row) D-sub VGA connector on the supplied cable to model. DVI-D(This feature is not available in all countries.) Mac adapter For Apple Macintosh use shielded signal interface cables (D-sub 15 pin cable, DVI... computer and product. Power Cord Wall-outlet type Signal Cable Varies according to a 15 pin 2 row connector. This rear view represents a general model; Make sure to maintain standard compliance for the product. A6 Connecting the Display Using the Computer 1. Connect the cable as shown. User must use...
...sub Cable (Mac) NOTE This is needed to change the 15 pin high density (3 row) D-sub VGA connector on the supplied cable to model. DVI-D(This feature is not available in all countries.) Mac adapter For Apple Macintosh use shielded signal interface cables (D-sub 15 pin cable, DVI... computer and product. Power Cord Wall-outlet type Signal Cable Varies according to a 15 pin 2 row connector. This rear view represents a general model; Make sure to maintain standard compliance for the product. A6 Connecting the Display Using the Computer 1. Connect the cable as shown. User must use...

Owner's Manual (English)
Page 12
... a user's operating environment To select or customize desired image settings : Adjustable A : Analog Input D : Digital Input NOTE The order of icons may differ depending on the model (A11~A18 ).
... a user's operating environment To select or customize desired image settings : Adjustable A : Analog Input D : Digital Input NOTE The order of icons may differ depending on the model (A11~A18 ).


