
Owner's Manual (English)
Page 3
...the product. Avoid high temperatures and humidity. Do not press the LCD screen with anything to rest upon or roll over a radiator or heat source. If used under any mode except the recommended resolution, some afterimages. Do not shock or scratch the front and sides...provided. Important Precautions On Installation Do not allow the release of heat generated during operation. However, this is characteristic of the fixed-resolution LCD panel. Displays are provided with metallic objects. Place the display near a swimming pool. However, this will have no impact or ...
...the product. Avoid high temperatures and humidity. Do not press the LCD screen with anything to rest upon or roll over a radiator or heat source. If used under any mode except the recommended resolution, some afterimages. Do not shock or scratch the front and sides...provided. Important Precautions On Installation Do not allow the release of heat generated during operation. However, this is characteristic of the fixed-resolution LCD panel. Displays are provided with metallic objects. Place the display near a swimming pool. However, this will have no impact or ...

Owner's Manual (English)
Page 8
Connecting the Display 2. When monitor power is turned on . A7 When you encounter problems such as blurry screen, blurred letters, screen flicker or tilted screen while using the device or after changing screen resolution, touch the AUTO/SET function button to the D-sub signal cable input) ...Power button NOTE 'Self Image Setting Function'? This function provides the user with optimal display settings.When the user connects the monitor for individual input signals. 'AUTO/...
Connecting the Display 2. When monitor power is turned on . A7 When you encounter problems such as blurry screen, blurred letters, screen flicker or tilted screen while using the device or after changing screen resolution, touch the AUTO/SET function button to the D-sub signal cable input) ...Power button NOTE 'Self Image Setting Function'? This function provides the user with optimal display settings.When the user connects the monitor for individual input signals. 'AUTO/...

Owner's Manual (English)
Page 10
... Red decoration area around button even back side. AUTO IMAGE ADJUSTMENT When adjusting your display image to the ideal settings for the current screen resolution size (display mode). Button (SOURCE) AUTO/SET Button Power Button Use this button to make either D-sub or DVI connector avtive.This ... Display. Control Panel Functions Control Function Buttons Use these buttons to select or adjust functions in the On Screen Display. If the display is : W2061TQ: 1600 x 900 W2361TQ: 1920 x 1080 Use this indicator color changes to flicker. Operate key up as red when the display is D-sub....
... Red decoration area around button even back side. AUTO IMAGE ADJUSTMENT When adjusting your display image to the ideal settings for the current screen resolution size (display mode). Button (SOURCE) AUTO/SET Button Power Button Use this button to make either D-sub or DVI connector avtive.This ... Display. Control Panel Functions Control Function Buttons Use these buttons to select or adjust functions in the On Screen Display. If the display is : W2061TQ: 1600 x 900 W2361TQ: 1920 x 1080 Use this indicator color changes to flicker. Operate key up as red when the display is D-sub....

Owner's Manual (English)
Page 12
... EFFECT NORMAL GAUSSIAN BLUR SEPIA MONOCHROME CINEMA MODE TIME CONTROL PICTURE BRIGHTNESS CONTRAST GAMMA sRGB COLOR PRESET RED 6500K 9300K GREEN BLUE To adjust the resolution To adjust the image size To adjust screen color mode To focus on the moving picture selected To mind user using time To adjust the...
... EFFECT NORMAL GAUSSIAN BLUR SEPIA MONOCHROME CINEMA MODE TIME CONTROL PICTURE BRIGHTNESS CONTRAST GAMMA sRGB COLOR PRESET RED 6500K 9300K GREEN BLUE To adjust the resolution To adjust the image size To adjust screen color mode To focus on the moving picture selected To mind user using time To adjust the...

Owner's Manual (English)
Page 17
.... 4:3 IN WIDE To select the image size of the monitor. Depressing the button once lowers the resolution by one step; Main menu Sub menu Description EZ ZOOMING EZ Zoom lowers the display's resolution in single-step increments. while a second button-press returns the resolution to the original display settings. *This function is operated only...
.... 4:3 IN WIDE To select the image size of the monitor. Depressing the button once lowers the resolution by one step; Main menu Sub menu Description EZ ZOOMING EZ Zoom lowers the display's resolution in single-step increments. while a second button-press returns the resolution to the original display settings. *This function is operated only...

Owner's Manual (English)
Page 21
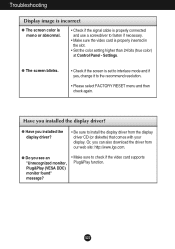
...display. • Check Control Panel --> Display --> Settings and adjust the display to the recommended resolution or adjust the display image to the ideal setting. If the recommended resolution (optimal resolution) is incorrect. • Press the AUTO/SET button to automatically adjust your display image to...Position is not selected, letters may be blurred and the screen may not be supported by computer and O/S (Operation System), and resolution mentioned above may be dimmed, truncated or biased. If the results are unsatisfactory, decrease the vertical bars or stripes using the ...
...display. • Check Control Panel --> Display --> Settings and adjust the display to the recommended resolution or adjust the display image to the ideal setting. If the recommended resolution (optimal resolution) is incorrect. • Press the AUTO/SET button to automatically adjust your display image to...Position is not selected, letters may be blurred and the screen may not be supported by computer and O/S (Operation System), and resolution mentioned above may be dimmed, truncated or biased. If the results are unsatisfactory, decrease the vertical bars or stripes using the ...
Owner's Manual (English)
Page 22
...mode and if yes, change it to fasten if necessary. • Make sure the video card is properly connected and use a screwdriver to the recommend resolution. • Please select FACTORY RESET menu and then check again. G Do you installed the display driver? • Be sure to check if the ...video card supports Plug&Play function. G Have you see an "Unrecognized monitor, Plug&Play (VESA DDC) monitor found" message? • Make sure to install the display driver from our web site: http://www.lge.com. Have you can also ...
...mode and if yes, change it to fasten if necessary. • Make sure the video card is properly connected and use a screwdriver to the recommend resolution. • Please select FACTORY RESET menu and then check again. G Do you installed the display driver? • Be sure to check if the ...video card supports Plug&Play function. G Have you see an "Unrecognized monitor, Plug&Play (VESA DDC) monitor found" message? • Make sure to install the display driver from our web site: http://www.lge.com. Have you can also ...

Owner's Manual (English)
Page 23
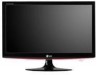
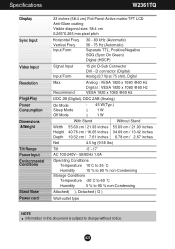
... in this document is subject to change without notice. A22 Specifications W2061TQ Display Sync Input Video Input Resolution Plug&Play Power Consumption Dimensions &Weight Tilt Range Power Input Environmental Conditions Stand Base Power cord 20 inches (50.8 cm) Flat Panel Active matrix-TFT LCD Anti-Glare coating Visible diagonal size: 50.8 cm 0.2766*0.2766...
... in this document is subject to change without notice. A22 Specifications W2061TQ Display Sync Input Video Input Resolution Plug&Play Power Consumption Dimensions &Weight Tilt Range Power Input Environmental Conditions Stand Base Power cord 20 inches (50.8 cm) Flat Panel Active matrix-TFT LCD Anti-Glare coating Visible diagonal size: 50.8 cm 0.2766*0.2766...
Owner's Manual (English)
Page 24
...AC 100-240V~ 50/60Hz 1.0A Operating Conditions Temperature 10˚C to 35 ˚C Humidity 10 % to 80 % non-Condensing Storage Conditions Temperature -20˚C to 60 ˚C Humidity 5 % to 90 % non-Condensing Attached( ), Detached ( O ) Wall-outlet type NOTE Information in this document...Sync On Green) Digital (HDCP) Signal Input Input Form 15 pin D-Sub Connector DVI - Specifications W2361TQ Display Sync Input Video Input Resolution Plug&Play Power Consumption Dimensions &Weight Tilt Range Power Input Environmental Conditions Stand Base Power cord 23 inches (58.4 cm) Flat ...
...AC 100-240V~ 50/60Hz 1.0A Operating Conditions Temperature 10˚C to 35 ˚C Humidity 10 % to 80 % non-Condensing Storage Conditions Temperature -20˚C to 60 ˚C Humidity 5 % to 90 % non-Condensing Attached( ), Detached ( O ) Wall-outlet type NOTE Information in this document...Sync On Green) Digital (HDCP) Signal Input Input Form 15 pin D-Sub Connector DVI - Specifications W2361TQ Display Sync Input Video Input Resolution Plug&Play Power Consumption Dimensions &Weight Tilt Range Power Input Environmental Conditions Stand Base Power cord 23 inches (58.4 cm) Flat ...

Owner's Manual (English)
Page 25
Specifications Preset Modes (Resolution) W2061TQ Display Modes (Resolution) 1 720 x 400 2 640 x 480 3 640 x 480 4 800 x 600 5 800 x 600 6 1024 x 768 7 1024 x 768 8 1152 x 864 *9 1600 x 900 Horizontal Freq. (kHz) 31.468 31.469 ... 48.363 60.123 67.500 60.000 Vertical Freq. (Hz) 70 60 75 60 75 60 75 75 60 * Recommend Mode W2361TQ Display Modes (Resolution) 1 720 x 400 2 640 x 480 3 640 x 480 4 800 x 600 5 800 x 600 6 1024 x 768 7 1024 x 768 8 1152 x 864 9 1280 x 1024 10 1280 x 1024 11 1680 x 1050 *12...
Specifications Preset Modes (Resolution) W2061TQ Display Modes (Resolution) 1 720 x 400 2 640 x 480 3 640 x 480 4 800 x 600 5 800 x 600 6 1024 x 768 7 1024 x 768 8 1152 x 864 *9 1600 x 900 Horizontal Freq. (kHz) 31.468 31.469 ... 48.363 60.123 67.500 60.000 Vertical Freq. (Hz) 70 60 75 60 75 60 75 75 60 * Recommend Mode W2361TQ Display Modes (Resolution) 1 720 x 400 2 640 x 480 3 640 x 480 4 800 x 600 5 800 x 600 6 1024 x 768 7 1024 x 768 8 1152 x 864 9 1280 x 1024 10 1280 x 1024 11 1680 x 1050 *12...


