
Owner's Manual
Page 2
... display. Use only a stand recommended by the supplier. Some internal parts carry hazardous voltages. Important Precautions This unit has been engineered and manufactured to be very dangerous. If the power cable is OFF. Call your service technician for a replacement. There are frayed power cords and broken plugs. When the display is turned off. They may result in this manual or listed on the product screen...
... display. Use only a stand recommended by the supplier. Some internal parts carry hazardous voltages. Important Precautions This unit has been engineered and manufactured to be very dangerous. If the power cable is OFF. Call your service technician for a replacement. There are frayed power cords and broken plugs. When the display is turned off. They may result in this manual or listed on the product screen...

Owner's Manual
Page 3
... heat source. However, this product. Leaving a fixed image on the display performance. Do not shock or scratch the front and sides of the screen with cloth or other material. Contact an authorized the service center for a long time may cause damage to move. Do not use the recommended resolution to damage. If these openings are provided with your LCD display. Cover the openings...
... heat source. However, this product. Leaving a fixed image on the display performance. Do not shock or scratch the front and sides of the screen with cloth or other material. Contact an authorized the service center for a long time may cause damage to move. Do not use the recommended resolution to damage. If these openings are provided with your LCD display. Cover the openings...

Owner's Manual
Page 6
... the picture. Once assembled take the monitor up the monitor, ensure that the power to tighten. 3. Your monitor may fall and get damaged or injure your foot. 5 The product may differ from the stand base, use a coin to turn the screw clockwise to the monitor, the computer system, and other attached devices is turned off. 1 way stand 1. Use a coin on a soft cloth. 2. Connecting the Display Before setting up...
... the picture. Once assembled take the monitor up the monitor, ensure that the power to tighten. 3. Your monitor may fall and get damaged or injure your foot. 5 The product may differ from the stand base, use a coin to turn the screw clockwise to the monitor, the computer system, and other attached devices is turned off. 1 way stand 1. Use a coin on a soft cloth. 2. Connecting the Display Before setting up...

Owner's Manual
Page 7
... the front side. (Once you pull the stand body up, please keep pressing the button.If you don't press the button, it will damage the product.) When limited tilt degree, the button is turned off. 2 way stand 1. Connecting the Display Before setting up the monitor, ensure that the power to the monitor, the computer system, and other attached devices is not working, pull stand body up .
... the front side. (Once you pull the stand body up, please keep pressing the button.If you don't press the button, it will damage the product.) When limited tilt degree, the button is turned off. 2 way stand 1. Connecting the Display Before setting up the monitor, ensure that the power to the monitor, the computer system, and other attached devices is not working, pull stand body up .
Owner's Manual
Page 9
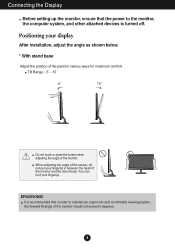
... stand base Adjust the position of the panel in various ways for maximum comfort. Tilt Range : -5˚ - 15˚ Do not touch or press the screen when adjusting the angle of the monitor and the stand body. ERGONOMIC It is turned off. When adjusting the angle of the screen, do not put your finger(s) in between the head of the monitor. Connecting the Display Before setting up the monitor, ensure...
... stand base Adjust the position of the panel in various ways for maximum comfort. Tilt Range : -5˚ - 15˚ Do not touch or press the screen when adjusting the angle of the monitor and the stand body. ERGONOMIC It is turned off. When adjusting the angle of the screen, do not put your finger(s) in between the head of the monitor. Connecting the Display Before setting up the monitor, ensure...

Owner's Manual
Page 10
Connecting the Display Before setting up the monitor, ensure that in order to the monitor, the computer system, and other attached devices is recommended that the power to maintain an ergonomic and comfortable viewing position, the backward tilt angle of the monitor should exceed 10 degrees. 9 Positioning your display * Without stand base Ergonomic It is turned off.
Connecting the Display Before setting up the monitor, ensure that in order to the monitor, the computer system, and other attached devices is recommended that the power to maintain an ergonomic and comfortable viewing position, the backward tilt angle of the monitor should exceed 10 degrees. 9 Positioning your display * Without stand base Ergonomic It is turned off.

Owner's Manual
Page 11
your display may differ from the view as shown. 10 This rear view represents a general model; Connect signal input cable 1 and power cord 2 in all countries.) When using a D-Sub signal input cable connector for Macintosh Mac adapter : For Apple Macintosh use, a separate plug adapter is needed to change the 15 pin high density (3 row) D-sub VGA connector on the AV equipment. * Not supported PC Wall-outlet type OR Wall-outlet type Varies according to a 15 pin 2 row connector. NOTE...
your display may differ from the view as shown. 10 This rear view represents a general model; Connect signal input cable 1 and power cord 2 in all countries.) When using a D-Sub signal input cable connector for Macintosh Mac adapter : For Apple Macintosh use, a separate plug adapter is needed to change the 15 pin high density (3 row) D-sub VGA connector on the AV equipment. * Not supported PC Wall-outlet type OR Wall-outlet type Varies according to a 15 pin 2 row connector. NOTE...
Owner's Manual
Page 12
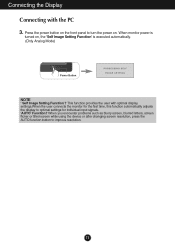
Connecting the Display Connecting with optimal display settings.When the user connects the monitor for individual input signals. 'AUTO' Function? When you encounter problems such as blurry screen, blurred letters, screen flicker or tilted screen while using the device or after changing screen resolution, press the AUTO function button to optimal settings for the first time, this function automatically adjusts the display to improve resolution. 11 When monitor power is executed automatically. (Only Analog Mode) Power Button NOTE ' Self Image Setting Function'? This function provides...
Connecting the Display Connecting with optimal display settings.When the user connects the monitor for individual input signals. 'AUTO' Function? When you encounter problems such as blurry screen, blurred letters, screen flicker or tilted screen while using the device or after changing screen resolution, press the AUTO function button to optimal settings for the first time, this function automatically adjusts the display to improve resolution. 11 When monitor power is executed automatically. (Only Analog Mode) Power Button NOTE ' Self Image Setting Function'? This function provides...

Owner's Manual
Page 13
... changed. The message "OSD LOCKED" should appear. Press and hold the MENU button for several seconds. You can unlock the OSD controls at any time by pushing the MENU button for several seconds. The message "OSD UNLOCKED" should appear. ENGINE Button For more information, refer to page 23~25. 12 Control Panel Functions Front Panel Controls MENU Button OSD LOCKED/UNLOCKED This function allows you to enter AUTO BRIGHT,ORIGINAL RATIO, DUAL WEB,CINEMA MODE...
... changed. The message "OSD LOCKED" should appear. Press and hold the MENU button for several seconds. You can unlock the OSD controls at any time by pushing the MENU button for several seconds. The message "OSD UNLOCKED" should appear. ENGINE Button For more information, refer to page 23~25. 12 Control Panel Functions Front Panel Controls MENU Button OSD LOCKED/UNLOCKED This function allows you to enter AUTO BRIGHT,ORIGINAL RATIO, DUAL WEB,CINEMA MODE...

Owner's Manual
Page 14
... Analog Mode) This will automatically adjust your display image to the ideal settings for light sensor detect outside luminance, when setting AUTO BRIGHT ON. 13 The best display mode is lens for the current screen resolution size (display mode). When two input signals at least are connected, you can select the input signal (D-SUB/DVI/HDMI) you want. From front view,the power indicator stays purple if the display is automatically detected. Light Sensor This is E2250V/E2350V : 1920 x 1080 INPUT Button (SOURCE...
... Analog Mode) This will automatically adjust your display image to the ideal settings for light sensor detect outside luminance, when setting AUTO BRIGHT ON. 13 The best display mode is lens for the current screen resolution size (display mode). When two input signals at least are connected, you can select the input signal (D-SUB/DVI/HDMI) you want. From front view,the power indicator stays purple if the display is automatically detected. Light Sensor This is E2250V/E2350V : 1920 x 1080 INPUT Button (SOURCE...
Owner's Manual
Page 16
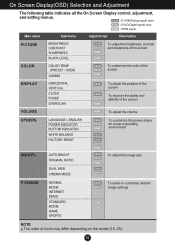
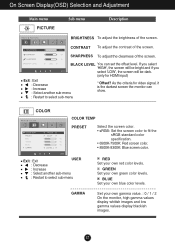
...following table indicates all the On Screen Display control, adjustment, and setting menus. DSUB : D-SUB(Analog signal) input DVI-D : DVI-D(Digital signal) input HDMI : HDMI signal Main menu Sub-menu Supported input Description PICTURE BRIGHTNESS CONTRAST SHARPNESS BLACK LEVEL DSUB DVI-D HDMI HDMI To adjust the brightness, contrast and sharpness of the screen COLOR COLOR TEMP (PRESET / USER) GAMMA DSUB DVI-D HDMI To customize the color of the screen DISPLAY HORIZONTAL VERTICAL CLOCK PHASE OVERSCAN DSUB DSUB HDMI To adjust the position of the screen To improve the clarity and...
...following table indicates all the On Screen Display control, adjustment, and setting menus. DSUB : D-SUB(Analog signal) input DVI-D : DVI-D(Digital signal) input HDMI : HDMI signal Main menu Sub-menu Supported input Description PICTURE BRIGHTNESS CONTRAST SHARPNESS BLACK LEVEL DSUB DVI-D HDMI HDMI To adjust the brightness, contrast and sharpness of the screen COLOR COLOR TEMP (PRESET / USER) GAMMA DSUB DVI-D HDMI To customize the color of the screen DISPLAY HORIZONTAL VERTICAL CLOCK PHASE OVERSCAN DSUB DSUB HDMI To adjust the position of the screen To improve the clarity and...
Owner's Manual
Page 18
CONTRAST To adjust the contrast of the screen. BLACK LEVEL You can show. As the criteria for HDMI input) Exit : Exit : Decrease : Increase : Select another sub-menu : Restart to select sub-menu GAMMA RED Set your own blue color levels. Set your own green color levels. GREEN Set your own gamma value. : 0 / 1 / 2 On the monitor, high gamma values display whitish images and low gamma values display blackish images. 17 SHARPNESS To adjust the clearness of...
CONTRAST To adjust the contrast of the screen. BLACK LEVEL You can show. As the criteria for HDMI input) Exit : Exit : Decrease : Increase : Select another sub-menu : Restart to select sub-menu GAMMA RED Set your own blue color levels. Set your own green color levels. GREEN Set your own gamma value. : 0 / 1 / 2 On the monitor, high gamma values display whitish images and low gamma values display blackish images. 17 SHARPNESS To adjust the clearness of...

Owner's Manual
Page 19
... focus of characters. VOLUME To adjust the volume of output image for DTV timing in HDMI input. (only for HDMI input) Exit : Exit : Decrease : Increase : Mute : Restart to turn on the screen background. The horizontal screen size will also change. On Screen Display(OSD) Selection and Adjustment Main menu Sub menu Description HORIZONTAL To move image up and down. OVERSCAN To select the range of headphone/ Earphone. (Only for HDMI input) Recommend overscan function to...
... focus of characters. VOLUME To adjust the volume of output image for DTV timing in HDMI input. (only for HDMI input) Exit : Exit : Decrease : Increase : Mute : Restart to turn on the screen background. The horizontal screen size will also change. On Screen Display(OSD) Selection and Adjustment Main menu Sub menu Description HORIZONTAL To move image up and down. OVERSCAN To select the range of headphone/ Earphone. (Only for HDMI input) Recommend overscan function to...

Owner's Manual
Page 20
.... On Screen Display(OSD) Selection and Adjustment Main menu Sub menu Description LANGUAGE To choose the language in which the control names are present in order to provide the optimal image. Restore all factory default settings except "LANGUAGE." Press the , buttons to video signal distortion. If you set OFF, it will automatically be turned off . Use this function, the signal level is different the required specifications, the color level may deteriorate due to reset immediately.
.... On Screen Display(OSD) Selection and Adjustment Main menu Sub menu Description LANGUAGE To choose the language in which the control names are present in order to provide the optimal image. Restore all factory default settings except "LANGUAGE." Press the , buttons to video signal distortion. If you set OFF, it will automatically be turned off . Use this function, the signal level is different the required specifications, the color level may deteriorate due to reset immediately.
Owner's Manual
Page 22
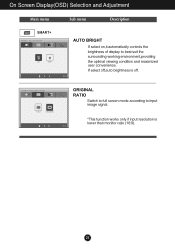
Switch to full screen mode according to best suit the surrounding working environment,providing the optimal viewing condition and maximized user convenience. If select off . On Screen Display(OSD) Selection and Adjustment Main menu Sub menu Description If select on,it automatically controls the brightness of display to input image signal. *This function works only if input resolution is off ,auto brightness is lower than monitor ratio (16:9). 21
Switch to full screen mode according to best suit the surrounding working environment,providing the optimal viewing condition and maximized user convenience. If select off . On Screen Display(OSD) Selection and Adjustment Main menu Sub menu Description If select on,it automatically controls the brightness of display to input image signal. *This function works only if input resolution is off ,auto brightness is lower than monitor ratio (16:9). 21
Owner's Manual
Page 27
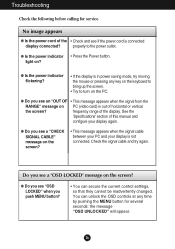
... the power outlet. Check the signal cable and try moving the mouse or pressing any time by pushing the MENU button for service. Troubleshooting Check the following before calling for several seconds: the message "OSD UNLOCKED" will appear. 26 See the 'Specifications' section of the display. properly to turn on the screen? frequency range of this manual and configure your display is connected display connected? Do you see if the power cord is not connected.
... the power outlet. Check the signal cable and try moving the mouse or pressing any time by pushing the MENU button for service. Troubleshooting Check the following before calling for several seconds: the message "OSD UNLOCKED" will appear. 26 See the 'Specifications' section of the display. properly to turn on the screen? frequency range of this manual and configure your display is connected display connected? Do you see if the power cord is not connected.

Owner's Manual
Page 28
... video card performance. Troubleshooting Display image is incorrect G Display Position is not selected, letters may be blurred and the screen may not be dimmed, truncated or biased. If the results are not clearly portrayed. • Press the AUTO button to automatically adjust your display image to the recommend resolution. IMPORTANT Check Control Panel --> Display --> Settings and see if the frequency or the resolution were changed. G Any horizontal noise appearing in the on screen display. • Check Control Panel --> Display --> Settings...
... video card performance. Troubleshooting Display image is incorrect G Display Position is not selected, letters may be blurred and the screen may not be dimmed, truncated or biased. If the results are not clearly portrayed. • Press the AUTO button to automatically adjust your display image to the recommend resolution. IMPORTANT Check Control Panel --> Display --> Settings and see if the frequency or the resolution were changed. G Any horizontal noise appearing in the on screen display. • Check Control Panel --> Display --> Settings...

Owner's Manual
Page 29
G The screen blinks. • Check if the screen is "0". • Check sound muted. • HDMI cable installed properly. • Head phone cable installed properly. • Check sound format. The Audio function is not working G Picture OK & No sound. • Check whether volume is set to interlace mode and if yes, change it to the recommend resolution. G Have you see an "Unrecognized monitor, Plug&Play (VESA DDC) monitor found" message? Troubleshooting Display image is incorrect G The screen color is mono or abnormal. • Check if...
G The screen blinks. • Check if the screen is "0". • Check sound muted. • HDMI cable installed properly. • Head phone cable installed properly. • Check sound format. The Audio function is not working G Picture OK & No sound. • Check whether volume is set to interlace mode and if yes, change it to the recommend resolution. G Have you see an "Unrecognized monitor, Plug&Play (VESA DDC) monitor found" message? Troubleshooting Display image is incorrect G The screen color is mono or abnormal. • Check if...

Owner's Manual
Page 30
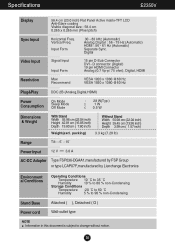
... Storage Conditions Temperature -20 ˚C to 60 ˚C Humidity 5 % to 90 % non-Condensing Attached ( ), Detached ( O ) Wall-outlet type NOTE Information in this document is subject to change without notice. 29 Vertical Freq. Digital Signal Input Input Form 15 pin D-Sub Connector DVI - Specifications E2250V Display Sync Input Video Input 54.6 cm (21.5 inch) Flat Panel Active matrix-TFT LCD Anti-Glare coating Visible diagonal size : 54.6 cm 0.248 x 0.248 mm (Pixel pitch) Horizontal Freq.
... Storage Conditions Temperature -20 ˚C to 60 ˚C Humidity 5 % to 90 % non-Condensing Attached ( ), Detached ( O ) Wall-outlet type NOTE Information in this document is subject to change without notice. 29 Vertical Freq. Digital Signal Input Input Form 15 pin D-Sub Connector DVI - Specifications E2250V Display Sync Input Video Input 54.6 cm (21.5 inch) Flat Panel Active matrix-TFT LCD Anti-Glare coating Visible diagonal size : 54.6 cm 0.248 x 0.248 mm (Pixel pitch) Horizontal Freq.
Owner's Manual
Page 31
... change without notice. 30 Specifications E2350V Display 58.4 cm (23.0 inch) Flat Panel Active matrix-TFT LCD Anti-Glare coating Visible diagonal size : 58.4 cm 0.265 x 0.265 mm (Pixel pitch) Sync Input Video Input Horizontal Freq. D connector (Digital) 19 pin HDMI Connector Analog (0.7 Vp-p/ 75 ohm), Digital, HDMI Resolution Max Recommend VESA 1920 x 1080 @60 Hz VESA 1920 x 1080 @60 Hz Plug&Play DDC 2B (Analog,Digital,HDMI) Power Consumption On Mode Sleep Mode Off Mode : 28 W(Typ.) ≤ 1W ≤ 0.5 W Dimensions & Weight With Stand...
... change without notice. 30 Specifications E2350V Display 58.4 cm (23.0 inch) Flat Panel Active matrix-TFT LCD Anti-Glare coating Visible diagonal size : 58.4 cm 0.265 x 0.265 mm (Pixel pitch) Sync Input Video Input Horizontal Freq. D connector (Digital) 19 pin HDMI Connector Analog (0.7 Vp-p/ 75 ohm), Digital, HDMI Resolution Max Recommend VESA 1920 x 1080 @60 Hz VESA 1920 x 1080 @60 Hz Plug&Play DDC 2B (Analog,Digital,HDMI) Power Consumption On Mode Sleep Mode Off Mode : 28 W(Typ.) ≤ 1W ≤ 0.5 W Dimensions & Weight With Stand...


