Owners Manual
Page 1
... . See the label attached on the back cover and quote this manual carefully before operating your dealer when you require service. Trade Mark of the set . LCD TV PLASMA TV OWNER'S MANUAL LCD TV MODELS 26LC4* 32LC4* 37LC4* 42LC4* 26LB7* 26LC5* 32LC5* 37LC5* 42LC5* 32LB7* PLASMA TV MODELS 42PC5* 50PC5* 50PB6* 42PC3* 50PC3* 60PC4* Please read this information...
... . See the label attached on the back cover and quote this manual carefully before operating your dealer when you require service. Trade Mark of the set . LCD TV PLASMA TV OWNER'S MANUAL LCD TV MODELS 26LC4* 32LC4* 37LC4* 42LC4* 26LB7* 26LC5* 32LC5* 37LC5* 42LC5* 32LB7* PLASMA TV MODELS 42PC5* 50PC5* 50PB6* 42PC3* 50PC3* 60PC4* Please read this information...

Owners Manual
Page 3
...26", 32", 37" only 26/32LB7* only 4-bolts for stand assembly Refer to p. 12 1-screw for the product exterior if there is not available for all models.) Polish the screen with your TV...TV models 50PB6*, 60PC4* only 60PC4* only 2-Wall brackets 2-eye-bolts (This feature is not available for all models.) One desk-type stand fixture protection cover Refer to p. 20 3-bolts Refer to p. 20 2-Rubber cap Refer to p. 14 1 Owner's Manual Owner's manual Owner's Manual... for all models.) LCD TV models (This feature is stain or fingerprint on the exterior only with the twister holder....
...26", 32", 37" only 26/32LB7* only 4-bolts for stand assembly Refer to p. 12 1-screw for the product exterior if there is not available for all models.) Polish the screen with your TV...TV models 50PB6*, 60PC4* only 60PC4* only 2-Wall brackets 2-eye-bolts (This feature is not available for all models.) One desk-type stand fixture protection cover Refer to p. 20 3-bolts Refer to p. 20 2-Rubber cap Refer to p. 14 1 Owner's Manual Owner's manual Owner's Manual... for all models.) LCD TV models (This feature is stain or fingerprint on the exterior only with the twister holder....
Owners Manual
Page 4
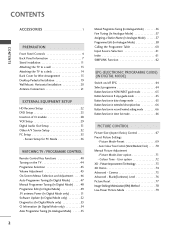
... Back Cover for PC Mode 36 WATCHING TV / PROGRAMME CONTROL Remote Control Key Functions 40 Turning on the TV 44 Programme Selection 45 Volume Adjustment 45 On-Screen Menus Selection and Adjustment . . . . 46 Auto Programme Tuning (In Digital Mode 47 Manual Programme Tuning (In Digital Mode) . ... 73 XD Demo 74 Advanced - Cinema 75 Advanced - Auto Colour Tone Control (Warm/Medium/Cool) . . . . .70 Manual Picture Adjustment - Screen Setup for Wire Arrangement 15 Desktop Pedestal Installation 19 Wall Mount: Horizontal installation 20 Antenna Connection 21 EXTERNAL EQUIPMENT ...
... Back Cover for PC Mode 36 WATCHING TV / PROGRAMME CONTROL Remote Control Key Functions 40 Turning on the TV 44 Programme Selection 45 Volume Adjustment 45 On-Screen Menus Selection and Adjustment . . . . 46 Auto Programme Tuning (In Digital Mode 47 Manual Programme Tuning (In Digital Mode) . ... 73 XD Demo 74 Advanced - Cinema 75 Advanced - Auto Colour Tone Control (Warm/Medium/Cool) . . . . .70 Manual Picture Adjustment - Screen Setup for Wire Arrangement 15 Desktop Pedestal Installation 19 Wall Mount: Horizontal installation 20 Antenna Connection 21 EXTERNAL EQUIPMENT ...
Owners Manual
Page 24
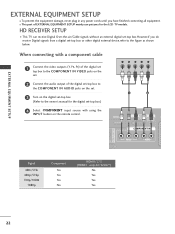
... set top box to the owner's manual for the digital set-top box.) 1 2 4 Select COMPONENT input source with a component cable 1 Connect the video outputs (Y, PB, PR) of the digital set . 2 Connect the audio output of EXTERNAL EQUIPMENT SETUP mainly use pictures for the LCD TV models. EJECT HDMI/DVI IN 1 ...HDMI IN 2 RGB IN RGB(PC) AUDIO IN (RGB/DVI) AV 1 AV ANTENNA IN COMPONENT IN AL VIDEO AUDIO DIGITAL AUDIO OUT RS-232C IN Signal 480i/576i 480p/576p 720p/1080i 1080p Component HDMI1/2/3 (HDMI3 : only 26/32LB7*) Yes ...
... set top box to the owner's manual for the digital set-top box.) 1 2 4 Select COMPONENT input source with a component cable 1 Connect the video outputs (Y, PB, PR) of the digital set . 2 Connect the audio output of EXTERNAL EQUIPMENT SETUP mainly use pictures for the LCD TV models. EJECT HDMI/DVI IN 1 ...HDMI IN 2 RGB IN RGB(PC) AUDIO IN (RGB/DVI) AV 1 AV ANTENNA IN COMPONENT IN AL VIDEO AUDIO DIGITAL AUDIO OUT RS-232C IN Signal 480i/576i 480p/576p 720p/1080i 1080p Component HDMI1/2/3 (HDMI3 : only 26/32LB7*) Yes ...
Owners Manual
Page 25
...remote control. VIDEO AUDIO 1 COMPONENT IN AV 1 AV 23 ANTENNA IN RGB IN (Refer to the owner's manual for the digital set -top box. RS-232C IN 1(CONTROL & SERVICE) AV 1 AV EXTERNAL EQUIPMENT SETUP Only 26/32LB7* PCMCIA CARD SLOT EJECT HDMI/DVI IN 1 HDMI IN 2 HDMI IN 3 1 Connect the digital set... HDMI IN 2 1 Connect the digital set-top box to HDMI/DVI IN 1or HDMI IN 2 jack on the set . ANTENNA IN (Refer to the owner's manual for the digital set -top box. RGB IN RGB(PC) AUD (RG COMPONENT I DIGITAL AUDIO OUT 2 Turn on the digital set -top box.) OPTICAL VIDEO...
...remote control. VIDEO AUDIO 1 COMPONENT IN AV 1 AV 23 ANTENNA IN RGB IN (Refer to the owner's manual for the digital set -top box. RS-232C IN 1(CONTROL & SERVICE) AV 1 AV EXTERNAL EQUIPMENT SETUP Only 26/32LB7* PCMCIA CARD SLOT EJECT HDMI/DVI IN 1 HDMI IN 2 HDMI IN 3 1 Connect the digital set... HDMI IN 2 1 Connect the digital set-top box to HDMI/DVI IN 1or HDMI IN 2 jack on the set . ANTENNA IN (Refer to the owner's manual for the digital set -top box. RGB IN RGB(PC) AUD (RG COMPONENT I DIGITAL AUDIO OUT 2 Turn on the digital set -top box.) OPTICAL VIDEO...

Owners Manual
Page 26
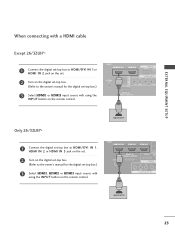
...HDMI1 input source with using the INPUT DMI/DVI IN 1 HDMI IN 2 button on thAeVr1emoAtVe2control. VIDEO AUDIO RS-232C IN Only 26/32LB7* IN 2 HDMI IN 3 N ERVICE) VIDEO AV 1 AV 2 PCMCIA CARD SLOT EJECT HDMI/DVI IN 1 HDMI...DVI) jack on the set . Turn on the digital set-top box. (Refer to the owner's manual for the digital set -top box.) RS-232C IN (CONTROL & SERVICE) ANTENNA IN RGB(PC) ... with using the INPUT button on the remote control. 24 When connecting with a HDMI to DVI cable Except 26/32LB7* EJECT HDMI/DVI IN 1 ANTENNA IN HDMI IN 2 AV 1 AV 2 PCMCIA CARD SLOT EJECT...
...HDMI1 input source with using the INPUT DMI/DVI IN 1 HDMI IN 2 button on thAeVr1emoAtVe2control. VIDEO AUDIO RS-232C IN Only 26/32LB7* IN 2 HDMI IN 3 N ERVICE) VIDEO AV 1 AV 2 PCMCIA CARD SLOT EJECT HDMI/DVI IN 1 HDMI...DVI) jack on the set . Turn on the digital set-top box. (Refer to the owner's manual for the digital set -top box.) RS-232C IN (CONTROL & SERVICE) ANTENNA IN RGB(PC) ... with using the INPUT button on the remote control. 24 When connecting with a HDMI to DVI cable Except 26/32LB7* EJECT HDMI/DVI IN 1 ANTENNA IN HDMI IN 2 AV 1 AV 2 PCMCIA CARD SLOT EJECT...
Owners Manual
Page 28
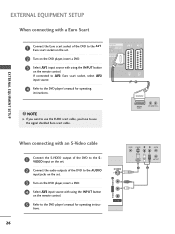
... the AUDIO input jacks on the set . 2 Turn on the set. 2 Connect the audio outputs of the DVD to the DVD player's manual for operating instructions. IN VIDEO 3 Select AV1 input source with a Euro Scart PCMCIA EJECT CARD SLOT 1 Connect the Euro scart sockeHtDoMfI/DtVhIeIND1VD tHoDMtIhINe2A...input on the DVD player,ANiTnEsNNeArt a DVD. VIDEO L/MONO AUDIO R VIDEO S-VIDEO L R ANT IN S-VIDEO OUTPUT SWITCH ANT OUT 1 2 AV IN 3 26 HDMI IN 2 AV 1 AV 2 PCMCIA CARD SLOT EJECT HDMI/DVI IN 1 HDMI IN 2 AV 1 AUDIO/ VIDEO (R) AUDIO (L) EXTERNAL EQUIPMENT SETUP When connecting...
... the AUDIO input jacks on the set . 2 Turn on the set. 2 Connect the audio outputs of the DVD to the DVD player's manual for operating instructions. IN VIDEO 3 Select AV1 input source with a Euro Scart PCMCIA EJECT CARD SLOT 1 Connect the Euro scart sockeHtDoMfI/DtVhIeIND1VD tHoDMtIhINe2A...input on the DVD player,ANiTnEsNNeArt a DVD. VIDEO L/MONO AUDIO R VIDEO S-VIDEO L R ANT IN S-VIDEO OUTPUT SWITCH ANT OUT 1 2 AV IN 3 26 HDMI IN 2 AV 1 AV 2 PCMCIA CARD SLOT EJECT HDMI/DVI IN 1 HDMI IN 2 AV 1 AUDIO/ VIDEO (R) AUDIO (L) EXTERNAL EQUIPMENT SETUP When connecting...
Owners Manual
Page 29
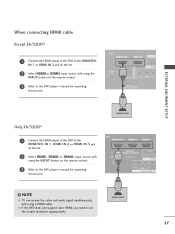
...G If the DVD does not support Auto HDMI, you need to the HDMI/DVI IN 1 or HDMI IN 2 jack on the set. NOTE G TV can receive the video and audio signal simultaneously with ANTENNA IN RGB using the ANTENNA IN INPUT button on the remote control. DIGITAL AUDIO OUT... HDMI1or HDMI2 input source with using the INPUT button on the remote control. 3 Refer to the DVD player's manual for operating instructions. 1 RS-232C IN (CONTROL & SERVICE) EXTERNAL EQUIPMENT SETUP Only 26/32LB7* PCMCIA EJECT 1 Connect the HDMI output of the DVD to set the output resolution appropriately. 27 AV ...
...G If the DVD does not support Auto HDMI, you need to the HDMI/DVI IN 1 or HDMI IN 2 jack on the set. NOTE G TV can receive the video and audio signal simultaneously with ANTENNA IN RGB using the ANTENNA IN INPUT button on the remote control. DIGITAL AUDIO OUT... HDMI1or HDMI2 input source with using the INPUT button on the remote control. 3 Refer to the DVD player's manual for operating instructions. 1 RS-232C IN (CONTROL & SERVICE) EXTERNAL EQUIPMENT SETUP Only 26/32LB7* PCMCIA EJECT 1 Connect the HDMI output of the DVD to set the output resolution appropriately. 27 AV ...
Owners Manual
Page 32
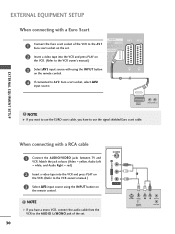
... = yellow, Audio Left = white, and Audio Right = red) 2 Insert a video tape into the VCR and press PLAY on the VCR. (Refer to the VCR owner's manual.) 3 Select AV3 input source using thRSe-23I2NC INPUT button on the remote control. 4 If connected to AV2 Euro scart socket, select AV2 input source. 1 S-VIDEO... socket of the set . (RGB/DVI) MPONENT IN AV 1 AV 2 2 Insert a video tape intoANtThIENNeNAVCR and press PLAY on the VCR. (Refer to the VCR owner's manual.) VIDEO AUDIO RS-232C IN VIDEO 3 AUDIO Select AV1 input source with a RCA cable 1 Connect the AUDIO/VIDEO jacks between...
... = yellow, Audio Left = white, and Audio Right = red) 2 Insert a video tape into the VCR and press PLAY on the VCR. (Refer to the VCR owner's manual.) 3 Select AV3 input source using thRSe-23I2NC INPUT button on the remote control. 4 If connected to AV2 Euro scart socket, select AV2 input source. 1 S-VIDEO... socket of the set . (RGB/DVI) MPONENT IN AV 1 AV 2 2 Insert a video tape intoANtThIENNeNAVCR and press PLAY on the VCR. (Refer to the VCR owner's manual.) VIDEO AUDIO RS-232C IN VIDEO 3 AUDIO Select AV1 input source with a RCA cable 1 Connect the AUDIO/VIDEO jacks between...
Owners Manual
Page 33
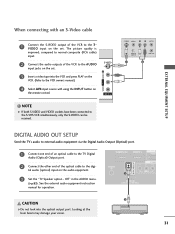
... input jacks on the set . AV IN 3 S-VIDEO VIDEO L R ANT IN OUTPUT SWITCH ANT OUT 1 2 EXTERNAL EQUIPMENT SETUP ! See the external audio equipment instruction manual for operation. Looking at the laser beam may damage your vision. 31 tal audio (optical) input on the audio equipment. compared to normal composite (RCA...into the optical output port. VIDEO L/MONO AUDIO R DIGITAL AUDIO OUT PCMCIA EJECT CARD SLOT 1 Connect one end of an optical cable to the TV Digital HDMI/DVI IN 1 HDMI IN 2 R RGB(PC AV Audio (Optical) Output port. Off" in the AUDIO menu. (Gp.85).
... input jacks on the set . AV IN 3 S-VIDEO VIDEO L R ANT IN OUTPUT SWITCH ANT OUT 1 2 EXTERNAL EQUIPMENT SETUP ! See the external audio equipment instruction manual for operation. Looking at the laser beam may damage your vision. 31 tal audio (optical) input on the audio equipment. compared to normal composite (RCA...into the optical output port. VIDEO L/MONO AUDIO R DIGITAL AUDIO OUT PCMCIA EJECT CARD SLOT 1 Connect one end of an optical cable to the TV Digital HDMI/DVI IN 1 HDMI IN 2 R RGB(PC AV Audio (Optical) Output port. Off" in the AUDIO menu. (Gp.85).
Owners Manual
Page 38
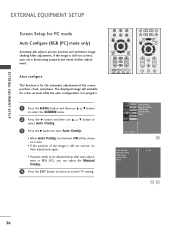
.... 1 Auto Config. has finished, OK will unstable for a few seconds while the auto configuration is in RGB (PC), you can adjust the Manual Config.. 4 Press the EXIT button to return to start Auto Config.. • When Auto Config. EXTERNAL EQUIPMENT SETUP EXTERNAL EQUIPMENT SETUP Screen Setup ... E button to select the SCREEN menu. 2 Press the G button and then use D or E button to select Auto Config.. 3 Press the G button to normal TV viewing. 7 LIST MENU 8 9 0 Q.VIEW EXIT OK INFO i GUIDE BACK VOL * PR FAV RATIO SLEEP SUBTITLE UPDATE BACK MENU INFO i EXIT GUIDE OK FAV...
.... 1 Auto Config. has finished, OK will unstable for a few seconds while the auto configuration is in RGB (PC), you can adjust the Manual Config.. 4 Press the EXIT button to return to start Auto Config.. • When Auto Config. EXTERNAL EQUIPMENT SETUP EXTERNAL EQUIPMENT SETUP Screen Setup ... E button to select the SCREEN menu. 2 Press the G button and then use D or E button to select Auto Config.. 3 Press the G button to normal TV viewing. 7 LIST MENU 8 9 0 Q.VIEW EXIT OK INFO i GUIDE BACK VOL * PR FAV RATIO SLEEP SUBTITLE UPDATE BACK MENU INFO i EXIT GUIDE OK FAV...
Owners Manual
Page 39
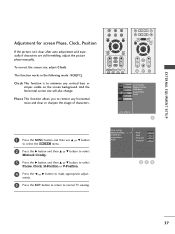
..., Clock, H-Position or V-Position. 4 Press the F or G button to remove any vertical bars or stripes visible on the screen background. Manual Config. ments. 5 Press the EXIT button to return to minimize any horizontal noise and clear or sharpen the image of characters. 7 LIST MENU...Ratio Reset G Phase 0 Clock 0 H-Position 0 V-Position 0 23 4 37 Clock This function is to normal TV viewing. And the horizontal screen size will also change. PICTUREO Manual Config. To correct the screen size, adjust Clock. This function works in the following mode : RGB[PC]. EXTERNAL...
..., Clock, H-Position or V-Position. 4 Press the F or G button to remove any vertical bars or stripes visible on the screen background. Manual Config. ments. 5 Press the EXIT button to return to minimize any horizontal noise and clear or sharpen the image of characters. 7 LIST MENU...Ratio Reset G Phase 0 Clock 0 H-Position 0 V-Position 0 23 4 37 Clock This function is to normal TV viewing. And the horizontal screen size will also change. PICTUREO Manual Config. To correct the screen size, adjust Clock. This function works in the following mode : RGB[PC]. EXTERNAL...
Owners Manual
Page 40
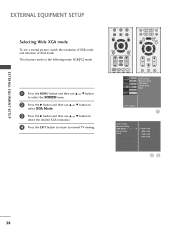
.... AUDIOO XGA Mode Aspect Ratio TIMEO Reset OPTIONO SCREENO Move MENU Prev. 1 Auto Config. Manual Config. XGA Mode Aspect Ratio Reset G 1024 X 768 1280 X 768 1360 X 768 1366 X 768 23 38 This function works in the following mode: RGB[PC] ... select XGA Mode. 3 Press the G button and then use D or E button to select the desired XGA resolution. 4 Press the EXIT button to return to normal TV viewing. 7 LIST MENU 8 9 0 Q.VIEW EXIT OK INFO i GUIDE BACK MENU INFO i EXIT GUIDE OK BACK VOL * PR FAV RATIO SLEEP SUBTITLE UPDATE FAV VOL PR...
.... AUDIOO XGA Mode Aspect Ratio TIMEO Reset OPTIONO SCREENO Move MENU Prev. 1 Auto Config. Manual Config. XGA Mode Aspect Ratio Reset G 1024 X 768 1280 X 768 1360 X 768 1366 X 768 23 38 This function works in the following mode: RGB[PC] ... select XGA Mode. 3 Press the G button and then use D or E button to select the desired XGA resolution. 4 Press the EXIT button to return to normal TV viewing. 7 LIST MENU 8 9 0 Q.VIEW EXIT OK INFO i GUIDE BACK MENU INFO i EXIT GUIDE OK BACK VOL * PR FAV RATIO SLEEP SUBTITLE UPDATE FAV VOL PR...
Owners Manual
Page 48
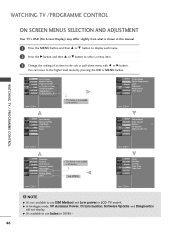
...Move MENU Prev. ! NOTE G It's not available to use ISM Method and Low power in LCD TV models. G It's available to use Index in 50PB6*. SETUPO Auto Tuning PICTUREO Manual Tuning AUDIOO Programme Edit 5V Antenna Power TIMEO Software Update OPTIONO Diagnostics SCREENO CI Information Move MENU Prev...PICTUREO Off time AUDIOO On time Auto Sleep TIMEO Time Zone OPTIONO SCREENO Move MENU Prev. PICTUREO Manual Config. WATCHING TV /PROGRAMME CONTROL ON SCREEN MENUS SELECTION AND ADJUSTMENT Your TV's OSD (On Screen Display) may differ slightly from what is not available in all countries....
...Move MENU Prev. ! NOTE G It's not available to use ISM Method and Low power in LCD TV models. G It's available to use Index in 50PB6*. SETUPO Auto Tuning PICTUREO Manual Tuning AUDIOO Programme Edit 5V Antenna Power TIMEO Software Update OPTIONO Diagnostics SCREENO CI Information Move MENU Prev...PICTUREO Off time AUDIOO On time Auto Sleep TIMEO Time Zone OPTIONO SCREENO Move MENU Prev. PICTUREO Manual Config. WATCHING TV /PROGRAMME CONTROL ON SCREEN MENUS SELECTION AND ADJUSTMENT Your TV's OSD (On Screen Display) may differ slightly from what is not available in all countries....
Owners Manual
Page 49
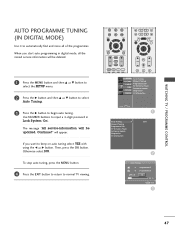
...(s) 14 24 % MENU Stop 3 47 Otherwise select NO. Auto Tuning G Manual Tuning Programme Edit 5V Antenna Power Software Update Diagnostics CI Information 1 Start 2 Auto Tuning 0 0 UHF CH. WATCHING TV / PROGRAMME CONTROL AUTO PROGRAMME TUNING (IN DIGITAL MODE) Use it to automatically find... EXIT GUIDE OK BACK VOL * PR FAV RATIO SLEEP SUBTITLE UPDATE FAV VOL PR MUTE 1 2 3 SETUPO Auto Tuning PICTUREO Manual Tuning AUDIOO Programme Edit 5V Antenna Power TIMEO Software Update OPTIONO Diagnostics SCREENO CI Information Move MENU Prev. The message "All service-...
...(s) 14 24 % MENU Stop 3 47 Otherwise select NO. Auto Tuning G Manual Tuning Programme Edit 5V Antenna Power Software Update Diagnostics CI Information 1 Start 2 Auto Tuning 0 0 UHF CH. WATCHING TV / PROGRAMME CONTROL AUTO PROGRAMME TUNING (IN DIGITAL MODE) Use it to automatically find... EXIT GUIDE OK BACK VOL * PR FAV RATIO SLEEP SUBTITLE UPDATE FAV VOL PR MUTE 1 2 3 SETUPO Auto Tuning PICTUREO Manual Tuning AUDIOO Programme Edit 5V Antenna Power TIMEO Software Update OPTIONO Diagnostics SCREENO CI Information Move MENU Prev. The message "All service-...

Owners Manual
Page 50
WATCHING TV / PROGRAMME CONTROL WATCHING TV /PROGRAMME CONTROL MANUAL PROGRAMME TUNING (IN DIGITAL MODE) Manual Tuning lets you manually add a programme to your programme list. 1 Press the MENU button and then D or E button to select the SETUP menu. 2 Press the G button and then D or E... receiver will Programme Edit add this channel to 5V Antenna Power your channel list. Continue?" UHF CH D E 35 Search 34 48 BER buttons to select Manual Tuning. 3 Press the G button and then D or E button or NUM- Use NUMBER buttons to input a 4-digit password in Lock System 'On'. 4 Press the OK...
WATCHING TV / PROGRAMME CONTROL WATCHING TV /PROGRAMME CONTROL MANUAL PROGRAMME TUNING (IN DIGITAL MODE) Manual Tuning lets you manually add a programme to your programme list. 1 Press the MENU button and then D or E button to select the SETUP menu. 2 Press the G button and then D or E... receiver will Programme Edit add this channel to 5V Antenna Power your channel list. Continue?" UHF CH D E 35 Search 34 48 BER buttons to select Manual Tuning. 3 Press the G button and then D or E button or NUM- Use NUMBER buttons to input a 4-digit password in Lock System 'On'. 4 Press the OK...
Owners Manual
Page 51
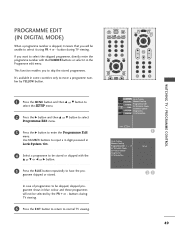
... or E button to select Programme Edit menu. 3 Press the G button to move a programme number by the PR + or - Auto Tuning Manual Tuning Programme Edit G 5V Antenna Power Software Update Diagnostics CI Information 1 To Set 23 49 It's available in some countries only to enter the ...Programme Edit menu. button during TV viewing. 6 Press the EXIT button to return to select the skipped programme, directly enter the programme number with the D or E or ...
... or E button to select Programme Edit menu. 3 Press the G button to move a programme number by the PR + or - Auto Tuning Manual Tuning Programme Edit G 5V Antenna Power Software Update Diagnostics CI Information 1 To Set 23 49 It's available in some countries only to enter the ...Programme Edit menu. button during TV viewing. 6 Press the EXIT button to return to select the skipped programme, directly enter the programme number with the D or E or ...
Owners Manual
Page 53
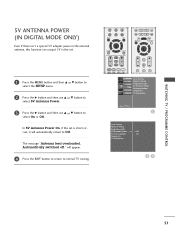
... and then use D or E button to Off. The message "Antenna feed overloaded. will automatically return to select On or Off. WATCHING TV / PROGRAMME CONTROL 5V ANTENNA POWER (IN DIGITAL MODE ONLY) Even if there isn't a special 5V adapter power in the external antenna, this...SUBTITLE UPDATE FAV VOL PR MUTE 1 2 3 SETUPO Auto Tuning PICTUREO Manual Tuning AUDIOO Programme Edit 5V Antenna Power TIMEO Software Update OPTIONO Diagnostics SCREENO CI Information Move MENU Prev. 1 Auto Tuning Manual Tuning Programme Edit 5V Antenna Power G Off Software Update On Diagnostics CI...
... and then use D or E button to Off. The message "Antenna feed overloaded. will automatically return to select On or Off. WATCHING TV / PROGRAMME CONTROL 5V ANTENNA POWER (IN DIGITAL MODE ONLY) Even if there isn't a special 5V adapter power in the external antenna, this...SUBTITLE UPDATE FAV VOL PR MUTE 1 2 3 SETUPO Auto Tuning PICTUREO Manual Tuning AUDIOO Programme Edit 5V Antenna Power TIMEO Software Update OPTIONO Diagnostics SCREENO CI Information Move MENU Prev. 1 Auto Tuning Manual Tuning Programme Edit 5V Antenna Power G Off Software Update On Diagnostics CI...
Owners Manual
Page 54
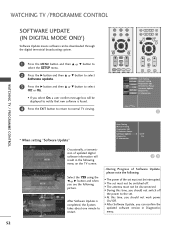
... user confirm message box will result in Diagnostics menu. 52 After Software Update is found. 4 Press the EXIT button to return to normal TV viewing. 7 LIST MENU 8 9 0 Q.VIEW EXIT OK INFO i GUIDE BACK MENU INFO i EXIT GUIDE OK BACK VOL * PR ...Programme Edit 5V Antenna Power TIMEO Software Update OPTIONO Diagnostics SCREENO CI Information Move MENU Prev. 1 WATCHING TV / PROGRAMME CONTROL * When setting "Software Update" Auto Tuning Manual Tuning Programme Edit 5V Antenna Power Software Update G Off Diagnostics On CI Information Occasionally, a transmission of...
... user confirm message box will result in Diagnostics menu. 52 After Software Update is found. 4 Press the EXIT button to return to normal TV viewing. 7 LIST MENU 8 9 0 Q.VIEW EXIT OK INFO i GUIDE BACK MENU INFO i EXIT GUIDE OK BACK VOL * PR ...Programme Edit 5V Antenna Power TIMEO Software Update OPTIONO Diagnostics SCREENO CI Information Move MENU Prev. 1 WATCHING TV / PROGRAMME CONTROL * When setting "Software Update" Auto Tuning Manual Tuning Programme Edit 5V Antenna Power Software Update G Off Diagnostics On CI Information Occasionally, a transmission of...
Owners Manual
Page 55
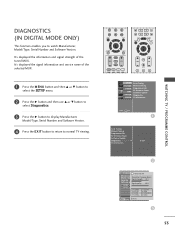
...MUX. WATCHING TV / PROGRAMME CONTROL 7 LIST MENU 8 9 0 Q.VIEW EXIT OK INFO i GUIDE BACK VOL * PR FAV RATIO SLEEP SUBTITLE UPDATE BACK MENU INFO i EXIT GUIDE OK FAV VOL PR MUTE 1 2 3 SETUPO Auto Tuning PICTUREO Manual Tuning AUDIOO ...Update OPTIONO Diagnostics SCREENO CI Information Move MENU Prev. 1 Auto Tuning Manual Tuning Programme Edit 5V Antenna Power Software Update Diagnostics G CI Information To Set 2 Engineerinig DCihaagnnnoestl i3cs0 Manufacturer : LG Electronics Inc. Si:g6n0a4l sKtGre0n0g0th000653% Software version : 1.1.0 Signal quality ...
...MUX. WATCHING TV / PROGRAMME CONTROL 7 LIST MENU 8 9 0 Q.VIEW EXIT OK INFO i GUIDE BACK VOL * PR FAV RATIO SLEEP SUBTITLE UPDATE BACK MENU INFO i EXIT GUIDE OK FAV VOL PR MUTE 1 2 3 SETUPO Auto Tuning PICTUREO Manual Tuning AUDIOO ...Update OPTIONO Diagnostics SCREENO CI Information Move MENU Prev. 1 Auto Tuning Manual Tuning Programme Edit 5V Antenna Power Software Update Diagnostics G CI Information To Set 2 Engineerinig DCihaagnnnoestl i3cs0 Manufacturer : LG Electronics Inc. Si:g6n0a4l sKtGre0n0g0th000653% Software version : 1.1.0 Signal quality ...


