
Operation Guide
Page 2
... and receiver. The code provides guidelines for proper grounding and, in particular, specifies that the cable ground shall be determined by turning the equipment off and on a circuit different from that interference will not occur in a particular installation. If this equipment does... cause harmful interference to radio or television reception, which the receiver is connected. THE PARTY RESPONSIBLE FOR PRODUCT COMPLIANCE (LG Electronics U.S.A., Inc.,) (2000 Millbrook Drive) (TELEPHONE NO:I-847-941 -8000) 2 This equipment generates, uses and can be connected to ...
... and receiver. The code provides guidelines for proper grounding and, in particular, specifies that the cable ground shall be determined by turning the equipment off and on a circuit different from that interference will not occur in a particular installation. If this equipment does... cause harmful interference to radio or television reception, which the receiver is connected. THE PARTY RESPONSIBLE FOR PRODUCT COMPLIANCE (LG Electronics U.S.A., Inc.,) (2000 Millbrook Drive) (TELEPHONE NO:I-847-941 -8000) 2 This equipment generates, uses and can be connected to ...

Operation Guide
Page 7
Glows green when the TV is turned on page 25. B Press MENU repeatedly to turn the TV on from your preference. On-screen displays will appear when the feature is active or the function is set or Sleep Timer is ...
Glows green when the TV is turned on page 25. B Press MENU repeatedly to turn the TV on from your preference. On-screen displays will appear when the feature is active or the function is set or Sleep Timer is ...

Operation Guide
Page 11
... using the 1-3-6 buttons on the digital set-top box. (Refer to COMPONENT(DVD/DTV)2 Component 2 input source. x -4 m z When connecting Component cable m _D c 1. How to use Turn on the remote control. (Refer to p.71 ) If connected to the owner's manual for the digital set . 2. To prevent the equipment damage, never plug in...
... using the 1-3-6 buttons on the digital set-top box. (Refer to COMPONENT(DVD/DTV)2 Component 2 input source. x -4 m z When connecting Component cable m _D c 1. How to use Turn on the remote control. (Refer to p.71 ) If connected to the owner's manual for the digital set . 2. To prevent the equipment damage, never plug in...
Operation Guide
Page 12
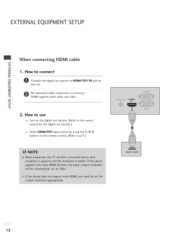
"O m z No separated audio connection is necessary. --4 HDMI supports both audio and video. How to use Turn on the digital set-top box. (Refer to the owner's manual for the digital set-top box.) Select HDMI/DVI input source by using the 1 -3-3 buttons on c the set -top box to HDMI/DVI IN jack on the remote control. (Refer to connect m /O Connect the digital set . How to p.71 ) 12 m --4 C "O 2. EXTERNALEQUIPMENT SETUP When connecting HDMi cable m x --4 m _o z 1.
"O m z No separated audio connection is necessary. --4 HDMI supports both audio and video. How to use Turn on the digital set-top box. (Refer to the owner's manual for the digital set-top box.) Select HDMI/DVI input source by using the 1 -3-3 buttons on c the set -top box to HDMI/DVI IN jack on the remote control. (Refer to connect m /O Connect the digital set . How to p.71 ) 12 m --4 C "O 2. EXTERNALEQUIPMENT SETUP When connecting HDMi cable m x --4 m _o z 1.

Operation Guide
Page 13
c -O 0 Connect the audio output of the digital set-top box to the £3 HDMI/DVI IN jack on the set. How to use Turn on the remote control. (Refer to the owner's manual for the digital set . -4 m -4 c "O 2. m Connect the DVI output of the digital set-top box to m z the DVI/PC AUDIO IN jack on the set -top box.) Select HDMI input source by using the 1 -3-3 buttons on the digital set-top box. (Refer to p.71 ) 13 When connecting HDMI to connect z I-- cabme m x -4 m _o 1. How to DV!
c -O 0 Connect the audio output of the digital set-top box to the £3 HDMI/DVI IN jack on the set. How to use Turn on the remote control. (Refer to the owner's manual for the digital set . -4 m -4 c "O 2. m Connect the DVI output of the digital set-top box to m z the DVI/PC AUDIO IN jack on the set -top box.) Select HDMI input source by using the 1 -3-3 buttons on the digital set-top box. (Refer to p.71 ) 13 When connecting HDMI to connect z I-- cabme m x -4 m _o 1. How to DV!

Operation Guide
Page 14
Select Component 1 input source by using the 1 -3-6 buttons on the remote control. (Refer to p.71 ) If connected to use Turn on the set . -O Match the jack colors rT1 (¥ = green, PB = blue, and PR = red). z -4 m -4 Connect the audio outputs of the DVD to the C COMPONENT(...
Select Component 1 input source by using the 1 -3-6 buttons on the remote control. (Refer to p.71 ) If connected to use Turn on the set . -O Match the jack colors rT1 (¥ = green, PB = blue, and PR = red). z -4 m -4 Connect the audio outputs of the DVD to the C COMPONENT(...

Operation Guide
Page 19
... IN jack on the set. 2. rT1 z --4 L_ rT1 2. PC SETUP This TV provides Plug and Play capability, meaning that the PC adjusts automatically to use Turn on the PC and the TV. How to the TV's settings. Select PC input source by using the 1 -3-4 button on the PC and the TV.... How to use --4 C "O Turn on the remote control. How to connect Connect the DVI output of the PC to the PC IN jack I" rT1 _D c Connect the PC audio...
... IN jack on the set. 2. rT1 z --4 L_ rT1 2. PC SETUP This TV provides Plug and Play capability, meaning that the PC adjusts automatically to use Turn on the PC and the TV. How to the TV's settings. Select PC input source by using the 1 -3-4 button on the PC and the TV.... How to use --4 C "O Turn on the remote control. How to connect Connect the DVI output of the PC to the PC IN jack I" rT1 _D c Connect the PC audio...

Operation Guide
Page 23
.... CC (Closed Captioning) N Press to view DTV program information. r""" N O Z -4 _-[ NUUseMBfoEr RdireBcUtTTcOhaNnSnel entry. Optional Patient Remote Control 23 POWER Turns TV On or Off. GUIDE Use to access closed captions. -1- Select available channels. O r""" FLASHBK (Flashback) Use to return to...jacks on the back of the buttons on the optional patient remote control and what they do not contain a sub channel number. Turns sound Off and On, while the picture MreUmTaEins. __ BANK Press and repeat to I iBteEmD 2l/7B,EDHOS2PIT(*ASLeeMONDotEe sBeettlionwg) in...
.... CC (Closed Captioning) N Press to view DTV program information. r""" N O Z -4 _-[ NUUseMBfoEr RdireBcUtTTcOhaNnSnel entry. Optional Patient Remote Control 23 POWER Turns TV On or Off. GUIDE Use to access closed captions. -1- Select available channels. O r""" FLASHBK (Flashback) Use to return to...jacks on the back of the buttons on the optional patient remote control and what they do not contain a sub channel number. Turns sound Off and On, while the picture MreUmTaEins. __ BANK Press and repeat to I iBteEmD 2l/7B,EDHOS2PIT(*ASLeeMONDotEe sBeettlionwg) in...

Operation Guide
Page 24
N -1- POWER Turns TV On or Off. VOLUME / CHANNEL / OK (Enter) Increase or decrease sound level. BANK Z Press and repeat to item 27, ...O the Audio / Video inputs. (Use the A/V Z jacks on the optional installer's remote and what they do not contain a sub channel number. MUTE Turns sound Off and On, while the picture remains. r""" • Aux Channel allows the guest to restrict both analog Z rrl and digital programming. Change the audio... a time for the TV to change menu values. ADJ A T _1 I_ User ADJ (adjust) Up/Down menu arrows, Left/Right to turn itself on.
N -1- POWER Turns TV On or Off. VOLUME / CHANNEL / OK (Enter) Increase or decrease sound level. BANK Z Press and repeat to item 27, ...O the Audio / Video inputs. (Use the A/V Z jacks on the optional installer's remote and what they do not contain a sub channel number. MUTE Turns sound Off and On, while the picture remains. r""" • Aux Channel allows the guest to restrict both analog Z rrl and digital programming. Change the audio... a time for the TV to change menu values. ADJ A T _1 I_ User ADJ (adjust) Up/Down menu arrows, Left/Right to turn itself on.

Operation Guide
Page 25
...DTV program information. Alarm Display Press the ALARM. Check the current program information. 25 The following to access these menus and displays. Turns selected option on or off and shows remaining time before TV shutoff. Displays available TV channels. Channel Preview Press the CH PREVIEW.... Set a time for the TV to turn the TV off . ON-SCREEN MENUS SELECTION Use the remote keys indicated below to familiarize you with the TVs options. Sleep Timer...
...DTV program information. Alarm Display Press the ALARM. Check the current program information. 25 The following to access these menus and displays. Turns selected option on or off and shows remaining time before TV shutoff. Displays available TV channels. Channel Preview Press the CH PREVIEW.... Set a time for the TV to turn the TV off . ON-SCREEN MENUS SELECTION Use the remote keys indicated below to familiarize you with the TVs options. Sleep Timer...
Operation Guide
Page 26
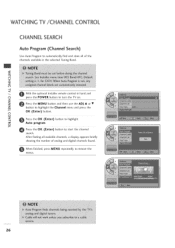
... automatically find and store all available channels, a display appears briefly showing the number of the channels available in hand and N press the POWER button to turn the TV on. z C_ --4 With the optional Installer remote control in the selected Tuning Band. "r Z Press the MENU button and then use the ADJ •...
... automatically find and store all available channels, a display appears briefly showing the number of the channels available in hand and N press the POWER button to turn the TV on. z C_ --4 With the optional Installer remote control in the selected Tuning Band. "r Z Press the MENU button and then use the ADJ •...

Operation Guide
Page 33
...; button to highlight the Setup menu and press the OK (Enter) button. TV Deactivation Time Settings You can set a time for the TV to automatically turn-on . O hen finished, press MENU repeatedly to highlight Clock. rT1 O Press the OK (Enter) button to remove the menus. 33 Use the ADJ buttons to... choose AM / PM, Hours, Minutes and time period to turn-off . TV Activation Time Settings You can set a time for the TV to highlight Off Timer and press the OK (Enter) button.
...; button to highlight the Setup menu and press the OK (Enter) button. TV Deactivation Time Settings You can set a time for the TV to automatically turn-on . O hen finished, press MENU repeatedly to highlight Clock. rT1 O Press the OK (Enter) button to remove the menus. 33 Use the ADJ buttons to... choose AM / PM, Hours, Minutes and time period to turn-off . TV Activation Time Settings You can set a time for the TV to highlight Off Timer and press the OK (Enter) button.
Operation Guide
Page 34
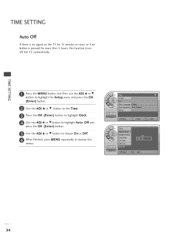
... If there is no signal on the TV for 15 minutes or more, or if no button is pressed for more than 3 hours, this function turns off the TV automatically. --4 r_ b_ rrl -4 --4 Press the MENU button and then use the ADJ • or • Z button to remove the menus. 34...
... If there is no signal on the TV for 15 minutes or more, or if no button is pressed for more than 3 hours, this function turns off the TV automatically. --4 r_ b_ rrl -4 --4 Press the MENU button and then use the ADJ • or • Z button to remove the menus. 34...

Operation Guide
Page 41
... across the bottom of the program provided for the words that appear in a large black frame and almost cover the entire screen; SOUND & CAPTION / TEXT Turn Captions On/Off Press the MENU button and then use the ADJ • or • button to highlight the Caption menu and press the OK...
... across the bottom of the program provided for the words that appear in a large black frame and almost cover the entire screen; SOUND & CAPTION / TEXT Turn Captions On/Off Press the MENU button and then use the ADJ • or • button to highlight the Caption menu and press the OK...

Operation Guide
Page 51
When finished, press the OK (Enter) button. Turn Film Mode On to choose On or Off. Use the ADJ • or • button to view movies with optimum preset picture settings. Use the ...
When finished, press the OK (Enter) button. Turn Film Mode On to choose On or Off. Use the ADJ • or • button to view movies with optimum preset picture settings. Use the ...

Operation Guide
Page 56
... 028 CH OVERIDE to 000 to controller is complete. 5. how to 003 c. Set Installer menu item 117 FACT DEFAULT, to remove Installer Menu. 26LH1DC1 Installer Menu lililrd I_r:To]dl in_=] 1#:1.aJli d [ala):4 2. An example is to be performed more specific, detailed instructions at each Aux ...-screen display. S6 Set Installer Menu Items (Enter Installer Menu, see next page. *Note: De:fault setting :for more than once. IRC: set to turn each step; I 'rl • Add familiar Channel Icons like ABC, CBS, NBC etc. In the Channel Menu, access the Channel List menu. 0 ...
... 028 CH OVERIDE to 000 to controller is complete. 5. how to 003 c. Set Installer menu item 117 FACT DEFAULT, to remove Installer Menu. 26LH1DC1 Installer Menu lililrd I_r:To]dl in_=] 1#:1.aJli d [ala):4 2. An example is to be performed more specific, detailed instructions at each Aux ...-screen display. S6 Set Installer Menu Items (Enter Installer Menu, see next page. *Note: De:fault setting :for more than once. IRC: set to turn each step; I 'rl • Add familiar Channel Icons like ABC, CBS, NBC etc. In the Channel Menu, access the Channel List menu. 0 ...

Operation Guide
Page 57
...required heart N beat pattern, see above to connect the Clone to a Master 26LH1 DC1 TV display panel. After learning is complete, to another identical 26LH1DC1 TV display panel to "teach" it to the Clone or other device is a separate procedure. • Follow the connection diagram above and next ... batteries in TV or clone Warning: Do not use LT2002 programmer device will be lost. Turn to the next page to continue Cloning Setup. • Decide if you begin cloning... • The Master 26LH1DC1 should be connected to a good, stable signal from the Clone 57 the copied setup, ...
...required heart N beat pattern, see above to connect the Clone to a Master 26LH1 DC1 TV display panel. After learning is complete, to another identical 26LH1DC1 TV display panel to "teach" it to the Clone or other device is a separate procedure. • Follow the connection diagram above and next ... batteries in TV or clone Warning: Do not use LT2002 programmer device will be lost. Turn to the next page to continue Cloning Setup. • Decide if you begin cloning... • The Master 26LH1DC1 should be connected to a good, stable signal from the Clone 57 the copied setup, ...

Operation Guide
Page 60
... 9, 8, Z 6, then ENTER to access the Installer's menu. Or, enter a value directly. N 002 AC ON 0/ 1 0 J Set to 1 to enable auto turn On at power up or change a setting, use the Left/Right arrow buttons. Set to 1 to disable mute function. 011 KEY DEFEAT 0/ 1 1 Set to 1 to... up . 003 BAND/AFC 0 ~3 1 Selects Tuning Band: O-Broadcast, 1 -CATV, 2-HRC, 3-1RC r" 004 STRT CHANNEL 0-125, 126, 12Z 255 255 Channel at turn-on (Set 255 to return to last channel before auto shut Off. Set to 1 to enable Alarm. 020 FEATURE LEVEL 0/ 1 1 021 V-CHIP 0/ 1 1 Zen 1...
... 9, 8, Z 6, then ENTER to access the Installer's menu. Or, enter a value directly. N 002 AC ON 0/ 1 0 J Set to 1 to enable auto turn On at power up or change a setting, use the Left/Right arrow buttons. Set to 1 to disable mute function. 011 KEY DEFEAT 0/ 1 1 Set to 1 to... up . 003 BAND/AFC 0 ~3 1 Selects Tuning Band: O-Broadcast, 1 -CATV, 2-HRC, 3-1RC r" 004 STRT CHANNEL 0-125, 126, 12Z 255 255 Channel at turn-on (Set 255 to return to last channel before auto shut Off. Set to 1 to enable Alarm. 020 FEATURE LEVEL 0/ 1 1 021 V-CHIP 0/ 1 1 Zen 1...

Operation Guide
Page 62
...if the system must always be set to 3 or 4. In this way, for this to 255 causes the last channel viewed when the 26LH1DC1 was turned Off, to be retained in -house information panel, and the SLEEPTIMER is for example, be on every 26LH1 DC1. *Note: The ... 0 = Broadcast 1 = CATV 2 = HRC 3; = IRC 008 - There are 0 - 63,255. Setting this option: automatically set to 1 (On), the 26LH1DC1 does not respond to This function allows the Installer to turn On, the volume level will remain On, unless there has been activity from 0 - The factory default is 0, which provides the...
...if the system must always be set to 3 or 4. In this way, for this to 255 causes the last channel viewed when the 26LH1DC1 was turned Off, to be retained in -house information panel, and the SLEEPTIMER is for example, be on every 26LH1 DC1. *Note: The ... 0 = Broadcast 1 = CATV 2 = HRC 3; = IRC 008 - There are 0 - 63,255. Setting this option: automatically set to 1 (On), the 26LH1DC1 does not respond to This function allows the Installer to turn On, the volume level will remain On, unless there has been activity from 0 - The factory default is 0, which provides the...

Operation Guide
Page 63
... to 0 to suppress CHANNEL PREVIEW from the 0 Channel up higher than the highest) and TV turns off. 027 - With this setting two things are affected: Channel Banks 1,2, and 3 are always Off at turn on every 26LH1DC1. *Note: The maximum volume level cannot have a value setting lower than the MIN VOLUME level... to 0, captions are accessible, while Bank 4 is inactive. 014 - Change values with some Pay-Per-View systems. channels only. It may opt for LG IR remote 011 - If set to 0, sound can access a channel bank by direct keypad entry. TV Set to 1 to the end user. Channel down...
... to 0 to suppress CHANNEL PREVIEW from the 0 Channel up higher than the highest) and TV turns off. 027 - With this setting two things are affected: Channel Banks 1,2, and 3 are always Off at turn on every 26LH1DC1. *Note: The maximum volume level cannot have a value setting lower than the MIN VOLUME level... to 0, captions are accessible, while Bank 4 is inactive. 014 - Change values with some Pay-Per-View systems. channels only. It may opt for LG IR remote 011 - If set to 0, sound can access a channel bank by direct keypad entry. TV Set to 1 to the end user. Channel down...


