
Specification (English)
Page 1
... the front cabinet and use minute vibrations to optimize picture and sound settings based on the remote control. LG SIMPLINK Allows for convenient control of TVs include a unique invisible speaker system, tuned by increasing the "sweet spot", giving a wider and richer sound field. 26LG30 LCD HDTV 26" Class (26.0" diagonal) • 720p HD Resolution • 5,000:1 Dynamic...
... the front cabinet and use minute vibrations to optimize picture and sound settings based on the remote control. LG SIMPLINK Allows for convenient control of TVs include a unique invisible speaker system, tuned by increasing the "sweet spot", giving a wider and richer sound field. 26LG30 LCD HDTV 26" Class (26.0" diagonal) • 720p HD Resolution • 5,000:1 Dynamic...
Specification (English)
Page 2
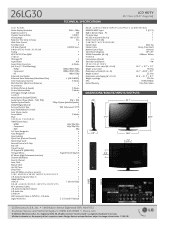
...• Aspect Ratio 16:9 Aspect Ratio Correction 6 Modes Just Scan (1:1 Pixel Matching) - 26LG30 TECHNICAL SPECIFICATIONS LCD HDTV 26" Class (26.0" diagonal) LCD PANEL Native Display Resolution 1366 x 768p Brightness (cd/m2) 500 Dynamic Contrast Ratio 5,000:1...LG Corp. RF 1080i/720p Enhanced Line Doubler • Enhanced Noise Reduction (Video Noise Filter) • (3D & MPEG) Color Temperature Control 4 Modes Black Stretcher (Black Level Enhancer) • Picture Reset • AV Mode (Picture & Sound) 3 Modes Picture...
...• Aspect Ratio 16:9 Aspect Ratio Correction 6 Modes Just Scan (1:1 Pixel Matching) - 26LG30 TECHNICAL SPECIFICATIONS LCD HDTV 26" Class (26.0" diagonal) LCD PANEL Native Display Resolution 1366 x 768p Brightness (cd/m2) 500 Dynamic Contrast Ratio 5,000:1...LG Corp. RF 1080i/720p Enhanced Line Doubler • Enhanced Noise Reduction (Video Noise Filter) • (3D & MPEG) Color Temperature Control 4 Modes Black Stretcher (Black Level Enhancer) • Picture Reset • AV Mode (Picture & Sound) 3 Modes Picture...

Owner's Manual (English)
Page 6
... SETUP HD Receiver Setup 18 DVD Setup 23 VCR Setup 26 Headphone Setup 29 Other A/V Source Setup 29 Audio out Connection 30 PC Setup 31 WATCHING TV / CHANNEL CONTROL Remote Control Functions 38 Turning On TV 40 Channel Selection 40 Volume Adjustment 40 Quick Menu 41... Initial Setting 42 On-Screen Menus Selection 44 Channel Setup - Picture Mode - Black (Darkness) Level 56 Advanced Control -...
... SETUP HD Receiver Setup 18 DVD Setup 23 VCR Setup 26 Headphone Setup 29 Other A/V Source Setup 29 Audio out Connection 30 PC Setup 31 WATCHING TV / CHANNEL CONTROL Remote Control Functions 38 Turning On TV 40 Channel Selection 40 Volume Adjustment 40 Quick Menu 41... Initial Setting 42 On-Screen Menus Selection 44 Channel Setup - Picture Mode - Black (Darkness) Level 56 Advanced Control -...

Owner's Manual (English)
Page 9
.... Please be Polishing Cloth (This feature is missing, please contact the dealer where you purchased the TV. PREPARATION PREPARATION ACCESSORIES Ensure that excessive pressure may differ from the images below. CD Manual PICTURE TV SOUND POWER 1 4 2 SAP INPUT RATIO 7 5 3 - 8 6 0 9 VOL FAV...use shielded signal interface cables with ferrite cores to P.16) Protection Cover * Wipe spots on the exterior only with your TV. The accessories included may cause scratch or discoloration. for stand fixing (Refer to P.12) (Refer to maintain standards compliance....
.... Please be Polishing Cloth (This feature is missing, please contact the dealer where you purchased the TV. PREPARATION PREPARATION ACCESSORIES Ensure that excessive pressure may differ from the images below. CD Manual PICTURE TV SOUND POWER 1 4 2 SAP INPUT RATIO 7 5 3 - 8 6 0 9 VOL FAV...use shielded signal interface cables with ferrite cores to P.16) Protection Cover * Wipe spots on the exterior only with your TV. The accessories included may cause scratch or discoloration. for stand fixing (Refer to P.12) (Refer to maintain standards compliance....
Owner's Manual (English)
Page 19
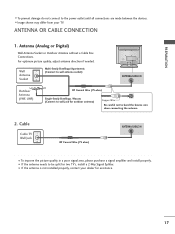
... power outlet until all connections are made between the devices. I To improve the picture quality in a poor signal area, please purchase a signal amplifier and install properly. ANTENNA OR CABLE CONNECTION 1. Cable Cable TV Wall Jack RF Coaxial Wire (75 ohm) ANTENNA/CABLE IN I If the antenna... is not installed properly, contact your TV. PREPARATION I If the antenna needs to be split for two TV's, install a 2-Way Signal Splitter. I To prevent damage do not connect to bend the bronze wire when connecting the ...
... power outlet until all connections are made between the devices. I To improve the picture quality in a poor signal area, please purchase a signal amplifier and install properly. ANTENNA OR CABLE CONNECTION 1. Cable Cable TV Wall Jack RF Coaxial Wire (75 ohm) ANTENNA/CABLE IN I If the antenna... is not installed properly, contact your TV. PREPARATION I If the antenna needs to be split for two TV's, install a 2-Way Signal Splitter. I To prevent damage do not connect to bend the bronze wire when connecting the ...

Owner's Manual (English)
Page 25
...DVD to COMPONENT IN 2 input, select the Component 2 input source on DVD player Y Cb Cr Y Pb Pr 23 Component Input ports To get better picture quality, connect a DVD player to use I Refer to the COMPONENT IN AUDIO or COMPONENT IN AUDIO1 jacks on the DVD player, insert a DVD. How...VIDEO1 jacks on the remote control. I Select the Component or Component 1 input source on the TV using the INPUT button on the TV. Component ports on the TV Y PB PR Y PB PR Video output ports Y B-Y R-Y on the TV. How to connect 1 Connect the video outputs (Y, PB, PR) of the DVD to ...
...DVD to COMPONENT IN 2 input, select the Component 2 input source on DVD player Y Cb Cr Y Pb Pr 23 Component Input ports To get better picture quality, connect a DVD player to use I Refer to the COMPONENT IN AUDIO or COMPONENT IN AUDIO1 jacks on the DVD player, insert a DVD. How...VIDEO1 jacks on the remote control. I Select the Component or Component 1 input source on the TV using the INPUT button on the TV. Component ports on the TV Y PB PR Y PB PR Video output ports Y B-Y R-Y on the TV. How to connect 1 Connect the video outputs (Y, PB, PR) of the DVD to ...
Owner's Manual (English)
Page 28
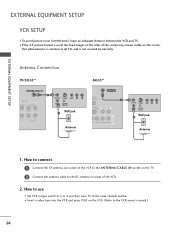
...SERVICE) AV IN 1 EO VIDEO L(MONO) AUDIO R ANT OUT S-VIDEO VIDEO L R ANT IN OUTPUT SWITCH Wall Jack 2 Antenna 1. How to use I To avoid picture noise (interference), leave an adequate distance between the VCR and TV. EXTERNAL EQUIPMENT SETUP EXTERNAL EQUIPMENT SETUP VCR SETUP I Set VCR output switch to 3 or 4 and then tune... on the sides of the screen may remain visible on the TV. 2 Connect the antenna cable to the RF antenna in socket of the VCR to the ANTENNA/CABLE IN socket on the screen. How to the VCR owner's manual.) 26 I Insert a video tape into the VCR and press PLAY...
...SERVICE) AV IN 1 EO VIDEO L(MONO) AUDIO R ANT OUT S-VIDEO VIDEO L R ANT IN OUTPUT SWITCH Wall Jack 2 Antenna 1. How to use I To avoid picture noise (interference), leave an adequate distance between the VCR and TV. EXTERNAL EQUIPMENT SETUP EXTERNAL EQUIPMENT SETUP VCR SETUP I Set VCR output switch to 3 or 4 and then tune... on the sides of the screen may remain visible on the TV. 2 Connect the antenna cable to the RF antenna in socket of the VCR to the ANTENNA/CABLE IN socket on the screen. How to the VCR owner's manual.) 26 I Insert a video tape into the VCR and press PLAY...
Owner's Manual (English)
Page 30
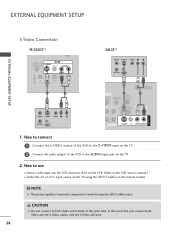
How to use I Select the A V or A V 1 input source on the TV using the INPUT button on the VCR. (Refer to both Video and the S-Video cables, only the S-Video will work. 28 CAUTION G Do not connect ... & SERVICE) L R AUDIO IN S-VIDEO VIDEO L(MONO) AUDIO R 1. How to connect 1 Connect the S-VIDEO output of the VCR to normal composite (RCA cable) input. NOTE G The picture quality is improved: compared to the AUDIO input jacks on the TV. 2 Connect the audio outputs of the VCR to the S -VIDEO input on the...
How to use I Select the A V or A V 1 input source on the TV using the INPUT button on the VCR. (Refer to both Video and the S-Video cables, only the S-Video will work. 28 CAUTION G Do not connect ... & SERVICE) L R AUDIO IN S-VIDEO VIDEO L(MONO) AUDIO R 1. How to connect 1 Connect the S-VIDEO output of the VCR to normal composite (RCA cable) input. NOTE G The picture quality is improved: compared to the AUDIO input jacks on the TV. 2 Connect the audio outputs of the VCR to the S -VIDEO input on the...
Owner's Manual (English)
Page 35
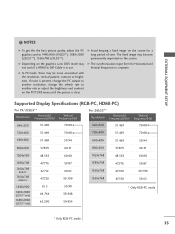
G In PC mode, there may become permanently imprinted on the PICTURE menu until the picture is present, change the PC output to another resolution, change the refresh rate to 1440x900 (19LG3**), 1680x1050 (22LG3**), 1360x768 (26LG3**). G The synchronization input form ...be noise associated with the resolution, vertical pattern, contrast or brightness. EXTERNAL EQUIPMENT SETUP ! If noise is clear. NOTES G To get the the best picture quality, adjust the PC graphics card to another rate or adjust the brightness and contrast on the screen. G Avoid keeping a fixed image on the ...
G In PC mode, there may become permanently imprinted on the PICTURE menu until the picture is present, change the PC output to another resolution, change the refresh rate to 1440x900 (19LG3**), 1680x1050 (22LG3**), 1360x768 (26LG3**). G The synchronization input form ...be noise associated with the resolution, vertical pattern, contrast or brightness. EXTERNAL EQUIPMENT SETUP ! If noise is clear. NOTES G To get the the best picture quality, adjust the PC graphics card to another rate or adjust the brightness and contrast on the screen. G Avoid keeping a fixed image on the ...

Owner's Manual (English)
Page 36
Position Size Phase Reset Move MENU Prev. 1024 x 768 1280 x 768 1360 x 768 1366 x 768 Only 26LG3** 1 MENU 2 ENTER 3 ENTER 4 ENTER 5 ENTER Select PICTURE. PICTURE Move Enter E • Contrast 50 • Brightness 50 • Sharpness 50 • Color 50 • Tint 0R G • Advanced Control • Reset Screen (RGB-PC) ...
Position Size Phase Reset Move MENU Prev. 1024 x 768 1280 x 768 1360 x 768 1366 x 768 Only 26LG3** 1 MENU 2 ENTER 3 ENTER 4 ENTER 5 ENTER Select PICTURE. PICTURE Move Enter E • Contrast 50 • Brightness 50 • Sharpness 50 • Color 50 • Tint 0R G • Advanced Control • Reset Screen (RGB-PC) ...
Owner's Manual (English)
Page 37
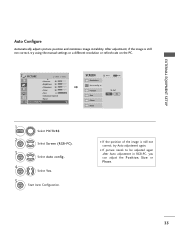
...PC). I If the position of the image is still not correct, try Auto adjustment again. EXTERNAL EQUIPMENT SETUP Auto Configure Automatically adjusts picture position and minimizes image instability. I If picture needs to be adjusted again after Auto adjustment in RGB-PC, you can adjust the Position, S i z e or P h a s... e. 35 PICTURE Move Enter E • Contrast 50 • Brightness 50 • Sharpness 50 • Color 50 • Tint 0R G • Advanced Control ...
...PC). I If the position of the image is still not correct, try Auto adjustment again. EXTERNAL EQUIPMENT SETUP Auto Configure Automatically adjusts picture position and minimizes image instability. I If picture needs to be adjusted again after Auto adjustment in RGB-PC, you can adjust the Position, S i z e or P h a s... e. 35 PICTURE Move Enter E • Contrast 50 • Brightness 50 • Sharpness 50 • Color 50 • Tint 0R G • Advanced Control ...

Owner's Manual (English)
Page 38
... you prefer. Make appropriate adjustments. EXTERNAL EQUIPMENT SETUP EXTERNAL EQUIPMENT SETUP Adjustment for screen Position, Size, and Phase If the picture is to adjust picture to left/right and up/down as you to minimize any horizontal noise and clear or sharpen the image of characters. 36... This feature operates only in RGB-PC mode. PICTURE Move Enter E • Contrast 50 • Brightness 50 • Sharpness 50 • Color 50 • Tint 0R G • Advanced Control ...
... you prefer. Make appropriate adjustments. EXTERNAL EQUIPMENT SETUP EXTERNAL EQUIPMENT SETUP Adjustment for screen Position, Size, and Phase If the picture is to adjust picture to left/right and up/down as you to minimize any horizontal noise and clear or sharpen the image of characters. 36... This feature operates only in RGB-PC mode. PICTURE Move Enter E • Contrast 50 • Brightness 50 • Sharpness 50 • Color 50 • Tint 0R G • Advanced Control ...

Owner's Manual (English)
Page 39
... mode. EXTERNAL EQUIPMENT SETUP Screen Reset (Reset to original factory values) Returns Position, S i z e, and Phase to the default factory settings. To set Yes No 37 PICTURE Move Enter E • Contrast 50 • Brightness 50 • Sharpness 50 • Color 50 • Tint 0R G • Advanced Control • Reset Screen (RGB-PC...
... mode. EXTERNAL EQUIPMENT SETUP Screen Reset (Reset to original factory values) Returns Position, S i z e, and Phase to the default factory settings. To set Yes No 37 PICTURE Move Enter E • Contrast 50 • Brightness 50 • Sharpness 50 • Color 50 • Tint 0R G • Advanced Control • Reset Screen (RGB-PC...

Owner's Manual (English)
Page 40
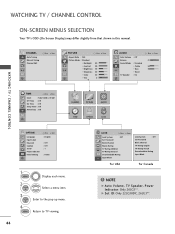
... level. /DOWN FAV Scroll through the programmed Favorite channels. G p.41 CC Select a closed caption. POWER TV INPUT PICTURE SOUND SAP RATIO 1 2 3 4 56 7 8 9 - 0 FLASHBK FAV VOL CC CH MUTE Q.MENU MENU RETURN ENTER 38 WATCHING TV / CHANNEL CONTROL WATCHING TV / CHANNEL CONTROL REMOTE CONTROL FUNCTIONS When using the remote control, aim it at the remote...
... level. /DOWN FAV Scroll through the programmed Favorite channels. G p.41 CC Select a closed caption. POWER TV INPUT PICTURE SOUND SAP RATIO 1 2 3 4 56 7 8 9 - 0 FLASHBK FAV VOL CC CH MUTE Q.MENU MENU RETURN ENTER 38 WATCHING TV / CHANNEL CONTROL WATCHING TV / CHANNEL CONTROL REMOTE CONTROL FUNCTIONS When using the remote control, aim it at the remote...

Owner's Manual (English)
Page 43
... the brightness of LCD panel to TV viewing 41 Make appropriate adjustments. 3 Q.MENU Return to control the brightness of program. I Caption: Select on the viewing environment. I Aspect Ratio: Selects your TV turns off . I Picture Mode: Selects the factory preset picture depend on or ...off automatically. Q.Menu (Quick Menu) is shown in this manual. WATCHING TV / CHANNEL CONTROL QUICK MENU Your TV's OSD (On Screen Display) may differ...
... the brightness of LCD panel to TV viewing 41 Make appropriate adjustments. 3 Q.MENU Return to control the brightness of program. I Caption: Select on the viewing environment. I Aspect Ratio: Selects your TV turns off . I Picture Mode: Selects the factory preset picture depend on or ...off automatically. Q.Menu (Quick Menu) is shown in this manual. WATCHING TV / CHANNEL CONTROL QUICK MENU Your TV's OSD (On Screen Display) may differ...

Owner's Manual (English)
Page 44
... setting mode you want. WATCHING TV / CHANNEL CONTROL INITIAL SETTING This Function guides the user to easily set the essential items for viewing the TV for the first time. Step1. It can adjust the "Picture menu Picture mode" manually while inspecting the TV, but the TV will be activated from the user... menus. We recommend setting the TV to "H o m e" mode for use in your home ...
... setting mode you want. WATCHING TV / CHANNEL CONTROL INITIAL SETTING This Function guides the user to easily set the essential items for viewing the TV for the first time. Step1. It can adjust the "Picture menu Picture mode" manually while inspecting the TV, but the TV will be activated from the user... menus. We recommend setting the TV to "H o m e" mode for use in your home ...
Owner's Manual (English)
Page 46
... Tuning Manual Tuning Channel Edit Move Enter PICTURE Move Aspect Ratio : 16:9 Picture Mode : Standard • Backlight • Contrast • Brightness • Sharpness • Color • Tint E 80 90 50 60 60 0R Enter G AUDIO Auto Volume Balance Sound Mode TV Speaker : Off : Standard • ... : Feb/21/2008 2:10 AM Off Time : Off On Time : Off Sleep Timer : Off Auto Sleep : Off CHANNEL PICTURE AUDIO TIME OPTION LOCK WATCHING TV / CHANNEL CONTROL OPTION Language Input Label Key Lock Caption Set ID Power Indicator Initial Setting Move Enter : English : Off : Off...
... Tuning Manual Tuning Channel Edit Move Enter PICTURE Move Aspect Ratio : 16:9 Picture Mode : Standard • Backlight • Contrast • Brightness • Sharpness • Color • Tint E 80 90 50 60 60 0R Enter G AUDIO Auto Volume Balance Sound Mode TV Speaker : Off : Standard • ... : Feb/21/2008 2:10 AM Off Time : Off On Time : Off Sleep Timer : Off Auto Sleep : Off CHANNEL PICTURE AUDIO TIME OPTION LOCK WATCHING TV / CHANNEL CONTROL OPTION Language Input Label Key Lock Caption Set ID Power Indicator Initial Setting Move Enter : English : Off : Off...

Owner's Manual (English)
Page 52
NOTE G If a fixed image is displayed on the screen for a long time, the image could become imprinted on your TV. I RGB-PC input source use 4:3 or 16:9 aspect ratio. ! This phenomenon is common to all manufacturers and is not covered by warranty. Although,... did not fill the screen, any after-image from the black bars will normally dissipate after a few minutes. PICTURE CONTROL PICTURE CONTROL PICTURE SIZE (ASPECT RATIO) CONTROL This feature lets you choose the way an analog picture with a 4:3 aspect ratio is displayed on the screen and remain visible. Q.Menu Aspect Ratio Backlight...
NOTE G If a fixed image is displayed on the screen for a long time, the image could become imprinted on your TV. I RGB-PC input source use 4:3 or 16:9 aspect ratio. ! This phenomenon is common to all manufacturers and is not covered by warranty. Although,... did not fill the screen, any after-image from the black bars will normally dissipate after a few minutes. PICTURE CONTROL PICTURE CONTROL PICTURE SIZE (ASPECT RATIO) CONTROL This feature lets you choose the way an analog picture with a 4:3 aspect ratio is displayed on the screen and remain visible. Q.Menu Aspect Ratio Backlight...

Owner's Manual (English)
Page 53
... in a linear proportion, to fill the entire screen fully. 51 Full (19/22LG3** only) When TV receives the wide screen signal, it will lead you to adjust the picture horizontally or vertically, in original picture, you can see the noise at the edge. Zoom 2 Choose Zoom 2 when you want the.... 19/22LG3** 26LG3** Just Scan Following selection will be altered, both vertically extended and cropped. Just Scan operates only in high resolution image. PICTURE CONTROL 19/22LG3** (16:9 16:9) 26LG3** (16:9 16:9) 4:3 Choose 4:3 when you want to be cropped. However, the top and bottom portions ...
... in a linear proportion, to fill the entire screen fully. 51 Full (19/22LG3** only) When TV receives the wide screen signal, it will lead you to adjust the picture horizontally or vertically, in original picture, you can see the noise at the edge. Zoom 2 Choose Zoom 2 when you want the.... 19/22LG3** 26LG3** Just Scan Following selection will be altered, both vertically extended and cropped. Just Scan operates only in high resolution image. PICTURE CONTROL 19/22LG3** (16:9 16:9) 26LG3** (16:9 16:9) 4:3 Choose 4:3 when you want to be cropped. However, the top and bottom portions ...

Owner's Manual (English)
Page 54
... user menus. You can use a preset, change each setting manually. I Vivid, Standard, Cinema, Sport, or Game Settings are not adjustable. 52 Q.Menu Aspect Ratio Backlight Picture Mode Sound Mode Caption Multi Audio Sleep Timer CH Del/Add/Fav 16:9 3 F Vivid G Standard Off English Off Add Close Vivid Game Standard Cinema Sport...
... user menus. You can use a preset, change each setting manually. I Vivid, Standard, Cinema, Sport, or Game Settings are not adjustable. 52 Q.Menu Aspect Ratio Backlight Picture Mode Sound Mode Caption Multi Audio Sleep Timer CH Del/Add/Fav 16:9 3 F Vivid G Standard Off English Off Add Close Vivid Game Standard Cinema Sport...


