Owner's Manual (English)
Page 3
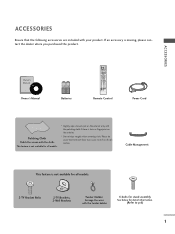
...I/II TIME Remote Control Power Cord Polishing Cloth Polish the screen with your product. Cable Management This feature is stain or fingerprint on the exterior only with the polishing cloth if there is not available for all models. 2-TV Bracket Bolts 2-TV Brackets, 2-...1 If an accessory is missing, please contact the dealer where you purchased the product. Owner's Manual 1.5V 1.5V Batteries INPUT D/A INPUT POWER SIMPLINK BRIGHT MODE TV VCR DVD RATIO TEXT INFO i GUIDE i SUBTITLE MENU LIST EXIT FAV OK VOL Q.VIEW PR PAGE MUTE 1 2 3 4 5 6 7 8 9 APM...
...I/II TIME Remote Control Power Cord Polishing Cloth Polish the screen with your product. Cable Management This feature is stain or fingerprint on the exterior only with the polishing cloth if there is not available for all models. 2-TV Bracket Bolts 2-TV Brackets, 2-...1 If an accessory is missing, please contact the dealer where you purchased the product. Owner's Manual 1.5V 1.5V Batteries INPUT D/A INPUT POWER SIMPLINK BRIGHT MODE TV VCR DVD RATIO TEXT INFO i GUIDE i SUBTITLE MENU LIST EXIT FAV OK VOL Q.VIEW PR PAGE MUTE 1 2 3 4 5 6 7 8 9 APM...
Owner's Manual (English)
Page 4
... 4 Back Panel Information 5 Stand Installation 6 Attaching the TV to a Wall 7 Back Cover for PC Mode 25 AV Output Setup 26 ...Digital Audio Output Setup 27 WATCHING TV/PROGRAMME CONTROL Remote Control Key Functions 28 Turning on the TV 30 Initializing Setup 30 Programme Selection 31 Volume Adjustment 31 ...Picture Size(Aspect Ratio) Control 49 Preset Picture Settings - PSM - User Option 54 Brightness Adjustment 55 XD - User Mode 63 Balance 65 TV Speakers ON/OFF Setup 66 I/II - Black(Darkness) Level 58 Picture Preset 59 ...XD Demo 60 ...SOUND & LANGUAGE CONTROL Auto Volume...
... 4 Back Panel Information 5 Stand Installation 6 Attaching the TV to a Wall 7 Back Cover for PC Mode 25 AV Output Setup 26 ...Digital Audio Output Setup 27 WATCHING TV/PROGRAMME CONTROL Remote Control Key Functions 28 Turning on the TV 30 Initializing Setup 30 Programme Selection 31 Volume Adjustment 31 ...Picture Size(Aspect Ratio) Control 49 Preset Picture Settings - PSM - User Option 54 Brightness Adjustment 55 XD - User Mode 63 Balance 65 TV Speakers ON/OFF Setup 66 I/II - Black(Darkness) Level 58 Picture Preset 59 ...XD Demo 60 ...SOUND & LANGUAGE CONTROL Auto Volume...
Owner's Manual (English)
Page 5
CONTENTS TIME SETTING Clock Setting 69 Auto On/Off Timer Setting 71 Sleep Timer Setting 72 Auto Shut - Off Setting 73 PARENTAL CONTROL/RATINGS Set Password & Lock System 74 Programme Blocking 76 Parental Guidance 77 External Input Blocking 78 TELETEXT Switch On/Off 79 Simple Text 79 TOP Text 79 Fastext 80 Special Teletext Functions 80 APPENDIX Troubleshooting 81 Maintenance 83 Product Specifications 84 Programming the Remote Control 85 IR Codes 87 External Control Through RS-232C 90 After reading this manual, keep it handy for future reference. 3
CONTENTS TIME SETTING Clock Setting 69 Auto On/Off Timer Setting 71 Sleep Timer Setting 72 Auto Shut - Off Setting 73 PARENTAL CONTROL/RATINGS Set Password & Lock System 74 Programme Blocking 76 Parental Guidance 77 External Input Blocking 78 TELETEXT Switch On/Off 79 Simple Text 79 TOP Text 79 Fastext 80 Special Teletext Functions 80 APPENDIX Troubleshooting 81 Maintenance 83 Product Specifications 84 Programming the Remote Control 85 IR Codes 87 External Control Through RS-232C 90 After reading this manual, keep it handy for future reference. 3
Owner's Manual (English)
Page 6
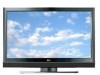
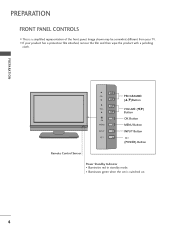
Image shown may be somewhat different from your product has a protection film attached, remove the film and then wipe the product with a polishing cloth. PREPARATION PR VOL OK MENU R INPUT PROGRAMME (D,E)Button VOLUME (F,G) Button OK Button MENU Button INPUT Button (POWER) Button Remote Control Sensor Power Standby Indicator • Illuminates red in standby mode. • Illuminates green when the set is a simplified representation of the front panel. I This is switched on. 4 PREPARATION FRONT PANEL CONTROLS I If your TV.
Image shown may be somewhat different from your product has a protection film attached, remove the film and then wipe the product with a polishing cloth. PREPARATION PR VOL OK MENU R INPUT PROGRAMME (D,E)Button VOLUME (F,G) Button OK Button MENU Button INPUT Button (POWER) Button Remote Control Sensor Power Standby Indicator • Illuminates red in standby mode. • Illuminates green when the set is a simplified representation of the front panel. I This is switched on. 4 PREPARATION FRONT PANEL CONTROLS I If your TV.
Owner's Manual (English)
Page 7
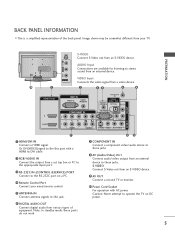
... IN (CONTROL & SERVICE) 5 AUDIO OUT AV OUT V IN 1 1 S-VIDEO Connect S-Video out from an S-VIDEO device. 9 AV OUT Connect a second TV or monitor. 10 Power Cord Socket For operation with a HDMI to DVI cable. 2 ANTENNA IN RGB/AUDIO IN DIGITAL Connect the output from a set top... 8 AV (Audio/Video) IN 1 Connect audio/video output from an external device. MI/DVI IN 6 DIGITAL AUDIO OUT Connect digital audio from your wired remote control. 5 ANTENNA IN Connect antenna signals to the RS-232C port on DC power. PREPARATION VIDEO L/MONO AUDIO R VIDEO L/MONO AUDIO R VIDEO L/MONO ...
... IN (CONTROL & SERVICE) 5 AUDIO OUT AV OUT V IN 1 1 S-VIDEO Connect S-Video out from an S-VIDEO device. 9 AV OUT Connect a second TV or monitor. 10 Power Cord Socket For operation with a HDMI to DVI cable. 2 ANTENNA IN RGB/AUDIO IN DIGITAL Connect the output from a set top... 8 AV (Audio/Video) IN 1 Connect audio/video output from an external device. MI/DVI IN 6 DIGITAL AUDIO OUT Connect digital audio from your wired remote control. 5 ANTENNA IN Connect antenna signals to the RS-232C port on DC power. PREPARATION VIDEO L/MONO AUDIO R VIDEO L/MONO AUDIO R VIDEO L/MONO ...
Owner's Manual (English)
Page 14
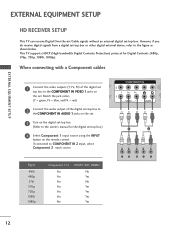
... COMPONENT IN AUDIO 1 jacks on the set . If connected to the COMPONENT IN VIDEO 1 jacks on the set . 3 Turn on the remote control. This TV supports HDCP (High-bandwidth Digital Contents Protection) protocol for the digital set-top box.) 4 Select Component 1 input source using the INPUT button on...R 12 HDMI/DVI IN 2 RGB IN RGB (PC) AUDIO (RGB/DVI) COMPONENT IN DIGITAL AUDIO OUT EXTERNAL EQUIPMENT SETUP HD RECEIVER SETUP This TV can receive Digital Over-the-air/Cable signals without an external digital set -top box or other digital external device, refer to the owner's manual...
... COMPONENT IN AUDIO 1 jacks on the set . If connected to the COMPONENT IN VIDEO 1 jacks on the set . 3 Turn on the remote control. This TV supports HDCP (High-bandwidth Digital Contents Protection) protocol for the digital set-top box.) 4 Select Component 1 input source using the INPUT button on...R 12 HDMI/DVI IN 2 RGB IN RGB (PC) AUDIO (RGB/DVI) COMPONENT IN DIGITAL AUDIO OUT EXTERNAL EQUIPMENT SETUP HD RECEIVER SETUP This TV can receive Digital Over-the-air/Cable signals without an external digital set -top box or other digital external device, refer to the owner's manual...
Owner's Manual (English)
Page 15
... RGB (PC) AUDIO (RGB/DVI) COMPONENT IN VIDEO AUDIO 1 DIGITAL AUDIO OUT EXTERNAL EQUIPMENT SETUP ! VIDEO 2 AUDNIOo separate audio connection is necessary. 3 Turn on the remote control. To get the best picture quality, adjust the output resolution of the source device will be automatically set the output resolution appropriately.
... RGB (PC) AUDIO (RGB/DVI) COMPONENT IN VIDEO AUDIO 1 DIGITAL AUDIO OUT EXTERNAL EQUIPMENT SETUP ! VIDEO 2 AUDNIOo separate audio connection is necessary. 3 Turn on the remote control. To get the best picture quality, adjust the output resolution of the source device will be automatically set the output resolution appropriately.
Owner's Manual (English)
Page 16
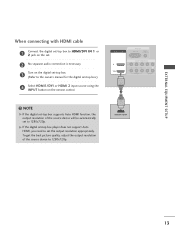
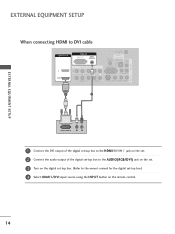
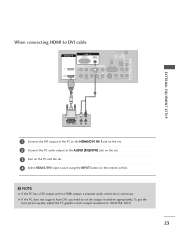
... SETUP EXTERNAL EQUIPMENT SETUP When connecting HDMI to DVI cable HDMI/DVI IN 2 1 (DVI) RGB IN RGB (PC) AUDIO (RGB/DVI) COMPONENT IN ANTENNA IN REMOTE CONTROL IN DIGITAL AUDIO OUT OPTICAL VIDEO RS-232C IN (CONTROL & SERVICE) AUDIO VIDEO AUDIO S-VIDEO VIDEO (MONO) AUDIO 1 2 AV OUT AV IN 1 DVI-DTV... set-top box. (Refer to the owner's manual for the digital set-top box.) 4 Select HDMI1/DVI input source using the INPUT button on the remote control. 14
... SETUP EXTERNAL EQUIPMENT SETUP When connecting HDMI to DVI cable HDMI/DVI IN 2 1 (DVI) RGB IN RGB (PC) AUDIO (RGB/DVI) COMPONENT IN ANTENNA IN REMOTE CONTROL IN DIGITAL AUDIO OUT OPTICAL VIDEO RS-232C IN (CONTROL & SERVICE) AUDIO VIDEO AUDIO S-VIDEO VIDEO (MONO) AUDIO 1 2 AV OUT AV IN 1 DVI-DTV... set-top box. (Refer to the owner's manual for the digital set-top box.) 4 Select HDMI1/DVI input source using the INPUT button on the remote control. 14
Owner's Manual (English)
Page 17
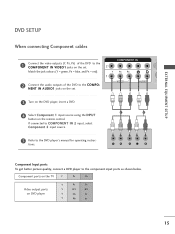
... . DVD SETUP HDMI/DVI IN When connecting Component cables 1 Connect the video outputs (Y, PB, PR) of the DVD to the COMPO- Component ports on the TV Y PB PR Video output ports on DVD player Y PB PR Y B-Y R-Y Y Cb Cr Y Pb Pr 15 tions. Match the jack colours (Y = green, PB = blue, and PR... the COMPONENT IN VIDEO1 jacks on the set . 3 Turn on the DVD player, insert a DVD. 4 Select Component 1 input source using the INPUT button on the remote control. RGB IN RGB (PC) COMPONENT IN DIGI AUDIO (C VIDEO AUDIO S-
... . DVD SETUP HDMI/DVI IN When connecting Component cables 1 Connect the video outputs (Y, PB, PR) of the DVD to the COMPO- Component ports on the TV Y PB PR Video output ports on DVD player Y PB PR Y B-Y R-Y Y Cb Cr Y Pb Pr 15 tions. Match the jack colours (Y = green, PB = blue, and PR... the COMPONENT IN VIDEO1 jacks on the set . 3 Turn on the DVD player, insert a DVD. 4 Select Component 1 input source using the INPUT button on the remote control. RGB IN RGB (PC) COMPONENT IN DIGI AUDIO (C VIDEO AUDIO S-
Owner's Manual (English)
Page 18
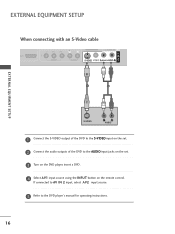
... the DVD to the S-VIDEO input on the set . 3 Turn on the DVD player, insert a DVD. 4 Select A V 1 input source using the INPUT button on the remote control. If connected to AV IN 2 input, select A V 2 input source. 5 Refer to the AUDIO input jacks on the set . 2 Connect the audio outputs of the...
... the DVD to the S-VIDEO input on the set . 3 Turn on the DVD player, insert a DVD. 4 Select A V 1 input source using the INPUT button on the remote control. If connected to AV IN 2 input, select A V 2 input source. 5 Refer to the AUDIO input jacks on the set . 2 Connect the audio outputs of the...
Owner's Manual (English)
Page 19
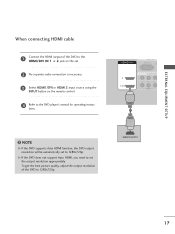
... IN 1 or 2 jack on the set. 2 No separate audio connection is necessary. 3 Select HDMI1/DVI or HDMI 2 input source using the INPUT button on the remote control. 4 Refer to set to 1280x720p. HDMI-DVD OUTPUT 17 NOTE G If the DVD supports Auto HDMI function, the DVD output resolution will be automatically...
... IN 1 or 2 jack on the set. 2 No separate audio connection is necessary. 3 Select HDMI1/DVI or HDMI 2 input source using the INPUT button on the remote control. 4 Refer to set to 1280x720p. HDMI-DVD OUTPUT 17 NOTE G If the DVD supports Auto HDMI function, the DVD output resolution will be automatically...
Owner's Manual (English)
Page 20
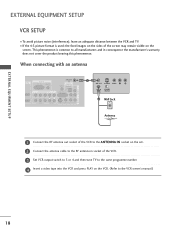
... on the screen. I To avoid picture noise (interference), leave an adequate distance between the VCR and TV. the fixed images on the sides of the VCR. 3 Set VCR output switch to 3 or 4 and then tune TV to the same programme number. 4 Insert a video tape into the VCR and press PLAY on the... VCR. (Refer to the VCR owner's manual.) 18 When connecting with an antenna HDMI/DVI IN 2 1 (DVI) RGB IN RGB (PC) AUDIO (RGB/DVI) COMPONENT IN ANTENNA IN REMOTE CONTROL IN DIGITAL...
... on the screen. I To avoid picture noise (interference), leave an adequate distance between the VCR and TV. the fixed images on the sides of the VCR. 3 Set VCR output switch to 3 or 4 and then tune TV to the same programme number. 4 Insert a video tape into the VCR and press PLAY on the... VCR. (Refer to the VCR owner's manual.) 18 When connecting with an antenna HDMI/DVI IN 2 1 (DVI) RGB IN RGB (PC) AUDIO (RGB/DVI) COMPONENT IN ANTENNA IN REMOTE CONTROL IN DIGITAL...
Owner's Manual (English)
Page 21
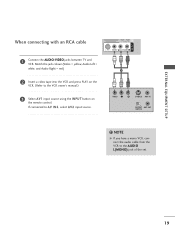
...) DIGITAL AUDIO OUT COMPONENT IN 2 When connecting with an RCA cable 1 (DVI) VIDEO AUDIO AUDIO S-VIDEO VIDEO (MONO) AUDIO 1 Connect the AUDIO/VIDEO jacks between TV and VCR. Match the jack colours(Video = yellow, Audio Left = white, and Audio Right = red) 1 2 Insert a video tape into the VCR and press PLAY on...
...) DIGITAL AUDIO OUT COMPONENT IN 2 When connecting with an RCA cable 1 (DVI) VIDEO AUDIO AUDIO S-VIDEO VIDEO (MONO) AUDIO 1 Connect the AUDIO/VIDEO jacks between TV and VCR. Match the jack colours(Video = yellow, Audio Left = white, and Audio Right = red) 1 2 Insert a video tape into the VCR and press PLAY on...
Owner's Manual (English)
Page 22
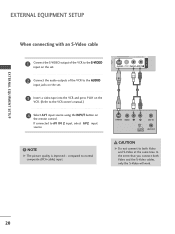
... to AV IN 2 input, select A V 2 input source. ! S-VIDEO VIDEO L R ANT IN OUTPUT ANT OUT SWITCH CAUTION G Do not connect to the S-VIDEO input on the remote control. If connected to normal composite (RCA cable) input. NOTE G The picture quality is improved: ; VIDEO AUDIO DIGITAL AUDIO OUT AUDIO S-VIDEO VIDEO (MONO) AUDIO...
... to AV IN 2 input, select A V 2 input source. ! S-VIDEO VIDEO L R ANT IN OUTPUT ANT OUT SWITCH CAUTION G Do not connect to the S-VIDEO input on the remote control. If connected to normal composite (RCA cable) input. NOTE G The picture quality is improved: ; VIDEO AUDIO DIGITAL AUDIO OUT AUDIO S-VIDEO VIDEO (MONO) AUDIO...
Owner's Manual (English)
Page 23
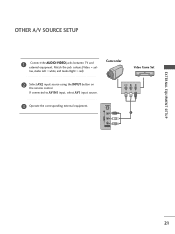
If connected to AV IN1 input, select AV1 input source. VIDEO L R 3 Operate the corresponding external equipment. EXTERNAL EQUIPMENT SETUP OTHER A/V SOURCE SETUP 1 Connect the AUDIO/VIDEO jacks between TV and external equipment. Match the jack colours.(Video = yel- S-VIDEO 1 VIDEO L/MONO AUDIO R AV IN 2 21 low, Audio Left = white, and Audio Right = red) Camcorder Video Game Set 2 Select AV2 input source using the INPUT button on the remote control.
If connected to AV IN1 input, select AV1 input source. VIDEO L R 3 Operate the corresponding external equipment. EXTERNAL EQUIPMENT SETUP OTHER A/V SOURCE SETUP 1 Connect the AUDIO/VIDEO jacks between TV and external equipment. Match the jack colours.(Video = yel- S-VIDEO 1 VIDEO L/MONO AUDIO R AV IN 2 21 low, Audio Left = white, and Audio Right = red) Camcorder Video Game Set 2 Select AV2 input source using the INPUT button on the remote control.
Owner's Manual (English)
Page 24
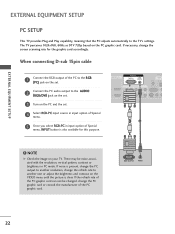
...RGB-PC in PC mode. RGB OUTPUT AUDIO 22 HDMI/DVI IN 2 (DVI) RGB IN RGB (PC) AUDIO (RGB/DVI) COMPONENT IN ANTEN IN REMOTE CONTROL IN DIGITAL AUDIO OUT OPTICA RS-232C IN (CONTROL & SERVICE) VIDEO AUDIO S-VIDEO VIDEO (MON 1 2 ! If noise is present, change ... graphic card accordingly. COMPONENT IN 2 Connect the PC audio output to the TV's settings. The TV perceives 1024x768, 60Hz as DTV 720p based on your TV. EXTERNAL EQUIPMENT SETUP EXTERNAL EQUIPMENT SETUP PC SETUP This TV provides Plug and Play capability, meaning that the PC adjusts automatically to the ...
...RGB-PC in PC mode. RGB OUTPUT AUDIO 22 HDMI/DVI IN 2 (DVI) RGB IN RGB (PC) AUDIO (RGB/DVI) COMPONENT IN ANTEN IN REMOTE CONTROL IN DIGITAL AUDIO OUT OPTICA RS-232C IN (CONTROL & SERVICE) VIDEO AUDIO S-VIDEO VIDEO (MON 1 2 ! If noise is present, change ... graphic card accordingly. COMPONENT IN 2 Connect the PC audio output to the TV's settings. The TV perceives 1024x768, 60Hz as DTV 720p based on your TV. EXTERNAL EQUIPMENT SETUP EXTERNAL EQUIPMENT SETUP PC SETUP This TV provides Plug and Play capability, meaning that the PC adjusts automatically to the ...
Owner's Manual (English)
Page 25
... necessary. G If the PC does not support Auto DVI, you need to set . 4 Select HDMI1/DVI input source using the INPUT button on the remote control. ! To get the best picture quality, adjust the PC graphics card's output resolution to 1024x768, 60Hz. 23 When connecting HDMI to DVI cable HDMI.../DVI IN 2 1 (DVI) RGB IN RGB (PC) AUDIO (RGB/DVI) COMPONENT IN ANTENNA IN REMOTE CONTROL IN DIGITAL AUDIO OUT OPTICAL VIDEO RS-232C IN (CONTROL & SERVICE) AUDIO VIDEO AUDIO S-VIDEO VIDEO (MONO) AUDIO 1 2 AV IN 1 AV OUT HDMI/...
... necessary. G If the PC does not support Auto DVI, you need to set . 4 Select HDMI1/DVI input source using the INPUT button on the remote control. ! To get the best picture quality, adjust the PC graphics card's output resolution to 1024x768, 60Hz. 23 When connecting HDMI to DVI cable HDMI.../DVI IN 2 1 (DVI) RGB IN RGB (PC) AUDIO (RGB/DVI) COMPONENT IN ANTENNA IN REMOTE CONTROL IN DIGITAL AUDIO OUT OPTICAL VIDEO RS-232C IN (CONTROL & SERVICE) AUDIO VIDEO AUDIO S-VIDEO VIDEO (MONO) AUDIO 1 2 AV IN 1 AV OUT HDMI/...
Owner's Manual (English)
Page 28
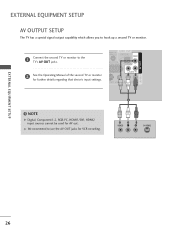
... monitor to hook up a second TV or monitor. NOTE G Digital, Component1-2, RGB-PC, HDMI1/DVI, HDMI2 input sources cannot be used for fur1th(DeVrI) details regarding that device's input settings. VIDEO AUDIO REMOTE ONTROL IN DIGITAL AUDIO OUT OPTICAL VIDEO RS-232C IN NTROL & SERVICE) AUDIO... IDEO VIDEO (MONO) AUDIO ! G We recommend to use the AV OUT jacks for VCR recording. 1 VIDEO L R S-VIDEO EXTERNAL EQUIPMENT SETUP 26
... monitor to hook up a second TV or monitor. NOTE G Digital, Component1-2, RGB-PC, HDMI1/DVI, HDMI2 input sources cannot be used for fur1th(DeVrI) details regarding that device's input settings. VIDEO AUDIO REMOTE ONTROL IN DIGITAL AUDIO OUT OPTICAL VIDEO RS-232C IN NTROL & SERVICE) AUDIO... IDEO VIDEO (MONO) AUDIO ! G We recommend to use the AV OUT jacks for VCR recording. 1 VIDEO L R S-VIDEO EXTERNAL EQUIPMENT SETUP 26
Owner's Manual (English)
Page 29
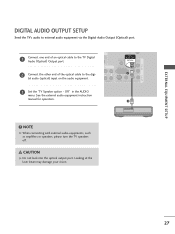
...external audio equipment instruction manual for operation. 2 ! NOTE G When connecting with external audio equipments, such as amplifiers or speakers, please turn the TV speakers off. tal audio (optical) input on the 1a(DuVdI) io equipment. Off" in the AUDIO menu. Looking at the laser beam may... damage your vision. 27 VIDEO AUDIO IN REMOTE CONTROL IN DIGITAL AUDIO OUT OPTICAL VIDEO RS-232C IN (CONTROL & SERVICE) 1 AUDIO S-VIDEO VIDEO (MONO) AUDIO 3 Set the "TV Speaker option - CAUTION G Do not look into the optical output port. O DVI)...
...external audio equipment instruction manual for operation. 2 ! NOTE G When connecting with external audio equipments, such as amplifiers or speakers, please turn the TV speakers off. tal audio (optical) input on the 1a(DuVdI) io equipment. Off" in the AUDIO menu. Looking at the laser beam may... damage your vision. 27 VIDEO AUDIO IN REMOTE CONTROL IN DIGITAL AUDIO OUT OPTICAL VIDEO RS-232C IN (CONTROL & SERVICE) 1 AUDIO S-VIDEO VIDEO (MONO) AUDIO 3 Set the "TV Speaker option - CAUTION G Do not look into the optical output port. O DVI)...

Owner's Manual (English)
Page 30
.../DOWN Q.VIEW Returns to the default settings brightness by changing mode source. When you toggle this button, the Simplink menu appears at the remote control sensor on the TV. Selects numbered items in regular sequence: Digital, Analogue, AV1-2, Component 1-2, RGB-PC, HDMI1/DVI, HDMI2. VOLUME Increase/decrease the sound level. It returns...
.../DOWN Q.VIEW Returns to the default settings brightness by changing mode source. When you toggle this button, the Simplink menu appears at the remote control sensor on the TV. Selects numbered items in regular sequence: Digital, Analogue, AV1-2, Component 1-2, RGB-PC, HDMI1/DVI, HDMI2. VOLUME Increase/decrease the sound level. It returns...


