Owner's Manual (English)
Page 3
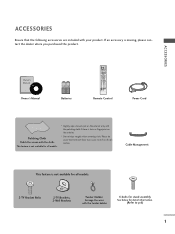
This feature is not available for all models. 2-TV Bracket Bolts 2-TV Brackets, 2-Wall Brackets Twister Holder Arrange the wires with the cloth. ACCESSORIES ACCESSORIES Ensure that excessive force may cause scratch or discoloration. REVEAL ... accessories are included with the polishing cloth if there is stain or fingerprint on the exterior only with your product. Owner's Manual 1.5V 1.5V Batteries INPUT D/A INPUT POWER SIMPLINK BRIGHT MODE TV VCR DVD RATIO TEXT INFO i GUIDE i SUBTITLE MENU LIST EXIT FAV OK VOL Q.VIEW PR PAGE MUTE 1 2 3 4 5 6 7 8 9 APM 0...
This feature is not available for all models. 2-TV Bracket Bolts 2-TV Brackets, 2-Wall Brackets Twister Holder Arrange the wires with the cloth. ACCESSORIES ACCESSORIES Ensure that excessive force may cause scratch or discoloration. REVEAL ... accessories are included with the polishing cloth if there is stain or fingerprint on the exterior only with your product. Owner's Manual 1.5V 1.5V Batteries INPUT D/A INPUT POWER SIMPLINK BRIGHT MODE TV VCR DVD RATIO TEXT INFO i GUIDE i SUBTITLE MENU LIST EXIT FAV OK VOL Q.VIEW PR PAGE MUTE 1 2 3 4 5 6 7 8 9 APM 0...
Owner's Manual (English)
Page 4
...) 51 Adaptive Picture Mode(APM 52 Manual Picture Adjustment - Picture Improvement Technology 56 Advanced - CONTENTS CONTENTS ACCESSORIES 1 PREPARATION Front Panel Controls 4 Back Panel Information 5 Stand Installation 6 Attaching the TV to a Wall 7 Back Cover for PC Mode 25 AV Output Setup 26 ...Digital Audio Output Setup 27 WATCHING TV/PROGRAMME CONTROL Remote Control Key Functions...
...) 51 Adaptive Picture Mode(APM 52 Manual Picture Adjustment - Picture Improvement Technology 56 Advanced - CONTENTS CONTENTS ACCESSORIES 1 PREPARATION Front Panel Controls 4 Back Panel Information 5 Stand Installation 6 Attaching the TV to a Wall 7 Back Cover for PC Mode 25 AV Output Setup 26 ...Digital Audio Output Setup 27 WATCHING TV/PROGRAMME CONTROL Remote Control Key Functions...
Owner's Manual (English)
Page 5
CONTENTS TIME SETTING Clock Setting 69 Auto On/Off Timer Setting 71 Sleep Timer Setting 72 Auto Shut - Off Setting 73 PARENTAL CONTROL/RATINGS Set Password & Lock System 74 Programme Blocking 76 Parental Guidance 77 External Input Blocking 78 TELETEXT Switch On/Off 79 Simple Text 79 TOP Text 79 Fastext 80 Special Teletext Functions 80 APPENDIX Troubleshooting 81 Maintenance 83 Product Specifications 84 Programming the Remote Control 85 IR Codes 87 External Control Through RS-232C 90 After reading this manual, keep it handy for future reference. 3
CONTENTS TIME SETTING Clock Setting 69 Auto On/Off Timer Setting 71 Sleep Timer Setting 72 Auto Shut - Off Setting 73 PARENTAL CONTROL/RATINGS Set Password & Lock System 74 Programme Blocking 76 Parental Guidance 77 External Input Blocking 78 TELETEXT Switch On/Off 79 Simple Text 79 TOP Text 79 Fastext 80 Special Teletext Functions 80 APPENDIX Troubleshooting 81 Maintenance 83 Product Specifications 84 Programming the Remote Control 85 IR Codes 87 External Control Through RS-232C 90 After reading this manual, keep it handy for future reference. 3
Owner's Manual (English)
Page 14
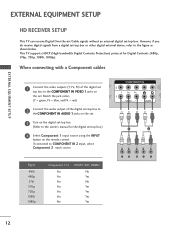
... the digital set-top box to the COMPONENT IN AUDIO 1 jacks on the set. 3 Turn on the digital set-top box. (Refer to the owner's manual for Digital Contents (480p, 576p, 720p, 1080i, 1080p). COMPONENT IN (CO VIDEO AUDIO S- 1 2 Signal 480i 480p 576i 576p 720p 1080i 1080p Component 1/2 ... 1 (DVI) (Y = green, PB = blue, and PR = red) 2 Connect the audio output of the digital2 set . EXTERNAL EQUIPMENT SETUP HD RECEIVER SETUP This TV can receive Digital Over-the-air/Cable signals without an external digital set -top box or other digital external device, refer to the figure as...
... the digital set-top box to the COMPONENT IN AUDIO 1 jacks on the set. 3 Turn on the digital set-top box. (Refer to the owner's manual for Digital Contents (480p, 576p, 720p, 1080i, 1080p). COMPONENT IN (CO VIDEO AUDIO S- 1 2 Signal 480i 480p 576i 576p 720p 1080i 1080p Component 1/2 ... 1 (DVI) (Y = green, PB = blue, and PR = red) 2 Connect the audio output of the digital2 set . EXTERNAL EQUIPMENT SETUP HD RECEIVER SETUP This TV can receive Digital Over-the-air/Cable signals without an external digital set -top box or other digital external device, refer to the figure as...
Owner's Manual (English)
Page 15
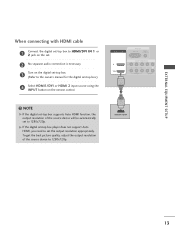
... AUDIO 1 DIGITAL AUDIO OUT EXTERNAL EQUIPMENT SETUP ! VIDEO 2 AUDNIOo separate audio connection is necessary. 3 Turn on the digital set-top box. (Refer to the owner's manual for the digital set the output resolution appropriately. G If the digital set-top box player does not support Auto HDMI, you need to set -top...
... AUDIO 1 DIGITAL AUDIO OUT EXTERNAL EQUIPMENT SETUP ! VIDEO 2 AUDNIOo separate audio connection is necessary. 3 Turn on the digital set-top box. (Refer to the owner's manual for the digital set the output resolution appropriately. G If the digital set-top box player does not support Auto HDMI, you need to set -top...
Owner's Manual (English)
Page 16
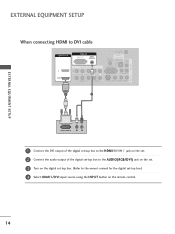
... the digital set-top box to the AUDIO(RGB/DVI) jack on the set. 3 Turn on the digital set-top box. (Refer to the owner's manual for the digital set-top box.) 4 Select HDMI1/DVI input source using the INPUT button on the remote control. 14
... the digital set-top box to the AUDIO(RGB/DVI) jack on the set. 3 Turn on the digital set-top box. (Refer to the owner's manual for the digital set-top box.) 4 Select HDMI1/DVI input source using the INPUT button on the remote control. 14
Owner's Manual (English)
Page 17
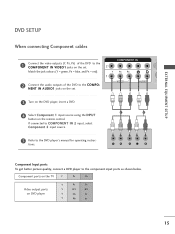
DVD SETUP HDMI/DVI IN When connecting Component cables 1 Connect the video outputs (Y, PB, PR) of the DVD to the DVD player's manual for operating instruc- RGB IN RGB (PC) COMPONENT IN DIGI AUDIO (C VIDEO AUDIO S- EXTERNAL EQUIPMENT SETUP 1 2 Y PB PR L R Component Input ports To get better picture ... component input ports as shown below. NENT IN AUDIO1 jacks on DVD player Y PB PR Y B-Y R-Y Y Cb Cr Y Pb Pr 15 tions. Component ports on the TV Y PB PR Video output ports on the set .
DVD SETUP HDMI/DVI IN When connecting Component cables 1 Connect the video outputs (Y, PB, PR) of the DVD to the DVD player's manual for operating instruc- RGB IN RGB (PC) COMPONENT IN DIGI AUDIO (C VIDEO AUDIO S- EXTERNAL EQUIPMENT SETUP 1 2 Y PB PR L R Component Input ports To get better picture ... component input ports as shown below. NENT IN AUDIO1 jacks on DVD player Y PB PR Y B-Y R-Y Y Cb Cr Y Pb Pr 15 tions. Component ports on the TV Y PB PR Video output ports on the set .
Owner's Manual (English)
Page 18
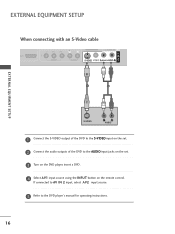
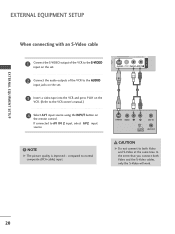
... 1 Connect the S-VIDEO output of the DVD to the S-VIDEO input on the set. 2 Connect the audio outputs of the DVD to the DVD player's manual for operating instructions. 16
... 1 Connect the S-VIDEO output of the DVD to the S-VIDEO input on the set. 2 Connect the audio outputs of the DVD to the DVD player's manual for operating instructions. 16
Owner's Manual (English)
Page 19
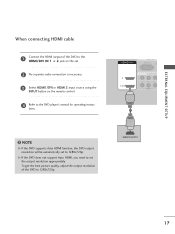
... set the output resolution appropriately. NOTE G If the DVD supports Auto HDMI function, the DVD output resolution will be automatically set to the DVD player's manual for operating instruc- HDMI-DVD OUTPUT 17 tions.
... set the output resolution appropriately. NOTE G If the DVD supports Auto HDMI function, the DVD output resolution will be automatically set to the DVD player's manual for operating instruc- HDMI-DVD OUTPUT 17 tions.
Owner's Manual (English)
Page 20
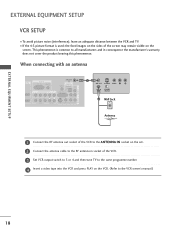
.... 3 Set VCR output switch to 3 or 4 and then tune TV to the same programme number. 4 Insert a video tape into the VCR and press PLAY on the screen. This phenomenon is used; I If the 4:3 picture format is common to the VCR owner's manual.) 18 EXTERNAL EQUIPMENT SETUP AV IN 1 COMPONENT IN 2 EXTERNAL EQUIPMENT... 1 Connect the RF antenna out socket of the VCR to the ANTENNA I To avoid picture noise (interference), leave an adequate distance between the VCR and TV.
.... 3 Set VCR output switch to 3 or 4 and then tune TV to the same programme number. 4 Insert a video tape into the VCR and press PLAY on the screen. This phenomenon is used; I If the 4:3 picture format is common to the VCR owner's manual.) 18 EXTERNAL EQUIPMENT SETUP AV IN 1 COMPONENT IN 2 EXTERNAL EQUIPMENT... 1 Connect the RF antenna out socket of the VCR to the ANTENNA I To avoid picture noise (interference), leave an adequate distance between the VCR and TV.
Owner's Manual (English)
Page 21
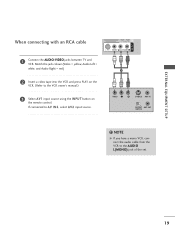
... IN VIDEO AUDIO ANTENNA IN DIGITAL AUDIO OUT ! NOTE G If you have a mono VCR, connect the audio cable from the VCR to the VCR owner's manual.) 3 Select A V 1 input source using the INPUT button on the VCR. (Refer to the AUDIO L(MONO) jack of the set. 19 EXTERNAL EQUIPMENT SETUP AV IN...) DIGITAL AUDIO OUT COMPONENT IN 2 When connecting with an RCA cable 1 (DVI) VIDEO AUDIO AUDIO S-VIDEO VIDEO (MONO) AUDIO 1 Connect the AUDIO/VIDEO jacks between TV and VCR. If connected to AV IN2, select A V 2 input source.
... IN VIDEO AUDIO ANTENNA IN DIGITAL AUDIO OUT ! NOTE G If you have a mono VCR, connect the audio cable from the VCR to the VCR owner's manual.) 3 Select A V 1 input source using the INPUT button on the VCR. (Refer to the AUDIO L(MONO) jack of the set. 19 EXTERNAL EQUIPMENT SETUP AV IN...) DIGITAL AUDIO OUT COMPONENT IN 2 When connecting with an RCA cable 1 (DVI) VIDEO AUDIO AUDIO S-VIDEO VIDEO (MONO) AUDIO 1 Connect the AUDIO/VIDEO jacks between TV and VCR. If connected to AV IN2, select A V 2 input source.
Owner's Manual (English)
Page 22
... connected to the S-VIDEO input on the set . 1 2 3 Insert a video tape into the VCR and press PLAY on the VCR. (Refer to the VCR owner's manual.) 4 Select AV1 input source using the INPUT button on the set .
... connected to the S-VIDEO input on the set . 1 2 3 Insert a video tape into the VCR and press PLAY on the VCR. (Refer to the VCR owner's manual.) 4 Select AV1 input source using the INPUT button on the set .
Owner's Manual (English)
Page 26
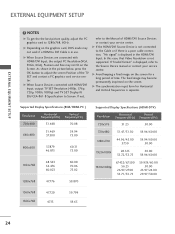
...33.72/33.75 50.00 59.94/60.00 1920x1080p 67.432/67.500 56.25 26.97/27.00 33.71/33.75 59.939/60.00 50.00 23.97/24.00... Source Devices are connected with HDMI/DVI Input, output TV SET Resolution (480p, 576p, 720p, 1080i, 1080p) and TV SET Display fit EIA/CEA-861-B Specification to the Source Device manual or contact your service centre. G When Source Devices ..., "No signal" is in the HDMI/DVI Input. G The synchronization input form for a long period of the TV SET and contact a PC graphics card service center. If "Invalid Format" is not connected to adjust the screen Position...
...33.72/33.75 50.00 59.94/60.00 1920x1080p 67.432/67.500 56.25 26.97/27.00 33.71/33.75 59.939/60.00 50.00 23.97/24.00... Source Devices are connected with HDMI/DVI Input, output TV SET Resolution (480p, 576p, 720p, 1080i, 1080p) and TV SET Display fit EIA/CEA-861-B Specification to the Source Device manual or contact your service centre. G When Source Devices ..., "No signal" is in the HDMI/DVI Input. G The synchronization input form for a long period of the TV SET and contact a PC graphics card service center. If "Invalid Format" is not connected to adjust the screen Position...
Owner's Manual (English)
Page 27
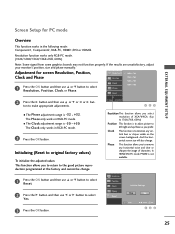
... Clock Phase Reset Initialize Settings Yes No MENU Prev F G Select OK 123 25 If the results are unsatisfactory, adjust your monitor's position, size and phase manually. Resolution This function allows you select resolution of characters. Adjustment for PC mode Overview This function works in the following mode: Component1, Component2, RGB-PC...
... Clock Phase Reset Initialize Settings Yes No MENU Prev F G Select OK 123 25 If the results are unsatisfactory, adjust your monitor's position, size and phase manually. Resolution This function allows you select resolution of characters. Adjustment for PC mode Overview This function works in the following mode: Component1, Component2, RGB-PC...
Owner's Manual (English)
Page 28
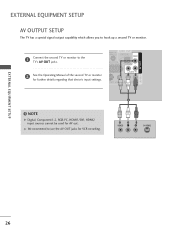
...IN NTROL & SERVICE) AUDIO IDEO VIDEO (MONO) AUDIO ! COMPONENT IN 2 2 See the Operating Manual of the second TV or monitor for AV out. EXTERNAL EQUIPMENT SETUP AV OUTPUT SETUP The TV has a special signal output capability which allows you to use the AV OUT jacks for VCR recording.... 1 VIDEO L R S-VIDEO EXTERNAL EQUIPMENT SETUP 26 NOTE G Digital, Component1-2, RGB-PC, HDMI1/DVI, HDMI2 input sources ...
...IN NTROL & SERVICE) AUDIO IDEO VIDEO (MONO) AUDIO ! COMPONENT IN 2 2 See the Operating Manual of the second TV or monitor for AV out. EXTERNAL EQUIPMENT SETUP AV OUTPUT SETUP The TV has a special signal output capability which allows you to use the AV OUT jacks for VCR recording.... 1 VIDEO L R S-VIDEO EXTERNAL EQUIPMENT SETUP 26 NOTE G Digital, Component1-2, RGB-PC, HDMI1/DVI, HDMI2 input sources ...
Owner's Manual (English)
Page 29
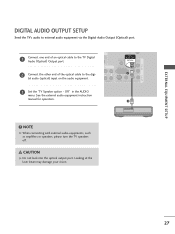
...IN (CONTROL & SERVICE) 1 AUDIO S-VIDEO VIDEO (MONO) AUDIO 3 Set the "TV Speaker option - CAUTION G Do not look into the optical output port. Off" in the AUDIO menu. See the external audio equipment instruction manual for operation. 2 ! Looking at the laser beam may damage your vision. 27 O ...DVI) COMPONENT IN 2 2 Connect the other end of an optical cable to the TV DiRgGiBt(aPCl) Audio (Optical) Output port. NOTE G When connecting...
...IN (CONTROL & SERVICE) 1 AUDIO S-VIDEO VIDEO (MONO) AUDIO 3 Set the "TV Speaker option - CAUTION G Do not look into the optical output port. Off" in the AUDIO menu. See the external audio equipment instruction manual for operation. 2 ! Looking at the laser beam may damage your vision. 27 O ...DVI) COMPONENT IN 2 2 Connect the other end of an optical cable to the TV DiRgGiBt(aPCl) Audio (Optical) Output port. NOTE G When connecting...

Owner's Manual (English)
Page 37
... from what is shown in this manual. 1 Press the MENU button and then use D or E button to select the each menu. 2 Press the G button and then use D or E or F or G buttons to display the available menus. block AUDIO SSM AVL Balance TV Speaker SPECIAL Input Subtitle Child lock... ARC XD demo SIMPLINK TIME Auto clock Manual clock Off time On time Sleep timer Auto sleep 35 SETUP Auto programme Manual programme Programme edit Signal strength Set ID PICTURE PSM Color Temperature ...
... from what is shown in this manual. 1 Press the MENU button and then use D or E button to select the each menu. 2 Press the G button and then use D or E or F or G buttons to display the available menus. block AUDIO SSM AVL Balance TV Speaker SPECIAL Input Subtitle Child lock... ARC XD demo SIMPLINK TIME Auto clock Manual clock Off time On time Sleep timer Auto sleep 35 SETUP Auto programme Manual programme Programme edit Signal strength Set ID PICTURE PSM Color Temperature ...
Owner's Manual (English)
Page 38
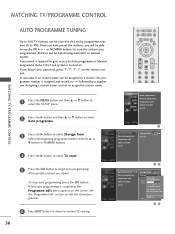
or NUMBER buttons to scan the stations you will be updated. 26 % 5 channels found Press (OK) to begin auto programming. followed by programme numbers (0 to 99). Select the beginning programme number with the D or E ...edit the stored programme. 6 Press EXIT button to return to normal TV viewing. 36 SUBTITLE MENU LIST EXIT FAV OK VOL Q.VIEW PR PAGE MUTE 1 2 3 4 5 6 7 8 9 Auto programme Manual programme Programme edit Signal strength Set ID 1 Auto programme G Storage from D E 0 G Manual programme To start digital programme scan. In Australia, if no station...
or NUMBER buttons to scan the stations you will be updated. 26 % 5 channels found Press (OK) to begin auto programming. followed by programme numbers (0 to 99). Select the beginning programme number with the D or E ...edit the stored programme. 6 Press EXIT button to return to normal TV viewing. 36 SUBTITLE MENU LIST EXIT FAV OK VOL Q.VIEW PR PAGE MUTE 1 2 3 4 5 6 7 8 9 Auto programme Manual programme Programme edit Signal strength Set ID 1 Auto programme G Storage from D E 0 G Manual programme To start digital programme scan. In Australia, if no station...
Owner's Manual (English)
Page 39
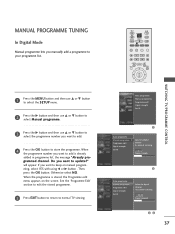
... TEXT INFO GUIDE SUBTITLE MENU LIST EXIT FAV OK WATCHING TV/PROGRAMME CONTROL 1 Press the MENU button and then use D or E button to select the SETUP menu. 2 Press the G button and then use D or E button to select Manual programme. 3 Press the G button and then use ...the O K button to normal TV viewing. When the programme is already added in programme list, the message "Already pro- When the programme number you want to your programme list. Otherwise select N O. MANUAL PROGRAMME TUNING POWER In Digital Mode Manual programme lets you manually add a programme to keep ...
... TEXT INFO GUIDE SUBTITLE MENU LIST EXIT FAV OK WATCHING TV/PROGRAMME CONTROL 1 Press the MENU button and then use D or E button to select the SETUP menu. 2 Press the G button and then use D or E button to select Manual programme. 3 Press the G button and then use ...the O K button to normal TV viewing. When the programme is already added in programme list, the message "Already pro- When the programme number you want to your programme list. Otherwise select N O. MANUAL PROGRAMME TUNING POWER In Digital Mode Manual programme lets you manually add a programme to keep ...
Owner's Manual (English)
Page 40
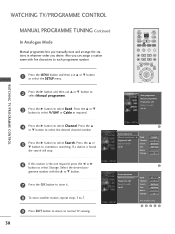
... E button to select the desired channel number. 5 Press the G button to select Search. WATCHING TV/PROGRAMME CONTROL MANUAL PROGRAMME TUNING Continued POWER In Analogue Mode Manual programme lets you manually tune and arrange the stations in whatever order you can assign a station name with the D or ... K button to store it. 8 To store another station, repeat steps 3 to 7. 9 Press EXIT button to return to normal TV viewing. 38 1 Auto programme Manual programme G Programme edit Signal strength Set ID Band Channel Search Fine Name Storage V/UHF 1 Up/Down Up/Down - - - - - 0...
... E button to select the desired channel number. 5 Press the G button to select Search. WATCHING TV/PROGRAMME CONTROL MANUAL PROGRAMME TUNING Continued POWER In Analogue Mode Manual programme lets you manually tune and arrange the stations in whatever order you can assign a station name with the D or ... K button to store it. 8 To store another station, repeat steps 3 to 7. 9 Press EXIT button to return to normal TV viewing. 38 1 Auto programme Manual programme G Programme edit Signal strength Set ID Band Channel Search Fine Name Storage V/UHF 1 Up/Down Up/Down - - - - - 0...


